Wooliam

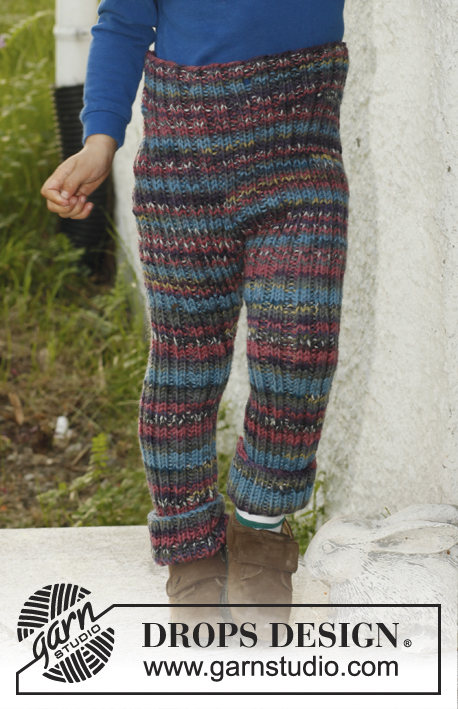
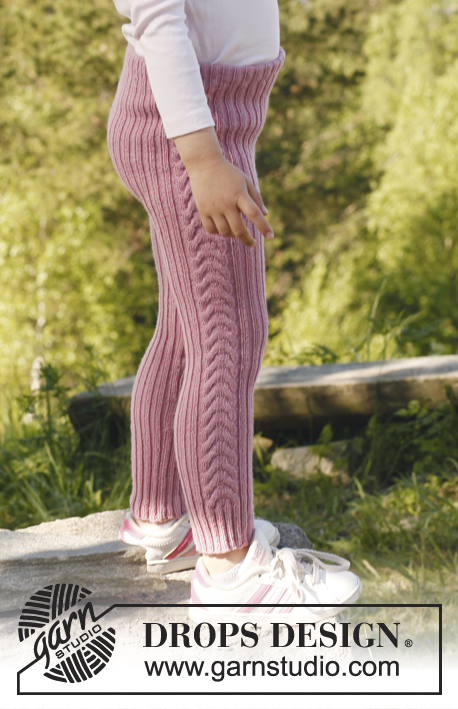
Knitted pants in rib, in 1 thread DROPS Big Fabel or 2 threads DROPS Fabel. Size children 3 to 12 years.

DROPS Children 23-41
DROPS design: Pattern no BF-003-bn
Yarn group C
-----------------------------------------------------------
Size: 3/4 - 5/6 - 7/8 - 9/10 - 11/12 years
Size in cm: 98/104 - 110/116 - 122/128 - 134/140 - 146/152
Because of rib the pants will contract and be somewhat smaller than on chart.

Materials:
DROPS BIG FABEL from Garnstudio
300-400-400-400-500 g colour no 906p, wild berries.

Or use:
DROPS FABEL from Garnstudio
250-300-300-300-400 g colour no 671, blue/brown/mustard .

DROPS DOUBLE POINTED NEEDLES and CIRCULAR NEEDLE (60 cm) SIZE 4.5 mm - or size needed to get 18 sts x 23 rows in stocking st = 10 x 10 cm with 1 thread Big Fabel or 2 threads Fabel.

ACCESSORIES: Elastic: approx. 55-60-65-70-75 cm

-------------------------------------------------------

Alternative Yarn – See how to change yarns here
Yarn Groups A to F – Use the same pattern and change the yarn here
Yarn usage using an alternative yarn – Use our yarn converter here

-------------------------------------------------------

DROPS Big Fabel
DROPS Big Fabel
75% Wool, 25% Polyamide
Discontinued
find alternatives

Pattern instructions

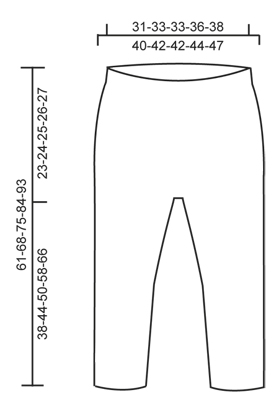
INCREASE TIP:
Inc on each side of 2 K sts by making 1 YO. On next round work the YOs twisted to avoid holes. Work the inc sts in rib, i.e. K first 2 sts inc, and P the next 2 sts etc.

DECREASE TIP:
Work until 2 sts remain before marker, K 2 tog and then K 2 twisted tog (marker is between these sts).
----------------------------------------------------------

PANTS:
Worked in the round, top down. Rounds start mid back.
Cast on 112-120-120-128-136 sts on circular needle size 4.5 mm with 1 thread Big Fabel or 2 threads Fabel. Insert a marker at beg of round (= mid back) and a marker after 56-60-60-64-68 sts (= mid front). Work rib from mid back as follows: K 1, * P 2, K 2 *, repeat from *-* the entire round and finish with P 2 and K 1. When piece measures approx. 2 cm, work a round with eyelet holes as follows: K 1, * P 2 tog, 1 YO, K 2 tog, 1 YO *, repeat from *-* the entire round, finish with P 2 tog, 1 YO and K 1. Continue with rib as before. When piece measures 5 cm, work an elevation at the back as follows: Work 7 sts rib, turn, tighten thread and work 14 sts rib on return, turn, tighten thread and work 24 sts rib, turn, tighten thread and work 34 sts rib on return. Continue like this by working 10 sts more on every turn until a total of 74-94-94-114-114 sts have been worked. Turn, continue in the round over all sts again until piece measures 16-17-18-19-20 cm mid front. On next round, inc 1 st on each side of the middle 2 sts at the front and back – SEE INCREASE TIP! Repeat inc every other round 7 more times = 144-152-152-160-168 sts. When piece measures 23-24-25-26-27 cm mid front, cast off 12 sts mid front and mid back (i.e. cast off 6 sts on each side of both markers). Finish each leg separately, slip sts for one leg on a stitch holder.

LEG:
= 60-64-64-68-72 sts. Distribute sts on 4 double pointed needles size 4.5 mm and continue in rib - insert a marker on the inside of leg. When leg measures 2 cm, dec 1 st on each side of marker - READ DECREASE TIP. Repeat dec every 2-2-2-3-3 cm, 5 more times = 48-52-52-56-60 sts. When leg measures 38-44-50-58-66 cm, loosely cast off with K over K and P over P. NOTE: Continue to work if longer leg length is desired.
Slip sts from the other leg back on needle and work as first leg.

ASSEMBLY:
Sew the 12 sts that were cast off between the legs tog towards each other.
Thread an elastic through the round with eyelet holes.

Diagram

diagram measurements
Do you have a question? See a list of frequently asked questions (FAQ)

Knitting tension is what determines the final measurements of your work, and is usually measured per 10 x 10 cm. It is provided like so: number of stitches in width x number of rows in height - eg: 19 stitches x 26 rows = 10 x 10 cm.

The knitting tension is very individual; some people knit/crochet loosely while others work tightly. You adjust the knitting tension with the needle size, which is why the suggested needle size is only meant as a guide! You need to adjust this (up or down) to ensure that YOUR knitting tension matches the knitting tension provided in the pattern. If you work with a different knitting tension than provided you will have a different yarn consumption, and your work will have different measurements than what the pattern suggests.

The knitting tension also determines which yarns can replace each other. As long as you achieve the same knitting tension you can replace one yarn with another.

See DROPS lesson: How to measure your tension/gauge

See DROPS video: How to make a gauge tension swatch

The required amount of yarn is provided in grams, eg: 450 g. To calculate how many balls you’ll need you first need to know how many grams are in 1 ball (25g, 50g or 100g). This information is available if you click on the individual yarn quality on our pages. Divide the amount required with the amount of each ball. For example, if each ball is 50g (the most common amount), the calculation will be as follows: 450 / 50 = 9 balls.

The important thing when changing from one yarn to another is that the knitting/crochet tension remains the same. This is so that the measurements of the finished piece will be the same as on the sketch provided. It is easier to achieve the same knitting tension using yarns from the same yarn group. It is also possible to work with multiple strands of a thinner yarn to achieve the knitting tension of a thicker one. Please try our yarn converter. We recommend you to always work a test swatch.

Please NOTE: when changing yarn the garment might have a different look and feel to the garment in the photo, due to individual properties and qualities of each yarn.

See DROPS lesson: Can I use a different yarn than the one mentioned in the pattern?

All our yarns are categorised into yarn groups (from A to F) according to thickness and knitting tension – group A contains the thinnest yarns and group F the thickest. This makes it easier for you to find alternative yarns to our patterns, should you wish to switch yarn. All yarns within the same group have a similar knitting tension and can easily replace each other. However, different yarn qualities have different structures and properties which will give the finished work a unique look and feel.

Click here for an overview of the yarns in each yarn group

At the top of all our patterns you’ll find a link to our yarn calculator, which is a helpful tool should you wish to use a different yarn than suggested. By filling in the yarn quality you wish to replace, the amount (in your size) and number of strands, the calculator will present good alternative yarns with the same knitting tension. Additionally it will tell you how much you’ll require in the new qualities and whether you’ll need to work with multiple strands. Most skeins are 50g (some are 25g or 100g).

If the pattern is worked with multiple colours, every colour will have to be calculated separately. Similarly, if the pattern is worked with several strands of different yarns (for example 1 strand Alpaca and 1 strand Kid-Silk) you will have to find alternatives for each, individually.

Click here to see our yarn calculator

Since different yarns have different qualities and textures we have chosen to keep the original yarn in our patterns. However, you can easily find options among our available qualities by using our yarn calculator, or simply pick a yarn from the same yarn group.

It is possible that some retailers still have discontinued yarns in stock, or that someone has a few skeins at home that they would like to find patterns for.

The yarn calculator will provide both alternative yarn as well as required amount in the new quality.

If you think it's hard to decide what size to make, it can be a good idea to measure a garment you own already and like the size of. Then you can pick the size by comparing those measures with the ones available in the pattern's size chart.

You'll find the size chart at the bottom of the pattern.

See DROPS lesson: How to read size chart

The needle size provided in the pattern serves only as a guide, the important thing is to follow the knitting tension. And since knitting tension is very individual, you will have to adjust the needle size to ensure that YOUR tension is the same as in the pattern – maybe you’ll have to adjust 1, or even 2 needle sizes, up or down to achieve the correct tension. For this, we recommend that you work test swatches.

Should you work with a different knitting tension than the one provided, the measurements of the finished garment might deviate from the measurement sketch.

See DROPS lesson: How to measure your tension/gauge

See DROPS video: How to make a tension/gauge swatch

Working a garment top-down provides more flexibility and room for personal adjustment. For example it is easier to try the garment on while working, as well as making adjustments to length of yoke and shoulder caps.

The instructions are carefully explaining every step, in the correct order. Diagrams are adjusted to the knitting direction and are worked as usual.

The diagram depicts all rows/rounds, and every stitch seen from the right side. It is read from bottom to top, from right to left. 1 square = 1 stitch.

When working back and forth, every other row is worked from the right side and every other row is worked from the wrong side. When working from the wrong side, the diagram will have to be worked reversed: from left to right, knit stitches are purled, purl stitches are knit etc.

When working in the round every round is worked from the right side and the diagram are worked from right to left on all rounds.

See DROPS lesson: How to read knitting diagrams

The diagram depicts all rows/rounds, and every stitch seen from the right side. It is worked from bottom to top, from right to left.

When working back and forth every other row is worked from the right side: from right to left and every other row is worked from the wrong side: from left to right.

When working in the round, every row in the diagram are worked from the right side, from right to left.

When working a circular diagram you start in the middle and work your way outwards, counter clockwise, row by row.

The rows usually start with a given number of chain stitches (equivalent to the height of the following stitch), this will either be depicted in the diagram or explained in the pattern.

See DROPS lesson: How to read crochet diagrams

Instructions for working several diagrams after each other on the same row/round, will often be written like so: “work A.1, A.2, A.3 a total of 0-0-2-3-4 times". This means you work A.1 once, then A.2 is worked once, and A.3 is repeated (in width) the number of times provided for your size – in this case like so: S = 0 times, M = 0 times, L=2 times, XL= 3 times and XXL = 4 times.

The diagrams are worked as usual: begin with the first row in A.1, then work the first row in A.2 etc.

See DROPS lesson: How to read knitting diagrams

See DROPS lesson: How to read crochet diagrams

The total width of the garment (from wrist-to-wrist) will be larger in the larger sizes, despite the actual sleeves being shorter. The larger sizes have longer sleeve caps and wider shoulders, so there will be a good fit in all sizes.

The measurement sketch/schematic drawing provides information regarding the full length of the garment. If it’s a jumper or a jacket the length is measured from the highest point on the shoulder closest to the neckline, and straight down to the bottom of the garment. It is NOT measured from the tip of shoulder. Similarly, the length of yoke is measured from the highest point on the shoulder and down to where yoke is split into body and sleeves.

On a jacket measures are never taken along bands, unless specifically stated. Always measure inside band stitches when measuring the length.

See DROPS lesson: How to read a schematic drawing

Diagrams are often repeated on the round or in height. 1 repeat is the diagram the way it appears in the pattern. If it says to work 5 repeats of A.1 in the round, then you work A.1 a total of 5 times after/next to each other in the round. If it says to work 2 repeats of A.1 vertically/in height you work the entire diagram once, then begin again at the start and work the entire diagram one more time.

Chain stitches are slightly narrower than other stitches and to avoid working the cast-on edge too tight, we simply chain more stitches to begin with. The stitch count will be adjusted on the following row to fit the pattern and measurement sketch.

The rib edge is more elastic and will contract slightly compared to, for example, stocking stitch. By increasing before the rib edge, you avoid a visible difference in width between the rib edge and the rest of the body.

It’s very easy to cast off too tightly, and by making yarn overs while casting off (and simultaneously casting these off) you avoid a too tight cast off edge.

See DROPS video: How to bind off with yarn overs (yo)

To achieve an even increase (or decrease) you can increase on, for example: every 3rd and 4th row alternately, like so: work 2 rows and increase on the 3rd row, work 3 rows and increase on the 4th. Repeat this until the increase is complete.

See DROPS lesson: Increase or decrease 1 st on every 3rd and 4th row alternately

Should you prefer to work in the round instead of back and forth, you may of course adjust the pattern. You’ll need to add steeks mid-front (usually 5 stitches), and follow the instructions. When you would normally turn and work from the wrong side, simply work across the steek and continue in the round. At the end you’ll cut the piece open, pick up stitches to work bands, and cover the cut edges.

See DROPS video: How to knit steeks and cut open

Should you prefer to work back and forth instead of in the round, you may of course adjust the pattern so you work the pieces separately and then assemble them at the end. Divide the stitches for the body in 2, add 1 edge stitch in each side (for sewing) and work the front and back pieces separately.

See DROPS lesson: Can I adapt a pattern for circular needles into straight needles?

Pattern repeats can vary slightly in the different sizes, in order to get the correct proportions. If you’re not working the exact same size as the garment in the photo, yours might deviate slightly. This has been carefully developed and adjusted so that the complete impression of the garment is the same in all sizes.

Make sure to follow instructions and diagrams for your size!

If you have found a pattern you like which is available in women’s size it’s not very difficult to convert it to men’s size. The biggest difference will be the length of sleeves and body. Start working on the women size that you think would fit across the chest. The additional length will be worked right before you cast off for the armhole/sleeve cap. If the pattern is worked top-down you can add the length right after the armhole or before the first decrease on sleeve.

Regarding additional yarn amount, this will depend on how much length you add, but it is better with a skein too many than too few.

All yarns will have excess fibres (from production) that might come off as lint or shedding. Brushed yarns (ie hairier yarns) have more of these loose, excess fibres, causing more shedding.

Shedding also depends on what is worn under or over the garment, and whether this pulls at the yarn fibres. It’s therefore not possible to guarantee that there will be no shedding

Below are some tips on how to get the best result when working with hairier yarns:

1. When the garment is finished (before you wash it) shake it vigorously so the looser hairs come off. NOTE: do NOT use a lint roller, brush or any method that pulls at the yarn.

2. Place the garment in a plastic bag and put it in your freezer - the temperature will cause the fibres to become less attached to each other, and excess fibres will come off easier.

3. Leave in the freezer for a few hours before taking it out and shaking it again.

4. Wash the garment according to the instructions on the yarn label.

Pilling is a natural process that happens to even the most exclusive of fibers. It's a natural sign of wear and tear that is hard to avoid, and that is most visible in high friction areas of your garment like a sweater's arms and cuffs.

You can make your garment look as new by removing the pilling, using a fabric comb or a pill/lint remover.

Still can't find the answer you need? Then scroll down and leave your question so one of our experts can try to help you. This will be done normally within 5 to 10 working days.
In the meantime, you can read the questions and answers that others have left to this pattern or join the DROPS Workshop on Facebook to get help from fellow knitters/crocheters!

You might also like...

Post a comment to pattern DROPS Children 23-41

We would love to hear what you have to say about this pattern!

If you want to leave a question, please make sure you select the correct category in the form below, to speed up the answering process. Required fields are marked *.

Comments / Questions (8)

country flag Marit Berggren wrote:

Hvordan strikker jeg `press`( i liten bukse)

15.07.2020 - 20:05

DROPS Design answered:

Hej Marit, forstår ikke rigtig hvad du mener med press i liten bukse... står det i opskriften?

30.07.2020 - 14:31

country flag Anita Oppedal wrote:

Min jente er sensitiv til ren ull. Hvilket garn kan jeh bruke her som både har ull og silke i seg?

21.11.2019 - 18:05

DROPS Design answered:

Hei Anita! Vi har flere garnsorter med silke og ull, f.eks. DROPS Kid-Silk, BabyAlpaca Silk, Lace og Brushed Alpaca Silk. Om du er usikker på strikkefasthet og på hvilket garn du vil bruke er det mulig å lese mer om garngrupper her Lykke til!

22.11.2019 - 14:47

country flag Anita wrote:

Hei. Vil strikke til min jente på snart 6 år. Men hun er sensitiv til ren ull , og skulke gjerne hatt ett garn som passer som er 70% ull og 30% silke.

21.11.2019 - 18:04

DROPS Design answered:

Hei Anita. Vi har ikke et garn som er multifarget og innholder 70%ull / 30% silke, men vi har BabyAlpaca Silk som innholder 70%Alpakkaull og 30% silke. Ta gjerne en titt på fargekartet til BabyAlpaca Silk. mvh DROPS design

25.11.2019 - 13:21

country flag Ann Helen Jacobsen wrote:

Hvis man strikker glattstrikk, bruker man samme maskeball?

01.11.2019 - 11:07

DROPS Design answered:

Hei Ann Helen. Maskeball?? Om du mener maskeantall, så kan man ikke strikke glattstrikk der det i oppskriften står 2 rett - 2 vrang (=ribbestrikk). Om du ønsker en buke strikket i glattstrikk, se evnt på småDROPS 22-35 og småDROPS 22-40. mvh DROPS design

04.11.2019 - 10:47

country flag Stina wrote:

Stemmer det at det er bare 400gr fabel mot 500 gr fabel big? Eller et det 400x2 de mener når du skal strikke med dobbel tråd?

20.01.2019 - 17:35

DROPS Design answered:

Hei Stina. garnmengden som står oppgitt er hele mengden du trenger. Altså de 400 grammene Fabel er det du trenger om du vil trikke med 2 tråder Fabel. 1 nøset Big Fabel og 1 nøste Fabel veier like mye, men de har foskjellige løpelengde (altså antall meter). Det er derfor du trenger ulikt antall gram i de 2 kvalitetene. Når det er sagt så er Big Fabel en utgaått kvalitete, men om du gjerne vil strikke med 1 tråd kan du velge et annet garn fra garngruppe C her. God fornøyelse

22.01.2019 - 13:28

country flag Trine wrote:

På 3. og 4. økning når og hvor skal man begynne å strikke vrang? Skal man begynne å strikke vrang på første maske med merketråd i mellom seg i den omgangen man skal øke? Eller etter økning?

07.09.2018 - 12:46

DROPS Design answered:

Hei Trine. De rettmaskene med merker i strikkes rett som vanlig. De maskene som økes på hver side av de 2 rettmaskene strikkes inn i vrangborden. Det vil si at på den 3 og 4 økningen strikkes de økte maskene vrang (på neste omgag) slik at vrangborden fortsetter. God fornøyelse

10.09.2018 - 10:08

country flag Hildegunn Hestnes wrote:

Jeg følger øketips og lager et kast på hver side av de to rette maskene midt foran og midt bak. I neste omgang strikker jeg de fire kastene rett, slik Øketips sier " .. de 2 første m som økes strikkes rett, de to neste vrang osv." Men hva betyr "de to neste vrang"? At det vil bli to vrang etter at de økte maskene er strikket rett på samme omgang? Eller - at de økte maskene på NESTE omgang strikkes vrang?

07.02.2018 - 09:54

DROPS Design answered:

Hei Hildegunn. På 1. og 2. omgang der du skal strikke de økte maskene, skal disse strikkes rett (etter 2. gang det er økt vil du ha 6 rett masker etter hverandre). Men neste gang du skal øke, 3. og 4. gang skal de økte maskene strikkes vrang (når du har økt 4 ganger/4 omganger med økninger, vil du igjen ha 2 rett-2 vrang). God Fornøyelse!

09.02.2018 - 11:19

country flag Elisabeth Scheflo wrote:

Jeg har nu strikket 5 cm av Wooliam buksa, skal begynne med forhøyningen bak. Men, skal jeg strikke 7 m vrbord rett etter at jeg har passert den første merketråden, slik at rumpa kommer mellom mine to merketråder (som jo egentlig skal være midt foran og midt bak..?), eller skal jeg begynne å strikke forhøyningen før merketråden, så merketråden kommer midt inni forhøyningen? Isåfall, skal det strikkes 3 eller 4 masker før tråden?

08.08.2015 - 20:58

DROPS Design answered:

Hej Elisabeth, Ja mærketråden skal være midt bak. Det vil sige du strikker først 7 m vrbord forbi mærketråden, vender og strikker 14 m tilbage (det bliver da 7 masker på den anden side af mærketråden) og således følger du opskriften. God fornøjelse!

10.08.2015 - 10:16