
Popular categories
Looking for a yarn?


|
||||||||||||||||
Cecilie |
||||||||||||||||
 |
 |
|||||||||||||||
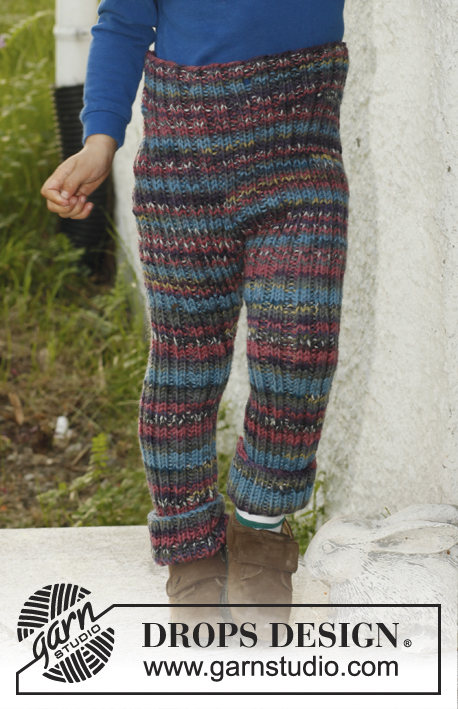
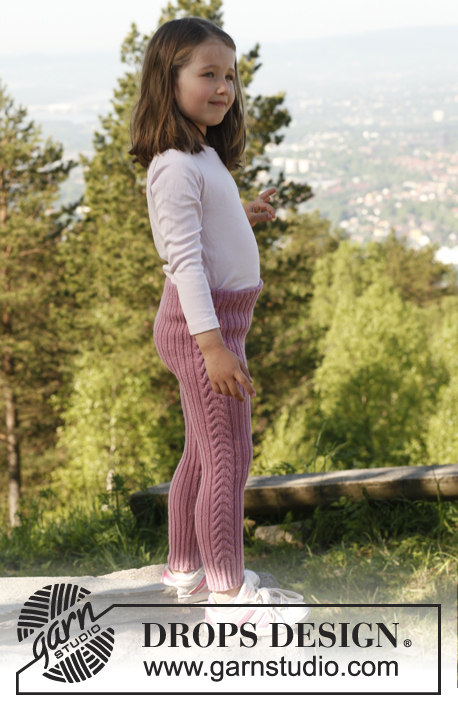
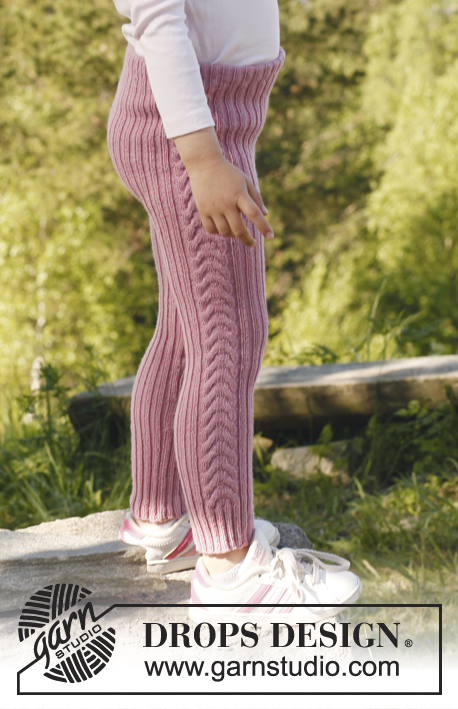
Knitted tights in rib, in DROPS BabyMerino. Size children 3 to 12 years.
DROPS Children 23-36 |
||||||||||||||||
|
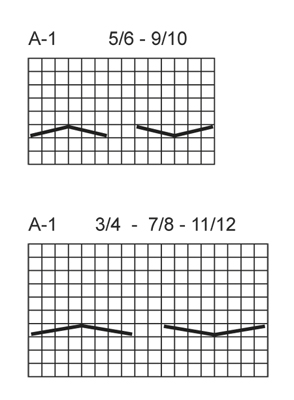
PATTERN: See diagram A.1 for correct size. Diagram shows pattern from RS. INCREASE TIP: Inc on each side of 2 K sts by working 1 YO. On next round work YOs twisted (i.e. work in back loop of st). Work the inc sts in rib, i.e. K first 2 sts inc, and P the next 2 sts etc. DECREASE TIP: Work until 2 sts remain before marker, then K 2 tog and K 2 twisted tog (work in back loop of st). --------------------------------------------------------- TIGHTS: Worked in the round, top down. Rounds start mid back. Cast on 160-168-176-184-192 sts on circular needle size 2.5 mm with Baby Merino. Insert a marker at beg of round (= mid back) and a marker after 80-84-88-92-96 sts (= mid front). Work rib from mid back as follows: K 1, * P 2, K 2 *, repeat from *-*, finish with P 2, K 1. When piece measures 5 cm, work an elevation at the back as follows: Work 11 sts in rib, turn, tighten thread, work 22 sts in rib on return, turn, tighten thread, work 32 sts in rib. Continue like this by working 10 sts more on every turn until a total of 122-142-142-162-162 sts have been worked. Turn, continue in the round over all sts. Work as follows from mid back: K 1, * P 2, K 2 *, repeat from *-* over the next 28-32-32-36-36 sts, P 2, A.1 – see diagram for size, * P 2, K 2 *, repeat from *-* over the next 60-68-68-76-76 sts, finish with P 2, A.1, * P 2, K 2 *, repeat from *-* over the next 28-32-32-36-36 and finish with P 2, K 1. Continue this pattern. When piece measures 18-19-20-21-22 cm mid front, inc 1 st on each side of the middle 2 sts mid front and back – see INCREASE TIP. Repeat inc every other round a total of 12 times = 208-216-224-232-240 sts. When piece measures 25-26-27-28-29 cm, cast off 16 sts mid front and mid back. Finish each leg separately, slip sts for one leg on a stitch holder. LEG: = 88-92-96-100-104 sts. Distribute sts on 4 double pointed needles size 2.5 mm and continue rib with cables in the side - insert a marker on the inside of leg. When leg measures 2 cm, dec 1 st on each side of marker - READ DECREASE TIP. Repeat dec every 4-4-5-5-6 cm a total of 8 times = 72-76-80-84-88 sts. AT THE SAME TIME when leg measures 30-36-42-50-58 cm, work rib K 2/P2 over all sts. When leg measures 38-44-50-58-66 cm, loosely cast off with K over K and P over P. Slip sts from the other leg back on needle and work as first leg. ASSEMBLY: Sew the 16 sts that were cast off between the legs tog towards each other. Fold the 2 cm at the top of tights double towards WS and fasten with neat little stitches, leaving a small opening to thread the elastic through. |
||||||||||||||||
Diagram explanations |
||||||||||||||||
|
||||||||||||||||
|
||||||||||||||||

|
||||||||||||||||
|
Have you made this or any other of our designs? Tag your pictures in social media with #dropsdesign so we can see them! Do you need help with this pattern?You'll find tutorial videos, a Comments/Questions area and more by visiting the pattern on garnstudio.com. © 1982-2024 DROPS Design A/S. We reserve all rights. This document, including all its sub-sections, has copyrights. Read more about what you can do with our patterns at the bottom of each pattern on our site. |
||||||||||||||||


With over 40 years in knitting and crochet design, DROPS Design offers one of the most extensive collections of free patterns on the internet - translated to 17 languages. As of today we count 304 catalogues and 11422 patterns - 11422 of which are translated into English (UK/cm).
We work hard to bring you the best knitting and crochet have to offer, inspiration and advice as well as great quality yarns at incredible prices! Would you like to use our patterns for other than personal use? You can read what you are allowed to do in the Copyright text at the bottom of all our patterns. Happy crafting!
Comments / Questions (21)
I work with straight needles, not in the round, How do I convert instructions in the round to straight needles?
15.10.2023 - 17:36DROPS Design answered:
Dear Francisca, you can read the following lesson: https://www.garnstudio.com/lesson.php?id=13&cid=19. Happy knitting!
15.10.2023 - 21:26I work with straight needles, not in the round, How do I convert instructions in the round to straight needles?
15.10.2023 - 17:36DROPS Design answered:
Dear Francisca, you can read the following lesson: https://www.garnstudio.com/lesson.php?id=13&cid=19. Happy knitting!
15.10.2023 - 21:26Når jeg legger opp 160 masker og skal starte økningen 2 masker annenhver gang 12 ganger .Så får jeg antal masker til å bli 184.Hvorfor står det da i oppskriften at det etter de 12 økningene skal være 280 masker? Er det feil i oppskriften?
16.09.2023 - 13:14DROPS Design answered:
Hei Anita. Du skriver 280 masker, regner med at det er en tastefeil siden det i oppskriften står 208 masker. Du har 160 masker og du skal øke 1 maske på hver side av de 2 midterste maskene både foran og bak, altså det økes 4 masker pr øke omgang. Du skal øke 12 ganger, 12 x 4 masker = 48 masker og du startet med 160 masker. 48+160= 208 masker. mvh DROPS Design
18.09.2023 - 14:18Hei. Jeg har kommet dit at jeg skal begynne å øke. Skal det strikkes slik at 1 omgang blir slik: 1 vridd rett bak og 1 vridd rett foran, 1 vridd vrang foran og 1 vridd vrang bak? Eller skal det være 2 rett vridd på hver side bak og 2 vridd vrang foran? Skal de vridde maskene fortsatt strikkes vridd etter 1. omgang?
21.09.2022 - 11:00DROPS Design answered:
Hei Lena. Når du strikkes kastet vridd (dvs i bakre maskebue) unngår du å få et stort hull ved økningen. Så alle kast strikkes vridd på alle omgangene. Du kan strikke 1. og 2. omgang med økninger slik: 1 vridd rett bak og 1 vridd rett foran, 1 vridd rett foran og 1 vridd rett bak, mens 3. og 4. omgang med økninger slik: 1 vridd vrang bak og 1 vridd vrang foran, 1 vridd vrang foran og 1 vridd vrang bak. mvh DROPS Design
26.09.2022 - 09:40Ich bin gerade etwas irritiert. Die gestrickte Leggings auf dem Bild ist nicht entsprechend der Anleitung gestrickt sondern von unten nach oben. Also vom Beinsaum zum Bund? Es ist mir nämlich gerade unerklärlich was ich falsch mache, dass mein Zopfmuster genau anders herum zeigt. Ich stricke von oben.
28.11.2020 - 09:41DROPS Design answered:
Liebe Maria, die Arbeit wird hier von oben nach unten gestrickt, das Diagram lesen Sie aber von unten nach oben. Viel Spaß beim stricken!
30.11.2020 - 10:49Hei. Jeg lurer på om det ikke hadde vært bedre å øke til kile i skrittet med å ha to masker mer mellom maskene på hver økning, altså at økningen skrår utover mot benet. Jeg synes sammensyingen mellom bena ble litt merkelig, med en spiss, vi økte bestandig sånn før, men fikk lyst til å prøve å følge oppskriften som den er.
03.02.2020 - 16:53Hvor mange omg. Rett skal det være mellom hver vridning på mønsteret er det 6 elller 9 på str. 7/8 år
20.01.2019 - 23:59DROPS Design answered:
Hei Anne Britt. Hvis du mener hvor mange omganger det er mellom hver flette er dette 9. Du strikker etter A.1 slik: først strikkes 3 omganger rett, så flettes på neste omgang, og videre strikkes 6 omganger rett. Når du har strikket A.1 en gang i høyden begynner du på nytt med 3 omganger rett, 1 omgang flette osv. God fornøyesle.
29.01.2019 - 07:58Hei! Jeg får ikke mønsteret til å gå opp på str 5/6 år selvom maskeantallet på hver side av merkene er riktig. Jeg har forsøkt flere ganger. Tar da utgangspunkt i det lille diagrammet.
17.10.2018 - 20:06DROPS Design answered:
Hei Siri. Du har altså 168 masker på pinnen, og 84 masker mellom hvert merke. Du strikker slik: 1 rett, vrangbord over 32 masker, 2 vrang = 35 masker strikket før A.1. Så strikkes A.1 (=14 masker), vrangbord over 68 masker, og 2 masker vrang = 119 masker strikket før neste A.1. Så strikkes A.1 (14 masker). Det er nå 35 masker igjen på pinnen, og de strikkes slik: vrangbord over 32, 2 vrang, iog 1 rett. Du har nå strikket: 35 masker, A.1, 70 masker, A.1, 35 masker = 168 masker. God fornøyelse
30.11.2018 - 09:08Se denne!
27.02.2018 - 12:47Monica Thylin wrote:
Bästa modellen jag någonsin stickat. Jag stickade till mitt 3-åriga barnbarn och hon var såå nöjd. Jag förlängde benen med 5 cm.
12.01.2018 - 08:41