
Popular categories
Looking for a yarn?


|
||||||||||
My honey |
||||||||||
 |
 |
|||||||||
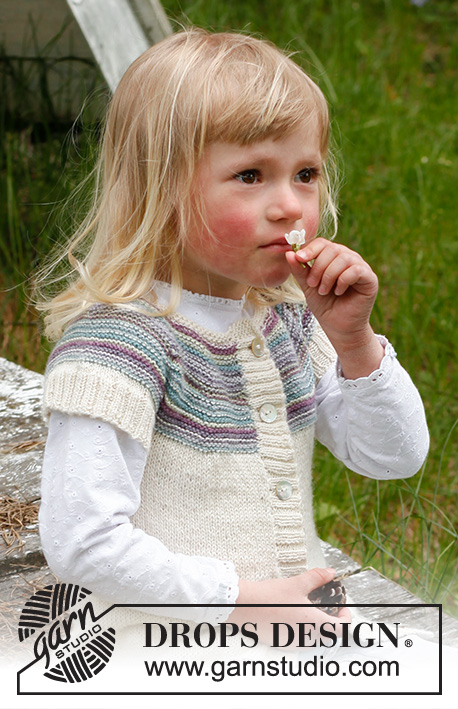
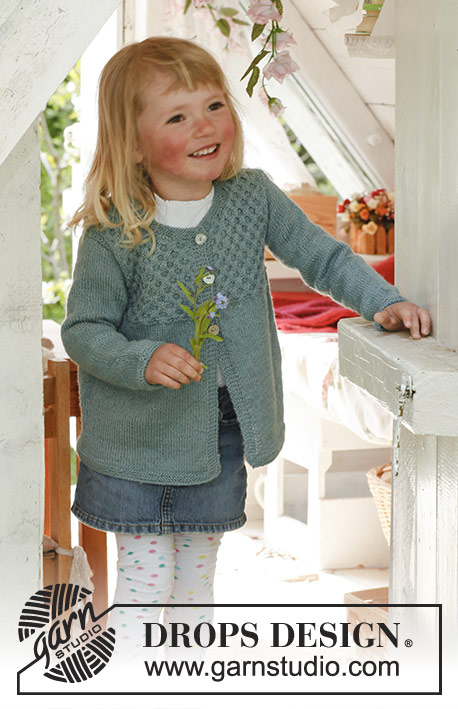
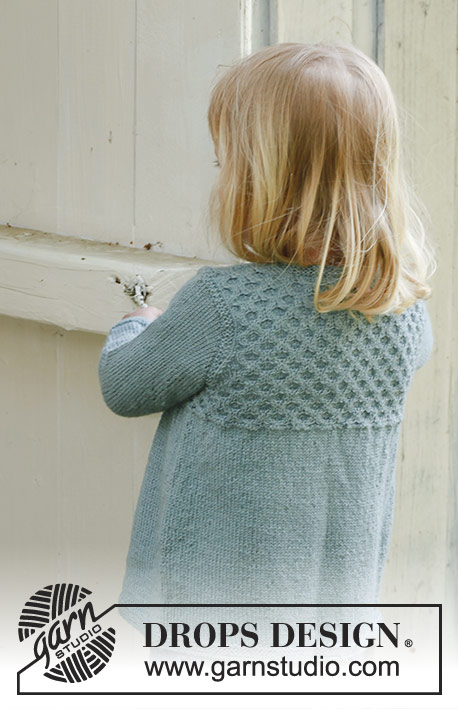
Knitted jacket with honeycomb pattern in DROPS Alpaca. Size children 3 to 12 years.
DROPS Children 23-19 |
||||||||||
|
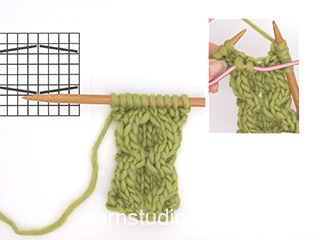
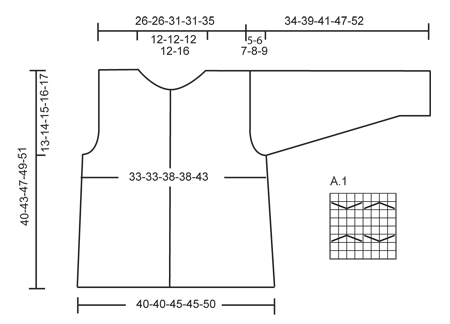
GARTER ST (back and forth on needle): K all rows. GARTER ST (in the round): * K 1 round and P 1 round *, repeat from *-*. PATTERN: See diagram A.1. Diagram shows the pattern from RS. BUTTON HOLES: Bind off for button holes on right band. 1 button hole = bind off 3rd st from mid front. On next row cast on 1 new st over the bound off st. Bind off for button holes when piece measures: Size 3/4: 21, 27 and 33 cm / 8¼", 10⅝" and 13" Size 5/6: 24, 30 and 36 cm / 9½", 11¾" and 14¼" Size 7/8: 25, 30, 35 and 40 cm / 9¾",11¾",13¾" and 15¾" Size 9/10: 27, 32, 37 and 42 cm / 10⅝",12½",14½" and 16½" Size 11/12: 29, 34, 39 and 44 cm / 11⅜",13⅜",15¼" and 17¼". DECREASE TIP (applies to armholes): All dec are done from RS. Dec inside 3 sts in garter st. Work sts that do not fit A.1 in stockinette st. Dec after 3 sts in garter st as follows: Slip 1 st as if to K, K 1, psso. Dec before 3 sts in garter st as follows: K 2 tog. --------------------------------------------------------- JACKET: Worked back and forth on circular needle. Cast on 202-202-226-226-250 sts on circular needle size 3 mm / US 2.5 with Alpaca. P 1 row from WS. Then work 6 rows in garter st - see explanation above. REMEMBER THE GAUGE! Then work in stockinette st but work the 5 outermost sts (= band) in each side in garter st until finished measurements. When piece measures 24-26-28-29-30 cm / 9½"-10¼"-11"-11⅜"-11¾", K1 row from RS and AT THE SAME TIME inc 34-34-42-42-50 sts evenly = 236-236-268-268-300 sts on needle. K1 row on WS. Work next row from RS as follows: 5 sts in garter st, K 1, diagram A.1 over the next 224-224-256-256-288 sts, finish with K 1 (i.e stockinette st) and 5 sts in garter st. Continue like this and remember to bind off for button holes - see explanation above. Insert 2 markers in the piece; 62-62-70-70-78 sts in from each side (back piece = 112-112-128-128-144 sts). When piece measures 27-29-32-33-34 cm / 10⅝"-11⅜"-12½"-13"-13⅜", work 2 rows in garter st over 8 sts on each side of markers, work the other sts as before. On next row bind off 4 sts on each side of every marker and finish each piece separately. BACK PIECE: = 104-104-120-120-136 sts. Work as follows seen from RS: 3 sts in garter st, K 1, diagram A.1 over the next 96-96-112-112-128 sts, finish with K 1 and 3 sts in garter st. At the same time dec for armholes in each side every other row as follows - read DECREASE TIP: 1 st 8 times = 88-88-104-104-120 sts. When piece measures 38-41-45-47-49 cm / 15"-16⅛"-17¾"-18½"-19¼", bind off the middle 40-40-40-40-56 sts for neck = 24-24-32-32-32 sts remain on each shoulder. Finish each part separately. Bind off when piece measures 40-43-47-49-51 cm / 15¾"-17"-18½"-19¼"-20". RIGHT FRONT PIECE: = 58-58-66-66-74 sts. Work as follows seen from RS: 5 sts in garter st, K 1, A.1 over the next 48-48-56-56-64 sts, finish with K 1 and 3 sts in garter st. Dec for armhole in the side as on back piece. Remember to bind off for button holes. AT THE SAME TIME when piece measures 34-37-41-43-45 cm / 13⅜"-14½"-16⅛"-17"-17¾", put 14-14-14-14-22 sts towards mid front on a stitch holder. Then bind off for neck in beg of every row from neck side: 2 sts 4 times, and 1 st 4 times – work the sts that do not fit A.1 in stockinette st. After all bind offs, 24-24-32-32-32 sts remain on shoulder. Bind off when piece measures 40-43-47-49-51 cm / 15¾"-17"-18½"-19¼"-20". LEFT FRONT PIECE: Work as right front piece but reversed. SLEEVE: Worked in the round on double pointed needles. Cast on 44-48-48-52-52 sts on double pointed needles size 3 mm / US 2.5 with Alpaca. Insert a marker at the beg of round. Work 6 rounds in garter st, then work in stockinette st until finished measurements. When piece measures 5 cm / 2", inc 1 st on each side of marker, repeat every 3½-4-3½-4½-4 cm / 1¼"-1½"-1¼"-1¾"-1½" a total of 7-7-8-8-9 times = 58-62-64-68-70 sts. When piece measures 29-33-34-39-43 cm / 11⅜"-13"-13⅜"-15¼"-17", bind off 3 sts on each side of marker, now work piece back and forth. Then bind off for sleeve cap at beg of every row, in each side as follows: 2 sts 3 times and 1 st 0-1-3-5-6 times, then bind off 2 sts in each side until piece measures 33-38-40-46-51 cm / 13"-15"-15¾"-18"-20", bind off 3 sts 1 time in each side. Bind off the remaining sts, piece measures approx. 34-39-41-47-52 cm / 13⅜"-15¼"-16⅛"-18½"-20½". ASSEMBLY: Sew the shoulder seams. Sew in sleeves. Sew the buttons on to left front piece. NECK EDGE: Pick up 74 to 94 sts (including sts on stitch holders) around the neck on circular needle size 3 mm / US 2.5. Work 6 rows in garter st. Bind off. |
||||||||||
Diagram explanations |
||||||||||
|
||||||||||
|
||||||||||
|
Have you made this or any other of our designs? Tag your pictures in social media with #dropsdesign so we can see them! Do you need help with this pattern?You'll find tutorial videos, a Comments/Questions area and more by visiting the pattern on garnstudio.com. © 1982-2024 DROPS Design A/S. We reserve all rights. This document, including all its sub-sections, has copyrights. Read more about what you can do with our patterns at the bottom of each pattern on our site. |
||||||||||


With over 40 years in knitting and crochet design, DROPS Design offers one of the most extensive collections of free patterns on the internet - translated to 17 languages. As of today we count 304 catalogs and 11422 patterns - 11417 of which are translated into English (US/in).
We work hard to bring you the best knitting and crochet have to offer, inspiration and advice as well as great quality yarns at incredible prices! Would you like to use our patterns for other than personal use? You can read what you are allowed to do in the Copyright text at the bottom of all our patterns. Happy crafting!
Comments / Questions (138)
Danke für die schnelle Antwort. Ich fange jetzt das Rückenteil an. Mit 3 M. kraus re. fängt die R. an. Wird die Randmasche dabei schon mitgezählt?
12.05.2018 - 14:13DROPS Design answered:
Liebe Sophie, ja genau, die erste Masche gehört zu diesen 3 M kraus re und die letzte Masche zu den 3 letzten M kraus re. Viel Spaß beim stricken!
14.05.2018 - 09:41Hallo, ich fange jetzt mit dem Muster an. Bisher habe ich die Randmaschen nicht mitgezählt; ich habe also 1 Randmasche, 5M. kraus und dann glatt re. gestrickt. Ich fürchte, das war verkehrt. Müsste jetzt aber so weiter stricken, also mit 238 M. statt 236 M. Ist das richtig?
07.05.2018 - 22:53DROPS Design answered:
Liebe Sophie, Randmaschen sind in der gesamten Maschenanzahl inbegriffen, wenn Sie diese Maschen extra haben, dann sollen Sie 2 Maschen zunehmen, damit Sie genügend Maschen für Muster A.1 haben. Viel Spaß beim stricken!
08.05.2018 - 08:46Bonjour et merci pour ce joli patron. J'ai tout tricoté mais je dois maintenant coudre les manches. et là, je ne sais pas comment faire. Quel point utiliser, comment les joindre? Merci.
22.02.2018 - 10:31DROPS Design answered:
Bonjour Mme Brown, cette vidéo montre comment assembler les manches, commencez par les mailles rabattues de la manche contre celles rabattues pour les emmanchures, continuez tout le long de l'arrondi de la manche et terminez par l'autre côté, comme au début de la manche. Bon tricot!
22.02.2018 - 13:25Jag är på varvet där man ska maska av 4 m på varje sida av varje markör och varje del ska stickas för sig. har nu kommit till den andra markören, dvs vid bakstyckets ena kant. Ska jag sticka 4 masker (de av de 8 som ska tillhöra bakstycket) och sedan stanna där och vända på stycket och börja på bakstycket, eller göra minskningarna och fortsätta varvet ut? Hur ska jag sedan "komma åt" bakstycket? Allt sitter ju på samma rundsticka?
02.02.2018 - 18:16DROPS Design answered:
Hej, du får bäst resultat genom att maska av alla de 8 maskorna på samma gång. Du kan sedan sätta m från framst på en tråd eller hjälpsticka, så kan du fortsätta med bakst.
05.02.2018 - 17:55Vid vilket antal centimeter ska markörer sättas i arbetet? (se mönstret för "kofta" efter anvisningen om att påbörja A1) Jag stickar minsta storleken.
29.01.2018 - 17:58DROPS Design answered:
Du kan sätta markörerna när du påbörjar mönstret. Det viktigaste är att markörerna finns på plats innan du stickar rätst över de 8 m i varje sida.
31.01.2018 - 13:28Hallo Ich komme nicht mehr weiter mit dem Vorderteil. 14 M auf die Hilfsnadel, 4x2 M und 4x1 M abketten, restliche 24 M abketten. (58-14-8-4-24=8 M) Was passiert mit den 8 M, die übrig sind?
27.01.2018 - 17:48DROPS Design answered:
Liebe Nicole, die 8 M sind die Maschen, die für das Armloch (wie beim Rückenteil) abgenommen werden. Viel Spaß beim stricken!
29.01.2018 - 10:55Kan man strikke denne med Cotton Merino?
15.01.2018 - 11:57DROPS Design answered:
Hei Lene. Dessverre, denne jakken er skrevet med en strikkefasthet som passer DROPS Alpaca (garngruppen A), mens DROPS Cotton Merino er i garngruppe B (B er tykkere enn A). mvh Drops design
17.01.2018 - 08:08Hallo, ich beginne gerade mit dem Jäckchen und habe zwei Fragen. Verstehe ich das richtig, dass man bei der Jacke nach dem Anschlagen 1R li strickt, dann 6R re und dann 1R li/1R re im Wechsel? Wieso startet man die Jacke nach dem Anschlagen mit einer Reihe links und dann Krausrippe und bei den Ärmeln direkt mit Krausrippe? Vielen Dank und Grüsse, Elisabeth
09.11.2017 - 13:41DROPS Design answered:
Liebe Elisabeth, bei der Jacke strickt man zuerst 1 Reihe links (= Rückreihe) und dann 6 Krausrippen damit 2. Reihe eine Hinreihe ist, Die Ärmel werden in der Runde gestrickt, dann sieht die Anschlagskante genauso wie bei der Jacke. Viel Spaß beim stricken!
09.11.2017 - 14:30Hello Drops Team. When decreasing for the sleeve cap, do I bind off 2 sets at the beg and end of each row for 3 rows (RS,WS,RS), and complete the decreases in a similar fashion. Or are the decreases only done on the RS? Thank you for your response. Joan
19.09.2017 - 19:47DROPS Design answered:
Dear Joan, you will bind off 2 sts at the beg of next 6 rows (= 3 times from RS and 3 times from WS). Happy knitting!
20.09.2017 - 08:37Vivi Busch-Christensen wrote:
Hei - kan jeg følge oppskriften og strikke denne jakken med knapper hele veien ned eller blir det litt umulig ?
13.06.2017 - 19:40DROPS Design answered:
Hei Vivi. Det går helt fint. Bare regn ut hvor du må starte knappehull fellingen til den størrelsen du vil strikke, og kjøpe nok knapper :) God Fornøyelse!
14.06.2017 - 08:41