DROPS Karisma
DROPS Karisma
100% Wool
from 3.00 $ /50g
Get the yarn to make this pattern from 30.00$.

The yarn cost is calculated from the pattern’s smallest size and the yarn’s cheapest product type. Looking for an even better price? You might find it on the DROPS Deals!

DROPS SS24

Silje jacket

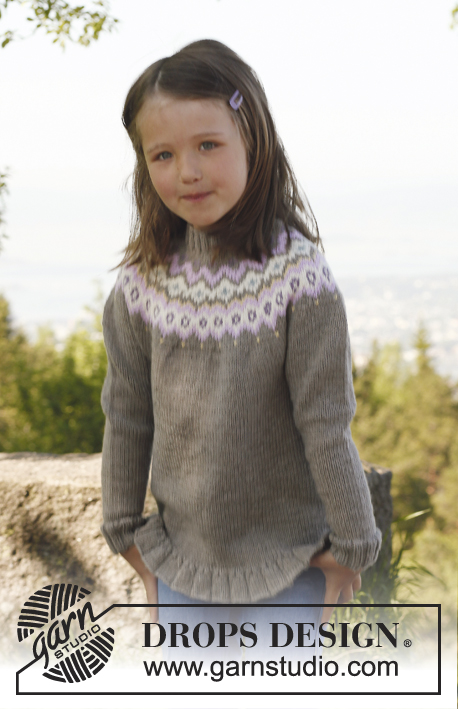
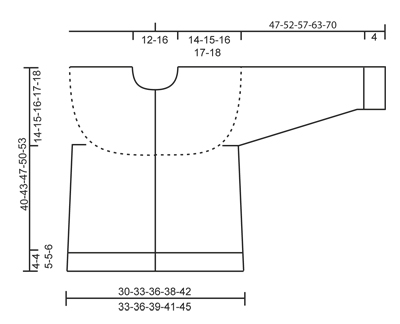
Knitted jacket with round yoke and flounce in DROPS Karisma. Size children 3 to 12 years.

DROPS Children 23-15
DROPS design: Pattern no U-058-bn
Yarn group B
-----------------------------------------------------------
Size: 3/4 - 5/6 - 7/8 - 9/10 - 11/12 years
Finished measurements:
Bust: 60-66-72-76-84 cm / 23½"-26"-28½"-30"-33"
Full length: 40-43-47-50-53 cm / 15¾"-17"-18½"-19¾"-21"

Materials: DROPS KARISMA from Garnstudio
250-300-300-350-350 color no 54, beige brown.
50 g color no 01, off white
50 g color no 52, dark mustard
50 g color no 64, gray purple
50 g color no 69, light gray green
50 g color no 71, light beige

DROPS DOUBLE POINTED NEEDLES AND CIRCULAR NEEDLE (60 or 80 cm / 24" or 32") SIZE 4 mm / US 6 - or size needed to get 21 sts x 28 rows in stockinette st = 10 x 10 cm / 4" x 4".
DROPS DOUBLE POINTED NEEDLES and CIRCULAR NEEDLE (60 or 80 cm / 24" or 32") SIZE 3.5 mm /US 4 - for edges.

DROPS WOODEN BUTTONS BURNED, NO 511: 5-5-6-6-6 pieces

-------------------------------------------------------

Alternative Yarn – See how to change yarns here
Yarn Groups A to F – Use the same pattern and change the yarn here
Yarn usage using an alternative yarn – Use our yarn converter here

-------------------------------------------------------

DROPS Karisma
DROPS Karisma
100% Wool
from 3.00 $ /50g
Get the yarn to make this pattern from 30.00$.

The yarn cost is calculated from the pattern’s smallest size and the yarn’s cheapest product type. Looking for an even better price? You might find it on the DROPS Deals!

Pattern instructions

NOTE: This pattern is written in American English. All measurements in charts are in cm. For conversion from inches to cm - click here. There are different terms for crocheting in American and British English. If this pattern includes crochet, click for "crochet terms" here. For this pattern in British English, please click here.
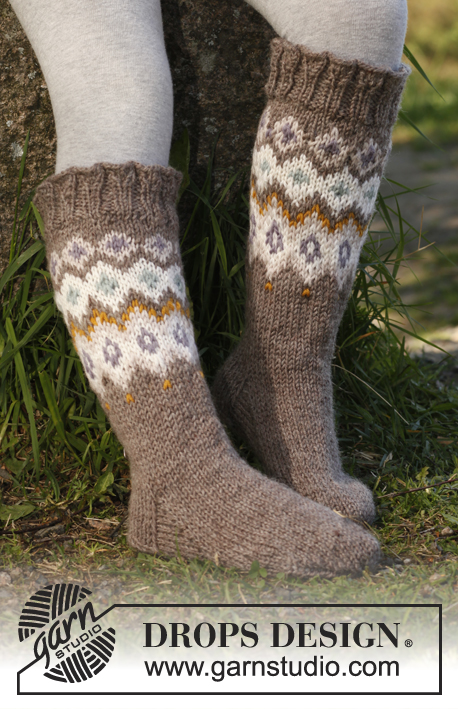
GARTER ST (back and forth on circular needle):
K sts on all rows.

DECREASE TIP (applies to sides of body):
Dec as follows before marker: K 2 tog.
Dec as follows after marker: Slip 1 st as if to K, K 1, psso.

PATTERN:
See diagram A.1 – choose diagram for correct size. Work entire pattern in stockinette st.
----------------------------------------------------------

BODY:
Worked back and forth on circular needle from mid front. Cast on 280-304-328-352-384 sts (includes 1 edge st in each side towards mid front) on circular needle size 3.5 mm / US 4 with beige brown Karisma.
Work first row as follows from RS: 1 edge st in GARTER ST - see explanation above - * K 6, P 2 *, repeat from *-* until 7 sts remain and finish with K 6 and 1 edge st in garter st. Continue rib like this for 3-3-4-4-5 cm / 1"-1"-1½"-1½"-2" – adjust so that next row is worked from RS.
Now dec 1 st on each side of every K-section by working all 6 K sts as follows (2 P sts are worked as before): Slip 1 st as if to K, K 1, psso, K until 2 sts remain, K 2 tog.
Repeat dec on next row from RS = 140-152-164-176-192 sts. Work 1 row with K over K and P over P.
Switch to circular needle size 4 mm / US 6 and K 1 row from RS while AT THE SAME TIME adjusting no of sts in the 2 largest sizes to 140-152-164-175-191 sts.
Now insert 2 markers in the piece, 35-38-41-44-48 sts in from each side (= 70-76-82-87-95 sts between markers on back piece). Then work in stockinette st with 1 edge st in garter st in each side towards mid front.
When piece measures 7-8-8-9-9 cm / 2¾"-3"-3"-3½"-3½", dec 1 st on each side of both markers – READ DECREASE TIP (= 4 sts dec).
Repeat dec every 7-7-8-8-9 cm / 2¾"-2¾"-3"-3"-3½"- 2 more times = 128-140-152-163-179 sts.
When piece measures 26-28-31-33-35 cm / 10¼"-11"-12¼"-13"-13¾", bind off 6 sts in each side for armholes (i.e. 3 sts on each side of both markers) = 58-64-70-75-83 sts on back piece and 29-32-35-38-42 sts on each front piece.
Put piece aside and knit the sleeves.

SLEEVE:
Worked in the round on double pointed needles.
Cast on 36-36-40-44-44 sts on double pointed needles size 3.5 mm / US 4 with beige brown. Work rib (= K 2/P 2).
When piece measures 4 cm / 1½", K 1 round while AT THE SAME TIME dec 4-4-4-8-8 sts evenly = 32-32-36-36-36 sts. Switch to double pointed needles size 4 mm / US 6 and work in stockinette st. Insert a marker at beg of round (= mid under sleeve).
When piece measures 7 cm / 2¾", inc 2 sts mid under sleeve (i.e. 1 st on each side of marker).
Repeat inc every 2-2-2½-2½-2½ cm / ¾"-¾"-⅞"-⅞"-⅞", 8-11-10-12-14 more times = 50-56-58-62-66 sts.
When piece measures 27-31-34-39-44 cm / 10⅝"-12¼"-13⅜"-15¼"-17¼", bind off 6 sts mid under sleeve (i.e. 3 sts on each side of marker) = 44-50-52-56-60 sts remain on sleeve.
Put piece aside and knit another sleeve.

YOKE:
Slip sleeves on to same circular needle as body where armholes were bound off = 204-228-244-263-287 sts. Work 3-4-2-3-4 cm / 1⅛"-1½"-¾"-1⅛"-1½" in stockinette st with 1 edge st in garter st in each side with beige brown.
AT THE SAME TIME dec 5-1-3-8-4 sts evenly on last row = 199-227-241-255-283 sts.
Then work next row as follows from RS: 1 edge st in garter st, work diagram A.1 until 2 sts remain on needle (= 14-16-17-18-20 repetitions), work 1st st in A.1 (i.e. this st follows the pattern so that A.1 beg and ends the same way inside edge st in each side towards mid front but do not dec in this st), finish with 1 edge st in garter st as before. Continue the pattern like this.
After A.1 87-99-105-111-123 sts remain on needle. P 1 row from WS. Then work an elevation in the back of neck with short rows as follows (1st row = RS): K until 18-19-20-22-26 sts remain, turn, tighten thread and P until 18-19-20-22-26 sts remain in the other side. Turn, tighten thread and K until 36-38-40-44-52 sts remain, turn, tighten thread and P until 36-38-40-44-52 sts remain in the other side, turn, tighten thread and K the rest of row.
Then P 1 row from WS while AT THE SAME TIME dec 27-35-37-39-47 sts evenly = 60-64-68-72-76 sts.
Piece measures approx. 40-43-47-50-53 cm / 15¾"-17"-18½"-19¾"-21" up to shoulder.
Put sts on a thread or stitch holder (or keep them on the needle), while working the front bands.

BAND:
Pick up from RS approx. 84 to 112 sts along right front piece inside 1 edge st on circular needle size 3.5 mm / US 4 with beige brown.
P 1 row from WS while AT THE SAME TIME inc evenly to 101-105-113-121-129 sts.
Work next row as follows from RS: 2 edge sts in garter st, * K 2, P 2 *, repeat from *-* until 3 sts remain and finish with K 2 and 1 edge st in garter st.
Continue rib like this. AT THE SAME TIME after 1 cm / ⅜", bind off for 5-5-6-6-6 button holes evenly. 1 button hole = work 2 sts tog and make 1 YO (binding off P 2 seen from RS will look more pretty). Upper button hole should be approx. 0.5-1 cm / ¼"-½" from neck edge and bottom hole approx. 4-4-5-5-6 cm / 1½"-1½"-2"-2"-2⅜" from bottom edge.
When band measures 2.5 cm / ⅞", bind off with K over K and P over P. Repeat along left front piece but do not bind off for button holes on left band.

NECK:
Pick up from RS approx. 70 to 86 sts around the neck (also over bands) on circular needle size 3.5 mm / US 4 with beige brown.
P 1 row from WS while AT THE SAME TIME inc evenly to 78-82-86-90-94 sts. Work next row as follows from RS: 2 edge sts in garter st, * K 2, P 2 *, repeat from *-* until 4 sts remain and finish with K 2 and 2 edge sts in garter st. Continue rib like this.
When neck edge measures approx. 2.5 cm / ⅞", loosely bind off K over K and P over P.

ASSEMBLY:
Sew the openings under the sleeves. Sew on buttons.


---------------------------------------------------------
Jumper - see pattern SmåDrops 23-16
---------------------------------------------------------
Socks - see pattern SmåDrops 23-17
---------------------------------------------------------

Diagram

All measurements in charts are in cm.

symbols = beige brown
symbols = dark mustard
symbols = light beige
symbols = off white
symbols = gray purple
symbols = light gray green
symbols = K 2 tog
diagram
diagram
Do you have a question? See a list of frequently asked questions (FAQ)

Knitting tension is what determines the final measurements of your work, and is usually measured per 10 x 10 cm. It is provided like so: number of stitches in width x number of rows in height - eg: 19 stitches x 26 rows = 10 x 10 cm.

The knitting tension is very individual; some people knit/crochet loosely while others work tightly. You adjust the knitting tension with the needle size, which is why the suggested needle size only serve as a guide! You need to adjust this (up or down) to ensure that YOUR knitting tension matches the knitting tension provided in the pattern. If you work with a different knitting tension than provided you will have a different yarn consumption, and your work will have different measurements than what the pattern suggests.

The knitting tension also determines which yarns can replace each other. As long as you achieve the same knitting tension you can replace one yarn with another.

See DROPS lesson: How to measure your tension/gauge

See DROPS video: How to make a gauge tension swatch

The required amount of yarn is provided in grams, eg: 450 g. To calculate how many balls you’ll need you first need to know how many grams are in 1 ball (25g, 50g or 100g). This information is available if you click on the individual yarn quality on our pages. Divide the amount required with the amount of each ball. For example, if each ball is 50g (the most common amount), the calculation will be as follows: 450 / 50 = 9 balls.

The important thing when changing from one yarn to another is that the knitting/crochet tension remains the same. This is so that the measurements of the finished piece will be the same as on the sketch provided. It is easier to achieve the same knitting tension using yarns from the same yarn group. It is also possible to work with multiple strands of a thinner yarn to achieve the knitting tension of a thicker one. Please try our yarn converter. We recommend you to always work a test swatch.

Please NOTE: when changing yarn the garment might have a different look and feel to the garment in the photo, due to individual properties and qualities of each yarn.

See DROPS lesson: Can I use a different yarn than the one mentioned in the pattern?

All our yarns are categorised into yarn groups (from A to F) according to thickness and knitting tension – group A contains the thinnest yarns and group F the thickest. This makes it easier for you to find alternative yarns to our patterns, should you wish to switch yarn. All yarns within the same group have a similar knitting tension and can easily replace each other. However, different yarn qualities have different structures and properties which will give the finished work a unique look and feel.

Click here for an overview of the yarns in each yarn group

At the top of all our patterns you’ll find a link to our yarn converter, which is a helpful tool should you wish to use a different yarn than suggested. By filling in the yarn quality you wish to replace, the amount (in your size) and number of strands, the converter will present good alternative yarns with the same knitting tension. Additionally it will tell you how much you’ll require in the new qualities and whether you’ll need to work with multiple strands. Most skeins are 50g (some are 25g or 100g).

If the pattern is worked with multiple colours, every colour will have to be converted separately. Similarly, if the pattern is worked with several strands of different yarns (for example 1 strand Alpaca and 1 strand Kid-Silk) you will have to find alternatives for each, individually.

Click here to see our yarn converter

Since different yarns have different qualities and textures we have chosen to keep the original yarn in our patterns. However, you can easily find options among our available qualities by using our yarn converter, or simply pick a yarn from the same yarn group.

It is possible that some retailers still have discontinued yarns in stock, or that someone has a few skeins at home that they would like to find patterns for.

The yarn converter will provide both alternative yarn as well as required amount in the new quality.

If you think it's hard to decide what size to make, it can be a good idea to measure a garment you own already and like the size of. Then you can pick the size by comparing those measures with the ones available in the pattern's size chart.

You'll find the size chart at the bottom of the pattern.

See DROPS lesson: How to read size chart

The needle size provided in the pattern serves only as a guide, the important thing is to follow the knitting tension. And since knitting tension is very individual, you will have to adjust the needle size to ensure that YOUR tension is the same as in the pattern – maybe you’ll have to adjust 1, or even 2 needle sizes, up or down to achieve the correct tension. For this, we recommend that you work test swatches.

Should you work with a different knitting tension than the one provided, the measurements of the finished garment might deviate from the measurement sketch.

See DROPS lesson: How to measure your tension/gauge

See DROPS video: How to make a gauge tension swatch

Working a garment top-down provides more flexibility and room for personal adjustment. For example it is easier to try the garment on while working, as well as making adjustments to length of yoke and shoulder caps.

The instructions are carefully explaining every step, in the correct order. Diagrams are adjusted to the knitting direction and are worked as usual.

The diagram depicts all rows/rounds, and every stitch seen from the right side. It is read from bottom to top, from right to left. 1 square = 1 stitch.

When working back and forth, every other row is worked from the right side and every other row is worked from the wrong side. When working from the wrong side, the diagram will have to be worked reversed: from left to right, knit stitches are purled, purl stitches are knit etc.

When working in the round every round is worked from the right side and the diagram are worked from right to left on all rounds.

See DROPS lesson: How to read knitting diagrams

The diagram depicts all rows/rounds, and every stitch seen from the right side. It is worked from bottom to top, from right to left.

When working back and forth every other row is worked from the right side: from right to left and every other row is worked from the wrong side: from left to right.

When working in the round, every row in the diagram are worked from the right side, from right to left.

When working a circular diagram you start in the middle and work your way outwards, counter clockwise, row by row.

The rows usually start with a given number of chain stitches (equivalent to the height of the following stitch), this will either be depicted in the diagram or explained in the pattern.

See DROPS lesson: How to read crochet diagrams

Instructions for working several diagrams after each other on the same row/round, will often be written like so: “work A.1, A.2, A.3 a total of 0-0-2-3-4 times". This means you work A.1 once, then A.2 is worked once, and A.3 is repeated (in width) the number of times provided for your size – in this case like so: S = 0 times, M = 0 times, L=2 times, XL= 3 times and XXL = 4 times.

The diagrams are worked as usual: begin with the first row in A.1, then work the first row in A.2 etc.

See DROPS lesson: How to read knitting diagrams

See DROPS lesson: How to read crochet diagrams

The total width of the garment (from wrist-to-wrist) will be larger in the larger sizes, despite the actual sleeves being shorter. The larger sizes have longer sleeve caps and wider shoulders, so there will be a good fit in all sizes.

The measurement sketch/schematic drawing provides information regarding the full length of the garment. If it’s a jumper or a jacket the length is measured from the highest point on the shoulder (usually closest to the neckline), and straight down to the bottom of the garment. It is NOT measured from the tip of shoulder. Similarly, the length of yoke is measured from the highest point on the shoulder and down to where yoke is split into body and sleeves.

See DROPS lesson: How to read a schematic drawing

Diagrams are often repeated on the round or in height. 1 repeat is the diagram the way it appears in the pattern. If it says to work 5 repeats of A.1 in the round, then you work A.1 a total of 5 times after/next to each other in the round. If it says to work 2 repeats of A.1 vertically/in height you work the entire diagram once, then begin again at the start and work the entire diagram one more time.

Chain stitches are slightly narrower than other stitches and to avoid working the cast-on edge too tight, we simply chain more stitches to begin with. The stitch count will be adjusted on the following row to fit the pattern and measurement sketch.

The rib edge is more elastic and will contract slightly compared to, for example, stocking stitch. By increasing before the rib edge, you avoid a visible difference in width between the rib edge and the rest of the body.

It’s very easy to cast off too tightly, and by making yarn overs while casting off (and simultaneously casting these off) you avoid a too tight cast off edge.

See DROPS video: How to bind off with yarn overs (yo)

To achieve an even increase (or decrease) you can increase on, for example: every 3rd and 4th row alternately, like so: work 2 rows and increase on the 3rd row, work 3 rows and increase on the 4th. Repeat this until the increase is complete.

See DROPS lesson: Increase or decrease 1 st on every 3rd and 4th row alternately

Should you prefer to work in the round instead of back and forth, you may of course adjust the pattern. You’ll need to add steeks mid-front (usually 5 stitches), and follow the instructions. When you would normally turn and work from the wrong side, simply work across the steek and continue in the round. At the end you’ll cut the piece open, pick up stitches to work bands, and cover the cut edges.

See DROPS video: How to knit steeks and cut open

Should you prefer to work back and forth instead of in the round, you may of course adjust the pattern so you work the pieces separately and then assemble them at the end. Divide the stitches for the body in 2, add 1 edge stitch in each side (for sewing) and work the front and back pieces separately.

See DROPS lesson: Can I adapt a pattern for circular needles into straight needles?

Pattern repeats can vary slightly in the different sizes, in order to get the correct proportions. If you’re not working the exact same size as the garment in the photo, yours might deviate slightly. This has been carefully developed and adjusted so that the complete impression of the garment is the same in all sizes.

Make sure to follow instructions and diagrams for your size!

If you have found a pattern you like which is available in women’s size it’s not very difficult to convert it to men’s size. The biggest difference will be the length of sleeves and body. Start working on the women size that you think would fit across the chest. The additional length will be worked right before you cast off for the armhole/sleeve cap. If the pattern is worked top-down you can add the length right after the armhole or before the first decrease on sleeve.

Regarding additional yarn amount, this will depend on how much length you add, but it is better with a skein too many than too few.

All yarns will have excess fibres (from production) that might come off as lint or shedding. Brushed yarns (ie hairier yarns) have more of these loose, excess fibres, causing more shedding.

Shedding also depends on what is worn under or over the garment, and whether this pulls at the yarn fibres. It’s therefore not possible to guarantee that there will be no shedding

Below are some tips on how to get the best result when working with hairier yarns:

1. When the garment is finished (before you wash it) shake it vigorously so the looser hairs come off. NOTE: do NOT use a lint roller, brush or any method that pulls at the yarn.

2. Place the garment in a plastic bag and put it in your freezer - the temperature will cause the fibres to become less attached to each other, and excess fibres will come off easier.

3. Leave in the freezer for a few hours before taking it out and shaking it again.

4. Wash the garment according to the instructions on the yarn label.

Pilling is a natural process that happens to even the most exclusive of fibers. It's a natural sign of wear and tear that is hard to avoid, and that is most visible in high friction areas of your garment like a sweater's arms and cuffs.

You can make your garment look as new by removing the pilling, using a fabric comb or a pill/lint remover.

Still can't find the answer you need? Then scroll down and leave your question so one of our experts can try to help you. This will be done normally within 5 to 10 working days.
In the meantime, you can read the questions and answers that others have left to this pattern or join the DROPS Workshop on Facebook to get help from fellow knitters/crocheters!

You might also like...

Post a comment to pattern DROPS Children 23-15

We would love to hear what you have to say about this pattern!

If you want to leave a question, please make sure you select the correct category in the form below, to speed up the answering process. Required fields are marked *.

Comments / Questions (31)

country flag Karin Jørgensen wrote:

Tak for hurtigt svar👍 Det passer fint med 11 masker mellem hvert mønster. Vil det sige, at mønsteret "rykker" sig, i forhold til de foregående mønstre.. spidser ikke støde mod spidserne nedenunder osv.. altså, hvis du forstår?

10.12.2015 - 10:30

DROPS Design answered:

Hej Karin, Mønsteret kommer til at ligge lige over hinanden, nøjagtig som i diagrammet. God fornøjelse!

10.12.2015 - 15:15

country flag Karin Jørgensen wrote:

Spørgsmål vedr. DROPS Design: Model nr u-058-bn Jeg er nu nået til 14. række i mønster A1, str. 9/10. Jeg kan ikke få mønsteret til at passe. det starter fint med 5 naturhvid, 1 lys beige - men så går det galt. Hvis jeg så strikker 5 naturhvid (som der står i mønsteret), så passer mønsteret ikke, da jeg pga indtagninger kun har 4 masker imellem. Hvordan kommer jeg videre? Venlig hilsen Karin

09.12.2015 - 13:02

DROPS Design answered:

Hej Karin, Du starter med 14 masker nederst i diagrammet, tager ind i højre side på første pind, i venstre side på 5.p og i højre side på 11.p. Det vil sige at du nu har 14-3=11 m i diagrammet, hvilket stemmer med 5 natur,1 lysbeige, 5 natur. Hvis du sætter et mærke i mellem hver 14.m på første pind, flytter mærket for hver gang du tager ind, så er du sikker på at du altid har det rigtige antal masker i hver rapport hele vejen rundt. God fornøjelse!

09.12.2015 - 13:47

country flag Carolyn Ten Holter wrote:

Hello It would be helpful if the yarn requirement for the main colour specified a unit (it just says 250-300-300... etc). I assumed it was metres, then realised (as I was knitting it and ran out of yarn very quickly) that in fact it was grammes. thank you Carolyn

21.10.2015 - 10:45

country flag Anette wrote:

Klør dette garnet??;)

11.05.2015 - 13:11

DROPS Design answered:

Hei Anette. Det er efter min mening, dejlig blödt. Men det er helt afhaengigt af hvor fölsom du er overfor uldgarn. Det bedste du kan göre er at besöge en af vores butikker og saa föle selv.

11.05.2015 - 13:14

country flag Elena Iniesta wrote:

No se que significa la abreviatura rem que hace referencia el patrón al llegar a las sisas. Alguien sabría decirme que hay que hace? Gracias

17.01.2015 - 11:37

DROPS Design answered:

Hola Elena. Rematar (rem) = cerrar los pts (en este caso para la sisa).

17.01.2015 - 23:51

country flag Kerstin Lundqvist wrote:

Jag undrar om mönstret på oket. När man minskar som beskrivningen säger så stämmer inte mönstret. När du minskar så blir det 4 maskor grundfärg på varannat mönster och på nästa varv ska det vara tre maskor mellan och det går inte att få.

17.02.2014 - 08:40

DROPS Design answered:

Hej Kerstin. Er det er i 5e v i A.1? Mönstret er korrekt, du har 4 maskor grundfärg og ikke 3. Der er 1 streg för sammenstrikningen og 3 efter.

21.02.2014 - 10:52

country flag Janet wrote:

Super schöne Jacke, habe andere Farben genommen, die etwas freundlicher und mädchenhafter waren. Sitzt perfekt!!!Danke

20.12.2013 - 22:48

country flag Agnes Savigny wrote:

Il est conseillé de monter 36m pour les manches (t.5/6) ça parait très petit! pour les autres pull fait en karisma c'est environ 10m de plus. est-ce vraiment ça ou il y a une petite erreur?

31.08.2013 - 14:12

DROPS Design answered:

Bonjour Mme Savigny, le nombre de mailles est correct, après les côtes 2/2 (qui resserrent les mailles), on diminue 4 m et on continue en jersey tout en augmentant régulièrement sous la manche pour atteindre 50 m. Bon tricot!

02.09.2013 - 09:57

country flag Michaela wrote:

Hej! Jag har nu 76m på st enligt beskrivning under OK:. Jag har stickat framkanterna och skulle nu börja med d HALSKANT men då står det sticka upp ca 70 till 86 m runt halsen (också över framkanterna).... Jag undrar hur ni tänkt detta?

24.07.2013 - 10:34

DROPS Design answered:

Du sätter maskorna från tråden tillbaka på stickan, justerar så du har ca 86 m (största st) och ökar enligt beskrivningen.

10.10.2013 - 08:26

country flag Raffaella wrote:

Scusate ma non capisco cosa vuol dire che nel davanti bisogna portare il n. delle maglie nelle 2 taglie piu' grandi.Grazie

14.03.2013 - 14:23

DROPS Design answered:

Ora è stato modificato. Anziché portare abbiamo scritto aggiustare il n di m. Se vede nelle 2 taglie più grandi ci sono 176-192 m, ma in queste 2 taglie bisogna aggiustare questo numero a 175-191 (quindi diminuire-aumentare). Grazie per la segnalazione.

14.03.2013 - 15:32