
Popular categories
Looking for a yarn?


|
||||||||||||||||||||||
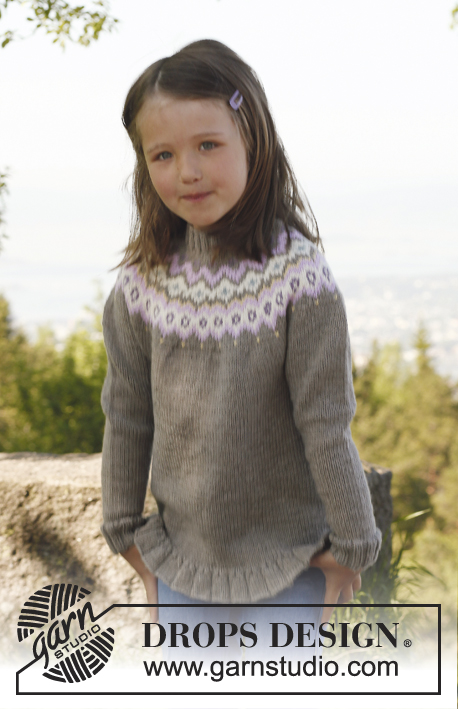
Silje jacket |
||||||||||||||||||||||
 |
 |
|||||||||||||||||||||
Knitted jacket with round yoke and flounce in DROPS Karisma. Size children 3 to 12 years.
DROPS Children 23-15 |
||||||||||||||||||||||
|
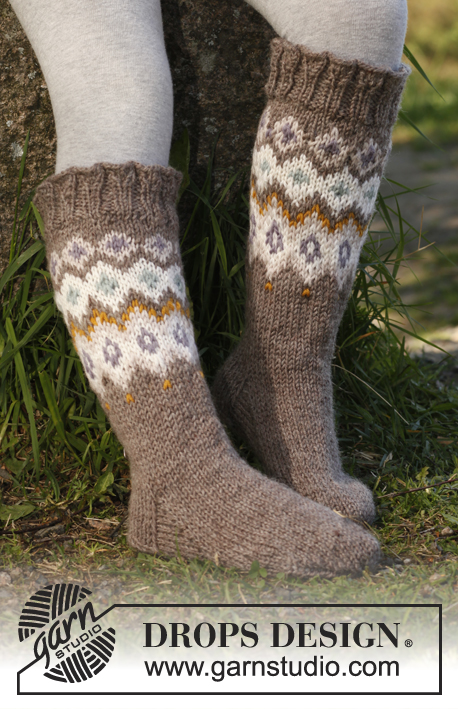
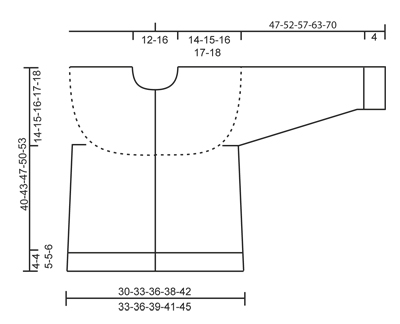
GARTER ST (back and forth on circular needle): K sts on all rows. DECREASE TIP (applies to sides of body): Dec as follows before marker: K 2 tog. Dec as follows after marker: Slip 1 st as if to K, K 1, psso. PATTERN: See diagram A.1 – choose diagram for correct size. Work entire pattern in stockinette st. ---------------------------------------------------------- BODY: Worked back and forth on circular needle from mid front. Cast on 280-304-328-352-384 sts (includes 1 edge st in each side towards mid front) on circular needle size 3.5 mm / US 4 with beige brown Karisma. Work first row as follows from RS: 1 edge st in GARTER ST - see explanation above - * K 6, P 2 *, repeat from *-* until 7 sts remain and finish with K 6 and 1 edge st in garter st. Continue rib like this for 3-3-4-4-5 cm / 1"-1"-1½"-1½"-2" – adjust so that next row is worked from RS. Now dec 1 st on each side of every K-section by working all 6 K sts as follows (2 P sts are worked as before): Slip 1 st as if to K, K 1, psso, K until 2 sts remain, K 2 tog. Repeat dec on next row from RS = 140-152-164-176-192 sts. Work 1 row with K over K and P over P. Switch to circular needle size 4 mm / US 6 and K 1 row from RS while AT THE SAME TIME adjusting no of sts in the 2 largest sizes to 140-152-164-175-191 sts. Now insert 2 markers in the piece, 35-38-41-44-48 sts in from each side (= 70-76-82-87-95 sts between markers on back piece). Then work in stockinette st with 1 edge st in garter st in each side towards mid front. When piece measures 7-8-8-9-9 cm / 2¾"-3"-3"-3½"-3½", dec 1 st on each side of both markers – READ DECREASE TIP (= 4 sts dec). Repeat dec every 7-7-8-8-9 cm / 2¾"-2¾"-3"-3"-3½"- 2 more times = 128-140-152-163-179 sts. When piece measures 26-28-31-33-35 cm / 10¼"-11"-12¼"-13"-13¾", bind off 6 sts in each side for armholes (i.e. 3 sts on each side of both markers) = 58-64-70-75-83 sts on back piece and 29-32-35-38-42 sts on each front piece. Put piece aside and knit the sleeves. SLEEVE: Worked in the round on double pointed needles. Cast on 36-36-40-44-44 sts on double pointed needles size 3.5 mm / US 4 with beige brown. Work rib (= K 2/P 2). When piece measures 4 cm / 1½", K 1 round while AT THE SAME TIME dec 4-4-4-8-8 sts evenly = 32-32-36-36-36 sts. Switch to double pointed needles size 4 mm / US 6 and work in stockinette st. Insert a marker at beg of round (= mid under sleeve). When piece measures 7 cm / 2¾", inc 2 sts mid under sleeve (i.e. 1 st on each side of marker). Repeat inc every 2-2-2½-2½-2½ cm / ¾"-¾"-⅞"-⅞"-⅞", 8-11-10-12-14 more times = 50-56-58-62-66 sts. When piece measures 27-31-34-39-44 cm / 10⅝"-12¼"-13⅜"-15¼"-17¼", bind off 6 sts mid under sleeve (i.e. 3 sts on each side of marker) = 44-50-52-56-60 sts remain on sleeve. Put piece aside and knit another sleeve. YOKE: Slip sleeves on to same circular needle as body where armholes were bound off = 204-228-244-263-287 sts. Work 3-4-2-3-4 cm / 1⅛"-1½"-¾"-1⅛"-1½" in stockinette st with 1 edge st in garter st in each side with beige brown. AT THE SAME TIME dec 5-1-3-8-4 sts evenly on last row = 199-227-241-255-283 sts. Then work next row as follows from RS: 1 edge st in garter st, work diagram A.1 until 2 sts remain on needle (= 14-16-17-18-20 repetitions), work 1st st in A.1 (i.e. this st follows the pattern so that A.1 beg and ends the same way inside edge st in each side towards mid front but do not dec in this st), finish with 1 edge st in garter st as before. Continue the pattern like this. After A.1 87-99-105-111-123 sts remain on needle. P 1 row from WS. Then work an elevation in the back of neck with short rows as follows (1st row = RS): K until 18-19-20-22-26 sts remain, turn, tighten thread and P until 18-19-20-22-26 sts remain in the other side. Turn, tighten thread and K until 36-38-40-44-52 sts remain, turn, tighten thread and P until 36-38-40-44-52 sts remain in the other side, turn, tighten thread and K the rest of row. Then P 1 row from WS while AT THE SAME TIME dec 27-35-37-39-47 sts evenly = 60-64-68-72-76 sts. Piece measures approx. 40-43-47-50-53 cm / 15¾"-17"-18½"-19¾"-21" up to shoulder. Put sts on a thread or stitch holder (or keep them on the needle), while working the front bands. BAND: Pick up from RS approx. 84 to 112 sts along right front piece inside 1 edge st on circular needle size 3.5 mm / US 4 with beige brown. P 1 row from WS while AT THE SAME TIME inc evenly to 101-105-113-121-129 sts. Work next row as follows from RS: 2 edge sts in garter st, * K 2, P 2 *, repeat from *-* until 3 sts remain and finish with K 2 and 1 edge st in garter st. Continue rib like this. AT THE SAME TIME after 1 cm / ⅜", bind off for 5-5-6-6-6 button holes evenly. 1 button hole = work 2 sts tog and make 1 YO (binding off P 2 seen from RS will look more pretty). Upper button hole should be approx. 0.5-1 cm / ¼"-½" from neck edge and bottom hole approx. 4-4-5-5-6 cm / 1½"-1½"-2"-2"-2⅜" from bottom edge. When band measures 2.5 cm / ⅞", bind off with K over K and P over P. Repeat along left front piece but do not bind off for button holes on left band. NECK: Pick up from RS approx. 70 to 86 sts around the neck (also over bands) on circular needle size 3.5 mm / US 4 with beige brown. P 1 row from WS while AT THE SAME TIME inc evenly to 78-82-86-90-94 sts. Work next row as follows from RS: 2 edge sts in garter st, * K 2, P 2 *, repeat from *-* until 4 sts remain and finish with K 2 and 2 edge sts in garter st. Continue rib like this. When neck edge measures approx. 2.5 cm / ⅞", loosely bind off K over K and P over P. ASSEMBLY: Sew the openings under the sleeves. Sew on buttons. --------------------------------------------------------- Jumper - see pattern SmåDrops 23-16 --------------------------------------------------------- Socks - see pattern SmåDrops 23-17 --------------------------------------------------------- |
||||||||||||||||||||||
Diagram explanations |
||||||||||||||||||||||
|
||||||||||||||||||||||

|
||||||||||||||||||||||
|
||||||||||||||||||||||
|
Have you made this or any other of our designs? Tag your pictures in social media with #dropsdesign so we can see them! Do you need help with this pattern?You'll find tutorial videos, a Comments/Questions area and more by visiting the pattern on garnstudio.com. © 1982-2024 DROPS Design A/S. We reserve all rights. This document, including all its sub-sections, has copyrights. Read more about what you can do with our patterns at the bottom of each pattern on our site. |
||||||||||||||||||||||


With over 40 years in knitting and crochet design, DROPS Design offers one of the most extensive collections of free patterns on the internet - translated to 17 languages. As of today we count 304 catalogs and 11422 patterns - 11417 of which are translated into English (US/in).
We work hard to bring you the best knitting and crochet have to offer, inspiration and advice as well as great quality yarns at incredible prices! Would you like to use our patterns for other than personal use? You can read what you are allowed to do in the Copyright text at the bottom of all our patterns. Happy crafting!
Comments / Questions (31)
Er det riktig at det skal legges opp så mange masker på bolen ?
15.03.2018 - 19:13DROPS Design answered:
Hej Astrid, ja det stemmer, det er fordi der er en lille volangkant nederst på jakken. God fornøjelse!
16.03.2018 - 15:19Hej! Jag har stickatbojet klart Strl 7/9 efter de förkortade varven ska man minska 37 maskor på varvet men då blir det 10 för många enl. mönster hyr tänker ni fortsättningen ?
09.02.2017 - 15:23DROPS Design answered:
Hej Gunilla. Det forstaar jeg ikke. Du havde 105 m og har strikket forhöjning midt bag med forkortede p. Og saa strikker du 1 p fra vrangen over alle m samtidig med du tager 37 m ind = 68 m tilbage. Det er som der staar i opskriften.
13.02.2017 - 14:50Bonjour, je ne comprends pas les dimensions : j'ai fait les côtes 6-2 et quelques rangs de jersey après les diminutions et c'est immense : pour un 7-8 ans j'ai une dimension de 1 mètre alors que su le schéma je comprends que je devrais avoir 75 cm. Dois, je recommencer avec moins de mailles ? Mon échantillon 10x10 semblait bon , même si je sais que je tricote plutôt lâche mais il vaut mieux avec les aiguilles circulaires Merci pour votre réponse Marie
23.01.2017 - 18:54DROPS Design answered:
Bonjour Mme Thouvenin, si votre échantillon est juste alors vous aurez les mesures du schéma, en taille 7/8 ans, vous avez 164 m jersey soit 78 cm de largeur totale = 39 cm de large comme indiqué dans le schéma. Bon tricot!
24.01.2017 - 09:24Vedr. Silje jaket kan den strikkes i dobbelt coast garn
18.05.2016 - 17:07DROPS Design answered:
Hej Vivi. Hvis du vil bruge et alternativt (ikke DROPS) garn, er det nemmest du kontakter den butik du vil köbe det i og bede om hjaelp til at vaelge det rette alternativ.
19.05.2016 - 13:23Bonjour, Je suis débutante en jacquard. Est-ce que vous pourriez m'orienter pour la technique à utiliser svp quand on a plusieurs coloris comme ce modèle? Par exemple, est-ce que l'on doit faire suivre tous les fils sous le travail (tisser), ou est-ce une autre technique? Merci pour votre aide!
18.05.2016 - 03:54DROPS Design answered:
Bonjour Véronique, dans ce modèle, on utilise plusieurs couleurs mais seulement un maximum de 2 par rang de jacquard - voir méthode en vidéo ci-dessous. Bon tricot!
18.05.2016 - 09:20Hallo, ich würde gerne dieses Jäckchen mit der Cotton Merino stricken, die je eine viel längere Lauflänge hat. Inwieweit muss ich diese Anleitung abändern? Die beiden Garne sind ja in der gleichen Garngruppe ... Viele Grüße Mia Rudrof
10.03.2016 - 08:44DROPS Design answered:
Liebe Mia, da Sie keine Grösse angeben, sende ich Ihnen hier die Info, wo Sie die Formel zum Ausrechnen finden: Garne / DROPS Garngruppen - dort ist der Link zu den FAQ und dort wiederum ist es Frage 5: Kann ich ein anderes Garn benutzen als in der Anleitung angegeben? Die Anleitung müssen Sie nicht abändern, wenn Sie innerhalb einer Garngruppe austauschen, nur die Lauflänge des Garns beachten.
10.03.2016 - 09:30Bonsoir, Je vous remercie des consignes ,je vais pouvoir continuer le gilet pour ma petite fille . cordialement
11.02.2016 - 21:53Bonsoir, j'ai réessayé de refaire le 5ème rg , donc j'ai 1 fois 5ms puis je fais les diminutions à la 12ème m et après je me trouve avec 4ms ,en beige brun ,donc sur le rg j' ai 1fs 5ms et 1fs 4ms ou est le problème? d' après vos explications il faut à chaque fois 5ms entre le jacquard , est-ce qu' au début du rg il faut ajouter la maille lisière? je vous remercie pour la réponse, cordialement
10.02.2016 - 21:21DROPS Design answered:
Bonjour Mme Cosme, au 5ème rang, tricotez: *3 m beige brun, 1 m beige clair, 5 m beige brun, 1 m beige clair, 1 m beige brun, 2 m ens à l'end en beige brun*. En répétant ce motif tout le tour, vous avez bien à la fin du tour: *3 m beige brun, 1 m beige clair, 5 m beige brun, 1 m beige clair, 2 m beige brun* - soit 5 m beige brun entre 2 m beige clair (sauf au début et à la fin du rang). Bon tricot!
11.02.2016 - 10:16Je fais le silje jacket by drops design en 5/6. au 5ème rgs le jacquard n' est pas régulier, c' est à dire lorsque je fais la diminution au bout de la 11ème m le jacquard n' est plus régulier et également au rg suivant, comment faut-il faire pour avoir pour que cela tombe juste ? merci de me donner la réponse , Cordialement
06.02.2016 - 17:01DROPS Design answered:
Bonjour Mme Cosme, répétez bien le diagramme en largeur, ainsi après la diminution du rang 5, vous avez bien 5 m dans la couleur du fond (beige brun) entre chaque maille en couleur du jacquard (beige clair). Placer un marqueur entre chaque motif à répéter peut bien aider à vérifier ses mailles. Bon tricot!
09.02.2016 - 10:00Så faldt ti-øren😀
10.12.2015 - 16:52