
Popular categories
Looking for a yarn?


|
|||||||||||||||||||||||||||||||
Solveig |
|||||||||||||||||||||||||||||||
|
|
|||||||||||||||||||||||||||||||
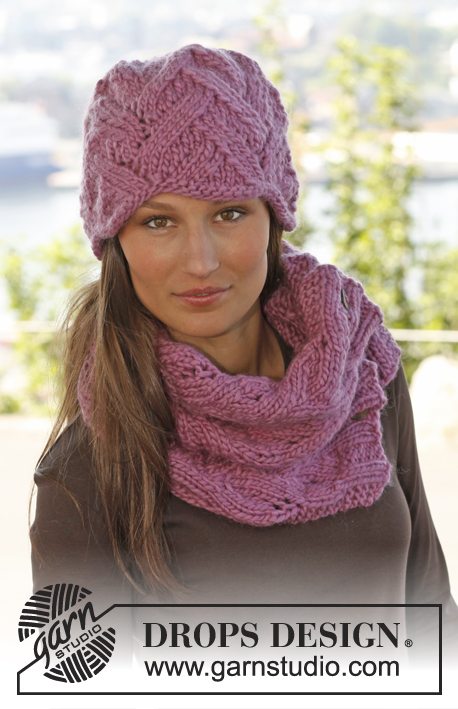
Knitted DROPS hat, neck warmer and mittens with lace pattern in ”Nepal”.
DROPS 142-17 |
|||||||||||||||||||||||||||||||
|
HAT AND NECKWARMER: PATTERN: See diagrams A.1 to A.6. Diagrams show pattern from RS. GARTER ST (back and forth on needle): K all rows. 1 ridge = 2 rows K. -------------------------------------------------------- HAT: Worked in the round. Cast on 98 sts on circular needle size 3 mm with Nepal and K 1 round. Then work rib according to diagram A.1 (= 2 repetitions on round). When A.1 has been worked 1 time vertically, switch to circular needle size 4 mm. Then work PATTERN according to diagram A.2. When piece measures approx. 21 cm – adjust after one whole repetition vertically of lace pattern, work and dec according to diagram A.3 (= 2 repetitions on round) – switch to double pointed needles when needed. When A.3 has been worked 1 time vertically, 24 sts remain on round. K all sts twisted tog 2 by 2. Cut the thread and pull it through the remaining sts, tighten tog and fasten. The hat measures approx. 26 cm vertically. NECK WARMER: Worked back and forth on needle. Cast on 40-44 sts on needle size 4.5 mm with Nepal. K 4 rows (1st row = RS) – AT THE SAME TIME on 3rd row inc 5-5 sts evenly (do not inc over the outermost 2 sts in each side) = 45-49 sts. Work next row as follows from RS: 2 edge sts in GARTER ST – see explanation above, work A.4 (= 6 sts), P 2-3, A.5 (= 6 sts), P 2-3, A.6 (= 9 sts), P 2-3, A.4, P 2-3, A.5 and 2 edge sts in GARTER ST. Continue pattern like this (from WS K the 2-3 sts between every diagram). When piece measures approx. 71-75 cm – adjust after one whole repetition vertically of lace pattern in the middle, K 4 rows – AT THE SAME TIME dec 5-5 sts evenly on 1st row = 40-44 sts. Then cast off with K from WS. ASSEMBLY: Place the 2 ends on top of each other so that the tip at the front is double. Sew cast off edge edge to edge with the outer side of one long side, and cast on edge edge to edge with outer side in the other side. -------------------------------------------------------- MITTENS: PATTERN: See diagram A.7. Diagram shows all rows in pattern. INCREASE TIP: Inc 1 st by making 1 YO, on next round K YO twisted to avoid holes. DECREASE TIP: Dec as follows (beg 3 sts before marker): K 2 tog, K 2 (marker is between these 2 sts), slip 1 st as if to K, K 1, psso. -------------------------------------------------------- RIGHT MITTEN: Cast on 40-40 sts on double pointed needles size 3 mm with Nepal and K 1 round. Then work rib (= K 2/P 2). When rib measures 6-7 cm, work next round as follows: * K 5, K the next 2 tog *, repeat from *-* 2 more times, K 1, P 2, * K 2 tog, K 2 *, repeat from *-* 1 more time, K 2 tog, P 2 and finish with K 4 = 34-34 sts. Switch to double pointed needles size 4 mm, work next round as follows: 19 sts in stocking st (= inside hand), A.7 (= 11 sts) and 4 sts in stocking st. Continue the pattern like this. When piece measures 8-9 cm, inc 1 st on each side of first st on round for thumb - READ INCREASE TIP. Repeat inc on each side of the inc sts every other round 4-5 more times = 44-46 sts. Now slip the 11-13 thumb sts on a stitch holder. Continue in the round as before while AT THE SAME TIME casting on 1 new st behind thumb on next round = 34-34 sts. When mitten measures approx. 21-23 cm (try the mitten on, approx. 4 cm remain until finished measurements), insert 1 marker after the first 16 sts on round and 1 marker after the next 17 sts (1 st remains on round after last marker). Now dec 1 st on each side of both markers - READ DECREASE TIP. Repeat dec every other round 2 more times and then every round a total of 3 times = 10 sts remain on needle – NOTE: When there is not room for more repetitions of A.7 vertically, finish the pattern after one whole repetition vertically, then work in stocking st over the remaining sts in pattern until dec are done. Cut the thread and pull it through the remaining sts, tighten tog and fasten. THUMB: Slip the 11-13 thumb sts from stitch holder back on double pointed needles size 4 mm. In addition knit up 4-3 sts behind thumb = 15-16 sts. Work in stocking st in the round until the thumb itself measures approx. 4½-5 cm (try on the mitten, approx. ½ cm remain until finished measurements). K 2 rounds while AT THE SAME TIME K all sts tog 2 by 2 on both rounds = 4-4 sts remain on needle. Cut the thread and pull it through the remaining sts, tighten tog and fasten. LEFT MITTEN: Cast on and work as right mitten but reversed. I.e. beg rib with P 2 (instead of K 2). Work 1st round after rib as follows: K 4, P 2, * K 2 tog, K 2 *, repeat from *-* 1 more time, K 2 tog, P 2, K 1, * K 2 tog, K 5 *, repeat from *-* 2 more times. Inc for thumb on each side of last st on round. And before dec at the top of mitten, insert 1st marker after 1st st on round and 2nd marker after the next 17 sts (= 16 sts remain on round after last marker). |
|||||||||||||||||||||||||||||||
Diagram explanations |
|||||||||||||||||||||||||||||||
|
|||||||||||||||||||||||||||||||

|
|||||||||||||||||||||||||||||||

|
|||||||||||||||||||||||||||||||
|
Have you made this or any other of our designs? Tag your pictures in social media with #dropsdesign so we can see them! Do you need help with this pattern?You'll find tutorial videos, a Comments/Questions area and more by visiting the pattern on garnstudio.com. © 1982-2024 DROPS Design A/S. We reserve all rights. This document, including all its sub-sections, has copyrights. Read more about what you can do with our patterns at the bottom of each pattern on our site. |
|||||||||||||||||||||||||||||||


With over 40 years in knitting and crochet design, DROPS Design offers one of the most extensive collections of free patterns on the internet - translated to 17 languages. As of today we count 304 catalogues and 11422 patterns - 11422 of which are translated into English (UK/cm).
We work hard to bring you the best knitting and crochet have to offer, inspiration and advice as well as great quality yarns at incredible prices! Would you like to use our patterns for other than personal use? You can read what you are allowed to do in the Copyright text at the bottom of all our patterns. Happy crafting!
Comments / Questions (20)
In the A2 diagram, the top 2 rows are empty for the central design. How do I knit across? Should I knot across the central design for the top 2 rows? This A2 needs to be repeated several times, so it isn't clear how to knit the top 2 rows for the central design. Any help would be appreciated. Thanks, Kay
12.01.2015 - 18:50DROPS Design answered:
Dear Kay, in A.2 there are 2 different kind of repetition: the cables and the lace pattern, both patterns are not worked over the same number of rows, when the lace pattern in the middle of A.2 is finished, work these sts on next row as in 1st row - when cables are done in height, work these sts as in 1st row and repeat in height as before. Happy knitting!
13.01.2015 - 09:08Cortesemente non riesco a capire cosa significa la casella tutta nera , forse devo fare una diminuzione? grazie mille catia
03.08.2014 - 11:56DROPS Design answered:
Buongiorno Catia. Quando lavora il diagramma A.3 deve saltare le caselle nere. Sono maglie diminuite nei giri precedenti. P.es al giro 4, deve lavorare: 2 m dir, 3 m rov, 4 m dir, 3 m rov e così via. Buon lavoro!
03.08.2014 - 12:23Natalia wrote:
Hello, Could you please help me with diagram A2 rows 11 and 12. What should I do after I knit 2 sts, P4, K6, P4, K2, P2???? Where will be 11 stitches, which after previous row are on my left needle?
26.01.2014 - 06:31DROPS Design answered:
Dear Natalia, when lace pattern is finished repeat the lace pattern from row 1, at the same time, continue cable pattern in A.2 as shown in diagram. Happy knitting!
27.01.2014 - 08:52Hallo, ich habe eine Frage bzgl der Musterzeichnungen. Sind dort nur die Hinreihen gezeichnet oder auch dieRückreihen ? Vielen Dank
22.01.2014 - 12:37DROPS Design answered:
Liebes Froilein Zak, es sind die Hin-und Rück-R dargestellt.
23.01.2014 - 07:48No puedo imprimir el patrón, la foto sí, pero el patrón no.
04.12.2013 - 20:04DROPS Design answered:
Hola Maria Antonia! He entrado en el patrón por si había algún error pero funciona bien. Pinchas en imprimir patrón y te salta una imagen de promoción, en la parte superior derecha aparece en letra pequeña "imprime el patrón" y al pinchar ahí te salen las 5 hojas de las que consta para que imprimas
06.12.2013 - 21:16Hej, hur är det meningen att man ska sticka de 11 mittersta maskorna i mönster A2? Varför är det helt tomt där?/Annika
14.10.2013 - 22:38Bonjour, pouvez-vous m'aider à comprendre ce qu'il faut faire pour le bonnet à partir du rang 21 (partie A.2)il y a un blanc de la 21ème maille jusqu'à la 32ème, je ne comprends pas pourquoi et ce qu'il faut faire. Merci par avance pour votre réponse. Cordialement. Merci par avance pour votre réponse.
26.11.2012 - 20:40DROPS Design answered:
Bonjour Angélique, dans le diagramme A.2, on répète les torsades et le point ajouré, ainsi, mais ils ne se tricotent pas sur le même nombre de rangs, ainsi, quand le point ajouré est terminé, on reprend au 1er rang du point ajouré dans A2, tout en continuant les torsades de chaque côté comme avant. Bon tricot !
27.11.2012 - 08:59Chiedo anch'io delucidazioni sulle due righe centrali vuote dello schema A2: non ho capito come devo riempirle! Riprendo la prima riga A2? Scusate se han già fatto questa domanda, ma non riesco a tradurre dal tedesco.....
08.11.2012 - 15:41DROPS Design answered:
E' un po' difficile, e ho cercato di chiedere l'aiuto anche dalle mie colleghe. Ti farò sapere molto presto.
21.11.2012 - 15:57In der Anleitung verstehe ich die Auslassung beim Muster A2 ganz oben in der Mitte nicht. Mit einem Mal A2 stricken ist es bei mir nicht getan, um die gewünschten 21cm für die Mütze zu errichen. Eben die Mitte von Reihe 11 und 12 ist mir nicht klar. Über eine baldige Antwort würde ich mich freuen, C. Maushake
03.10.2012 - 16:43DROPS Design answered:
Hallo Frau Maushake, Muster A2 wird nicht nur 1 x gestrickt sondern bis zu einer Höhe von 21 cm. Wenn der Mustersatz in der Mitte beendet ist, beginnen Sie dort wieder mit der ersten R von A2. Der mittlere Mustersatz ist weniger hoch als der seitliche, daher wird es so dargestellt.
04.10.2012 - 09:51Jeg forstår ikke helt mønster A.2 på de to sidste pinde i mønsteret er de midterste masker blanke, det forstår jeg ikke hvordan jeg skal gøre. Er det meningen at man bare lader maskerne være eller hvordan skal man forstå det?
30.08.2012 - 15:29DROPS Design answered:
Over disse 11 m fortsætter du bare med hulmønsteret direkte ifølge 1.p i A.2. Snoningerne i hver side fortsætter du bare på hver 6.pind.
13.12.2012 - 12:29