
Popular categories
Looking for a yarn?


|
|||||||||||||||||||
Sarah's Delight |
|||||||||||||||||||
|
|
|||||||||||||||||||
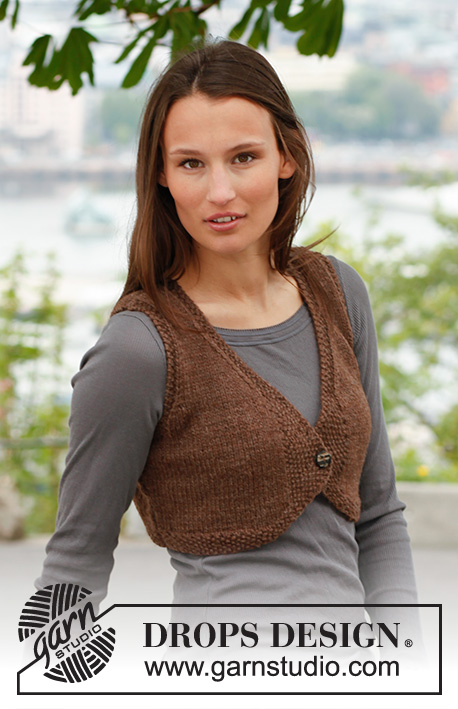
Knitted DROPS vest with cables in ”Karisma”. Size: S - XXXL.
DROPS 141-40 |
|||||||||||||||||||
|
GARTER ST (back and forth on needle): K all rows. 1 ridge = 2 rows K. PATTERN: See diagrams A.1 to A.6. Diagrams show all rows in pattern seen from RS. DECREASE TIP: Dec inside A.4/A.6. All dec are done from RS! Dec as follows before A.6: K 2 tog. Dec as follows after A.4: Slip 1 st as if to K, K 1, psso. BUTTONHOLES: Cast off for buttonholes on right band. 1 buttonhole = K tog third and fourth st from mid front and make 1 YO. Cast off for buttonholes when piece measures: SIZE S: 16, 22 and 28 cm SIZE M: 16, 23 and 29 cm SIZE L: 17, 23 and 30 cm SIZE XL: 18, 24 and 31 cm SIZE XXL: 18, 25 and 32 cm SIZE XXXL: 19, 26 and 33 cm -------------------------------------------------------- BACK PIECE: Worked back and forth on needle. Cast on 86-94-102-114-126-138 sts (incl 1 edge st in each side) on needle size 3 mm with Karisma. Work 5 ridges in GARTER ST - see explanation above. Work next row as follows (from RS): 1 edge st in garter st, K 25-29-33-39-45-51, K 34 sts while AT THE SAME TIME inc 8 sts evenly over these sts, K 25-29-33-39-45-51 and 1 edge st in garter st = 94-102-110-122-134-146 sts. Switch to needle size 4 mm, work next row as follows from WS: 1 edge st in garter st, P 25-29-33-39-45-51, A.1 (= 42 sts), P 25-29-33-39-45-51 and 1 edge st in garter st. Continue with A.1 and in stocking st over 25-29-33-39-45-51 sts and 1 edge st in garter st in each side. AT THE SAME TIME when piece measures 5 cm, dec 1 st in each side, repeat dec every 3 cm 3 more times = 86-94-102-114-126-138 sts. When A.1 has been worked 1 time vertically, continue with A.2 over sts in A.1. AT THE SAME TIME when piece measures 20 cm, inc 1 st in each side, repeat inc every 5-5½-5½-6-6½-6½ cm 3 more times = 94-102-110-122-134-146 sts. When piece measures 38-39-40-41-42-43 cm, cast off for armholes at the beg of every row in each side as follows: 3 sts 1-1-1-2-2-2 times, 2 sts 2-3-4-5-6-8 times and 1 st 2-3-4-4-7-8 times = 76-78-80-82-84-86 sts. When piece measures 50-52-54-56-58-60 cm, dec 8 sts evenly over the middle 42 sts = 68-70-72-74-76-78 sts. On next row from RS work as follows: 9-10-11-12-13-14 sts in stocking st, * P 2, K 2 *, repeat from *-* over the next 48 sts, P 2, 9-10-11-12-13-14 sts in stocking st. When piece measures 52-54-56-58-60-62 cm, cast off the middle 34 sts = 17-18-19-20-21-22 sts remain on each shoulder. Finish each shoulder separately. Continue with 9-10-11-12-13-14 sts in stocking st, P 2, K 2, P 2, K 1 and 1 st in garter st towards the neck, cast off with K over K and P over P when piece measures 54-56-58-60-62-64 cm. RIGHT FRONT PIECE: Cast on 49-53-57-63-69-75 sts (incl 1 edge st in the side) on needle size 3 mm with Karisma. Work as follows – from RS: A.3 (= 14 sts), work in garter st over the last 35-39-43-49-55-61 sts. Continue this pattern until A.3 has been worked 1 time vertically = 51-55-59-65-71-77 sts. Switch to needles size 4 mm. Now work as follows from RS: A.4 (= 16 sts), stocking st over the last 34-38-42-48-54-60 sts, 1 edge st in garter st. Continue this pattern upwards, when piece measures 5 cm, dec in the side as on back piece = 47-51-55-61-67-73 sts. When piece measures 16-16-17-18-18-19 cm, beg cast off for BUTTONHOLES - see explanation above. When piece measures 20 cm, inc in the side as on back piece. AT THE SAME TIME when piece measures 29-30-31-32-33-34 cm, dec 1 st towards mid front - READ DECREASE TIP, repeat dec every cm 22 more times. AT THE SAME TIME when piece measures 38-39-40-41-42-43 cm, cast off and dec for armhole in the side as on back piece. After all cast offs dec for armhole and neck are done, there are 19-20-21-22-23-24 sts on needle. When piece measures approx. 53-55-57-59-61-63-65 cm, dec 2 sts evenly over the cable in A.4 = 17-18-19-20-21-22 sts remain on needle. On next row cast off with K over K and P over P. LEFT FRONT PIECE: Work as right front piece but reversed. Instead of A.3 and A.4 work A.5 and A.6. Do not cast off for buttonholes. ASSEMBLY: Sew the shoulder seams. SLEEVE EDGE: Knit up 90-94-98-102-106-110 sts on needle size 3 mm along the armhole. K 1 row from WS, then work rib K 2/P 2 with 1 edge st in each side. Continue until sleeve edge measures 3 cm, cast off with K over K and P over P. ASSEMBLY: Sew the side seams inside 1 edge st. Sew on buttons. POCKET: Cast on 16 sts on needle size 4 mm with Karisma. Work according to A.6, cast off when piece measures 11 cm. Knit up approx. 23 sts inside last P st from A.6. Work in stocking st with 1 edge st in garter st in each side. Cast off when piece measures 12 cm in total. Knit another pocket. Sew pockets on to the middle of front pieces, directly above the ridges in garter st. |
|||||||||||||||||||
Diagram explanations |
|||||||||||||||||||
|
|||||||||||||||||||

|
|||||||||||||||||||

|
|||||||||||||||||||
|
Have you made this or any other of our designs? Tag your pictures in social media with #dropsdesign so we can see them! Do you need help with this pattern?You'll find tutorial videos, a Comments/Questions area and more by visiting the pattern on garnstudio.com. © 1982-2024 DROPS Design A/S. We reserve all rights. This document, including all its sub-sections, has copyrights. Read more about what you can do with our patterns at the bottom of each pattern on our site. |
|||||||||||||||||||


With over 40 years in knitting and crochet design, DROPS Design offers one of the most extensive collections of free patterns on the internet - translated to 17 languages. As of today we count 304 catalogues and 11422 patterns - 11422 of which are translated into English (UK/cm).
We work hard to bring you the best knitting and crochet have to offer, inspiration and advice as well as great quality yarns at incredible prices! Would you like to use our patterns for other than personal use? You can read what you are allowed to do in the Copyright text at the bottom of all our patterns. Happy crafting!
Comments / Questions (56)
I’m am working on the Right Front Piece and question is about the buttonhole. The patter says to k2tog in 3 and 4 stitch, then YO. The 3rd and 4th stitch are purl, so I P2tog. The button that is supposed to fit this tiny little hole is 20 mm. I could only get a 2.5 mm to fit. How to make a bigger hole, or am I missing something?
25.06.2021 - 19:55DROPS Design answered:
Dear Becky, K2Tog and a yarnover should be anough for that size of button (on the next ro, take care that do not twist the stitch you knit into the yarnover. If it is still too small, try to do a double yarnover, and in the next row knit into the first and drop the second. Happy Stitching!
26.06.2021 - 01:10I am working on the right front piece and am at the direction in the pattern that says "AT THE SAME TIME when piece measures 12 1/4 (my size), dec 1 st towards mid front." I want to clarify what "towards mid front" means. Would I be decreasing in the stockinette section of the front, and doing so close to the patterned section of the front?
04.06.2021 - 06:43DROPS Design answered:
Dear Mrs Clark, the decreases worked mid front are for the V-Neck, ie decrease as explained under DECRASE TIP = after A.4 on right front piece, ie at the beginning of the stocking section after the cable. Happy knitting!
04.06.2021 - 07:14Salve! Volevo avvisare che c'è un errore nella spiegazione del diagramma. Nella quinta riga dove dice. Trasferire 1 m sul f. ausiliario sul dietro del lavoro, 3 m dir (voi indicate 2) poi il resto è giusto.
15.05.2021 - 07:44DROPS Design answered:
Buonasera Anna, grazie per la segnalazione, abbiamo corretto la legenda. Buon lavoro!
15.05.2021 - 22:21Does the front pieces require the 10 rows of garter stitch ribbing as required for the back before starting with the A.3 pattern?
07.05.2021 - 01:28DROPS Design answered:
Dear Keri, The cable pattern at the back starts after the garter stitch, but on the front edge starts right after the cast on, because this cable is going allon all the front edge. There is a number of stitches on which a garter stitch edge still knitted, next to the cabled stitch at the edge. So no extra garter stitch needed on the front, just follow the pattern. Happy Knitting!
07.05.2021 - 01:37I’m currently on the back piece and wondering for the armhole decrease and it’s says “cast off for armholes at the beg of every row in each side as follows”, does that mean cast of (x) number of stitches at the BEG and END of row? Or does it mean ONLY beg of every row, so a 1 RS and 1 WS (or vice versa) = 1 set which = 1 times?
25.03.2021 - 00:17DROPS Design answered:
Dear Melody, it means, the beginning of EVERY row, so there are cast off on both sides. happy Knitting!
25.03.2021 - 01:51For sides it says when piece measures 20cm inc in the side as on back piece. Does this mean inc 1 stitch OR inc 1 stitch plus repeat inc every (applicable cm) 3 more times. I assume it is once as total number of stitches are not listed for side after increase as it does for back???
30.09.2020 - 18:05DROPS Design answered:
Dear Sylvia, on the side of teh back you increase once and three more times, that is 4 times in total, and so you have to increase 4 times total on the front as well. I hope this helps, Happy Knitting!
01.10.2020 - 00:22Na het opnemen van de steken voor de armsgaten, staat in de beschrijving: brei 1 naald rechts aan de verkeerde kant. Moet dit niet averechts zijn, zodat de rechtse kant aan de goede kant komt? Bedankt!
29.08.2018 - 15:52DROPS Design answered:
Dag Myriam, Nee, het is de bedoeling dat je 1 naald recht aan de verkeerde kant breit; zo is het patroon ontworpen. Maar uiteraard kun je er voor kiezen om een naald averecht aan de verkeerde kant te breien, maar net wat je zelf het mooist vindt :)
31.08.2018 - 12:08Is er geen aparte tekening van het rugpand. Zou het niet mooier geweest zijn als het patroon begint en eindigt met A2?Ook is het patroon niet aangepast aan een grotere of langere maat. Een heel gedoe omdat zelf mooi te verdelen. Wel leuk patroon hoor. Groetjes Mevrouw Bakker.
05.11.2017 - 10:39DROPS Design answered:
Hallo E. Bakker, De afmetingen van het voor- en achterpand, zijn op de v-hals na, verder gelijk, dus deze kunnen in 1 schematekening. Verder is het patroon door onze ontwerpers bedacht met A.2 aan één kant in de confectie maten S t/m XXXL. Je kunt de maat kiezen die het beste in de buurt komt door te vergelijken met een bestaand kledingstuk en evt. naar wens aanpassen, door de hoogte of breedte aan te passen door meer of minder steken op te zetten en te bfreien in de gedeeltes waar geen kabels zitten of meer of minder naalden in de hoogte te breien.
06.11.2017 - 13:12Anne wrote:
Do the diagrams show both right AND wrong side stitches? Please state how to knit stitches on the wrong side, this is not clear in your instructions. Thanks
29.06.2017 - 16:42DROPS Design answered:
Dear Anne, yes, diagrams shows ALL rows in pattern, seen from right side (RS). Please, see instructions above diagrams - RS = right side, WS = wrong side. When you knit cables, purl all stitches on the wrong side. Happy knitting!
29.06.2017 - 17:59Je trouve dommage que l'on ne puisse pas voir le dos du gilet au niveau des épaules. Les cheveux cache tout. J'aurai aimé voir le motif près des épaules.
20.01.2016 - 02:39