
Popular categories
Looking for a yarn?


|
||||||||||||||||||||||
Ulrika |
||||||||||||||||||||||
 |
 |
|||||||||||||||||||||
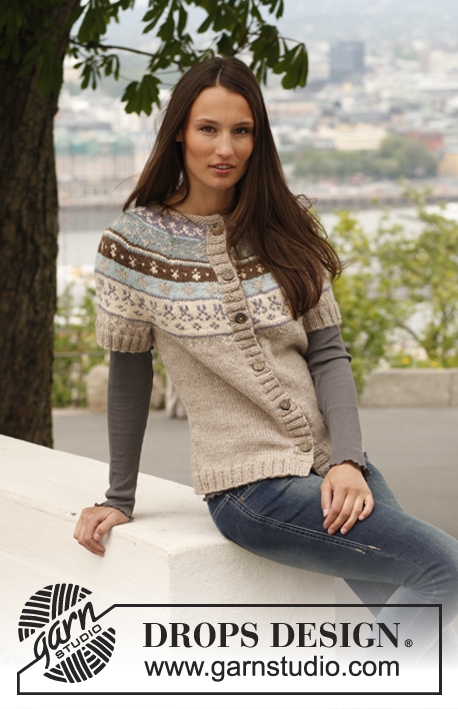
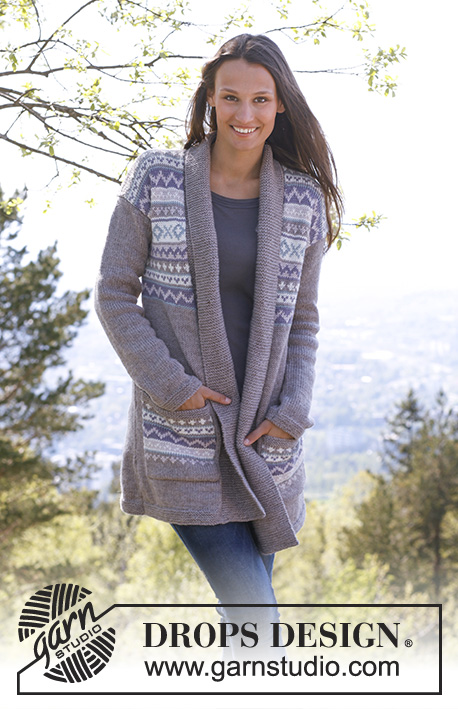
Knitted DROPS jacket with pattern borders and pockets in "Karisma". Size: S - XXXL.
DROPS 142-9 |
||||||||||||||||||||||
|
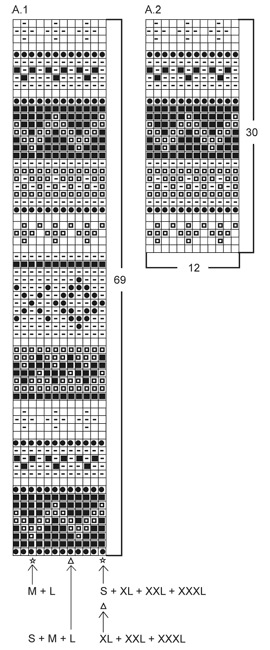
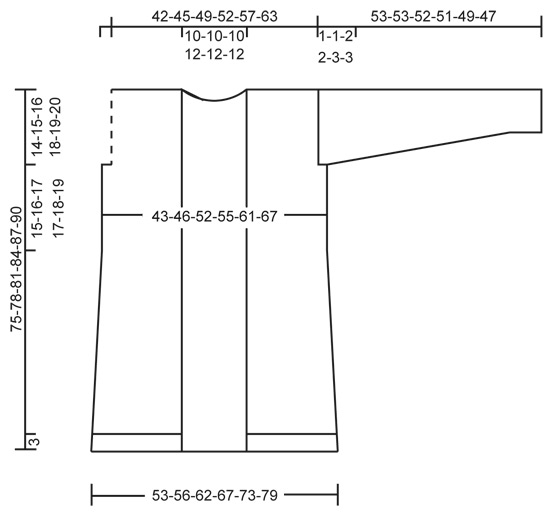
PATTERN: See diagrams A.1 and A.2. Work entire pattern in stockinette st. Beg with st marked with arrow in diagram for correct size - NOTE: The pattern beg differently on front and back piece so that the pattern fits in the side when sewn tog. GARTER ST (back and forth on needle): K all rows. 1 ridge = 2 K rows. ---------------------------------------------------------- BACK PIECE: Cast on 107-113-125-135-147-159 sts (includes 1 edge st in each side) on needle size 3.5 mm / US 4 with light beige brown. Work in GARTER ST - see explanation above. When piece measures 3 cm / 1⅛", switch to needle size 4.5 mm / US 7. Then work in stockinette st with 1 edge st in garter st in each side. REMEMBER THE GAUGE! AT THE SAME TIME when piece measures 4-4-4-5-5-5 cm / 1½"-1½"-1½"-2"-2"-2", dec 1 st in each side. Repeat dec every 3½-3½-3½-3-3-3 cm / 1¼"-1¼"-1¼"-1⅛"-1⅛"-1⅛", 9-9-9-11-11-11 more times = 87-93-105-111-123-135 sts. When piece measures 46-47-48-49-50-51 cm / 18"-18½"-19"-19¼"-19¾"-20", work next row from RS as follows: 1 edge st in garter st, work PATTERN following diagram A.1- see explanation above, until 1 st remains and finish with 1 edge st in garter st (pattern beg and ends the same way in each side inside edge st). When piece measures 61-63-65-66-68-70 cm / 24"-24¾"-25½"-26"-26¾"-27½", bind off 2-2-4-4-5-5 sts at beg of the next 2 rows for armholes = 83-89-97-103-113-125 sts. Continue pattern (make sure that the pattern still fits over each other in repetitions) with 1 edge st in garter st in each side until piece measures approx. 73-76-79-82-85-88 cm / 28¾"-30"-31"-32¼"-33½"-34½" – stop after one full border in pattern. Now finish pattern and work with light beige brown until finished measurements. AT THE SAME TIME on 1st row from RS after pattern, bind off the middle 17-17-17-21-21-21 sts for neck and finish each shoulder separately. Continue to bind off 1 st on next row from neck = 32-35-39-40-45-51 sts remain on the shoulder. Bind off when piece measures 75-78-81-84-87-90 cm / 29½"-30¾"-32"-33"-34¼"-35½". RIGHT FRONT PIECE: Cast on 44-47-53-56-62-68 sts (incl 1 edge st in each side) on needle size 3.5 mm / US 4 with light beige brown. Work in garter st. When piece measures 3 cm / 1⅛", switch to needle size 4.5 mm / US 7. Then work in stockinette st with 1 edge st in garter st in each side. When piece measures 4-4-4-5-5-5 cm / 1½"-1½"-1½"-2"-2"-2", beg dec in the side. Dec in the side as on back piece = 34-37-43-44-50-56 sts. When piece measures 46-47-48-49-50-51 cm / 18"-18½"-19"-19¼"-19¾"-20", work next row from RS as follows: 1 edge st in garter st, work PATTERN following diagram A.1 - see explanation above, until 1 st remains and finish with 1 edge st in garter st. When piece measures 61-63-65-66-68-70 cm / 24"-24¾"-25½"-26"-26¾"-27½", bind off for armhole at beg of row from the side as on back piece = 32-35-39-40-45-51 sts. Continue pattern with 1 edge st in each side until piece measures approx. 73-76-79-82-85-88 cm / 28¾"-30"-31"-32¼"-33½"-34½" - adjust according to back piece. Then work with light beige brown until piece measures 75-78-81-84-87-90 cm / 29½"-30¾"-32"-33"-34¼"-35½", bind off. LEFT FRONT PIECE: Work as right front piece but reversed. SLEEVE: Cast on 44-46-48-50-52-54 sts (includes 1 edge st in each side) on needle size 3.5 mm / US 4 with light beige brown. Work 6 ridges (i.e K12 rows), switch to needle size 4.5 mm / US 7 and continue in stockinette st with 1 edge st in garter st in each side. When piece measures 6-6-6-7-7-8 cm / 2⅜"-2⅜"-2⅜"-2¾"-2¾"-3⅛", inc 1 st in each side. Repeat inc every 7-6-5-3½-3-2½ cm / 2¾"-2⅜"-2"-1¼"-1⅛"-¾" 6-7-8-11-12-13 more times = 58-62-66-74-78-82 sts. When piece measures 52-52-50-49-46-44 cm / 20½"-20½"-19¾"-19¼"-18"-17¼" (shorter measurements in the larger sizes because of longer sleeve cap and wider shoulders), insert 1 marker in each side. Bind off for sleeve cap at beg of every row in each side as follows: 5 sts 1-1-2-2-1-1 times and 4 sts 0-0-0-0-2-2 times. Bind off the remaining sts, piece measures approx. 53-53-52-51-49-47 cm / 21"-21"-20½"-20"-19¼"-18½". ASSEMBLY: Sew the shoulder seams. Sew the side seams inside 1 edge st. Sew sleeve seams inside 1 edge st and sew in sleeves - section worked after markers at the top of sleeve should fit the bind off for armholes. POCKETS: Cast on 39 sts on needle size 4.5 mm / US 7 with light beige brown. Work in stockinette st with 1 edge st in each side. When piece measures 4-4-4-6-6-6 cm / 1½"-1½"-1½"-2⅜"-2⅜"-2⅜", work pattern according to diagram A.2 with 1 edge st in garter st in each side (pattern beg and ends the same way inside edge st). After A.2 switch to needle size 3.5 mm / US 4 and light beige brown. Work in garter st until piece measures 18-18-18-20-20-20 cm / 7"-7"-7"-8"-8"-8" (approx. 2 cm / ¾") and then bind off. Knit another pocket. Sew a pocket on to each front piece with duplicate sts, approx. 3-3-4-4-5-5 cm / 1⅛"-1⅛"-1½"-1½"-2"-2" from edge at the front and approx. 10-10-12-14-14-16 cm / 4"-4"-4¾"-5½"-5½"-6¼" from bottom edge (try the jacket on for where the pockets should be placed). BANDS: Cast on 34-34-34-38-38-38 sts on needle size 3.5 mm / US 4 with light beige brown and work in garter st back and forth until band measures approx. 82-85-88-92-95-98 cm / 32¼"-33½"-34½"-36¼"-37½"-38½" – hold the piece up when measuring otherwise the band will be too long. Bind off. Knit another band the same way. Sew one band on to right front piece from bottom edge and to mid back of neck – sew with 1 stitch in front loop of sts in garter st on band and 1 stitch inside 1 edge st on front piece. Sew the other band on to left front piece. Sew band tog mid back in front loop of outermost st to make the seam invisible. ---------------------------------------------------------- Wrist warmers, Hat and Neck warmer – see design: 142-10 ---------------------------------------------------------- Bag – see design: 142-11 ---------------------------------------------------------- Socks – see design: 142-12 ---------------------------------------------------------- |
||||||||||||||||||||||
Diagram explanations |
||||||||||||||||||||||
|
||||||||||||||||||||||
|
||||||||||||||||||||||
|
||||||||||||||||||||||
|
Have you made this or any other of our designs? Tag your pictures in social media with #dropsdesign so we can see them! Do you need help with this pattern?You'll find tutorial videos, a Comments/Questions area and more by visiting the pattern on garnstudio.com. © 1982-2024 DROPS Design A/S. We reserve all rights. This document, including all its sub-sections, has copyrights. Read more about what you can do with our patterns at the bottom of each pattern on our site. |
||||||||||||||||||||||


With over 40 years in knitting and crochet design, DROPS Design offers one of the most extensive collections of free patterns on the internet - translated to 17 languages. As of today we count 304 catalogs and 11422 patterns - 11417 of which are translated into English (US/in).
We work hard to bring you the best knitting and crochet have to offer, inspiration and advice as well as great quality yarns at incredible prices! Would you like to use our patterns for other than personal use? You can read what you are allowed to do in the Copyright text at the bottom of all our patterns. Happy crafting!
Comments / Questions (55)
Ich stricke das Modell in XXL ,soll jetzt mit A1 anfangen. Aber da bleibt immer eine Masche übrig.Habe wie in der Anleitung 123M ,davon 2 weg (RM),sind 121,die durch 12 Maschenrapporte sind 10,08 ,es bleibt 1Masche übrig. Was stimmt nicht?
27.06.2022 - 09:48DROPS Design answered:
Liebe Frau Tetzner, so stricken Sie die 123 Maschen: 1 Randmasche, die 12 M im Diagram insegesamt 10 Mal wiederholen, dann stricken Sie die 1. Masche im Diagram (so wird das Muster symmetrisch), 1 Randmasche = 1+120+1+1=123 M; Viel Spaß beim stricken!
27.06.2022 - 14:14Sehr schöne Strickjacke , die Farbe auf dem abgebildetes Foto gefällt mir sehr gut, können Sie mir sagen welche Farben Nr. das auf dem Foto ist ? in der Strickanleitung ist hellbraun meliert angegeben ??? Und was für Farben kann ich dann dazu passend für das Diagramm nehmen? Also ich möchte sie so Stricken in den Farben wie auf dem abgebildetes Foto . LG
06.10.2020 - 07:24DROPS Design answered:
Liebe Doris, die gestrickten Farben finden Sie unter Materialliste (und auch bei der Diagrambeschreibung) - gerne wird Ihnen Ihr DROPS Laden mit Farben weiterhelfen - auch telefonisch oder per E-Mail. Viel Spaß beim stricken!
06.10.2020 - 11:23Hei, På Drops design modell 681 så står det:VENSTRE FORSTK: Strikk som høyre forstk, men speilvendt. Starter man fra venstre i diagrammet da ? Eller har det ikke noe å si i tilfelle her? Laila
21.07.2020 - 16:47DROPS Design answered:
Hei Laila, Diagrammet er fremdeles strikket fra høyre til venstre og fra bunnen oppover. Det som er speilvendt er felling til armhule og hals som er begge på motsatt side enn på høyre forstykket. God fornøyelse!
22.07.2020 - 07:18Hei, hva mener oppskriften :strikkes det glstrikk med 1 kant-m rille i hver side? Betyr det at masken trikkes glattstrikk eller løftes av bare?
31.05.2020 - 22:48DROPS Design answered:
Hei Laila. I alle oppskrifter skal det stå hvordan RILLER skal strikkes. 1 kantmaske i rille betyr i denne oppskriften at kantmasken strikkes rett, både fra retten og fra vrangen. Da får du en fin kant som ikke bølger seg den ene veien, dersom man bare har strikket kantmasken i glattstrikk. mvh DROPS design
03.06.2020 - 15:19Hei, jeg vil strikke oppskriften nr Drops design modell nr 681 så lurer på hvilke lengde på strikkepinner jeg trenger for genseren? På forhånd takk Lail
20.04.2020 - 19:14DROPS Design answered:
Hej Laila, hvis du vil strikke på rundpin kan du bruge en 80 cm lang. Husk at du altid kan få hjælp hos den DROPS forhandler hvor du køber garnet
21.04.2020 - 14:24Goedendag, Ik wil graag dit vest maken. Ik heb wol voor pen 4 of 5, nu ben ik al een poosje bezig met het proeflapje. Ik zit inmiddels op pen 2,5 en bij 20 st heb ik nog steeds een breedte van 11 cm. Kan ik misschien besluiten om nu het vest in mt s te maken, omdat ik waarschijnlijk wat 'los' brei? Dan pakt het toch kleiner uit, en met mijn wat lossere brei techniek, komt dit dan goed? Zelf draag ik altijd mt 38, dus zeker geen 36 Bedankt.
21.10.2019 - 20:00DROPS Design answered:
Dag Ingeborg,
Ja, dat kan inderdaad een goed idee zijn. Als je met het aantal op te zetten steken in maat S op de juiste breedte komt, kun je die maat inderdaad aanhouden en de hoogtes in cm. aanhouden.
30.10.2019 - 12:25D'autres de vos modèles (207-4, 207-6 et 207-12) donnent tous 20 cm de 1/2 emmanchure pour taille M. Ne faut-il pas tout de même faire une correction, vu que 15 cm de 1/2 emmanchure est bien trop petite ? Si j'insiste, c'est pour éviter à d'autres qui feront ce beau modèle d'avoir à faire une "aisance" sous la manche comme j'ai du la faire. J'apprécie votre beau site de modèles! Merci encore!
20.08.2019 - 10:27DROPS Design answered:
Bonjour Mme Pinon, Merci pour votre retour. Le schéma des mesures correspond aux mesures finales de la manche, ce qui peut permettre à chacune d'ajuster la largeur si besoin. Bon tricot!
20.08.2019 - 11:20J'ai rencontré un problème avec la mesure de l'emmanchure pour la taille M qui est de 15 cm pour chaque côté, donc 30 cm au total. C'était vraiment trop étroite et toutes les autres mesures étaient bonnes. J'ai donc rajouté un triangle sous chaque manche et ai eu besoin d'une pelote supplémentaire. Est-ce que quelqu'un d'autre a eu ce problème? Dans ce cas ne faut-il pas corriger les explications? Autrement j'adore ce modèle que j'ai fait pour ma petite fille.
18.08.2019 - 20:24DROPS Design answered:
Bonjour Mme Pinon, vous devez avoir 62 m en taille M avant l'arrondi de la manche, soit 31 cm de large (sur la base des 20 m = 10 cm), on a dont la largeur suffisante pour les emmanchures, les derniers rangs de l'arrondi de la manche vont permettre l'aisance. Bon tricot!
19.08.2019 - 10:34Suzanne Lake wrote:
I LOVE this pattern. I live in Australia and we do not have this wool so I wonder if you could let me know what ply it is? Thank you so much. You have so many beautiful jumper patterns.
01.05.2018 - 11:02DROPS Design answered:
Dear Suzannem you can see every details about the yarns used for each of out modells on the page of the given yarn. For example you can see the weight, length per skein, fiber content and such for the Karisma yarn here
01.05.2018 - 21:31I LOVE this pattern. I live in Australia and we do not have this wool so I wonder if you could let me know what ply it is? Thank you so much. You have so many beautiful jumper patterns.
01.05.2018 - 11:00DROPS Design answered:
Dear Mrs Lake, you will find here a list of DROPS stores shipping worldwide! Happy knitting!
02.05.2018 - 11:12