DROPS Fabel
DROPS Fabel
75% Wool, 25% Polyamide
from 2.30 £ /50g
Get the yarn to make this pattern from 16.10£.

The yarn cost is calculated from the pattern’s smallest size and the yarn’s cheapest product type. Looking for an even better price? You might find it on the DROPS Deals!

DROPS SS24

Happy Sunday

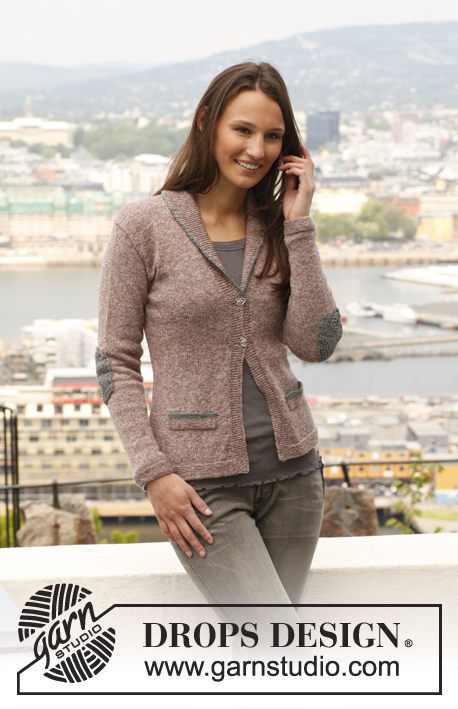
Knitted DROPS jacket with raglan, pockets, V-neck and elbow patches in "Fabel". Size: S - XXXL.

DROPS 142-23
DROPS design: Pattern no fa-196
Yarn group A
-----------------------------------------------------------
Size: S - M - L - XL - XXL - XXXL
Materials:
DROPS FABEL from Garnstudio
300-350-350-400-450-500 g colour no 823, bark
50-50-50-100-100-100 g colour no 300, brown

DROPS DOUBLE POINTED NEEDLES AND CIRCULAR NEEDLE (40 and 80 cm) SIZE 3 mm - or size needed to get 24 sts x 32 rows in stocking st = 10 x 10 cm.
DROPS DOUBLE POINTED NEEDLES and CIRCULAR NEEDLE (60 or 80 cm) SIZE 2.5 mm - for rib.
DROPS SEASHELL BUTTON NO 525: 5 pieces for all sizes

-------------------------------------------------------

Alternative Yarn – See how to change yarns here
Yarn Groups A to F – Use the same pattern and change the yarn here
Yarn usage using an alternative yarn – Use our yarn converter here

-------------------------------------------------------

DROPS Fabel
DROPS Fabel
75% Wool, 25% Polyamide
from 2.30 £ /50g
Get the yarn to make this pattern from 16.10£.

The yarn cost is calculated from the pattern’s smallest size and the yarn’s cheapest product type. Looking for an even better price? You might find it on the DROPS Deals!

Pattern instructions

NOTE: This pattern is written in British English. All measurements in charts are in cm. For conversion from cm to inches - click here. There are different terms for crocheting in British and American English. If this pattern includes crochet, click for "crochet terms" here. For this pattern in American English, please click here.
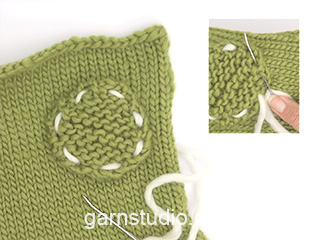
GARTER ST (back and forth on needle):
K all rows. 1 ridge = 2 rows K.

BUTTONHOLES:
Cast off for buttonholes on right band. 1 buttonhole = cast off 5th and 6th st from edge and cast on 2 new sts on next row over these sts.
Cast off for buttonholes when piece measures:
SIZE S: 2, 10, 18, 26 and 33 cm
SIZE M: 2, 10, 18, 26 and 34 cm
SIZE L: 2, 10, 18, 26 and 35 cm
SIZE XL: 2, 10, 19, 27 and 36 cm
SIZE XXL: 2, 11, 20, 29 and 37 cm
SIZE XXXL: 2, 11, 20, 29 and 38 cm

DECREASE TIP (applies to V-neck):
Dec inside 1 edge st in garter st. All dec are done from RS!
Dec before 1 edge st as follows: K 2 tog.
Dec after 1 edge st as follows: Slip 1 st as if to K, K 1, psso.

RAGLAN:
Dec 2 sts in every transition between body and sleeves. Beg 6 sts before marker and work as follows: K 2 tog, K 1, P 2, K 2 (marker is between these 2 sts), P 2, K 1, slip 1 st as if to K, K 1, psso.
----------------------------------------------------------

JACKET:
Worked back and forth on circular needle from mid front.
Cast on 262-286-310-338-370-406 sts (incl 10 band sts in each side towards mid front) on circular needle size 2.5 mm with bark Fabel. P 1 row from WS, then work next row as follows from RS: 2 edge sts in GARTER ST - see explanation above - * K 2, P 2 *, repeat from *-* until 4 sts remain and finish with K 2 and 2 edge sts in GARTER ST. Continue rib like this. Remember BUTTONHOLES on right band - see explanation above. When rib measures 4 cm, K 1 row from RS but continue the outermost 10 sts in each side towards mid front as before (= bands) – AT THE SAME TIME dec 42-46-50-54-58-66 sts evenly (do not dec over bands) = 220-240-260-284-312-340 sts. Switch to circular needle size 3 mm and continue in stocking st (continue bands as before). REMEMBER THE KNITTING TENSION!
When piece measures 6 cm, insert 2 markers in the piece; 60-65-70-76-83-90 sts in from each side (= 100-110-120-132-146-160 sts between markers on back piece). Now dec 1 st on each side of both markers (= 4 sts dec). Repeat dec every 3 cm 4 more times = 200-220-240-264-292-320 sts. AT THE SAME TIME when piece measures 10 cm, make an opening for pockets and work next row from RS as follows: Work the first 46-48-50-56-60-66 sts as before, slip the last 28-28-28-32-32-36 sts worked on a stitch holder for pocket opening, work as before until 18-20-22-24-28-30 sts remain on needle, slip the last 28-28-28-32-32-36 sts worked on a stitch holder for pocket opening and work the remaining sts on needle as before. On next row cast on 28-28-28-32-32-36 new sts over each of the 2 pocket openings and continue as before. When piece measures 22 cm, inc 1 st on each side of both markers in the sides (= 4 sts inc). Repeat inc every 2½-2½-2½-3-3-3 cm 4 more times = 220-240-260-284-312-340 sts.
READ ALL OF THE FOLLOWING SECTION BEFORE CONTINUING!
When piece measures 34-35-36-37-38-39 cm, work the next 2 rows as follows (beg from RS): Work the 10 band sts as before, then slip them on a stitch holder and work the rest of row, turn piece, work the 10 band sts as before and then slip them on a stitch holder, work the rest of row. On next row (= RS) dec 1 st in each side towards mid front for V-neck – READ DECREASE TIP: Repeat dec for neck in each side every other row (i.e. on every row from RS) 0-0-2-9-17-26 more times and then every 4th row (i.e. on every other row from RS) until 6 sts remain before raglan marker on front piece (insert raglan marker in front piece when body and sleeves are put tog – see explanation under yoke) = approx. 9-16-15-12-9-5 times in total every 4th row – NOTE: In size S after the 9 dec on every 4th row, continue dec every 6th row until 6 sts remain before raglan marker = dec approx 4 times in total on every 6th row.
AT THE SAME TIME when piece measures 35-36-37-38-39-40 cm, cast off for armholes in each side as follows: Work until 6 sts remain before first marker in the side, cast off the next 12 sts, work until 6 sts remain before the marker in the other side, cast off the next 12 sts and work the rest of row. There are now 88-98-108-120-134-148 sts on back piece and approx. 43-48-53-59-66-73 sts on each front piece (depending on how many sts were dec for V-neck). Put piece aside and knit the sleeves (continue dec for V-neck on yoke).

SLEEVE:
Worked in the round on double pointed needles. Cast on 72-72-72-76-76-76 sts on double pointed needles size 2.5 mm with bark Fabel. K 1 round, then work rib = K 2/P 2. When rib measures 4 cm, K 1 round while AT THE SAME TIME dec 14-14-12-14-14-12 sts evenly = 58-58-60-62-62-64 sts. Switch to double pointed needles size 3 mm and work in stocking st. When piece measures 8-8-9-8-10-8 cm, inc 2 sts mid under sleeve. Repeat inc every 3½-3-2½-2½-2-2 cm 11-13-15-16-18-19 more times = 82-86-92-96-100-104 sts. When piece measures 51-51-51-50-50-50 cm (shorter measurements in the larger sizes because of longer sleeve cap and broader shoulder width), cast off the middle 12 sts under sleeve = 70-74-80-84-88-92 sts remain on needle. Put piece aside and knit another sleeve.

YOKE:
Slip sleeves on to same circular needle as body where armholes were cast off = approx. 314-342-374-406-442-478 sts. Insert 1 marker in all transitions between body and sleeves (= 4 markers). Continue with stocking st and dec for V-neck as before. AT THE SAME TIME on next row from RS, beg dec for RAGLAN – see explanation above (= 8 sts dec). Repeat dec every 4th row (i.e. every other row from RS) 3-2-1-0-0-0 times and then every other row (i.e. every row from RS) a total of 21-24-28-32-34-36 times. After all dec for raglan and V-neck, there are approx. 90-96-100-108-118-128 sts on needle. Work 1 row in stocking st while AT THE SAME TIME dec evenly to 28-28-28-34-34-38 sts between the 2 markers on back piece (i.e. dec approx. 10-16-20-22-32-38 sts between markers on back piece), then loosely cast off all sts.

BAND/NECK EDGE:
Slip the 10 band sts from stitch holder on right front piece back on needle size 2.5 mm. Continue rib as before but with brown Fabel, in addition cast on 1 new st at the end of row in towards garment (= edge st to sew in). Continue until neck edge measures approx. 30-31-32-34-35-37 cm from where sts were put back on needle (place neck edge against garment mid back, lightly tug it to see if it fits the measurements), then cast off. Repeat along left front piece. Sew neck edges to neck line inside 1 edge st so that the neck edge is placed nicely against dec for V-neck. Sew seam mid back inside cast off edge (seam should be in towards WS of garment).

POCKET:
Slip the 28-28-28-32-32-36 sts from stitch holder on one front piece back on needle size 2.5 mm. Beg from WS with brown Fabel and P 1 row with 1 edge st in garter st in each side while AT THE SAME TIME inc 8 sts evenly = 36-36-36-40-40-44 sts. Continue to work rib from RS as follows: 1 edge st in garter st, * K 2, P 2 *, repeat from *-* until 3 sts remain and finish with K 2 and 1 edge st in garter st. When rib measures approx. 6-7 cm, loosely cast off with K over K and P over P. Fold rib double towards RS and sew it in each side through both layers inside 1 edge st.
POCKET POUCH:
Knit up 1 new st in each of the 28-28-28-32-32-36 sts cast on over pocket opening. Work in stocking st back and forth on needle size 3 mm with bark Fabel until pocket pouch measures approx. 6 cm, then loosely cast off. Sew pocket pouch to the back of garment with neat little loose stitches. Work a pocket on the other front piece the same way.

ELBOW PATCHES:
Worked back and forth on needle. Cast on 20 sts on needle size 3 mm with brown Fabel. Work as follows:
ROW 1: K all sts.
ROW 2: K 1, 1 YO, K 1, 1 YO, K 6,1 YO, K 1, 1 YO, K 2, 1 YO, K 1, 1 YO, K 6, 1 YO, K 1, 1 YO, K 1 = 28 sts.
ROW 3: K over all sts, K YO twisted.
ROW 4: K 1, 1 YO, K 2, 1 YO, K 8, 1 YO, K 2, 1 YO, K 2, 1 YO, K 2, 1 YO, K 8, 1 YO, K 2, 1 YO, K 1 = 36 sts.
ROW 5: K over all sts, K YO twisted.
ROW 6: K 1, 1 YO, K 3, 1 YO, K 10, 1 YO, K 3, 1 YO, K 2, 1 YO, K 3, 1 YO, K 10, 1 YO, K 3, 1 YO, K 1 = 44 sts.
ROW 7: K over all sts, K YO twisted.
ROW 8: K 1, 1 YO, K 4, 1 YO, K 12, 1 YO, K 4, 1 YO, K 2, 1 YO, K 4, 1 YO, K 12, 1 YO, K 4, 1 YO, K 1 = 52 sts.
ROW 9: K over all sts, K YO twisted.
ROW 10: K 1, 1 YO, K 5, 1 YO, K 14, 1 YO, K 5, 1 YO, K 2, 1 YO, K 5, 1 YO, K 14, 1 YO, K 5, 1 YO, K 1 = 60 sts.
ROW 11: K over all sts, K YO twisted.
ROW 12: K 1, 1 YO, K 6, 1 YO, K 16, 1 YO, K 6, 1 YO, K 2, 1 YO, K 6, 1 YO, K 16, 1 YO, K 6, 1 YO, K 1 = 68 sts.
ROW 13: K over all sts, K YO twisted.
ROW 14: K 1, 1 YO, K 7, 1 YO, K 18, 1 YO, K 7, 1 YO, K 2, 1 YO, K 7, 1 YO, K 18, 1 YO, K 7, 1 YO, K 1 = 76 sts.
ROW 15: K over all sts, K YO twisted.
ROW 16: K 1, 1 YO, K 8, 1 YO, K 20, 1 YO, K 8, 1 YO, K 2, 1 YO, K 8, 1 YO, K 20, 1 YO, K 8, 1 YO, K 1 = 84 sts.
ROW 17: Cast off all sts.
Sew opening on elbow patch tog from the middle and outwards with neat little stitches. Knit another elbow patch. Sew one elbow patch at the back of each sleeve with brown – sew with stitches. Patches are sewn on approx. 20 cm from bottom edge on sleeve and approx. 2-3 cm from mid under sleeve towards the back of sleeve. Fasten the patches with pins to see if they are placed correctly before sewing them on.

Diagram

diagram measurements
Do you have a question? See a list of frequently asked questions (FAQ)

Knitting tension is what determines the final measurements of your work, and is usually measured per 10 x 10 cm. It is provided like so: number of stitches in width x number of rows in height - eg: 19 stitches x 26 rows = 10 x 10 cm.

The knitting tension is very individual; some people knit/crochet loosely while others work tightly. You adjust the knitting tension with the needle size, which is why the suggested needle size is only meant as a guide! You need to adjust this (up or down) to ensure that YOUR knitting tension matches the knitting tension provided in the pattern. If you work with a different knitting tension than provided you will have a different yarn consumption, and your work will have different measurements than what the pattern suggests.

The knitting tension also determines which yarns can replace each other. As long as you achieve the same knitting tension you can replace one yarn with another.

See DROPS lesson: How to measure your tension/gauge

See DROPS video: How to make a gauge tension swatch

The required amount of yarn is provided in grams, eg: 450 g. To calculate how many balls you’ll need you first need to know how many grams are in 1 ball (25g, 50g or 100g). This information is available if you click on the individual yarn quality on our pages. Divide the amount required with the amount of each ball. For example, if each ball is 50g (the most common amount), the calculation will be as follows: 450 / 50 = 9 balls.

The important thing when changing from one yarn to another is that the knitting/crochet tension remains the same. This is so that the measurements of the finished piece will be the same as on the sketch provided. It is easier to achieve the same knitting tension using yarns from the same yarn group. It is also possible to work with multiple strands of a thinner yarn to achieve the knitting tension of a thicker one. Please try our yarn converter. We recommend you to always work a test swatch.

Please NOTE: when changing yarn the garment might have a different look and feel to the garment in the photo, due to individual properties and qualities of each yarn.

See DROPS lesson: Can I use a different yarn than the one mentioned in the pattern?

All our yarns are categorised into yarn groups (from A to F) according to thickness and knitting tension – group A contains the thinnest yarns and group F the thickest. This makes it easier for you to find alternative yarns to our patterns, should you wish to switch yarn. All yarns within the same group have a similar knitting tension and can easily replace each other. However, different yarn qualities have different structures and properties which will give the finished work a unique look and feel.

Click here for an overview of the yarns in each yarn group

At the top of all our patterns you’ll find a link to our yarn calculator, which is a helpful tool should you wish to use a different yarn than suggested. By filling in the yarn quality you wish to replace, the amount (in your size) and number of strands, the calculator will present good alternative yarns with the same knitting tension. Additionally it will tell you how much you’ll require in the new qualities and whether you’ll need to work with multiple strands. Most skeins are 50g (some are 25g or 100g).

If the pattern is worked with multiple colours, every colour will have to be calculated separately. Similarly, if the pattern is worked with several strands of different yarns (for example 1 strand Alpaca and 1 strand Kid-Silk) you will have to find alternatives for each, individually.

Click here to see our yarn calculator

Since different yarns have different qualities and textures we have chosen to keep the original yarn in our patterns. However, you can easily find options among our available qualities by using our yarn calculator, or simply pick a yarn from the same yarn group.

It is possible that some retailers still have discontinued yarns in stock, or that someone has a few skeins at home that they would like to find patterns for.

The yarn calculator will provide both alternative yarn as well as required amount in the new quality.

If you think it's hard to decide what size to make, it can be a good idea to measure a garment you own already and like the size of. Then you can pick the size by comparing those measures with the ones available in the pattern's size chart.

You'll find the size chart at the bottom of the pattern.

See DROPS lesson: How to read size chart

The needle size provided in the pattern serves only as a guide, the important thing is to follow the knitting tension. And since knitting tension is very individual, you will have to adjust the needle size to ensure that YOUR tension is the same as in the pattern – maybe you’ll have to adjust 1, or even 2 needle sizes, up or down to achieve the correct tension. For this, we recommend that you work test swatches.

Should you work with a different knitting tension than the one provided, the measurements of the finished garment might deviate from the measurement sketch.

See DROPS lesson: How to measure your tension/gauge

See DROPS video: How to make a tension/gauge swatch

Working a garment top-down provides more flexibility and room for personal adjustment. For example it is easier to try the garment on while working, as well as making adjustments to length of yoke and shoulder caps.

The instructions are carefully explaining every step, in the correct order. Diagrams are adjusted to the knitting direction and are worked as usual.

The diagram depicts all rows/rounds, and every stitch seen from the right side. It is read from bottom to top, from right to left. 1 square = 1 stitch.

When working back and forth, every other row is worked from the right side and every other row is worked from the wrong side. When working from the wrong side, the diagram will have to be worked reversed: from left to right, knit stitches are purled, purl stitches are knit etc.

When working in the round every round is worked from the right side and the diagram are worked from right to left on all rounds.

See DROPS lesson: How to read knitting diagrams

The diagram depicts all rows/rounds, and every stitch seen from the right side. It is worked from bottom to top, from right to left.

When working back and forth every other row is worked from the right side: from right to left and every other row is worked from the wrong side: from left to right.

When working in the round, every row in the diagram are worked from the right side, from right to left.

When working a circular diagram you start in the middle and work your way outwards, counter clockwise, row by row.

The rows usually start with a given number of chain stitches (equivalent to the height of the following stitch), this will either be depicted in the diagram or explained in the pattern.

See DROPS lesson: How to read crochet diagrams

Instructions for working several diagrams after each other on the same row/round, will often be written like so: “work A.1, A.2, A.3 a total of 0-0-2-3-4 times". This means you work A.1 once, then A.2 is worked once, and A.3 is repeated (in width) the number of times provided for your size – in this case like so: S = 0 times, M = 0 times, L=2 times, XL= 3 times and XXL = 4 times.

The diagrams are worked as usual: begin with the first row in A.1, then work the first row in A.2 etc.

See DROPS lesson: How to read knitting diagrams

See DROPS lesson: How to read crochet diagrams

The total width of the garment (from wrist-to-wrist) will be larger in the larger sizes, despite the actual sleeves being shorter. The larger sizes have longer sleeve caps and wider shoulders, so there will be a good fit in all sizes.

The measurement sketch/schematic drawing provides information regarding the full length of the garment. If it’s a jumper or a jacket the length is measured from the highest point on the shoulder closest to the neckline, and straight down to the bottom of the garment. It is NOT measured from the tip of shoulder. Similarly, the length of yoke is measured from the highest point on the shoulder and down to where yoke is split into body and sleeves.

On a jacket measures are never taken along bands, unless specifically stated. Always measure inside band stitches when measuring the length.

See DROPS lesson: How to read a schematic drawing

Diagrams are often repeated on the round or in height. 1 repeat is the diagram the way it appears in the pattern. If it says to work 5 repeats of A.1 in the round, then you work A.1 a total of 5 times after/next to each other in the round. If it says to work 2 repeats of A.1 vertically/in height you work the entire diagram once, then begin again at the start and work the entire diagram one more time.

Chain stitches are slightly narrower than other stitches and to avoid working the cast-on edge too tight, we simply chain more stitches to begin with. The stitch count will be adjusted on the following row to fit the pattern and measurement sketch.

The rib edge is more elastic and will contract slightly compared to, for example, stocking stitch. By increasing before the rib edge, you avoid a visible difference in width between the rib edge and the rest of the body.

It’s very easy to cast off too tightly, and by making yarn overs while casting off (and simultaneously casting these off) you avoid a too tight cast off edge.

See DROPS video: How to bind off with yarn overs (yo)

To achieve an even increase (or decrease) you can increase on, for example: every 3rd and 4th row alternately, like so: work 2 rows and increase on the 3rd row, work 3 rows and increase on the 4th. Repeat this until the increase is complete.

See DROPS lesson: Increase or decrease 1 st on every 3rd and 4th row alternately

Should you prefer to work in the round instead of back and forth, you may of course adjust the pattern. You’ll need to add steeks mid-front (usually 5 stitches), and follow the instructions. When you would normally turn and work from the wrong side, simply work across the steek and continue in the round. At the end you’ll cut the piece open, pick up stitches to work bands, and cover the cut edges.

See DROPS video: How to knit steeks and cut open

Should you prefer to work back and forth instead of in the round, you may of course adjust the pattern so you work the pieces separately and then assemble them at the end. Divide the stitches for the body in 2, add 1 edge stitch in each side (for sewing) and work the front and back pieces separately.

See DROPS lesson: Can I adapt a pattern for circular needles into straight needles?

Pattern repeats can vary slightly in the different sizes, in order to get the correct proportions. If you’re not working the exact same size as the garment in the photo, yours might deviate slightly. This has been carefully developed and adjusted so that the complete impression of the garment is the same in all sizes.

Make sure to follow instructions and diagrams for your size!

If you have found a pattern you like which is available in women’s size it’s not very difficult to convert it to men’s size. The biggest difference will be the length of sleeves and body. Start working on the women size that you think would fit across the chest. The additional length will be worked right before you cast off for the armhole/sleeve cap. If the pattern is worked top-down you can add the length right after the armhole or before the first decrease on sleeve.

Regarding additional yarn amount, this will depend on how much length you add, but it is better with a skein too many than too few.

All yarns will have excess fibres (from production) that might come off as lint or shedding. Brushed yarns (ie hairier yarns) have more of these loose, excess fibres, causing more shedding.

Shedding also depends on what is worn under or over the garment, and whether this pulls at the yarn fibres. It’s therefore not possible to guarantee that there will be no shedding

Below are some tips on how to get the best result when working with hairier yarns:

1. When the garment is finished (before you wash it) shake it vigorously so the looser hairs come off. NOTE: do NOT use a lint roller, brush or any method that pulls at the yarn.

2. Place the garment in a plastic bag and put it in your freezer - the temperature will cause the fibres to become less attached to each other, and excess fibres will come off easier.

3. Leave in the freezer for a few hours before taking it out and shaking it again.

4. Wash the garment according to the instructions on the yarn label.

Pilling is a natural process that happens to even the most exclusive of fibers. It's a natural sign of wear and tear that is hard to avoid, and that is most visible in high friction areas of your garment like a sweater's arms and cuffs.

You can make your garment look as new by removing the pilling, using a fabric comb or a pill/lint remover.

Still can't find the answer you need? Then scroll down and leave your question so one of our experts can try to help you. This will be done normally within 5 to 10 working days.
In the meantime, you can read the questions and answers that others have left to this pattern or join the DROPS Workshop on Facebook to get help from fellow knitters/crocheters!

You might also like...

Post a comment to pattern DROPS 142-23

We would love to hear what you have to say about this pattern!

If you want to leave a question, please make sure you select the correct category in the form below, to speed up the answering process. Required fields are marked *.

Comments / Questions (15)

country flag Ingrid Hilborn wrote:

Jag skulle vilja sticka denna tröja i storlek cl 122/128. Kan ni erbjuda en sådan "översättning" vad gäller antal maskor som ska läggas upp, hur många raglanintagningar etc.?

29.11.2023 - 12:50

DROPS Design answered:

Hej Ingrid, här hittar du koftor till baby i samma stickfasthet: Koftor till baby

30.11.2023 - 10:17

country flag Ingrid Hilborn wrote:

Vilken diameter på knapparna rekommenderas?

04.07.2023 - 16:33

DROPS Design answered:

Hej Ingrid, knappen er ca 20 mm :)

05.07.2023 - 08:01

country flag Le Terrier wrote:

Auriez-vous explication pour tricoter le gilet avec aiguilles droite et non circulaire car je ne comprends pas Merci

01.11.2022 - 19:46

DROPS Design answered:

Bonjour Mme Le Terrier, nous ne sommes malheureusement pas en mesure de pouvoir adapter chacun de nos modèles à chaque demande, toutefois, ce gilet se tricote en allers et retours sur aiguille circulaire (les 2 devants et le dos jusqu'aux emmanchures), vous pouvez ainsi le tricoter sur aiguilles droites (vos mailles seront juste plus serrées); pour les manches (et plus encore), retrouvez ici des astuces. Bon tricot!

02.11.2022 - 07:36

country flag Wilma wrote:

Kan iemand me dit patroon regel voor regel mailen? van af de v hals omhoog.nu staat het zo apart van elkaar terwijl het inelkaar moet voegen.

02.10.2018 - 18:12

DROPS Design answered:

Dag Wilma, Helaas kan ik je het patroon niet mailen, maar je kunt wel voor jezelf de tekst selecteren en deze plakken in een tekstverwerkingsprogramma, waarna je het voor jezelf overzichtelijk kunt maken. Je kan ook altijd hulp vragen bij de winkel waar je het garen gekocht hebt.

04.10.2018 - 11:57

country flag Eva Johansson wrote:

Hej, Går det att sticka denna modellen i slätstickning istället?

04.10.2016 - 12:58

DROPS Design answered:

Hej Eva. Hvad mener du? Den er strikket i glat efter ribben?

04.10.2016 - 14:19

country flag Mette Dræby wrote:

Jeg kan ikke få lommerne til at passe.. På billedet er de vist som om de sider tæt på forkantet. Men i opskriften er beskrevet som om de sidder næsten midt på siddesømmen...

06.04.2015 - 21:27

DROPS Design answered:

Hej Mette, bare følg opskriften så får du lommerne så de passer til den størrelse du strikker. God fornøjelse!

13.05.2015 - 16:03

country flag Annie Broda wrote:

Sauf erreur de ma part, il manque une partie de l'explication du raglan : d'après la photo, il faut tricoter les mailles comme elles viennent. Il pourrait être utile de le mentionner, notamment pour les tricoteuses de peu d'expérience. Cordialement A B

24.06.2013 - 14:56

DROPS Design answered:

Bonjour Mme Broda, sauf erreur, il est indiqué au début des explications comment tricoter les mailles et diminuer pour le raglan. Bon tricot !

24.06.2013 - 16:09

country flag Esther wrote:

Welke lengte rondbreinaalden heb ik hiervoor nu nodig? En welke lengte nld zonder knop? Het is me niet helemaal duidelijk. Rondbreinaalden kun je beter te kort dan te lang bestellen geloof ik.

26.02.2013 - 11:25

DROPS Design answered:

Je kan hiervoor het beste standaard 80 cm gebruiken. Breinaalden zonder knoop is van DROPS standaard 20 cm lang, maar je kan ook een andere lengte gebruiken - het maakt hier niets uit. Je kan ook de mouwen in de rondte breien. Leer eventueel de magic-loop techniek.

27.02.2013 - 17:13

country flag Kitte wrote:

En dejlig klassisk cardigan, som jeg bare MÅ lave.

28.06.2012 - 17:57

country flag Helena wrote:

Hur många gånger har vi inte sett detta plagg? Otroligt tråkigt och icke kreativt

19.06.2012 - 14:29