
Popular categories
Looking for a yarn?


|
|||||||||||||||||||||||||
Birch Leaves |
|||||||||||||||||||||||||
 |
 |
||||||||||||||||||||||||
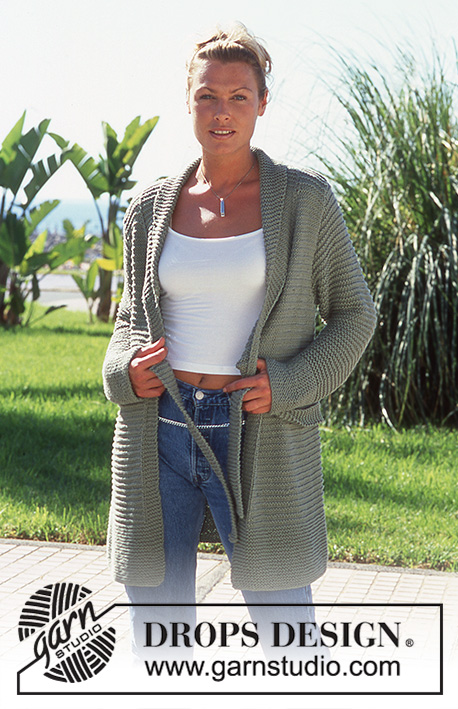
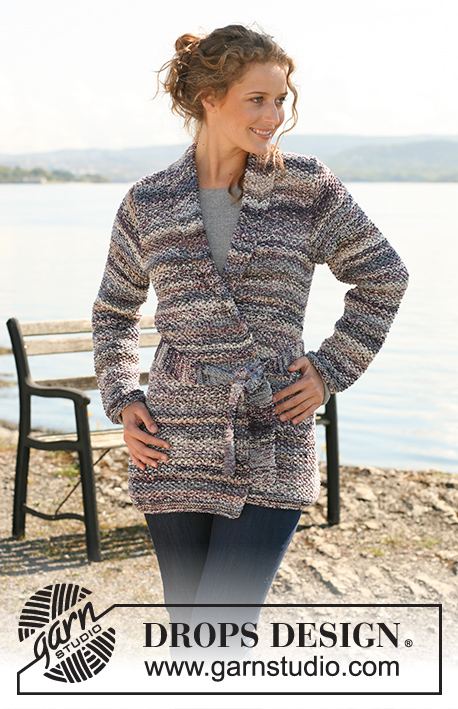
Knitted DROPS jacket with cables, lace pattern and band collar in ”Nepal”. Size: S - XXXL.
DROPS 141-19 |
|||||||||||||||||||||||||
|
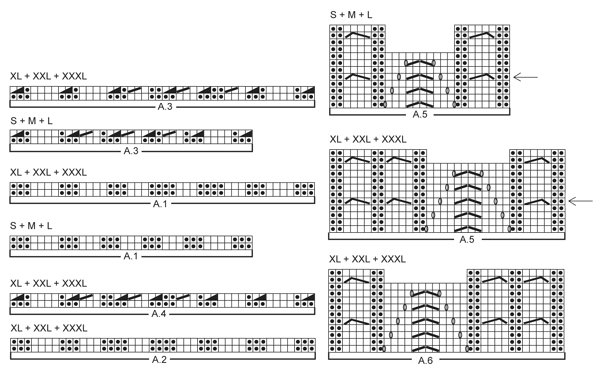
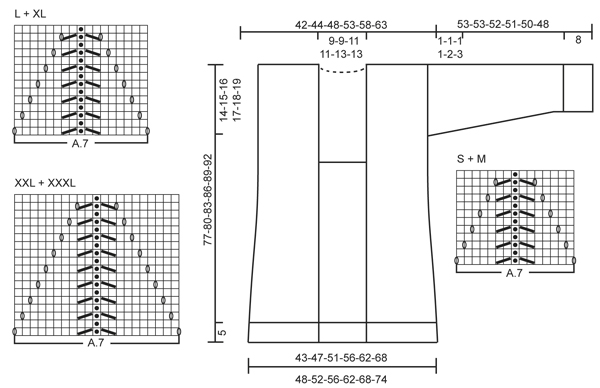
GARTER ST (back and forth on needle): K all rows. 1 ridge = 2 rows K. PATTERN: See diagrams A.1 to A.7. Diagrams show all rows in pattern seen from RS. Choose diagram for your size. DECREASE TIP (applies to sides of body): All dec are done from RS! Dec as follows before marker: K 2 tog. Dec as follows after marker: Slip 1 st as if to K, K 1, psso. KNITTING TIP (applies to band): To avoid the bands contracting at the front, work short rows over bands on every row marked with arrow in diagram A.5/A.6 as follows: * Beg from RS on right front piece (= mid front) on row marked with arrow in diagram and K 1 row over the outermost 16-16-18-18-22-22 sts (= band – the other sts on row are not worked), turn piece, tighten thread and K the rest of row, turn piece and work 1 row as before (in garter st and with pattern) over all sts, turn piece, K 1 row over the outermost 16-16-18-18-22-22 sts (= band on left front piece – the other sts on row are not worked), turn piece, tighten thread and K the rest of row *, repeat from *-* on every row marked with arrow in diagram. BUTTONHOLES: Cast off for 2 buttonholes on right band as follows: K tog third and fourth st from edge and make 1 YO, work until 5 sts remain on band, K the next 2 tog and make 1 YO. ---------------------------------------------------------- JACKET: Worked back and forth on circular needle from mid front. Cast on 239-251-269-305-335-347 sts (incl 16-16-18-18-22-22 band sts in each side towards mid front) on circular needle size 5 mm with Nepal. P 1 row from WS. Work next row as follows from RS: 3 edge sts in GARTER ST – see explanation above , * K 3, P 3 *, repeat from *-* a total of 3-3-4-4-5-5 times, K 3, work diagram A.1 (choose diagram for your size = 35-35-35-44-44-44 sts), * K 3, P 3 *, repeat from *-* a total of 2-3-3-3-4-5 times, K 3, work diagram A.1 in sizes S + M + L (= 35 sts) and diagram A.2 in sizes XL + XXL + XXXL (= 44 sts), * K 3, P 3 *, repeat from *-* a total of 3-3-4-4-5-5 times, K 3, work diagram A.1 (choose diagram for your size = 35-35-35-44-44-44 sts), * K 3, P 3 *, repeat from *-* a total of 2-3-3-3-4-5 times, K 3, work diagram A.1 in sizes S + M + L (= 35 sts) and diagram A.2 in sizes XL + XXL + XXXL (= 44 sts), * K 3, P 3 *, repeat from *-* a total of 3-3-4-4-5-5 times, K 3 and 3 edge sts in GARTER ST. Continue rib like this until piece measures 5 cm. Switch to circular needle size 6 mm and work next row from RS as follows: 3 edge sts in garter st, K while AT THE SAME TIME dec 8-7-9-12-12-10 sts evenly over the next 21-21-27-27-33-33 sts, work last row in A.3 over sts from A.1 (choose diagram for your size = 9-9-9-10-10-10 sts dec), K while AT THE SAME TIME dec 5-7-7-7-11-11 sts evenly over the next 15-21-21-21-27-33 sts, work last row in A.3 in sizes S + M + L over sts from A.1 (= 9 sts dec) and work last row in A.4 in sizes XL + XXL + XXXL over sts from A.2 (= 10 sts dec), K while AT THE SAME TIME dec 6-4-4-10-8-4 sts evenly over the next 21-21-27-27-33-33 sts, work last row in A.3 over sts from A.1 (choose diagram for your size = 9-9-9-10-10-10 sts dec), K while AT THE SAME TIME dec 5-7-7-7-11-11 sts evenly over the next 15-21-21-21-27-33 sts, work last row in A.3 in sizes S + M + L over sts from A.1 (= 9 sts dec) and work last row in A.4 in sizes XL + XXL + XXXL over sts from A.2 (= 10 sts dec), K while AT THE SAME TIME dec 8-7-9-12-12-10 sts evenly over the next 21-21-27-27-33-33 sts and finish with 3 edge sts in garter st = 171-183-197-217-241-261 sts. Work 1 row from WS with K over K and P over P but K the outermost 16-16-18-18-22-22 sts in each side (= bands). Then work pattern as follows, beg from RS - READ KNITTING TIP: 16-16-18-18-22-22 band sts in garter st, 0-1-3-0-2-4 sts in reverse stocking st, work pattern according to diagram A.5 (choose diagram for your size = 26-26-26-34-34-34 sts), work in stocking st over the next 10-14-14-14-16-22 sts, work A.5 in sizes S + M + L (= 26 sts) and A.6 in sizes XL + XXL + XXXL (= 34 sts), 0-1-3-0-2-4 sts in reverse stocking st, work diagram A.7 (choose diagram for your size = 15-15-17-17-21-21 sts), 0-1-3-0-2-4 sts in reverse stocking st, work A.5 (choose diagram for your size = 26-26-26-34-34-34 sts), work in stocking st over the next 10-14-14-14-16-22 sts, work A.5 in sizes S + M + L (= 26 sts) and A.6 in sizes XL + XXL + XXXL (= 34 sts) and 0-1-3-0-2-4 sts in reverse stocking st and 16-16-18-18-22-22 band sts in garter st. Insert 2 markers in the piece; 47-50-54-59-66-71 sts in from each side = 77-83-89-99-109-119 sts between markers on back piece. Continue pattern. REMEMBER THE KNITTING TENSION! When piece measures 10 cm, dec 1 st on each side of both markers – READ DECREASE TIP (= 4 sts dec). Repeat dec every 10-10-10-8-9-9 cm, 3-3-3-4-4-4 more times = 155-167-181-197-221-241 sts. When piece measures 50-52-54-56-58-60 cm, cast off for 2 buttonholes on right band - see explanation above! When piece measures 51-53-55-57-59-61 cm, cast off the first 15-15-17-17-21-21 sts on row, insert 1 marker (shows where to beg knit up for collar), work the rest of row. Turn piece, cast off the first 15-15-17-17-21-21 sts on row, insert 1 marker (this marks where to end the knit up for collar), work the rest of row = 125-137-147-163-179-199 sts. Continue pattern as before with 1 edge st in garter st in each side. When piece measures 63-65-67-69-71-73 cm, cast off 2-4-4-4-6-8 sts in each side for armholes (i.e. 1-2-2-2-3-4 sts on each side of both markers) = 67-71-77-85-93-101 sts on back piece and 27-29-31-35-37-41 sts on front piece. Finish each part separately. BACK PIECE: Continue pattern as before with 1 edge st in garter st in each side. When piece measures 75-78-81-84-87-90 cm, cast off the middle 11-11-13-13-17-17 sts for neck and finish each shoulder separately. Then cast off 1 st on next row from neck = 27-29-31-35-37-41 sts remain on needle. Continue until piece measures 77-80-83-86-89-92 cm and cast off. RIGHT FRONT PIECE: Continue pattern as before with 1 edge st in garter st in each side. When piece measures 77-80-83-86-89-92 cm – adjust so that same no of rows has been worked as on back piece, cast off. LEFT FRONT PIECE: Work as right front piece. SLEEVE: Worked in the round. Cast on 42-42-42-48-48-48 sts on double pointed needles size 5 mm with Nepal. K 1 round, then work rib (= K 3/P 3). When rib measures 8 cm, switch to double pointed needles size 6 mm. K 1 round while AT THE SAME TIME dec 8-7-6-11-10-9 sts evenly = 34-35-36-37-38-39 sts. Then work in stocking st. Insert 1 marker at the beg of round. When piece measures 10 cm, inc 1 st on each side of marker mid under sleeve. Repeat inc every 13-10-7½-6-5-4 cm 3-4-5-6-7-8 more times = 42-45-48-51-54-57 sts. When piece measures 52-52-51-50-48-45 cm (shorter measurements in the larger sizes because of longer sleeve cap and broader shoulder width), finish the piece back and forth on needle from mid under sleeve as follows: Sizes S + M + L + XL: Cast on 1 new st in each side (= edge st for assembly) and work until piece measures 53-53-52-51 cm, loosely cast off. Size XXL + XXXL: Cast on 1 new st in each side (= edge st for assembly) and work until 2 rows remain before piece measures 50-48 cm. Now cast off 5 sts at beg of the next 2 rows before casting off all sts. ASSEMBLY: Sew the shoulder seams. Sew in sleeves inside 1 edge st (section worked back and forth at the top of sleeve should fit the cast off for armhole). Sew on buttons. COLLAR: Knit up sts from RS (inside 1 edge st) on circular needle size 5 mm - start mid front at marker on right front piece: Knit up approx. 38 to 46 sts up to shoulder, then 16 to 22 sts along the neck, and 38 to 46 sts down along left front piece until marker = 92 to 114 sts. K 1 row from WS. Then K 1 row from RS while AT THE SAME TIME inc no of sts evenly to 137-143-149-155-161-167. Then work rib as follows (from WS): 1 edge st in garter st, * P 3, K 3 *, repeat from *-* until 4 sts remain and finish with P 3 and 1 edge st in garter st (from RS there are 3 K sts in each side inside edge st). Continue rib like this until collar measures approx. 5 cm. Now inc 1 st in each of the middle 12 P-sections, seen from RS (= back of neck) = 149-155-161-167-173-179 sts. Continue with K over K and P over P until collar measures approx. 9-9-11-11-13-13 cm. Now work as follows: Work 1 row as before and slip the first 16 sts worked on a stitch holder, turn piece, work the rest of row and slip the first 16 sts worked at the beg of row on another stitch holder. Turn piece, work the rest of row and slip the first 15-15-15-18-18-18 sts worked at the beg of row on the first stitch holder, turn piece, work the rest of row and slip the first 15-15-15-18-18-18 sts worked at the beg of row on the other stitch holder. Continue like this by slipping the first 15-15-15-18-18-18 sts worked on stitch holder in each side until there are 61-61-61-70-70-70 sts in total on stitch holder in each side. Then slip sts from stitch holders back on needle and work 1 row as before over all the 149-155-161-167-173-179 sts – NOTE: To avoid holes in every transition where piece was turned, slip loop before next st twisted on needle and work tog with first st on needle. On next row cast off with K over K and P over P. Neatly fasten collar with stitches in each side towards band – sew edge to edge to avoid a chunky seam. POCKET: Worked back and forth on circular needle. Cast on 28-28-28-36-36-36 sts on circular needle size 6 mm with Nepal. Work pattern according to diagram A.5 (choose diagram for your size) with 1 edge st in garter st in each side. When pocket measures approx. 17-17-17-20-20-20 cm – adjust after one whole repetition of lace pattern in the middle – dec from RS 2 sts over each cable and 3 sts over lace pattern in the middle = 21-21-21-27-27-27 sts. Switch to circular needle size 5 mm and K 4 rows and cast off with K from WS. Knit another pocket but in sizes XL + XXL + XXXL work diagram A.6 instead of A.5. Sew 1 pocket on to each front piece with stitches inside 1 edge st - approx. 13-13-13-17-17-17 cm from bottom edge (try the jacket on for placement) – pattern on pocket should fit pattern repetition on front piece. BELT: Cast on 9 sts on needle size 5 mm and work in garter st back and forth until belt measures approx. 150-190 cm, cast off. |
|||||||||||||||||||||||||
Diagram explanations |
|||||||||||||||||||||||||
|
|||||||||||||||||||||||||
|
|||||||||||||||||||||||||
|
|||||||||||||||||||||||||
|
Have you made this or any other of our designs? Tag your pictures in social media with #dropsdesign so we can see them! Do you need help with this pattern?You'll find tutorial videos, a Comments/Questions area and more by visiting the pattern on garnstudio.com. © 1982-2024 DROPS Design A/S. We reserve all rights. This document, including all its sub-sections, has copyrights. Read more about what you can do with our patterns at the bottom of each pattern on our site. |
|||||||||||||||||||||||||


With over 40 years in knitting and crochet design, DROPS Design offers one of the most extensive collections of free patterns on the internet - translated to 17 languages. As of today we count 304 catalogues and 11422 patterns - 11422 of which are translated into English (UK/cm).
We work hard to bring you the best knitting and crochet have to offer, inspiration and advice as well as great quality yarns at incredible prices! Would you like to use our patterns for other than personal use? You can read what you are allowed to do in the Copyright text at the bottom of all our patterns. Happy crafting!
Comments / Questions (65)
Are the short rows on the front bands every 6 rows like the cable twist or every 12th row and every other cable twist row?
09.12.2019 - 10:01DROPS Design answered:
Dear Maia, I might misunderstand your uestion, when working COLLAR, you work with rib, then increase and work then after 9-11-13 cm short rows slipping the first 16 sts (then first 15-18 sts) at the beg of every row worked on a thread until there are 61-70 sts on the stitch holder in each side. Happy knitting!
09.12.2019 - 10:34Hallo liebes Drops-Team! Das verstehe ich sehr gut. Ich kaufe übrigens zu 9/10 mein Garn bei euch und bin sehr dankbar für die vielen schönen Anleitungen, die ihr zur Verfügung stellt. Oft kaufe ich auch über euch das Garn und kaufe noch kostenpflichtige Anleitungen über andere Online-Plattformen, um auch die Designer dort zu unterstützen. Es war also nicht meine Absicht, mich hier kostenlos zu bedienen. LG
25.04.2019 - 14:31Hallo liebes Drops-Team! Ich möchte diese Jacke in Garn machen, das ich noch habe. Das sind allerdings nur 1190m statt 1275m in Größe S. Ich überlege, die Jacke etwas kürzer zu machen und ggf. die Taschen wegzulassen. An welcher Stelle wäre eine Kürzung am einfachsten möglich, ohne die Form zu verändern? Oder glauben Sie, es würde schon reichen, nur auf die Taschen zu verzichten? Vielen Dank!
23.04.2019 - 15:19DROPS Design answered:
Liebe Diana, wir bitten um Verständnis, dass wir nicht Produkte unserer Konkurrenz empfehlen können und dass der Kauf des Materials uns hilft, weiterhin kostenlose Anleitungen zur Verfügung stellen zu können.
23.04.2019 - 16:29Ik heb een vraag: moeten de omslagen die in de heengaande toer gebreid worden in de teruggaande toer verdraaid averecht gebreid worden of gewoon averecht in de voorkant van de steek?
08.02.2018 - 17:17DROPS Design answered:
Hallo Janneke, De omslagen die in het telpatroon staan brei je op de teruggaande naald niet gedraaid, zodat er gaatjes ontstaan.
11.02.2018 - 21:21Ich habe gerade ein Brett vor dem Kopf :( Ich habe eine Frage zu den Hinreihen im Muster. Ich stricke diese ja „von rechts nach links“, muss ich die Strickschrift dann auch von rechts nach links oder normal lesen? Danke.
30.09.2017 - 22:21DROPS Design answered:
Liebe Janina, die Hinreihen werden rechts nach links gelesen, und die Rückreihen werden von links nach rechts gelesen. Viel Spaß beim stricken!
02.10.2017 - 09:46Hei, jeg er ny på strikking og finner ikke ut hvor i mønsteret det står hvor mange nøster garn jeg må beregne.. Tenker å strikke denne i størrelse small. Kan dere hjelpe meg med hvor mange nøster jeg bør bestille? Mvh Camilla
05.09.2017 - 14:51DROPS Design answered:
Hei Camilla. Du finner garnmengden til høyre for bildet (eller under bildet). På denne jakken i str. S trenger du 850 gram (ett nøste nepal veier 50 gram), slik at du trenger da 17 nøster à 50 gram. God Fornøyelse!
06.09.2017 - 07:56Hallo :) Im 2. Absatz bei der Jacke heißt es "3 M kraus re, die nächsten 21 M re stricken {...} die letzte R von A.3 über den M von A.1 stricken (das Diagramm für die gewünschte Größe wählen, = 9 abgenommene M)". Warum sollen bei der letzen Reihe von Diagramm A3 9 M abgenommen werden? In dem Diagramm werden doch in der letzen Reihe nur re und li M gestrickt weil die letzte Reihe von A1 u. A3 sind ja gleich und die Abnahmen kommen erst in der zweiten Reihe von A3?! Danke für die Antwort :)
15.06.2017 - 11:52DROPS Design answered:
Liebe Janina, die Diagramm liest man von unten nach oben, dh bei der 2. (= letzten) Reihe in A.3 wird 9 M abgenommen. Damit hat man die richtige Breite (mit Bündchenmuster braucht man mehr Maschen für dieselbe Breite). Viel Spaß beim stricken!
15.06.2017 - 13:44Hi please could you explain chart A5 for s/m/l please as i cant understand where the extra 4 rows on either side have come from and what to do with the empty space between them? Thankyou
30.01.2016 - 20:37DROPS Design answered:
Dear Jodie, after you have worked the 7 rows with lace pattern in A.5 (middle sts), continue cables at the beg and end of repeat as in diagram, and work the middle sts from row 1. Happy knitting!
01.02.2016 - 09:54Ich habe eine Frage zum Ärmel. Ab einer Länge von 52 cm (Gr.M) soll in Hin-u.Rückrunden gearbeitet werden. Ich habe den Ärmel auf einem Nadelspiel und so lange nicht abgekettet wird, stricke ich immer in Hinrunden. Beim Fertigstellen steht dann, dass der in Hin-u.Rückrunden gestrickte Abschnitt in den für den Armausschnitt abgeketteten Teil passen soll. Mir ist nicht klar, welcher Teil das sein soll.
08.12.2015 - 13:50DROPS Design answered:
Wenn Sie ab 52 cm in Hin- und Rück-R stricken, entsteht ja an der unteren Ärmelmitte eine Öffnung, denn Sie wenden ja nach jeder R, d.h. Sie haben nun einen "Spalt" an der unteren Ärmelmitte. Sie stricken nun 1 cm in Hin- und Rück-R und dieser cm soll dann hinterher in den Armausschnitt passen.
12.12.2015 - 21:14Oksana wrote:
The model is described in quite complicated way. Could you please specify about collar in here: there are 61-61-61-70-70-70 sts in total on stitch holder in each side - so IN TOTAL or IN EACH SIDE? (Why not to describe the quantity of short rows instead? It is equal for all the sizes, isnt it)
27.08.2015 - 17:02DROPS Design answered:
Dear Oksana, you work short rows over collar sts slipping the first 16 sts (then the first 15-18 sts) sts at beg of every row (in each side) on a thread/ st holder until you have a total of 61-70 sts on each st holder (= on each side), you will repeat this a total of 4 times (1 time 16 sts + 3 times 15-18 sts) on each side. Happy knitting!
28.08.2015 - 09:49