
Popular categories
Looking for a yarn?


|
|||||||||||||||||||||||||
Jaqueline |
|||||||||||||||||||||||||
 |
 |
||||||||||||||||||||||||
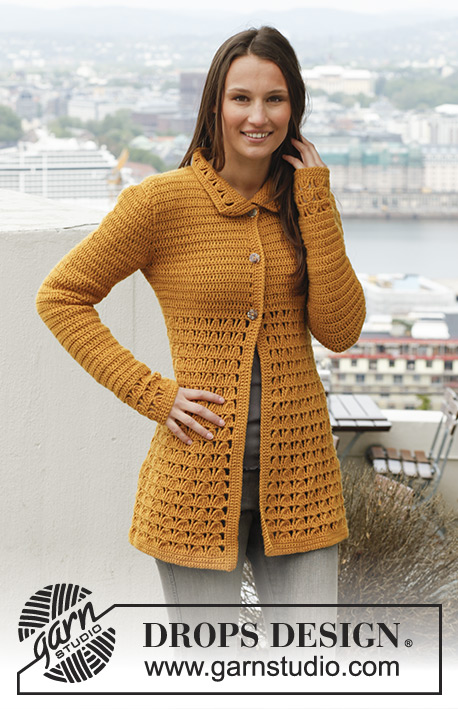
Crochet DROPS jacket with lace pattern in ”Karisma”. Size: S - XXXL.
DROPS 143-12 |
|||||||||||||||||||||||||
|
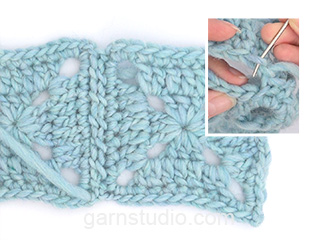
SC ROW: Beg every sc row with 1 ch (not counted as 1st sc), work 1 sc in every st the entire row, turn. PATTERN A.1 (divisible by 6 + 1): ROW 1 (= RS): Ch 4 (= 1 tr) in 1st sc, continue as follows – also see 1st row in diagram A.1: * ch 2, 1 bobble with 5 tr, ch 2, 1 tr in next sc *, repeat from *-* the entire row, turn piece. ROW 2 (= WS): ch 1, 3 sc in 1st ch-space, 1 sc in next bobble, 2 sc in next ch-space, continue as follows – also see 2nd row in diagram A.1: * 1 sc in next tr, 2 sc in next ch-space, 1 sc in next bobble, 2 sc in next ch-space *, repeat from *-* the entire row, finish with 1 sc more in last ch-space on row (= same no of sc as before). PATTERN A.2 (divisible by 5 + 1): ROW 1 (= RS): Ch 4 (= 1 tr) in 1st sc, continue as follows – also see 1st row in diagram A.2: * ch 2, work 1 bobble with 4 tr, ch 2, 1 tr in next sc *, repeat from *-* the entire row, turn. ROW 2 (= WS): ch 1, 3 sc in 1st ch-space, skip 1st bobble, 2 sc in next ch-space, continue as follows – also see 2nd row in diagram A.2: * 1 sc in next tr, 2 sc in next ch-space, skip next bobble, 2 sc in next ch-space *, repeat from *-* the entire row, finish row with 1 sc more last ch-space on row (= same no of sc as before). PATTERN A.3 (divisible by 4 + 1): ROW 1 (= RS): Ch 4 (= 1 tr) in 1st sc, continue as follows – also see 1st row in diagram A.3: * ch 1, work 1 bobble with 3 tr, ch 1, 1 tr in next sc *, repeat from *-* the entire row, turn. ROW 2 (= WS): ch 1, 2 sc in 1st ch-space, 1 sc in next bobble, 1 sc in next ch-space, continue as follows – also see 2nd row in diagram A.3: * 1 sc in next tr, 1 sc in next ch-space, 1 sc in next bobble, 1 sc in next ch-space *, repeat from *-* the entire row, finish with 1 sc more in last ch-space on row (= same no of sc as before). INCREASE TIP: Inc 1 st by working 2 sts in the same st. DC ROW: Work all dc rows from RS. Beg every dc row with 3 ch (= 1st dc), skip 1st sc from previous row, work 1 dc in every sc the entire row, turn. PATTERN A.4: ROW 1 (= RS): Work 1 dc row. ROW 2 (= WS): Work 1 sc row. DECREASE TIP - DC: Crochet 2 dc tog as follows: Work 1 dc in sc below but wait with last pull through (= 2 sts on hook), work 1 dc in next sc but on last pull through, pull thread through all sts on hook = 1 dc dec. Dec 3 dc at the beg or end of row by working the first 6 or last 6 dc tog 2 by 2. Dec 2 dc at the beg or end of row by working the first 4 or last 4 dc tog 2 by 2. Dec 1 dc at the beg or end of row by working the first 2 or last 2 dc tog. DECREASE TIP - SC: Insert hook in st below and pull thread through, insert hook in next st and pull thread through, make 1 YO and pull thread through all 3 loops on hook = 1 st dec. WORK IN THE ROUND IN A CIRCLE: After last sc on round do not finish with 1 sl st but continue on to next round with 1 sc in first sc on previous round. -------------------------------------------------------- BODY: Worked back and forth from mid front. Ch 188-200-218-242-266-290 LOOSELY with Karisma on hook size 4.5 mm/US 7, turn and work 1 sc in 2nd ch from hook, then 1 sc in every ch the entire row = 187-199-217-241-265-289 sc, turn piece (1st row = WS). Work 4 SC ROWS - read explanation above = a total of 5 sc rows, piece measures approx. 2½ cm / ⅞". Then work PATTERN A.1 - read explanation above = 31-33-36-40-44-48 repetitions + 1 tr. When 2ND ROW has been worked, there are 187-199-217-241-265-289 sc on row. REMEMBER THE CROCHET GAUGE! Work A.1 a total of 6-6-7-7-8-8 times vertically - but work last sc row from WS as follows: ch 1, 3 sc in 1st ch-space, skip 1st bobble, 2 sc in next ch-space, * 1 sc in next tr, 2 sc in next ch-space, skip next bobble, 2 sc in next ch-space *, repeat from *-* the entire row but finish with 3 sc in last ch-space = 156-166-181-201-221-241 sc, turn. Then work PATTERN A.2 - read explanation above. When 2ND ROW has been worked, there are 156-166-181-201-221-241 sc on row. Work A.2 a total of 6 times vertically - but work last sc row from WS as follows: ch 1, 2 sc in 1st ch-space, 1 sc in next bobble, 1 sc in next ch-space, * 1 sc in next tr, 1 sc in next ch-space, 1 sc in next bobble, 1 sc in next ch-space *, repeat from *-* the entire row, but finish with 2 sc in last ch-space = 125-133-145-161-177-193 sc. Then work PATTERN A.3 - read explanation above. When 2ND ROW has been worked, there are 125-133-145-161-177-193 sc on row. Work A.3 a total of 6 times vertically - but on last sc row from WS inc 10-12-14-16-18-20 sc evenly - READ INCREASE TIP = 135-145-159-177-195-213 sc, piece now measures approx. 48-48-50½-50½-53-53 cm / 19"-19"-20"-20"-21"-21". Continue to work PATTERN A.4 1 time - read explanation above - AT THE SAME TIME on sc row from WS inc 9-11-13-11-13-15 sts evenly = 144-156-172-188-208-228 sc. Work A.4 a total of 6-7-7-8-8-9 times vertically (last row = sc row from WS), piece now measures approx. 58-60-62-63-66-68 cm / 22¾"-23½"-24½"-24¾"-26"-26¾". Do not cut the thread. Insert 1 marker 36-39-43-47-52-57 sc in from each side on last sc row (= 72-78-86-94-104-114 sc between markers on back piece). RIGHT FRONT PIECE: = 36-39-43-47-52-57 sc. Continue with A.4 - AT THE SAME TIME dec for armholes on next row from RS as follows: Work dc until 3 sc remain before marker = 33-36-40-44-49-54 dc, turn (= skip 3 sts before marker) and work 1 sc row from WS. READ ALL OF THE FOLLOWING 2 SECTIONS BEFORE CONTINUING. Then dec for armhole at the end of every row from RS - READ DECREASE TIP - dc - as follows: Dec 3 dc 0-0-1-1-1-2 times, 2 dc 1-1-1-3-4-5 times, and 1 dc 1-3-3-2-3-1 time. AT THE SAME TIME when A.4 has been worked a total of 5-6-6-6-6-6 times vertically (counted from marker in last sc row before armhole dec), dec for neck on next dc row from RS as follows: Cut the thread, ch 3 (= 1 dc) in the 7th-7th-8th-8th-9th-9th sc from mid front (= skip 6-6-7-7-8-8 dc from mid front), work dc - AT THE SAME TIME continue armhole dec at the end of row if it is not done, turn and work 1 sc row from WS. Then dec at beg of every row from RS as follows: Dec 2 dc 2 times and 1 dc 2 times. When all dec are done, 18-19-19-20-21-23 sts remain for shoulder. Work A.4 a total of 11-12-13-13-14-14 times vertically (counted from marker in last sc row before armhole dec), piece measures approx. 76-80-84-86-89-91 cm / 30"-31½"-33"-34"-35"-35¾" (finish with 1 sc row), cut and fasten the thread. LEFT FRONT PIECE: = 36-39-43-47-52-57 sc. Continue with A.4 - AT THE SAME TIME dec for armholes on next row from RS as follows: Skip the first 3 sc from marker in the side, work 3 ch (= 1 dc) in next sc (= 4th sc from marker), work dc the entire row = 33-36-40-44-49-54 dc, turn and work 1 sc row from WS. READ ALL OF THE FOLLOWING 2 SECTIONS BEFORE CONTINUING. Then dec for armhole at beg of every row from RS as follows: Dec 3 dc 0-0-1-1-1-2 times, 2 dc 1-1-1-3-4-5 times, and 1 dc 1-3-3-2-3-1 time. AT THE SAME TIME when A.4 has been worked a total of 5-6-6-6-6-6 times vertically (counted from marker in last sc row before armhole dec), dec for neck on next dc row from RS as follows: Continue with armhole dec at beg of row if it is not done, work dc until 6-6-7-7-8-8 dc remain from mid front, turn and work 1 sc row from WS. Then dec at end of every row from RS as follows: Dec 2 dc 2 times and 1 dc 2 times. When all dec are done, 18-19-19-20-21-23 sts remain for shoulder. Work A.4 a total of 11-12-13-13-14-14 times vertically (counted from marker in last sc row before armhole dec), piece measures approx. 76-80-84-85-89-91 cm / 30"-31½"-33"-34"-35"-35¾" (finish with 1 sc row), cut and fasten the thread. BACK PIECE: = 72-78-86-94-104-114 sc. Continue with A.4 - AT THE SAME TIME dec for armholes on next row from RS as follows: Skip 3 sc from marker on right side of piece, work 3 ch in next sc (= 1st dc in 4th sc from marker), 1 dc in every sc until 3 sc remain from next marker = 66-72-80-88-98-108 dc, turn (= skip 3 sc in each side) and work 1 sc row from WS. Then dec for armhole at beg and end of every row from RS as follows: Dec 3 dc 0-0-1-1-1-2 times, 2 dc 1-1-1-3-4-5 times, and 1 dc 1-3-3-2-3-1 time = 60-62-64-66-70-74 sts remain. Work A.4 a total of 9-10-11-11-12-12 times vertically (counted from marker in last sc row before armhole dec). RIGHT SHOULDER: From RS work 19-20-20-21-22-24 dc, turn and work 19-20-20-21-22-24 sc from WS, turn. On next row from RS, dec 1 dc at the end of row for neck = 18-19-19-20-21-23 dc remain for shoulder. Work 1 sc row from WS = a total of 11-12-13-13-14-14 repetitions A.4 vertically (counted from marker in last sc row before armhole dec), cut and fasten the thread, piece measures approx. 76-80-84-85-89-91 cm / 30"-31½"-33"-34"-35"-35¾". LEFT SHOULDER: Now work from RS, beg from neck as follows: Count 19-20-20-21-22-24 sts in from left side and beg with 3 ch in this sc. Then work 1 dc in each of the 18-19-19-20-21-23 dc the entire row. (I.e. do not work over the middle 22-22-24-24-26-26 sts = neck.) Turn and work 1 sc in every dc, turn. On next row (= dc), dec 1 dc at the beg of row for neck = 18-19-19-20-21-23 dc. Work 1 row with sc, cut and fasten the thread, piece measures approx. 76-80-84-85-89-91 cm / 30"-31½"-33"-34"-35"-35¾". SLEEVE: Worked back and forth. Ch 37-37-42-42-47-47 LOOSELY with Karisma on hook size 4.5 mm/US 7, turn and work 1 sc in 2nd ch from hook, then 1 sc in every ch the entire row = 36-36-41-41-46-46 sc, turn (1st row = WS). Work 4 more sc rows = a total of 5 sc rows, piece measures approx. 2½ cm / ⅞". Then work PATTERN A.2 = 7-7-8-8-9-9 repetitions + 1 tr. When 2ND ROW has been worked, there are 36-36-41-41-46-46 sc on row. Work A.2 a total of 3 times vertically - but on last sc row from WS inc 0-4-2-4-6-8 sc evenly = 36-40-43-45-52-54 sc (piece now measures approx. 10 cm / 4"). Then work A.4 until finished measurements - AT THE SAME TIME inc 1 dc in the outermost sc in each side on 1st dc row - READ INCREASE TIP = 2 dc inc. Repeat inc in each side on every other dc row (i.e. every 4th row) 8-8-8-8-7-7 more times = 54-58-61-63-68-70 sts (= 9-9-9-9-8-8 times). Continue until A.4 has been worked a total of 21-21-20-20-19-19 times vertically (last row = sc row from WS), piece measures approx. 45-45-43½-43½-42-42 cm / 17¾"-17¾"-17"-17"-16½"-16½" (shorter measurements in the larger sizes because of longer sleeve cap and wider shoulders). Then dec for sleeve cap on next dc row from RS as follows: Sl sts until 4th sc, ch 3 in same sc (= 1st dc), 1 dc in every sc until 3 sc remain on row = 48-52-55-57-62-64 dc, turn and work 1 sc row from WS. Continue dec for sleeve cap in each side on every row from RS as follows: Dec 3 dc 1-2-2-2-2-2 times, 2 dc 2-2-2-3-4-4 times, 1 dc 1-0-1-1-1-1 time, 2 dc 2-2-2-1-1-1 time. On next row from RS, dec 3 dc in each side of piece = 18-18-19-21-22-24 sts remain. On next row from WS, dec 3 sc in each side of piece - READ DECREASE TIP - SC = 12-12-13-15-16-18 sc remain, cut and fasten the thread. The piece now measures approx. 57 cm / 22½" in all sizes. Work another sleeve the same way. ASSEMBLY: Sew shoulder seams in outermost sts with fine stitches. Sew in sleeves, sew sleeve seams tog. COLLAR: Work from RS approx. 80 - 100 sc along the entire neck edge (beg at the top of right front piece). Then work 1 sc row from WS while AT THE SAME TIME adjusting no of sts to 80-82-84-88-92-94 sc. Work 4 more sc rows = a total of 6 sc rows. On next row inc 3 sc evenly on row = 83-85-87-91-95-97 sc. Continue with sc rows until a total of 11 sc rows have been worked. On next sc row, inc 3-6-4-5-6-4 sc evenly = 86-91-91-96-101-101 sc. Then work A.2 (= 17-18-18-19-20-20 repetitions + 1 tr) 1 time vertically. Work 2 more sc rows, cut and fasten the thread, collar measures approx. 9 cm / 3½". FRONT BAND: Work from RS approx. 130 - 150 sc along the entire edge mid front on right front piece (incl short side of collar). Then work 1 sc row from WS while AT THE SAME TIME adjusting no of sts to 128-134-138-140-144-148 sc. On next row from RS work as follows: Work sc until 80-84-84-84-88-90 sc remain on row, * ch 2, skip 2 sc, work 13-14-16-17-17-18 sc *, repeat from *-* 1 more time, ch 2, skip 2 sc, work 12 sc, ch 2, skip 2 sc, work the last 2 sc on row = 4 buttonholes, turn. Then work 2 more sc rows (work 2 sc in every ch-space), cut and fasten the thread = 5 sc rows in total. Work band the same way mid front along left front piece but without buttonholes. Sew on 4 buttons on to left band. FLAP: Worked in the round. Ch 19 LOOSELY with Karisma on hook size 4.5 mm/US 7, turn and work 3 sc in 2nd ch from hook, then 1 sc in every ch until 1 ch remains on row, work 3 sc in last ch, turn piece and continue to work 1 sc in every ch on the other side of ch row - READ WORK IN THE ROUND IN A CIRCLE! On next round work 1 sc in every sc but in each short side inc 1 sc (by working 2 sc in same sc) in each of the middle 3 sc (= 3 inc sts in each short side). Continue in the round with inc in each short side the same way until flap measures approx. 14-14-15-15-16-16 cm / 5½"-5½"-6"-6"-6¼"-6¼" in width, work 1 sl st in next sc, cut and fasten the thread. Place flap in the middle of back piece where pattern A.3 goes over to A.4. Sew on 1 button on each side through both layers. |
|||||||||||||||||||||||||
Diagram explanations |
|||||||||||||||||||||||||
|
|||||||||||||||||||||||||

|
|||||||||||||||||||||||||
|
Have you made this or any other of our designs? Tag your pictures in social media with #dropsdesign so we can see them! Do you need help with this pattern?You'll find tutorial videos, a Comments/Questions area and more by visiting the pattern on garnstudio.com. © 1982-2024 DROPS Design A/S. We reserve all rights. This document, including all its sub-sections, has copyrights. Read more about what you can do with our patterns at the bottom of each pattern on our site. |
|||||||||||||||||||||||||


With over 40 years in knitting and crochet design, DROPS Design offers one of the most extensive collections of free patterns on the internet - translated to 17 languages. As of today we count 304 catalogs and 11422 patterns - 11417 of which are translated into English (US/in).
We work hard to bring you the best knitting and crochet have to offer, inspiration and advice as well as great quality yarns at incredible prices! Would you like to use our patterns for other than personal use? You can read what you are allowed to do in the Copyright text at the bottom of all our patterns. Happy crafting!
Comments / Questions (106)
Hola , quisiera saber como identificar las tallas por ejemplo la s
30.07.2020 - 19:42DROPS Design answered:
Hola Jessica. Debido a que el tallaje es diferente en cada país, para elegir la talla correcta, utiliza como referencia las medidas de la prenda que tienes bajo del patrón. Cuando tengas duda entre dos tallas, siempre recomendamos elegir la talla más grande.
02.08.2020 - 20:25Hello! I have finished the body of the jacket and I am somehow struggling with the rest of the pattern. The left piece, right piece, back piece, right shoulder, left shoulder and the sleeves are worked separately and afterwords we assemble them together? Because I thought each section would start with a chain. Thank you!
27.06.2020 - 09:19DROPS Design answered:
Dear Mrs Visan, after body you finish each front piece and back piece separately and you will sew then shoulder together. Work now A.4 and replace the first stitch at the beg of each row with 1 ch (= if dc row (Uk-English)/sc row (US-English) or 3 chains (= if tr row (UK-English)/dc row (US-English) depending on the row worked. Happy crocheting!
29.06.2020 - 07:54Bonjour, j'aimerais faire cette veste mais plutôt pour l'été, donc peut-être avec du coton ou un mélange. Que me conseillez-vous ? Merci
28.03.2020 - 22:41DROPS Design answered:
Bonjour Véronique, vous pouvez utiliser une autre qualité du groupe B - vous trouverez plus d'infos sur les alternatives ici, utilisez notre convertisseur sur le modèle pour connaître la quantité dans la nouvelle qualité choisie. N'hésitez pas à contacter votre magasin DROPS, même par mail ou téléphone - pour toute assistance au choix du nouveau fil. Bon crochet!
30.03.2020 - 10:09Hallo. Ich komme leider am Vorderteil schon nicht weiter. Muss ich jede Hinrunde (bei Gr. S) 1x2 Stb. und 1x1 Stb. abnehmen in einer Runde? Irgendwie verstehe ich das nicht. Dann hab ich nach 11x MusterA4 aber keine 18 Maschen mehr. Es kommen ja noch die Abnahmen für den Halsausschnitt dazu. Ich glaube ich steh auf dem Schlauch....
07.01.2019 - 16:54DROPS Design answered:
Liebe Yvonne, in der Größe S beginnt der rechte Vorderteil mit 36 M - 3 M = 33 Stb. Dann werden für das Armloch 2 Stb x 1 + 1 Stb x 1 abgenommen = 30 Stb. Dann werden 6 Stb abgenommen/übersprungen = 24 Stb und für den Hals: 2 Stb x 2 + 1 Stb x 2 = 18 Stb bleiben. Viel Spaß beim häkeln!
08.01.2019 - 08:34Dzień dobry, bardo chciałabym zrobić ten sweter, ale nie wszystko jest dla mnie jasne. We wzorze powołujecie się na schemat A.4, niestety nie widzę go nigdzie. Jak powinien wyglądać fragment ściegu fantazyjnego. Na dolny rysunku jest pokaane kilka "pęczków" słupków A.1, A.2 i A.3, ale czy tznaczy, że w takiej kolejności powinny być przerabiane? Czy słowo"raport" w tekście jest równoznaczne z "pęczkiem słupków"? pozdrawiam, Joanna
18.04.2018 - 16:40DROPS Design answered:
Witaj Joanno! Schemat A.4 jest wyjaśniony w objaśnieniach (na górze), tj. RZĄD 1 (= na prawej stronie robótki): przerobić 1 rząd słupków. RZĄD 2 (= na lewej stronie robótki): przerobić 1 rząd oczek ścisłych. 1 raport A.1= 1 powtórzenie schematu A.1. Ściegi fantazyjne wg schematów A.1, A.2 i A.3 są przerabiane zgodnie z opisem (kolejność taka jak w objaśnieniach). Miłej pracy!
18.04.2018 - 18:22I thought I was quite an intermediary crocheter but I don't even know where to start. I'm struggling to understand the instructions and pattern. If the pattern starts from the middle working down, how come it starts with pattern A1 first? surely in order to get the pattern stitches the same way up as in the picture you would start from the bottom up?
03.03.2018 - 20:03DROPS Design answered:
Dear Kharma-Sel, the body is indeed crochetet from the bottom up, but since it is done in one piece, we crochet from the opening at the front on one side to the other front edge on the other side. I hope this helps. Happy Crocheting!
04.03.2018 - 18:02I thought I was quite an intermediary crocheter but I don't even know where to start. I'm struggling to understand the instructions and pattern. If the pattern starts from the middle working down, how come it starts with pattern A1 first? surely in order to get the pattern stitches the same way up as in the picture you would start from the bottom up?
03.03.2018 - 20:02DROPS Design answered:
Dear Mrs Kharma-Sel, jacket is worked bottom up starting with "BODY" to the armholes, then you will work different pieces separately. Sleeves will be then worked afterwards and sewn. Finish with collar, bands and flap. Happy crocheting!
05.03.2018 - 08:42Grrrrr can you please check your gauge on your patterns, particularly the conversion from inches to cms. Looking at Jaqueline and the gauge is 3.5 cm / 1.25 inches. Except 1.25*2.54 = 3.175cm, not 3.5. Over the size I'm working, that's a difference of almost 6 inches at the bottom of a cardigan. Time to pull it out, rework all the measurements and start again.
31.10.2017 - 13:49Hei prøver å hekle denne jakke men fikk ikke det helt. Om dere kan lage video fra mønster A.1 og diagram A.1 og boble med 5 dblst. Jeg setter pris på om dere kan lage video av denne jakke.
25.02.2017 - 15:27DROPS Design answered:
Hej, Hvis du spoler frem til 25,6 så ser du hvordan man hækler boblerne
How to crochet the Christmas table cloth in DROPS Extra 0-1334 from Garnstudio Drops design on Vimeo.
02.03.2017 - 09:04Als eerste bedankt voor het beantwoorden van mijn vorige vraag ! Ik denk alleen toch dat ik ergens wat verkeerd doe. Als ik de laatste toer van patroon A1 doe in het lijf stuk kom ik uit op 157 ipv 156, of moet ik bij deze toer geen vaste doen op het laatste "stokje" ( de vier lossen aan het begin van de vorige toer ) Nogmaals bedankt !!
12.07.2016 - 22:47DROPS Design answered:
Hoi Daisy. Je haakt de laatste toer A.1 als volgt: 1 l, 3 v in de 1e l-lus, sla de 1e bobbel over, 2 v in de volgende l-lus, * 1 v in het volgende dstk, 2 v in de volgende l-lus, sla de volgende bobbel over, 2 v in de volgende l-lus *, herhaal van *-* de hele toer maar eindig met 3 v in de laatste l-lus, dus ik zie hier niet dat je ook in het laatste stk haakt (de 4 lossen), maar in het laatste boogje.
13.07.2016 - 15:36