DROPS Alpaca
DROPS Alpaca
100% Alpaca
from 3.40 £ /50g
Get the yarn to make this pattern from 34.00£.

The yarn cost is calculated from the pattern’s smallest size and the yarn’s cheapest product type. Looking for an even better price? You might find it on the DROPS Deals!

DROPS SS24

Bergen

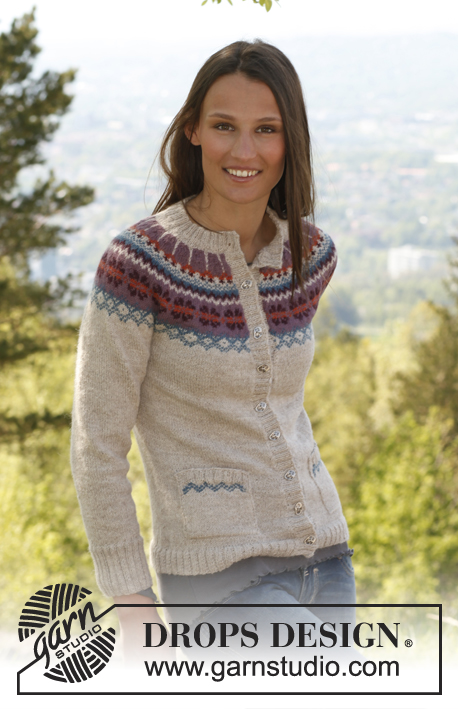
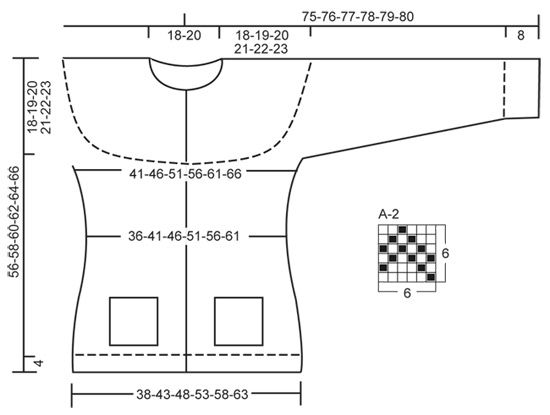
Knitted DROPS jacket with round yoke, pockets and Norwegian pattern in ”Alpaca”. Size XS – XXXL

DROPS 142-1
DROPS design: Pattern no z-612
Yarn group A
-----------------------------------------------------------
Size: XS/S - M - L - XL - XXL - XXXL
Materials:
DROPS ALPACA from Garnstudio
300-350-400-450-500-550 g colour no 2020, light camel eco
50-50-50-100-100-100 g colour no 3800, old pink
50-50-50-50-50-50 g colour no 2925, rust
50-50-50-50-50-50 g colour no 3969, red/purple
50-50-50-50-50-50 g colour no 6309, medium petrol

DROPS DOUBLE POINTED NEEDLES and CIRCULAR NEEDLE (80 cm) SIZE 3 mm - or size needed to get 24 sts x 32 rows in stocking st = 10 x 10 cm.
DROPS DOUBLE POINTED NEEDLES and CIRCULAR NEEDLE (80 cm) SIZE 2.5 mm - for rib.
DROPS ANGULAR SILVER BUTTON NO 534: 9 pieces
----------------------------------------------------------

-------------------------------------------------------

Alternative Yarn – See how to change yarns here
Yarn Groups A to F – Use the same pattern and change the yarn here
Yarn usage using an alternative yarn – Use our yarn converter here

-------------------------------------------------------

DROPS Alpaca
DROPS Alpaca
100% Alpaca
from 3.40 £ /50g
Get the yarn to make this pattern from 34.00£.

The yarn cost is calculated from the pattern’s smallest size and the yarn’s cheapest product type. Looking for an even better price? You might find it on the DROPS Deals!

Pattern instructions

NOTE: This pattern is written in British English. All measurements in charts are in cm. For conversion from cm to inches - click here. There are different terms for crocheting in British and American English. If this pattern includes crochet, click for "crochet terms" here. For this pattern in American English, please click here.
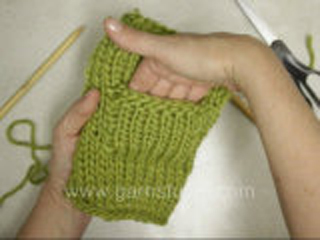
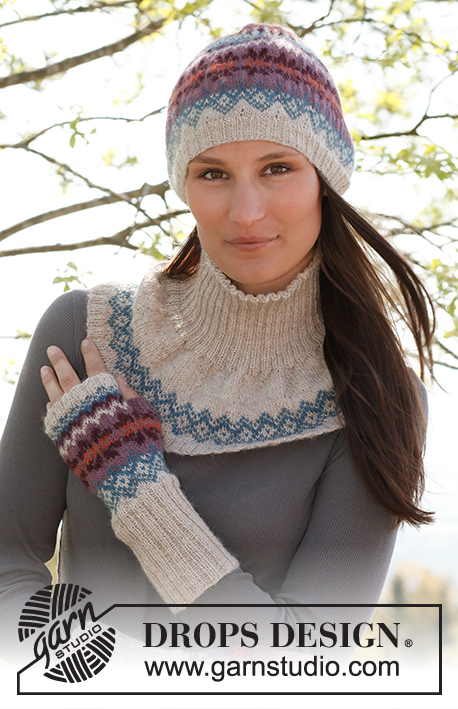
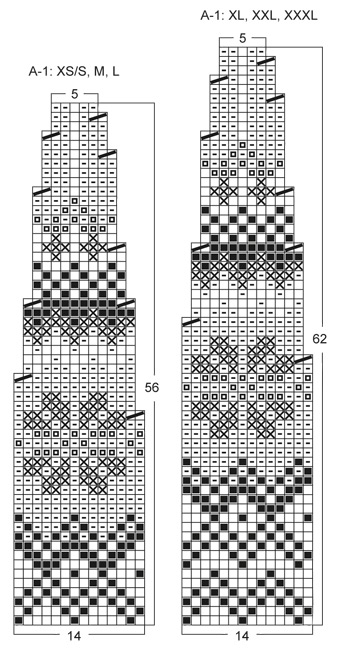
GARTER ST (back and forth on circular needle):
K all rows. 1 ridge = 2 rows K.

PATTERN:
See diagrams A-1 and A-2. Diagrams are worked in stocking st.
----------------------------------------------------------

BODY:
Worked back and forth on circular needle from mid front.
Cast on 244-276-308-340-372-404 sts on circular needle size 2.5 mm with light camel eco. Work rib as follows (1st row = RS): 1 edge st in GARTER ST - see explanation above - * K 2/P 2 *, repeat from *-* until 3 sts remain, K 2 and 1 edge st in garter st. When rib measures 4 cm, switch to circular needle size 3 mm and work next row as follows (from RS): K 3, * K 2 tog, K 2 *, repeat from *-* until 5 sts remain, K 2 tog and K 3 = 184-208-232-256-280-304 sts. Insert 2 markers in the piece; 46-52-58-64-70-76 sts in from each side (= 92-104-116-128-140-152 sts between markers on back piece). Continue in stocking st with 1 edge st in garter st in each side.
REMEMBER THE KNITTING TENSION!
When piece measures approx. 6 cm (adjust so that next row is worked from WS), work next row as follows: 1 st in garter st, P 38-40-44-47-51-53, then slip the last 29-29-31-31-33-33 sts worked on a stitch holder (these sts are knitted up for pocket later), continue with P until 10-12-14-17-19-21 sts remain, slip the last 29-29-31-31-33-33 sts worked on a stitch holder for pocket, P 9-11-13-16-18-20 and 1 st in garter st. On next row knit up 1 st at the back of each st slipped on stitch holder. Continue in stocking st. When piece measures 8-8-9-9-10-10 cm, dec 1 st on each side of markers in the sides. Repeat dec every 3 cm 2 more times = 172-196-220-244-268-292 sts. When piece measures 18-19-20-21-22-23 cm, inc 1 st on each side of markers in the sides. Repeat inc every 3 cm 5 more times = 196-220-244-268-292-316 sts. When piece measures approx. 38-39-40-41-42-43 cm (adjust so that next row is worked from WS), work next row as follows: 43-49-55-61-67-73 sts (= front piece), cast off 12 sts for armhole, 86-98-110-122-134-146 sts (= back piece), cast off 12 sts for armhole, 43-49-55-61-67-73 sts (= front piece) = 172-196-220-244-268-292 sts remain on needle.
Put piece aside and knit the sleeves.

SLEEVE:
Worked in the round on double pointed needles.
Cast on 72-80-80-80-88-88 sts on double pointed needles size 2.5 mm with light camel eco. Work rib = K 2/P 2 for 8 cm. Switch to double pointed needles size 3 mm, work next round as follows: * K 2, K 2 tog *, repeat from *-* = 54-60-60-60-66-66 sts. Insert 1 marker at the beg of the round. Continue in stocking st. When piece measures 10-10-12-14-14-14 cm, inc 1 st in each side of marker mid under sleeve, repeat inc every 3½-3½-2½-2-2-2 cm 10-10-13-15-14-16 more times = 76-82-88-92-96-100 sts. When piece measures 48 cm, cast off 12 sts mid under sleeve (i.e. cast off 6 sts on each side of marker) = 64-70-76-80-84-88 sts remain on needle. Put piece aside and knit another sleeve.

YOKE:
Slip sleeves on to same circular needle size 3 mm as body where armholes were cast off = 300-336-372-404-436-468 sts (do not work the sts when slipping them on needle).
Work 2-4-8-6-8-12 rows in stocking st with light camel eco - AT THE SAME TIME on 1st row (= RS) dec 3-11-5-9-13-3 sts evenly = 297-325-367-395-423-465 sts. Continue to work and dec according to A-1 (1st row = RS, see diagram for your size) with 1 edge st in garter st in each side, work next to last st on row as first st in A-1 but do not dec in this st.
After all dec there are 108-118-133-143-153-168 sts on needle and piece measures approx. 56-58-60-62-64-66 cm up to shoulder. Work 1 row with light camel eco (from RS) while at the same time dec 12-18-25-27-29-36 sts evenly = 96-100-108-116-124-132 sts. P 1 row on WS.
Then work an elevation at the back with light camel eco in stocking st as follows starting from RS: Work 58-60-64-68-72-76 sts, turn, P 20, turn, K 30, turn, P 40, continue like this by working 10 sts more on every turn until a total of 80-80-80-100-110-110 sts have been worked, turn and work the rest of row, slip sts on a stitch holder.

LEFT BAND:
Knit up approx. 172 to 204 sts (divisible by 4) inside 1 edge st along left front with light camel eco. Work rib as follows (1st row = WS): 1 edge st in garter st, * P 2/K 2 *, repeat from *-* and finish with P 2 and 1 edge st in garter st. Continue with K over K and P over P until rib measures 3 cm, loosely cast off.

RIGHT BAND:
Work as left band but after 1 cm, cast off for 8 buttonholes evenly (buttonholes are cast off in P-sections seen from RS). 1 BUTTONHOLE = P 2 tog and make 1 YO – bottom buttonhole should be in the second P-section from bottom edge and top hole approx. 6-7 cm from the top (also cast off for 1 buttonhole on neck edge).

NECK EDGE:
The neck edge is worked with light camel eco on circular needle size 2.5 mm as follows: Knit up 8 sts over right band (inside 1 edge st), work the 96-100-108-116-124-132 sts from stitch holder around the neck on to needle and knit up 8 sts over left band = 112-116-124-132-140-148 sts. P 1 row from WS while at the same time inc 20-20-16-16-12-12 sts evenly = 132-136-140-148-152-160 sts. Then work rib as follows (from RS): 1 edge st in garter st, * K 2/P 2 *, repeat from *-* and finish with K 2 and 1 edge st in garter st. Continue with K over K and P over P. When neck edge measures 1 cm, cast off for 1 buttonhole over the other holes on band. When neck edge measures 3 cm, cast off with K over K and P over P.

POCKET:
Worked back and forth on 2 double pointed needles.
Slip the 29-29-31-31-33-33 sts from stitch holder on one front piece back on 1 double pointed needle size 3 mm. Work in stocking st with light camel eco and 1 edge st in garter st in each side for 8-8-9-9-10-10 cm (adjust so that next row is worked from RS), continue like this: 1 st in garter st, 1-1-2-2-0-0 sts in stocking st with light camel eco, then diagram A-2 over the next 25-25-25-25-31-31 sts, 1-1-2-2-0-0 sts in stocking st with light camel eco and then 1 st in garter st. When A-2 has been worked, work 2 rows in stocking st with light camel eco - AT THE SAME TIME on last row inc 3-3-5-5-3-3 sts evenly = 32-32-36-36-36-36 sts. Switch to double pointed needles size 2.5 mm and continue with rib as follows (from RS): 1 st in garter st, * K 2, P 2 *, repeat from *-* and finish with K 2 and 1 st in garter st. Work a total of 6 rows in rib, then cast off from RS with K over K and P over P. Sew pocket neatly on to sts in garter st in the sides.
Knit another pocket on the other front piece.

ASSEMBLY:
Sew the openings under the sleeves. Sew on buttons.

----------------------------------------------------------
Hat, neck warmer and wrist warmers - see pattern 142-2
----------------------------------------------------------

This pattern has been corrected.

Updated online: 16.04.2013
YOKE:
.....= 96-100-108-116-124-132 sts. P 1 row from WS.
Then work an elevation at the back with light camel eco in stocking st as follows starting from RS: ....

Diagram

symbols = light camel eco
symbols = medium petrol
symbols = old pink
symbols = red/purple
symbols = rust
symbols = K 2 tog in the colour that fits the pattern
diagram
diagram
Do you have a question? See a list of frequently asked questions (FAQ)

Knitting tension is what determines the final measurements of your work, and is usually measured per 10 x 10 cm. It is provided like so: number of stitches in width x number of rows in height - eg: 19 stitches x 26 rows = 10 x 10 cm.

The knitting tension is very individual; some people knit/crochet loosely while others work tightly. You adjust the knitting tension with the needle size, which is why the suggested needle size is only meant as a guide! You need to adjust this (up or down) to ensure that YOUR knitting tension matches the knitting tension provided in the pattern. If you work with a different knitting tension than provided you will have a different yarn consumption, and your work will have different measurements than what the pattern suggests.

The knitting tension also determines which yarns can replace each other. As long as you achieve the same knitting tension you can replace one yarn with another.

See DROPS lesson: How to measure your tension/gauge

See DROPS video: How to make a gauge tension swatch

The required amount of yarn is provided in grams, eg: 450 g. To calculate how many balls you’ll need you first need to know how many grams are in 1 ball (25g, 50g or 100g). This information is available if you click on the individual yarn quality on our pages. Divide the amount required with the amount of each ball. For example, if each ball is 50g (the most common amount), the calculation will be as follows: 450 / 50 = 9 balls.

The important thing when changing from one yarn to another is that the knitting/crochet tension remains the same. This is so that the measurements of the finished piece will be the same as on the sketch provided. It is easier to achieve the same knitting tension using yarns from the same yarn group. It is also possible to work with multiple strands of a thinner yarn to achieve the knitting tension of a thicker one. Please try our yarn converter. We recommend you to always work a test swatch.

Please NOTE: when changing yarn the garment might have a different look and feel to the garment in the photo, due to individual properties and qualities of each yarn.

See DROPS lesson: Can I use a different yarn than the one mentioned in the pattern?

All our yarns are categorised into yarn groups (from A to F) according to thickness and knitting tension – group A contains the thinnest yarns and group F the thickest. This makes it easier for you to find alternative yarns to our patterns, should you wish to switch yarn. All yarns within the same group have a similar knitting tension and can easily replace each other. However, different yarn qualities have different structures and properties which will give the finished work a unique look and feel.

Click here for an overview of the yarns in each yarn group

At the top of all our patterns you’ll find a link to our yarn calculator, which is a helpful tool should you wish to use a different yarn than suggested. By filling in the yarn quality you wish to replace, the amount (in your size) and number of strands, the calculator will present good alternative yarns with the same knitting tension. Additionally it will tell you how much you’ll require in the new qualities and whether you’ll need to work with multiple strands. Most skeins are 50g (some are 25g or 100g).

If the pattern is worked with multiple colours, every colour will have to be calculated separately. Similarly, if the pattern is worked with several strands of different yarns (for example 1 strand Alpaca and 1 strand Kid-Silk) you will have to find alternatives for each, individually.

Click here to see our yarn calculator

Since different yarns have different qualities and textures we have chosen to keep the original yarn in our patterns. However, you can easily find options among our available qualities by using our yarn calculator, or simply pick a yarn from the same yarn group.

It is possible that some retailers still have discontinued yarns in stock, or that someone has a few skeins at home that they would like to find patterns for.

The yarn calculator will provide both alternative yarn as well as required amount in the new quality.

If you think it's hard to decide what size to make, it can be a good idea to measure a garment you own already and like the size of. Then you can pick the size by comparing those measures with the ones available in the pattern's size chart.

You'll find the size chart at the bottom of the pattern.

See DROPS lesson: How to read size chart

The needle size provided in the pattern serves only as a guide, the important thing is to follow the knitting tension. And since knitting tension is very individual, you will have to adjust the needle size to ensure that YOUR tension is the same as in the pattern – maybe you’ll have to adjust 1, or even 2 needle sizes, up or down to achieve the correct tension. For this, we recommend that you work test swatches.

Should you work with a different knitting tension than the one provided, the measurements of the finished garment might deviate from the measurement sketch.

See DROPS lesson: How to measure your tension/gauge

See DROPS video: How to make a tension/gauge swatch

Working a garment top-down provides more flexibility and room for personal adjustment. For example it is easier to try the garment on while working, as well as making adjustments to length of yoke and shoulder caps.

The instructions are carefully explaining every step, in the correct order. Diagrams are adjusted to the knitting direction and are worked as usual.

The diagram depicts all rows/rounds, and every stitch seen from the right side. It is read from bottom to top, from right to left. 1 square = 1 stitch.

When working back and forth, every other row is worked from the right side and every other row is worked from the wrong side. When working from the wrong side, the diagram will have to be worked reversed: from left to right, knit stitches are purled, purl stitches are knit etc.

When working in the round every round is worked from the right side and the diagram are worked from right to left on all rounds.

See DROPS lesson: How to read knitting diagrams

The diagram depicts all rows/rounds, and every stitch seen from the right side. It is worked from bottom to top, from right to left.

When working back and forth every other row is worked from the right side: from right to left and every other row is worked from the wrong side: from left to right.

When working in the round, every row in the diagram are worked from the right side, from right to left.

When working a circular diagram you start in the middle and work your way outwards, counter clockwise, row by row.

The rows usually start with a given number of chain stitches (equivalent to the height of the following stitch), this will either be depicted in the diagram or explained in the pattern.

See DROPS lesson: How to read crochet diagrams

Instructions for working several diagrams after each other on the same row/round, will often be written like so: “work A.1, A.2, A.3 a total of 0-0-2-3-4 times". This means you work A.1 once, then A.2 is worked once, and A.3 is repeated (in width) the number of times provided for your size – in this case like so: S = 0 times, M = 0 times, L=2 times, XL= 3 times and XXL = 4 times.

The diagrams are worked as usual: begin with the first row in A.1, then work the first row in A.2 etc.

See DROPS lesson: How to read knitting diagrams

See DROPS lesson: How to read crochet diagrams

The total width of the garment (from wrist-to-wrist) will be larger in the larger sizes, despite the actual sleeves being shorter. The larger sizes have longer sleeve caps and wider shoulders, so there will be a good fit in all sizes.

The measurement sketch/schematic drawing provides information regarding the full length of the garment. If it’s a jumper or a jacket the length is measured from the highest point on the shoulder closest to the neckline, and straight down to the bottom of the garment. It is NOT measured from the tip of shoulder. Similarly, the length of yoke is measured from the highest point on the shoulder and down to where yoke is split into body and sleeves.

On a jacket measures are never taken along bands, unless specifically stated. Always measure inside band stitches when measuring the length.

See DROPS lesson: How to read a schematic drawing

Diagrams are often repeated on the round or in height. 1 repeat is the diagram the way it appears in the pattern. If it says to work 5 repeats of A.1 in the round, then you work A.1 a total of 5 times after/next to each other in the round. If it says to work 2 repeats of A.1 vertically/in height you work the entire diagram once, then begin again at the start and work the entire diagram one more time.

Chain stitches are slightly narrower than other stitches and to avoid working the cast-on edge too tight, we simply chain more stitches to begin with. The stitch count will be adjusted on the following row to fit the pattern and measurement sketch.

The rib edge is more elastic and will contract slightly compared to, for example, stocking stitch. By increasing before the rib edge, you avoid a visible difference in width between the rib edge and the rest of the body.

It’s very easy to cast off too tightly, and by making yarn overs while casting off (and simultaneously casting these off) you avoid a too tight cast off edge.

See DROPS video: How to bind off with yarn overs (yo)

To achieve an even increase (or decrease) you can increase on, for example: every 3rd and 4th row alternately, like so: work 2 rows and increase on the 3rd row, work 3 rows and increase on the 4th. Repeat this until the increase is complete.

See DROPS lesson: Increase or decrease 1 st on every 3rd and 4th row alternately

Should you prefer to work in the round instead of back and forth, you may of course adjust the pattern. You’ll need to add steeks mid-front (usually 5 stitches), and follow the instructions. When you would normally turn and work from the wrong side, simply work across the steek and continue in the round. At the end you’ll cut the piece open, pick up stitches to work bands, and cover the cut edges.

See DROPS video: How to knit steeks and cut open

Should you prefer to work back and forth instead of in the round, you may of course adjust the pattern so you work the pieces separately and then assemble them at the end. Divide the stitches for the body in 2, add 1 edge stitch in each side (for sewing) and work the front and back pieces separately.

See DROPS lesson: Can I adapt a pattern for circular needles into straight needles?

Pattern repeats can vary slightly in the different sizes, in order to get the correct proportions. If you’re not working the exact same size as the garment in the photo, yours might deviate slightly. This has been carefully developed and adjusted so that the complete impression of the garment is the same in all sizes.

Make sure to follow instructions and diagrams for your size!

If you have found a pattern you like which is available in women’s size it’s not very difficult to convert it to men’s size. The biggest difference will be the length of sleeves and body. Start working on the women size that you think would fit across the chest. The additional length will be worked right before you cast off for the armhole/sleeve cap. If the pattern is worked top-down you can add the length right after the armhole or before the first decrease on sleeve.

Regarding additional yarn amount, this will depend on how much length you add, but it is better with a skein too many than too few.

All yarns will have excess fibres (from production) that might come off as lint or shedding. Brushed yarns (ie hairier yarns) have more of these loose, excess fibres, causing more shedding.

Shedding also depends on what is worn under or over the garment, and whether this pulls at the yarn fibres. It’s therefore not possible to guarantee that there will be no shedding

Below are some tips on how to get the best result when working with hairier yarns:

1. When the garment is finished (before you wash it) shake it vigorously so the looser hairs come off. NOTE: do NOT use a lint roller, brush or any method that pulls at the yarn.

2. Place the garment in a plastic bag and put it in your freezer - the temperature will cause the fibres to become less attached to each other, and excess fibres will come off easier.

3. Leave in the freezer for a few hours before taking it out and shaking it again.

4. Wash the garment according to the instructions on the yarn label.

Pilling is a natural process that happens to even the most exclusive of fibers. It's a natural sign of wear and tear that is hard to avoid, and that is most visible in high friction areas of your garment like a sweater's arms and cuffs.

You can make your garment look as new by removing the pilling, using a fabric comb or a pill/lint remover.

Still can't find the answer you need? Then scroll down and leave your question so one of our experts can try to help you. This will be done normally within 5 to 10 working days.
In the meantime, you can read the questions and answers that others have left to this pattern or join the DROPS Workshop on Facebook to get help from fellow knitters/crocheters!

You might also like...

Bergen Jacket

Kristina Mari, Portugal

Bergen

Kim, United Kingdom

Bergen jacket

Miriam, Germany

Post a comment to pattern DROPS 142-1

We would love to hear what you have to say about this pattern!

If you want to leave a question, please make sure you select the correct category in the form below, to speed up the answering process. Required fields are marked *.

Comments / Questions (111)

country flag Misia Fredriksson wrote:

Absolut snyggast o med bästa passformen! Härliga färger o häftigt med mössan till!

03.06.2012 - 23:43

country flag Malin wrote:

I like !

03.06.2012 - 20:54

country flag Yvonne Ström wrote:

Jättefin, härlig färgkontrast

03.06.2012 - 20:25

country flag Annsan wrote:

Jättefin. Väntar på mönstret. måste bara sticka den.

03.06.2012 - 18:02

country flag Nathalie wrote:

Joli modèle

03.06.2012 - 17:27

country flag Marit wrote:

Åååå! Gleder meg til mønsteret er å få tak i, helt nydelig!

03.06.2012 - 17:02

Marta Gunnars wrote:

Mjög falleg peysa.

03.06.2012 - 15:35

country flag Trine wrote:

Super smuk cardigan:-)

03.06.2012 - 11:45

country flag Tina wrote:

Namnförslag: Filefjell

03.06.2012 - 10:36

country flag Lisa Karlsson wrote:

Så vacker! Vill ha nu :)

03.06.2012 - 09:06