
Popular categories
Looking for a yarn?


|
|
Calypso |
|
 |
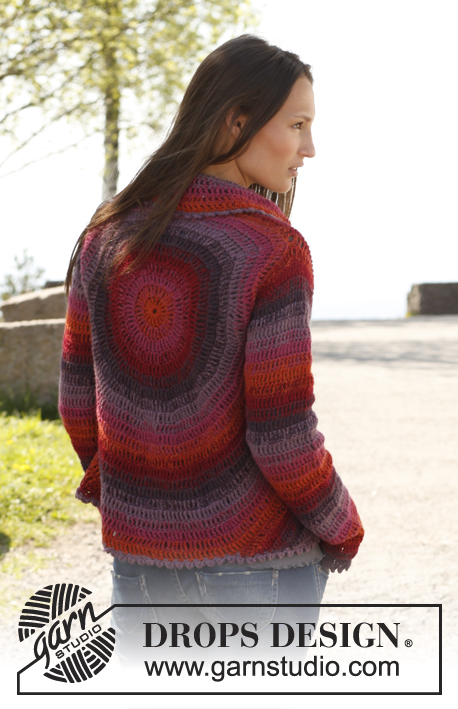 |
Crochet DROPS jacket worked in a circle in 2 strands "Alpaca". Size: S - XXXL.
DROPS 140-22 |
|
|
STRIPES: Work 1 round with every color combination as follows: 2 strands 2925 1 strand 3770 + 1 strand 2925 2 strands 3770 1 strand 3770 + 1 strand 3900 2 strands 3900 1 strand 3900 + 1 strand 6736 2 strands 6736 1 strand 6736 + 1 strand 3800 2 strands 3800 1 strand 3800 + 1 strand 3770 Then work 1 round with every color combination and repeat upwards as follows: 2 strands 3770 1 strand 3770 + 1 strand 2925 2 strands 2925 1 strand 2925 + 1 strand 3900 2 strands 3900 1 strand 3900 + 1 strand 6736 2 strands 6736 1 strand 6736 + 1 strand 3800 2 strands 3800 1 strand 3800 + 1 strand 3770 CROCHET TIP: Replace first tr on every round/row with ch 4. DECREASE TIP 1 (applies to body): Dec as follows: Work tr until 3 tr remain, * in the first of these work 1 dc, in the next 1 hdc and in the last 1 sc, turn with ch 1, skip sc, work 1 sl st in hdc and 1 sl st in dc, then 1 sc in first tr, 1 hdc in next tr and 1 dc in next tr, work tr until 3 tr remain at end of row *, repeat from *-* until a total of 6-8-12 rows have been worked. DECREASE TIP 2 (applies to sleeve): Dec at beg of row by working sl sts over the no of tr to be dec. Dec at end of row by working until same no of tr to be dec remains, turn piece. -------------------------------------------------------- BODY: Read US/UK above! Worked in the round in a circle from mid back with 2 strands Alpaca and STRIPES – see explanation above. Ch 8 on hook size 5 mm / H/8 and form a ring with 1 sl st in first ch. ROUND 1: Work 16 tr in ch-ring. READ CROCHET TIP! ROUND 2: 2 tr in every tr = 32 tr. ROUND 3: * 1 tr in next tr, 2 tr in next tr *, repeat from *-* the entire round = 48 tr. ROUND 4: * 1 tr in each of next 2 tr, 2 tr in next tr *, repeat from *-* the entire round = 64 tr. ROUND 5: * 1 tr in each of next 3 tr, 2 tr in next tr *, repeat from *-* the entire round = 80 tr. ROUND 6: * 1 tr in each of next 4 tr, 2 tr in next tr *, repeat from *-* the entire round = 96 tr. ROUND 7: * 1 tr in each of next 5 tr, 2 tr in next tr *, repeat from *-* the entire round = 112 tr. ROUND 8: * 1 tr in each of next 6 tr, 2 tr in next tr *, repeat from *-* the entire round = 128 tr. ROUND 9: * 1 tr in each of next 7 tr, 2 tr in next tr *, repeat from *-* the entire round = 144 tr. ROUND 10: * 1 tr in each of next 8 tr, 2 tr in next tr *, repeat from *-* the entire round = 160 tr. ROUND 11: * 1 tr in each of next 9 tr, 2 tr in next tr *, repeat from *-* the entire round = 176 tr. ROUND 12: Work 1 tr in every tr but work 2 tr in every 16th tr = 187 tr. Piece now measures approx. 20 cm / 8" from the middle and out. SIZE S/M: ROUND 13: ch 1, then work 1 sc in each of the first 45 tr (= up towards neck), ch 30 loosely, skip the next 27 tr (= armhole), then work 1 sc in each of the next 88 tr (= down towards back), ch 30 loosely, skip the next 27 tr (= armhole) and fasten with 1 sl st in first sc on round. ROUND 14: Work 1 tr in every sc - but inc 2 tr evenly over the first 45 sc (= 47 tr), then work 30 tr in ch-row over armhole, work 1 tr in every sc – but inc 3 tr evenly over the bottom 88 sc (= 91 tr), work 30 tr in ch-row over armhole and fasten with 1 sl st in 4th ch = 198 tr. ROUND 15 to 23: Continue with tr – while at the same time inc 6 tr evenly on every round. After 23rd round there are 252 tr on the round and piece now measures approx. 42 cm / 16½" from the middle and out. Continue working only over 87 tr in each side – i.e. do not work over 39 tr at top by neck and 39 tr at bottom of back. Cut the thread. Continue with explanation under left front piece. SIZE L/XL: ROUND 13: Work 1 tr in every tr but work 2 tr in every 17th tr = 198 tr. ROUND 14: 1 ch, then work 1 sc in each of the first 50 tr (= up towards neck), ch 32 loosely, skip the next 29 tr (= armhole), then work 1 sc in each of the next 90 tr (= down towards back), ch 32 loosely, skip the next 29 tr (= armhole) and fasten with 1 sl st in first sc on round. ROUND 15: Work 1 tr in every sc - but inc 3 tr evenly over the first 50 sc (= 53 tr), then work 32 tr in ch-row over armhole, work 1 tr in every sc – but inc 3 tr evenly over the bottom 90 sc (= 93 tr), work 32 tr in ch-row over armhole and fasten with 1 sl st in 4th ch = 210 tr. ROUND 16 to 24: Continue with tr – while at the same time inc 6 tr evenly on every round. After 24th round there are 264 tr on the round and piece now measures approx. 44 cm / 17¼" from the middle and out. Continue working only over 91 tr in each side – i.e. do not work over 41 tr at top by neck and 41 tr at bottom of back. Cut the thread. Continue with explanation under left front piece. SIZE XXL/XXXL: ROUND 13: Work 1 tr in every tr but work 2 tr in every 17th tr = 198 tr. ROUND 14: Work 1 tr in every tr but work 2 tr in every 18th tr = 209 tr. ROUND 15: 1 ch, then work 1 sc in each of the first 54 tr (= up towards neck), ch 36 loosely, skip the next 32 tr (= armhole), then work 1 sc in each of the next 91 tr (= down towards back), ch 36 loosely, skip the next 32 tr (= armhole) and fasten with 1 sl st in first sc on round. ROUND 16: Work 1 tr in every sc - but inc 2 tr evenly over the first 54 sc (= 56 tr), then work 36 tr in ch-row over armhole, work 1 tr in every sc – but inc 3 tr evenly over the bottom 91 sc (= 94 tr), and work 36 tr in ch-row over armhole = 222 tr. ROUND 17 to 26: Continue with tr – while at the same time inc 6 tr evenly on every round. After 26th round there are 282 tr on the round and piece now measures approx. 47 cm / 18½" from the middle and out. Continue working only over 95 tr in each side – i.e. do not work over 46 tr at top by neck and 46 tr at bottom of back. Continue with explanation under left front piece. LEFT FRONT PIECE - ALL SIZES: = 87-91-95 tr. Insert a marker after 27-29-33 sts in from each side (= 33-33-29 sts between markers). Then work tr back and forth over these sts while at the same time inc 1 st at every marker on every row (i.e. inc 2 sts on row, inc alternately before and after every marker) and dec 3 sts at beg and end of every row in each side - SEE DECREASE TIP 1 - until a total of 6-8-12 rows have been worked back and forth = 63-59-47 tr. RIGHT FRONT PIECE: Work the same way as on left front piece over the 87-91-95 tr in the right side. SLEEVE: Worked back and forth from sleeve cap and down with 2 strands Alpaca and STRIPES – see explanation above. Begin in the same color as round 13-14-15 on body, continue with stripes as on body. Ch 28-34-38. Turn and work 1 tr in 5th ch from hook ( = 2 tr), then work 1 tr in every ch = 25-31-35 tr. ROW 2: Ch 4, 3 tr in first tr, 1 tr in each of the next 23-29-33 tr, 4 tr in the last tr = 31-37-41 tr. Turn. ROW 3, 4 and 5: Ch 4, 2 tr in first tr, 1 tr in every tr until 1 tr remains, 3 tr in the last tr = 43-49-53 tr. Turn. ROW 6: Ch 4, 3 tr in first tr, 1 tr in each of the next 41-47-51 tr, 4 tr in the last tr = 49-55-59 tr. Turn. Then work 1 tr in every tr, AT THE SAME TIME when piece measures 14 cm / 5½", dec 1 tr in each side – SEE DECREASE TIP! Repeat dec every 7-5-5 cm / 2¾"-2"-2" 5-7-7 more times = 37-39-43 tr. Continue with 1 tr in every tr until sleeve measures approx. 61-61-61 cm / 24"-24"-24" (same in all sizes because of wider shoulders on body). Fasten off. ASSEMBLY: Sew sleeve seams tog edge to edge to avoid a chunky seam. Work 1 picot edge around the entire body and at the bottom around the sleeves with 2 strands in the last color used as follows: 1 sl st, * ch 5, 1 dc in first ch, skip 1 st, fasten with 1 sc in next st *, repeat from *-* the entire round and finish with 1 sl st in first ch. Sew in the sleeves. ---------------------------------------------------------- Head band and moebius neck warmer - see pattern 140-16 ---------------------------------------------------------- |
|

|
|
|
Have you made this or any other of our designs? Tag your pictures in social media with #dropsdesign so we can see them! Do you need help with this pattern?You'll find tutorial videos, a Comments/Questions area and more by visiting the pattern on garnstudio.com. © 1982-2024 DROPS Design A/S. We reserve all rights. This document, including all its sub-sections, has copyrights. Read more about what you can do with our patterns at the bottom of each pattern on our site. |
|


With over 40 years in knitting and crochet design, DROPS Design offers one of the most extensive collections of free patterns on the internet - translated to 17 languages. As of today we count 304 catalogs and 11422 patterns - 11417 of which are translated into English (US/in).
We work hard to bring you the best knitting and crochet have to offer, inspiration and advice as well as great quality yarns at incredible prices! Would you like to use our patterns for other than personal use? You can read what you are allowed to do in the Copyright text at the bottom of all our patterns. Happy crafting!
Comments / Questions (48)
Jess wrote:
I would like to make this but I just need clarification if the treble stitches that are making up most of the pattern are US treble? I am crocheting from US terms but my body section does not fit the measurement of 8in so now I am wondering if it pattern is written from UK terms and I should have done the body rounds in US dc stitch. Looking at the picture though it does look like treble stitch. Am a bit confused!
28.07.2015 - 08:25DROPS Design answered:
Dear Jess, the tr in this pattern is for US-English pattern (Uk-English pattern uses dtr) - remember to check and keep correct gauge, ie 14 tr x 5½ rows with tr vertically with 2 strands = 10 x 10 cm / 4'' x 4''. Happy crocheting!
28.07.2015 - 11:12Hello, love this sweater. I'm currently working on the sleeves, and am unclear how to do them... Do you work the sleeves separately then attach? If so the 28 chains doesn't seem to be near big enough to go around for an upper sleeve. Any help would be appreciated. Thank you!
17.04.2014 - 03:25DROPS Design answered:
Dear Katie, sleeves are worked separately top down, ie you start from top of cap with inc for cap and armhole then dec for length. Happy crocheting!
17.04.2014 - 08:36Ich habe jetzt den gehäkelten Kreis vor mir liegen und habe Probleme beim Start des Vorderteils. Soll ich jetzt von der geschätzten oberen Mitte 27 M. nach der Seite zählen; Marker anbringen und dann ab der 28. M. die 87 M. fürs Vorderteil beginnen? Aus der Anleitung ist für mich nicht ersichtlich, wo ich mit dem Zählen der M. anfangen soll. Die Skizze hilft zwar, aber ich wollte gerne sichergehen. Ansonsten ist es eine Freude mit den vorgegebenen Farben und der Wolle zu arbeiten!
16.01.2014 - 06:32DROPS Design answered:
Liebe Heike, der Rundenanfang bleibt wie gehabt. Sie setzten dann die Markierung nach der angegebenen Anzahl Maschen und häkeln in Hin-und Rück-Reihen.
17.01.2014 - 15:16Danke soweit. Also schließ ich die 28 Lm mit einer Kettmasche zum Ring? Und da steht von der Armkugel, d.h. die 28 Lm sind oben, oder? Ist das nicht zu schmal?
12.03.2013 - 13:09Tanja answered:
Hallo Lisa, die 28 Lm sollst du nicht zum Ring schließen. Du hast recht, du beginnst das "Ärmelteil" oben, d.h. mit der Schulter zuerst. Es wird oben halbrund und ist nicht zu schmal, da du ja weitere Dstb aufnimmst, vom orangenen Streifen, über rot, blaulila bis hin zu dem helllila. Dann hast du die breiteste Stelle vom Ärmelteil. Beim Einnähen des Ärmels landet genau der helllila Streifen noch in der Achsel, also im unteren Winkel des Armschlitzes, den du offen gelassen hast.
13.03.2013 - 21:49Hallo, ich habe das Rumpfteil und die vorderen Teile gehäkelt und wollt mich nun an die Ärmel machen. Leider verstehe ich die Anleitung ab hier überhaupt nicht mehr. Häkel ich die Ärmel direkt an die Jacke dran oder mach ich die einzeln und nähe sie später dran? Werden die 28 Lm (Gr.S) zu einem Ring geschlossen. Wer kann mir helfen? Ich bin am verzweifeln... Grüße
11.03.2013 - 22:16DROPS Design answered:
Liebe Lisa, die Ärmel werden in Hin-und Rück-R separat (von oben nach unten) gehäkelt. Sie sehen auch am Satz, dass sie nicht angehäkelt werden: „Die Ärmel einnähen“.
12.03.2013 - 12:20Die Jacke war total einfach zu häckeln und ist echt toll geworden. Ich hab vorne noch zwei Knöpfe angebracht, dass man sie unter der Brust locker schliessen kann. Trotz der luftigen Machart ist sie ziemlich warm, wegen der doppelt verarbeiteten Alpakawolle. Wegen dem Muster muss man am Schluss ziemlich viele Fäden vernähen, das war etwas mühsam; ansonsten ein super Teil aus tollem Garn!!
11.03.2013 - 11:00Sorry, habe leider vergessen zu erwähnen, dass ich sie mit BabyAlpacaSilk stricken möchte. Vielen Dank, im Voraus
03.02.2013 - 16:47Ich würde diese Jacke gerne in der Farbzusammenstellung wie bei Summer Circle DROPS-136-1 stricken, weiss aber nicht wie ich den Farbverlauf gut hinbekomme und wieviel von welcher Farbe ich benötige!
03.02.2013 - 16:32DROPS Design answered:
Liebe Frau Fliehmann, da es auch 5 Farben sind können Sie sich an der Anleitung mit dem Original –Garn orientieren. Die Übergänge werden sanft wenn Sie die 2 Farben schon mischen, also zusammen verhäkeln, ehe die nächste Farbe 2-fädig gehäkelt wird. Alpaca und BabyAlpaca Silk laufen gleich weit, daher ist der Materialverbrauch gleich.
05.02.2013 - 15:32Mati wrote:
Hola, esta precioso el saco, me decidí hacerlo, pero me quedo ondeado al terminar la primera parte de la espalda, está bien? sigo? o desarmo? muchas gracias, espero una pronta respuesta.
02.02.2013 - 12:20Bonjour, en taille S/M, après les tours 15 à 23, il est demandé de continuer sur les 2x87 brides et de laisser les 2x39, avant de continuer le devant gauche. Comment faire ? On travaille en rond avec des mailles coulées ou on coupe le fil pour passer à la série suivante ? Combien de rangs ? Juste 1 ?
18.01.2013 - 10:15DROPS Design answered:
Bonjour Nathcat, les emmanchures doivent être bien placées de chaque côté, et les 39 DB du bas du dos et de l'encolure doivent être bien centrées entre les emmanchures, pliez votre ouvrage pour vérifier où commencer, et, en fonction, continuez en mc jusqu'à la 1ère m ou coupez le fil au choix. Bon crochet !
18.01.2013 - 14:25