DROPS Verdi
DROPS Verdi
48% Acrylic, 20% Wool, 17% Polyester, 15% Mohair
Discontinued
find alternatives
DROPS Kid-Silk
DROPS Kid-Silk
75% Mohair, 25% Silk
from 4.60 £ /25g
DROPS Super Sale

Chestnutfire

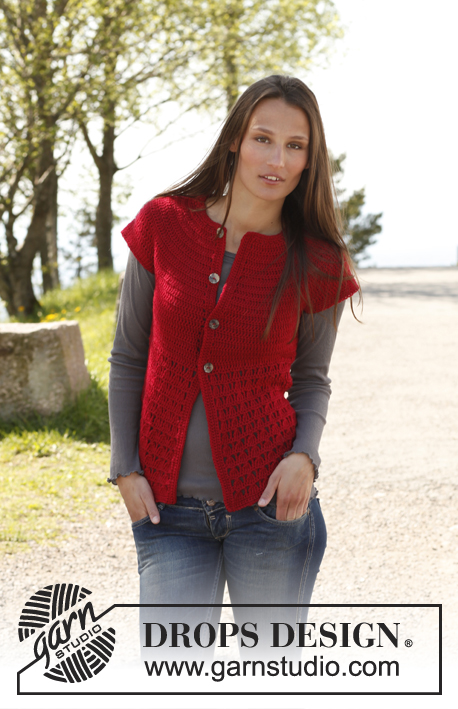
Knitted DROPS jacket worked sideways in ”Verdi” and ”Kid Silk”. Size: S - XXXL.

DROPS 140-6
DROPS design: Pattern no ve-029
Yarn group D and A
----------------------------------------------------------
Size: S - M - L - XL - XXL - XXXL
Materials: DROPS VERDI from Garnstudio
Colour no 07, red/black: 350-350-350-700-700-700 g
Materials: And use: DROPS KID-SILK from Garnstudio
Colour no 15, dark brown: 125-150-150-175-175-200 g

DROPS CIRCULAR NEEDLE SIZE 7 mm (80 cm) - or size needed to get 13 sts x 15 rows in stocking st with 1 thread Verdi and 1 thread Kid-Silk = 10 x 10 cm (13 sts x 23 rows in garter st = 10 x 10 cm).
DROPS CIRCULAR NEEDLE SIZE 6 mm (80 cm) - for bands

-------------------------------------------------------

Alternative Yarn – See how to change yarns here
Yarn Groups A to F – Use the same pattern and change the yarn here
Yarn usage using an alternative yarn – Use our yarn converter here

-------------------------------------------------------

DROPS Verdi
DROPS Verdi
48% Acrylic, 20% Wool, 17% Polyester, 15% Mohair
Discontinued
find alternatives
DROPS Kid-Silk
DROPS Kid-Silk
75% Mohair, 25% Silk
from 4.60 £ /25g

DROPS Super Sale

SAVE 30% on 6 cotton favourites!
Valid until 12.04.2024

Pattern instructions

NOTE: This pattern is written in British English. All measurements in charts are in cm. For conversion from cm to inches - click here. There are different terms for crocheting in British and American English. If this pattern includes crochet, click for "crochet terms" here. For this pattern in American English, please click here.
GARTER ST (back and forth on needle):
K all rows. 1 ridge = 2 rows K.

KNITTING TIP 1 (applies to body):
To get an A-shape on the jacket, work short rows on body as follows:
Row 1 (= WS): Work 30-30-32-32-34-34 sts, tighten thread and turn piece.
Row 2 (= RS): K all sts.
Row 3: Work 60-60-64-64-68-68 sts, tighten thread and turn piece.
Row 4: K all sts.
Row 5: Work all 95-98-99-99-102-103 sts on needle.

KNITTING TIP 2 (applies to collar):
To get a wider collar, work short rows over the 21-21-22-22-24-24 sts in garter st on collar as follows:
Row 1 (= RS): Work 7-7-7-8-8-8 sts, tighten thread and turn piece.
Row 2 (= WS): K all sts.
Row 3: Work 14-14-14-16-16-16 sts, tighten thread and turn piece.
Row 4: K all sts.
Row 5: Work over all sts on the needle.
Repeat rows 1 to 5 every 3 cm on collar a total of 7-7-7-8-8-8 times.

INCREASE TIP:
Inc 1 st inside outermost st in each side as follows: 1 st, make 1 YO, work until 1 st remains, make 1 YO, 1 st. On next row work YO twisted (i.e. work in back loop of YO instead of front) to avoid holes.
--------------------------------------------------------

BODY:
Back and front piece are worked sideways in one from mid front on right front piece. Cast on 137-141-144-146-152-154 sts (incl collar) on circular needle size 6 mm with 1 thread Verdi and 1 thread Kid-Silk. Work in GARTER ST - see explanation above - for 22-22-24-25-26-26 cm = band mid front (1st row = RS).
On next row from RS switch to circular needle size 7 mm and work as follows: Cast off the first 21-21-22-22-24-24 sts (= collar), K the rest of row = 116-120-122-124-128-130 sts on needle. Continue in stocking st but work the last 6 sts on row (seen from RS) in garter st until finished measurements (= bottom edge on body). REMEMBER THE KNITTING TENSION!
When piece measures 31-32-34-37-40-42 cm, cast off for armhole on next row from RS as follows: Cast off the first 21-22-23-25-26-27 sts = 95-98-99-99-102-103 sts on needle. When piece measures 33-35-38-41-45-48 cm, insert 1 marker at beg of row from RS, measure piece from here. Now work short rows on next row from WS - READ KNITTING TIP 1.
When piece measures 2-3-4-4-5-6 cm, cast on new sts for armhole as follows: On last row from WS, cast on 21-22-23-25-26-27 sts = 116-120-122-124-128-130 sts on needle.
Continue until piece measures 11-13-14-16-19-22 cm. On last row from WS, cast on 21-21-22-22-24-24 new sts (= collar on back piece) = 137-141-144-146-152-154 sts. Then work the first 21-21-22-22-24-24 sts and work the last 6 sts in garter st, work the other sts in stocking st. Work like this for 3 cm. Then work short rows over sts in garter st on collar on next row from RS - READ KNITTING TIP 2.
When piece measures 35-37-40-43-46-49 cm, cast off the first 21-21-22-22-24-24 sts in garter st on next row from RS = 116-120-122-124-128-130 sts. Continue in stocking st and 6 sts in garter st in the side. When piece measures 44-47-50-55-60-65 cm, cast off the first 21-22-23-25-26-27 sts for armhole on next row from RS = 95-98-99-99-102-103 sts on needle.
When piece measures 2-3-4-4-5-6 cm from where armhole were cast off (approx. 46-50-54-59-65-71 cm from 1st marker), insert 1 marker at beg of row from RS (remove 1st marker), measure piece from here. Now work short rows - READ KNITTING TIP 1 - one more time. When piece measures 2-3-4-4-5-6 cm, cast on new sts for armhole as follows: On last row from WS, cast on 21-22-23-25-26-27 sts = 116-120-122-124-128-130 sts on needle.
Continue until piece measures 11-13-14-16-19-22 cm. Now cast on 21-21-22-22-24-24 new sts on last row from WS = 137-141-144-146-152-154 sts on needle (= band on left front piece). On next row from RS switch to circular needle size 6 mm and then work in garter st over all sts until finished measurements. Loosely cast off all sts when piece measures 33-35-38-41-45-48 cm.

SLEEVE:
Worked back and forth on needle. Cast on 26-28-30-32-32-34 sts on circular needle size 6 mm with 1 thread Verdi and 1 thread Kid-Silk. Work in garter st for 5 cm (1st row = RS). On next row from RS switch to circular needle size 7 mm and continue in stocking st. When piece measures 7-7-7-6-6-6 cm, inc 1 st in each side - Read INCREASE TIP. Repeat inc 7-7-7-8-9-9 more times every 6-6-6-5-4½-4 cm (= a total of 8-8-8-9-10-10 inc) = 42-44-46-50-52-54 sts. When piece measures 53-53-53-52-51-50 cm (shorter measurements in the larger sizes because of broader shoulder width), loosely cast off all sts.

ASSEMBLY:
Sew shoulder seam and seam on collar in one on one side, repeat on the other side. Sew in sleeves, sew sleeve seams in front loop of outermost sts.

POCKET:
Worked back and forth on needle. Cast on 28 sts on circular needle size 6 mm with 1 thread Verdi and 1 thread Kid-Silk. Work in garter st until pocket measures 22 cm vertically, loosely cast off all sts. Knit another pocket the same way. Sew pockets on to front piece, approx. 8-8-9-9-10-10 cm in from mid front and approx. 24-24-24-25-25-25 cm from bottom edge.

Diagram

symbols = knitting direction
diagram
Do you have a question? See a list of frequently asked questions (FAQ)

Knitting tension is what determines the final measurements of your work, and is usually measured per 10 x 10 cm. It is provided like so: number of stitches in width x number of rows in height - eg: 19 stitches x 26 rows = 10 x 10 cm.

The knitting tension is very individual; some people knit/crochet loosely while others work tightly. You adjust the knitting tension with the needle size, which is why the suggested needle size is only meant as a guide! You need to adjust this (up or down) to ensure that YOUR knitting tension matches the knitting tension provided in the pattern. If you work with a different knitting tension than provided you will have a different yarn consumption, and your work will have different measurements than what the pattern suggests.

The knitting tension also determines which yarns can replace each other. As long as you achieve the same knitting tension you can replace one yarn with another.

See DROPS lesson: How to measure your tension/gauge

See DROPS video: How to make a gauge tension swatch

The required amount of yarn is provided in grams, eg: 450 g. To calculate how many balls you’ll need you first need to know how many grams are in 1 ball (25g, 50g or 100g). This information is available if you click on the individual yarn quality on our pages. Divide the amount required with the amount of each ball. For example, if each ball is 50g (the most common amount), the calculation will be as follows: 450 / 50 = 9 balls.

The important thing when changing from one yarn to another is that the knitting/crochet tension remains the same. This is so that the measurements of the finished piece will be the same as on the sketch provided. It is easier to achieve the same knitting tension using yarns from the same yarn group. It is also possible to work with multiple strands of a thinner yarn to achieve the knitting tension of a thicker one. Please try our yarn converter. We recommend you to always work a test swatch.

Please NOTE: when changing yarn the garment might have a different look and feel to the garment in the photo, due to individual properties and qualities of each yarn.

See DROPS lesson: Can I use a different yarn than the one mentioned in the pattern?

All our yarns are categorised into yarn groups (from A to F) according to thickness and knitting tension – group A contains the thinnest yarns and group F the thickest. This makes it easier for you to find alternative yarns to our patterns, should you wish to switch yarn. All yarns within the same group have a similar knitting tension and can easily replace each other. However, different yarn qualities have different structures and properties which will give the finished work a unique look and feel.

Click here for an overview of the yarns in each yarn group

At the top of all our patterns you’ll find a link to our yarn calculator, which is a helpful tool should you wish to use a different yarn than suggested. By filling in the yarn quality you wish to replace, the amount (in your size) and number of strands, the calculator will present good alternative yarns with the same knitting tension. Additionally it will tell you how much you’ll require in the new qualities and whether you’ll need to work with multiple strands. Most skeins are 50g (some are 25g or 100g).

If the pattern is worked with multiple colours, every colour will have to be calculated separately. Similarly, if the pattern is worked with several strands of different yarns (for example 1 strand Alpaca and 1 strand Kid-Silk) you will have to find alternatives for each, individually.

Click here to see our yarn calculator

Since different yarns have different qualities and textures we have chosen to keep the original yarn in our patterns. However, you can easily find options among our available qualities by using our yarn calculator, or simply pick a yarn from the same yarn group.

It is possible that some retailers still have discontinued yarns in stock, or that someone has a few skeins at home that they would like to find patterns for.

The yarn calculator will provide both alternative yarn as well as required amount in the new quality.

If you think it's hard to decide what size to make, it can be a good idea to measure a garment you own already and like the size of. Then you can pick the size by comparing those measures with the ones available in the pattern's size chart.

You'll find the size chart at the bottom of the pattern.

See DROPS lesson: How to read size chart

The needle size provided in the pattern serves only as a guide, the important thing is to follow the knitting tension. And since knitting tension is very individual, you will have to adjust the needle size to ensure that YOUR tension is the same as in the pattern – maybe you’ll have to adjust 1, or even 2 needle sizes, up or down to achieve the correct tension. For this, we recommend that you work test swatches.

Should you work with a different knitting tension than the one provided, the measurements of the finished garment might deviate from the measurement sketch.

See DROPS lesson: How to measure your tension/gauge

See DROPS video: How to make a tension/gauge swatch

Working a garment top-down provides more flexibility and room for personal adjustment. For example it is easier to try the garment on while working, as well as making adjustments to length of yoke and shoulder caps.

The instructions are carefully explaining every step, in the correct order. Diagrams are adjusted to the knitting direction and are worked as usual.

The diagram depicts all rows/rounds, and every stitch seen from the right side. It is read from bottom to top, from right to left. 1 square = 1 stitch.

When working back and forth, every other row is worked from the right side and every other row is worked from the wrong side. When working from the wrong side, the diagram will have to be worked reversed: from left to right, knit stitches are purled, purl stitches are knit etc.

When working in the round every round is worked from the right side and the diagram are worked from right to left on all rounds.

See DROPS lesson: How to read knitting diagrams

The diagram depicts all rows/rounds, and every stitch seen from the right side. It is worked from bottom to top, from right to left.

When working back and forth every other row is worked from the right side: from right to left and every other row is worked from the wrong side: from left to right.

When working in the round, every row in the diagram are worked from the right side, from right to left.

When working a circular diagram you start in the middle and work your way outwards, counter clockwise, row by row.

The rows usually start with a given number of chain stitches (equivalent to the height of the following stitch), this will either be depicted in the diagram or explained in the pattern.

See DROPS lesson: How to read crochet diagrams

Instructions for working several diagrams after each other on the same row/round, will often be written like so: “work A.1, A.2, A.3 a total of 0-0-2-3-4 times". This means you work A.1 once, then A.2 is worked once, and A.3 is repeated (in width) the number of times provided for your size – in this case like so: S = 0 times, M = 0 times, L=2 times, XL= 3 times and XXL = 4 times.

The diagrams are worked as usual: begin with the first row in A.1, then work the first row in A.2 etc.

See DROPS lesson: How to read knitting diagrams

See DROPS lesson: How to read crochet diagrams

The total width of the garment (from wrist-to-wrist) will be larger in the larger sizes, despite the actual sleeves being shorter. The larger sizes have longer sleeve caps and wider shoulders, so there will be a good fit in all sizes.

The measurement sketch/schematic drawing provides information regarding the full length of the garment. If it’s a jumper or a jacket the length is measured from the highest point on the shoulder closest to the neckline, and straight down to the bottom of the garment. It is NOT measured from the tip of shoulder. Similarly, the length of yoke is measured from the highest point on the shoulder and down to where yoke is split into body and sleeves.

On a jacket measures are never taken along bands, unless specifically stated. Always measure inside band stitches when measuring the length.

See DROPS lesson: How to read a schematic drawing

Diagrams are often repeated on the round or in height. 1 repeat is the diagram the way it appears in the pattern. If it says to work 5 repeats of A.1 in the round, then you work A.1 a total of 5 times after/next to each other in the round. If it says to work 2 repeats of A.1 vertically/in height you work the entire diagram once, then begin again at the start and work the entire diagram one more time.

Chain stitches are slightly narrower than other stitches and to avoid working the cast-on edge too tight, we simply chain more stitches to begin with. The stitch count will be adjusted on the following row to fit the pattern and measurement sketch.

The rib edge is more elastic and will contract slightly compared to, for example, stocking stitch. By increasing before the rib edge, you avoid a visible difference in width between the rib edge and the rest of the body.

It’s very easy to cast off too tightly, and by making yarn overs while casting off (and simultaneously casting these off) you avoid a too tight cast off edge.

See DROPS video: How to bind off with yarn overs (yo)

To achieve an even increase (or decrease) you can increase on, for example: every 3rd and 4th row alternately, like so: work 2 rows and increase on the 3rd row, work 3 rows and increase on the 4th. Repeat this until the increase is complete.

See DROPS lesson: Increase or decrease 1 st on every 3rd and 4th row alternately

Should you prefer to work in the round instead of back and forth, you may of course adjust the pattern. You’ll need to add steeks mid-front (usually 5 stitches), and follow the instructions. When you would normally turn and work from the wrong side, simply work across the steek and continue in the round. At the end you’ll cut the piece open, pick up stitches to work bands, and cover the cut edges.

See DROPS video: How to knit steeks and cut open

Should you prefer to work back and forth instead of in the round, you may of course adjust the pattern so you work the pieces separately and then assemble them at the end. Divide the stitches for the body in 2, add 1 edge stitch in each side (for sewing) and work the front and back pieces separately.

See DROPS lesson: Can I adapt a pattern for circular needles into straight needles?

Pattern repeats can vary slightly in the different sizes, in order to get the correct proportions. If you’re not working the exact same size as the garment in the photo, yours might deviate slightly. This has been carefully developed and adjusted so that the complete impression of the garment is the same in all sizes.

Make sure to follow instructions and diagrams for your size!

If you have found a pattern you like which is available in women’s size it’s not very difficult to convert it to men’s size. The biggest difference will be the length of sleeves and body. Start working on the women size that you think would fit across the chest. The additional length will be worked right before you cast off for the armhole/sleeve cap. If the pattern is worked top-down you can add the length right after the armhole or before the first decrease on sleeve.

Regarding additional yarn amount, this will depend on how much length you add, but it is better with a skein too many than too few.

All yarns will have excess fibres (from production) that might come off as lint or shedding. Brushed yarns (ie hairier yarns) have more of these loose, excess fibres, causing more shedding.

Shedding also depends on what is worn under or over the garment, and whether this pulls at the yarn fibres. It’s therefore not possible to guarantee that there will be no shedding

Below are some tips on how to get the best result when working with hairier yarns:

1. When the garment is finished (before you wash it) shake it vigorously so the looser hairs come off. NOTE: do NOT use a lint roller, brush or any method that pulls at the yarn.

2. Place the garment in a plastic bag and put it in your freezer - the temperature will cause the fibres to become less attached to each other, and excess fibres will come off easier.

3. Leave in the freezer for a few hours before taking it out and shaking it again.

4. Wash the garment according to the instructions on the yarn label.

Pilling is a natural process that happens to even the most exclusive of fibers. It's a natural sign of wear and tear that is hard to avoid, and that is most visible in high friction areas of your garment like a sweater's arms and cuffs.

You can make your garment look as new by removing the pilling, using a fabric comb or a pill/lint remover.

Still can't find the answer you need? Then scroll down and leave your question so one of our experts can try to help you. This will be done normally within 5 to 10 working days.
In the meantime, you can read the questions and answers that others have left to this pattern or join the DROPS Workshop on Facebook to get help from fellow knitters/crocheters!

You might also like...

Post a comment to pattern DROPS 140-6

We would love to hear what you have to say about this pattern!

If you want to leave a question, please make sure you select the correct category in the form below, to speed up the answering process. Required fields are marked *.

Comments / Questions (59)

country flag Linda Hilverink Hayes wrote:

I cannot find the yarn you recommend. Is Lion Brand Wool ease a good substitute for this pattern? How many skiens would I need?

13.10.2023 - 00:25

DROPS Design answered:

Dear Mrs Hayes, our DROPS Verdi is now discontinued, but please use our yarn converter to find alternatives - find stores shipping in USA here. Happy knitting!

13.10.2023 - 08:42

country flag Camilla Larsson wrote:

Hej, har fått tag i detta garn, Verdi, på Röda Korset☺️ Min undran är om koftan kan stickas utan Drops Kid Silk om stickfastheten stämmer på enbart Verdi?

23.09.2021 - 13:30

DROPS Design answered:

Hej Camilla. Gör en provlapp där du ser till att få den stickfasthet som uppges i mönstret så ser du om du tycker att det ser ok ut. Stickfastheten på bara Verdi är ca 14 m x 16 v, så det kan hända att det blir ok med den stickfasthet som uppges här i mönstret. Mvh DROPS Design

23.09.2021 - 13:38

country flag Ann wrote:

Vraag over de verkorte toeren voor de kraag. Deze 5 naalden moeten elke 3 cm herhaalt worden. Op welk punt van de kraag worden deze 3 cm gemeten? Op het punt bij de schouder of op het punt onderaan de kraag. Dit laatste zou betekenen dat de 5 toeren meteen achter elkaar herhaalt worden. Als je meet vanaf de schouder, dan zou dat betekenen dat er eerst weer 3 cm over alle steken gebreid moet worden alvorens aan de volgende 5 verkorte toeren te beginnen.

31.01.2016 - 22:29

DROPS Design answered:

Hoi Ann. Je meet de 3 cm vanaf de laatste punt dat je de verkorte toeren had gebreid. Dwz, je breit bijv de eerste keer na het plaatsen van de markeerder op 33 cm (in maat S). Dan meet je 3 cm vanaf het punt dat de vorige keer verkorte toeren waren klaar

01.02.2016 - 15:58

country flag Ann wrote:

Welke maat draagt het model?

27.01.2016 - 23:51

DROPS Design answered:

Hoi Ann. Onze modellen dragen de kleinste maat (S)

28.01.2016 - 12:51

country flag W. Kunkel wrote:

Guten Tag, ich habe eine Frage zu Stricktipp 1. Strickt man unter dem Armloch nur einmal Reihe 1-5 oder für die angegebenen cm? Danke für Ihre Hilfe.

27.09.2015 - 16:23

DROPS Design answered:

Sie wiederholen die verkürzten R so lange, bis die angegebenen cm erreicht sind. Also 2-3-4-4-5-6 cm ab dem Markierer, den Sie am Anfang der Hin-R angebracht haben.

27.09.2015 - 19:33

country flag Silvana Janssen wrote:

Hallo liebes Garnstudio Team, Ich habe zu dem Modell doch noch eine Frage, es geht um den breiteren Kragen .Ich verstehe die 5.Reihe nicht, muß ich die ganzen Maschen auch von die restlichen Maschen von der linken Nadel? Ich wäre über eine schnelle Antwort dankbar, da ich sie gerade str.und nicht weiterkomme. MFG S.JANSSEN

28.08.2015 - 13:25

DROPS Design answered:

Ja, Sie stricken alle M, die sich auf der linken Nadel befinden ab. Vorher haben Sie ja mitten in der R gewendet, in der 5. R stricken Sie dann wieder alle M der linken Nadel. Wenn Sie allgemeinere Hilfe zu verkürzten Reihen benötigen, können Sie auch im Kopf neben dem Foto unter Videos nachschauen.

19.09.2015 - 22:44

country flag Silvana Janßen wrote:

Wie kann ich die Jacke kürzer stricken?Da ich eine kleine Person bin. Ich komme auch mit dem Diagramm nicht klar.Wieviel cm muß der Kragen und die Kante sein? Über eine Antwort wäre ich dankbar. MFG S.JANßEN

27.08.2015 - 13:42

DROPS Design answered:

Leider ist es bei dieser Jacke etwas schwierig, sie kürzer zu arbeiten, da sie seitlich gestrickt wird (der Pfeil im Diagramm zeigt die Strickrichtung an, der Anschlagrand ist also die gesamte vordere rechte, senkrechte Kante) und für den Schnitt (A-Form) verkürzte R gestrickt werden, sodass man auch nicht einfach M weglassen kann. Der Kragen hat für Gr. S eine Höhe von 16 cm, der Armausschnitt ebenfalls. D.h. wenn Sie die M anschlagen, sind die ersten 21 M die Kragen-M und die nächsten 21 M die M des Armausschnitts, die restlichen M sind dann für das Rumpfteil.

02.09.2015 - 10:28

country flag Lemien wrote:

Bonjour, Je vois bien où commencer les rangs raccourcis pour la forme trapèze, mais je ne vois pas combien de fois il faut répéter les 6 rangs...

09.02.2015 - 17:12

DROPS Design answered:

Bonjour Mme Lemien, les rangs raccourcis du dos et des devants ne se tricotent que 2 fois sur toute la veste. Bon tricot!

26.02.2015 - 11:16

country flag Bi Lind wrote:

Skal til og i gang med jakken..... men er pindetykkelsen ikke for store i forhold til garnet? Virker noget "tyndt i det" :-( Mvh Bi

14.10.2014 - 13:39

DROPS Design answered:

Hej Bi, Modellen skal strikkes med 2 tråde, 1 trår Verdi + 1 tråd Kid Silk. Sørg for at du får 13 m på 10 cm i bredden. God fornøjelse!

20.10.2014 - 14:57

country flag HONGENS wrote:

Bonjour, j'ai déjà réalisé ce modèle avec la qualité Verdi , je souhaiterai le faire dans une qualité unie soit Vienna ou Vivaldi ? Si je choisi la Vivaldi dois je la tricoter en double ? Merci

25.09.2014 - 10:35

DROPS Design answered:

Bonjour Mme Hongens, on tricote ici avec 1 fil du groupe D (Verdi) + 1 fil du groupe A (Kid-Silk), Vienna appartient au même groupe que Verdi, le fil du groupe A devra être conservé. Pensez à demander conseil à votre magasin, il pourra vous renseigner et vous aider à choisir. Bon tricot!

25.09.2014 - 13:48