
Popular categories
Looking for a yarn?


|
|
Magic |
|
 |
 |
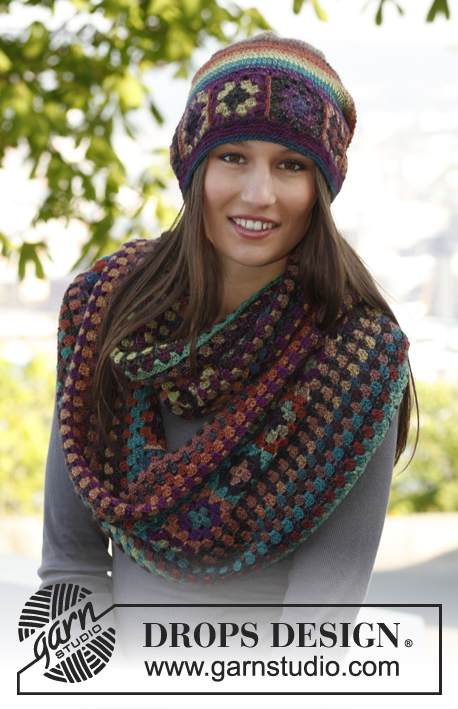
Crochet DROPS moebius neck warmer and hat with squares in ”Delight”.
DROPS 143-40 |
|
|
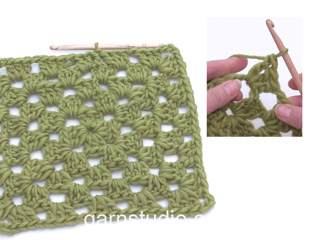
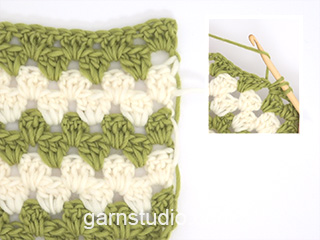
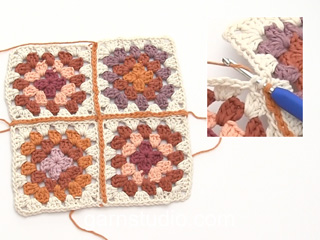
NECK WARMER: ROUNDS WITH DC: Beg every round with dc with 3 ch (= 1st dc), finish round with 1 sl st in 3rd ch from beg of round. COLOR CHANGE: To get a nice color change work last sl st on round with the new thread. Continue on to next round with the new thread. -------------------------------------------------------- SQUARE: Ch 6 with Delight on hook size 3.5 mmE/4 and form a ring with 1 sl st in 1st ch. Read ROUNDS WITH DC. ROUND 1: * Work 3 dc in ch-ring, 3 ch *, repeat from *-* a total of 4 times = 12 dc and 4 ch-spaces. Sl sts until next ch-space, cut the thread and switch to another color of the same ball (= new color each round) - READ COLOR CHANGE. ROUND 2: In every ch-space work as follows: 3 dc, 3 ch and 3 dc, 1 ch = 24 dc and 8 ch-spaces. Sl sts until next ch-space, cut the thread and switch to another color of the same ball. ROUND 3: * In next ch-space work as follows: 3 dc, 3 ch and 3 dc (= corner), ch 1, in next ch-space work 3 dc, 1 ch *, repeat from *-* the entire round = 36 dc and 12 ch-spaces. Cut and fasten the thread. Work a total of 25 squares. Work squares tog into 1 strip as follows: Place 2 and 2 squares on top of each other, insert hook through ch-space in the corner on both squares, work 1 ch and 1 sc, * ch 3, 1 sc in next ch-space on both squares *, repeat from *-*, cut and fasten the thread. Work the ends of the strip tog the same way to form a ring – NOTE: twist the strip 1 time to form a twisted ring, before working the ends tog. NECK WARMER: Worked from middle of piece = the twisted ring and out towards the outer edges - i.e. work upwards and downwards at the same time. NOTE! Beg every round with 3 ch (= 1st dc). Work 1st round along the strip as follows: In each of the 4 ch-spaces on every square work 3 dc and ch 1, finish round with 1 sl st in 3rd ch from beg of round (= 1st dc), sl st until next ch-space. Continue to work as follows: In every ch-space work 3 dc, ch 1, finish round with 1 sl st in 3rd ch from beg of round (= 1st dc), sl st until next ch-space. Continue like this until neck warmer measures approx. 36 cm / 14¼" vertically (the entire piece, not just from the middle and outwards). Cut and fasten the thread. -------------------------------------------------------- HAT: ROUNDS WITH DC: Beg every round with dc with 3 ch (= 1st dc), finish round with 1 sl st in 3rd ch from beg of round. DECREASE TIP 1: Dec 1 dc by working the next 2 dc tog as follows: Work 1 dc but wait with last pull through (= 2 sts on hook), work next dc but on last pull through, pull thread through all 3 sts on hook. ROUNDS WITH SC: Beg every round with sc with 1 ch (not counted as 1st sc) - NOTE! Work sc in back loop of every sc, finish with 1 sl st in 1st sc. DECREASE TIP 2: Dec 1 sc by working 2 sc tog as follows: * Insert hook in back loop of next sc, get thread *, repeat from *-* one more time, make 1 YO and pull thread through all 3 sts on hook. COLOR CHANGE: To get a nice color change work last sl st on round with the new thread. Continue on to next round with the new thread. -------------------------------------------------------- SQUARE: Ch 6 with Delight on hook size 3.5 mm/E/4 and form a ring with 1 sl st in 1st ch. Read ROUNDS WITH DC. ROUND 1: * Work 3 dc in ch-ring, 3 ch *, repeat from *-* a total of 4 times = 12 dc and 4 ch-spaces. Sl sts until next ch-space, cut the thread and switch to another color of the same ball (= new color each round) - READ COLOR CHANGE. ROUND 2: In every ch-space work as follows: 3 dc, 3 ch and 3 dc, 1 ch = 24 dc and 8 ch-spaces. Sl sts until next ch-space, cut the thread and switch to another color of the same ball. ROUND 3: * In next ch-space work as follows: 3 dc, 3 ch and 3 dc (= corner), ch 1, in next ch-space work 3 dc, 1 ch *, repeat from *-* the entire round = 36 dc and 12 ch-spaces. Cut and fasten the thread. Work a total of 8-9 squares. Work squares tog into 1 strip as follows: Place 2 and 2 squares on top of each other, insert hook through ch-space in the corner on both squares, work 1 ch and 1 sc, * ch 3, 1 sc in next ch-space on both squares *, repeat from *-*, cut and fasten the thread. Work the ends of the strip tog the same way to form a ring. HAT: Worked in the round. Work along one side of strip as follows: In each of the 4 ch-spaces on every square work 3 dc, finish with 1 sl st in 3rd ch (= 1st dc) from beg of round = 96-108 dc. Then work ROUNDS WITH DC - read explanation above - as follows: 3 ch (= 1st dc), skip 1st dc from previous round, 1 dc in every dc, finish round with 1 sl st in 3rd ch from beg of round. Continue until hat measures approx. 16 cm / 6¼" from bottom edge. Then dec as follows: ROUND 1: * 1 dc in each of the next 6-7 dc, dec 1 dc - READ DECREASE TIP 1 *, repeat from *-* the entire round = 84-96 dc (= 12 sts dec). ROUND 2: * 1 dc in each of the next 5-6 dc, dec 1 dc *, repeat from *-* the entire round = 72-84 dc. ROUND 3: * 1 dc in each of the next 4-5 dc, dec 1 dc *, repeat from *-* the entire round = 60-72 dc. ROUND 4: * 1 dc in each of the next 3-4 dc, dec 1 dc *, repeat from *-* the entire round = 48-60 dc. ROUND 5: * 1 dc in each of the next 2-3 dc, dec 1 dc *, repeat from *-* the entire round = 36-48 dc. ROUND 6: * 1 dc in each of the next 1-2 dc, dec 1 dc *, repeat from *-* the entire round = 24-36 dc. SIZE S/M: Work all dc on round tog 2 by 2 = 12 dc, cut the thread and sew the last dc tog with thread end. SIZE L/XL: ROUND 7: * 1 dc in next dc, dec 1 dc *, repeat from *-* the entire round = 24 dc. ROUND 8: Work all dc on round tog 2 by 2 = 12 dc, cut the thread and sew the last dc tog with thread end. EDGE: Work an edge along bottom edge of hat (along the other side of strip with squares) as follows: Work ch 1, in each of the 4 ch-spaces on every square work 4 sc = 128-144 sc, finish with 1 sl st in 1st sc from beg of round. Then work ROUNDS WITH SC - read explanation above. When edge measures approx. 1 cm / ½", dec 16-20 sc evenly on round - READ DECREASE TIP 2 = 112-124 sc. Continue until edge measures approx. 2 cm / ¾", cut and fasten the thread. The hat measures approx. 24-25 cm / 9½"-9¾" vertically. ---------------------------------------------------------- Wrist warmers – see design: 143-41 ---------------------------------------------------------- |
|
|
Have you made this or any other of our designs? Tag your pictures in social media with #dropsdesign so we can see them! Do you need help with this pattern?You'll find tutorial videos, a Comments/Questions area and more by visiting the pattern on garnstudio.com. © 1982-2024 DROPS Design A/S. We reserve all rights. This document, including all its sub-sections, has copyrights. Read more about what you can do with our patterns at the bottom of each pattern on our site. |
|


With over 40 years in knitting and crochet design, DROPS Design offers one of the most extensive collections of free patterns on the internet - translated to 17 languages. As of today we count 304 catalogs and 11422 patterns - 11417 of which are translated into English (US/in).
We work hard to bring you the best knitting and crochet have to offer, inspiration and advice as well as great quality yarns at incredible prices! Would you like to use our patterns for other than personal use? You can read what you are allowed to do in the Copyright text at the bottom of all our patterns. Happy crafting!
Comments / Questions (164)
Bonjour, je viens à nouveau vous questionner en regardant des bonnets crochetés par d'autres, je me suis apercue que le rendu n'était pas le même que pour le mien. En fait comme pour le tour de cou après le 1er tour de brides qui suit les carrés j'ai continué à crocheter 3 brides par arceau. En relisant les explications je pense avoir fait une erreur pouvez vous me la confirmer. Etant novice je crois que me suis trop précipitée... Cordialement Estelle
17.01.2013 - 16:17DROPS Design answered:
Bonjour Estelle, le 1er tour du bonnet se compose ainsi : 3 B dans chaque arceau des carrés, mais il se continue ensuite tout en brides = 1 B dans chaque B, d'un côté (haut du bonnet), puis en ms en bas du bonnet (bordure autour de la tête). Bon crochet !
17.01.2013 - 17:31Bonjour, nouvelle difficulté pour le bonnet. J'ai effectué le 1er tour de diminutions et j'ai bien obtenue 96 brides Pour le 2ème tour j'ai crocheté 6 brides et fais ensuite une diminution ce qui me donne deux brides... Mais à la fin de mon tour au lieu de n'avoir plus que 84 brides j'en ai toujours 96... Quand vous indiquez "1 B dans chacune des 5-6 B suiv" que faut il réellement faire? Merci pour votre aide et désolé du dérangement mais je débute en crochet. Cordialement Estelle
17.01.2013 - 08:00DROPS Design answered:
Bonjour Estelle, le bonnet est expliqué en 2 tailles, pour le 2ème tour de diminution, vous devez crocheter ainsi : *5 B (L/XL), 2 B écoulées ens *, répétez 12 fois au total de *-* sur les 7 B suivantes tout le tour = vous avez diminué 12 B et il reste 84 B. Bon crochet !
17.01.2013 - 09:39Bonjour Je suis en train de faire le bonnet et j'ai une question sur à ce sujet: il est indiqué de continuer les tours de brides jusqu'à ce que le bonnet mesure 16 cm de hauteur totale. Lorsque vous parlez de 16 cm de hauteur totale c'est en partant de la base d'un carré sans la bordure du bas? Merci d'avance pour votre réponse... Cordialement Estelle
15.01.2013 - 08:15DROPS Design answered:
Bonjour Estelle, vous avez raison, les 16 cm sont comptés à partir de la base d'un carré (la bordure du bas n'est pas encore faite), donc la hauteur d'un carré + les tours en brides. Bon crochet !
15.01.2013 - 09:18Il y a une petite erreur sur les explications, pour l echarpe j'ai fait le nombre de carrés indiqués 26 je crois , mis ensuite par 2 et le résultat fut que lécharpe s'est averee etre 2 fois plus courte que sur le model , et je trouve que c'est aussi bien, mais du coup il m est reste plein de laines, model du bonnet et mitaine 0k
08.01.2013 - 17:34Er dette virkelig hæklet af Delight-garnet? På billedet ser det ud, som om det er hæklet af noget tykkere garn. Delight er meget tyndt , er det meningen? Hækler på nål 3, synes ikke nålen kan være tykkere.
08.01.2013 - 11:55DROPS Design answered:
Denne model er haeklet med Delight. Men synes du selv at dit arbejde bliver paenere med naal 3 (og stemmer haeklefastheden), saa skal du naturligvis göre det. God fornöjelse
09.01.2013 - 09:40How would one get the pattern to actually print? I keep hitting the print button and nothing happens......
03.01.2013 - 19:40DROPS Design answered:
Dear Barbara, when you click on the print button, a pop up window will open, please click on "print pattern" in that new window and don't forget your browser must accept to open such windows. Happy knitting!
04.01.2013 - 09:59Ciao ho difficoltà nel cambio del colore con lo dtesso gomitolo perchè finito il primo giro comunque ho di nuovo quel colore.. potete aiutarmi? grazie
28.12.2012 - 20:37DROPS Design answered:
Deve tirare via un po' di filo per trovare il colore che Le serve. Il filo rimasto può essere utlizzato per la confezione del lavoro.
03.01.2013 - 17:37Jeg ser at fargene på bildet er mye klarere og veldig anderledes enn resultatet jeg selv får når jeg benytter det garnet som står oppført i oppskriften. Er det fordi det har blitt benyttet et annet garn på bildet? eller er det bildet i seg selv som blir såpass misvisende? Det var skuffende fordi det som er avbildet er så fint, og det får ikke jeg til med garnet som er oppført i oppskriften. :-(
23.12.2012 - 01:50DROPS Design answered:
Det er det samme garn vi har brugt, men farveskiftet (magic print) per nøgle kan på Deligth variere, så rækkefølgen er ikke som på bildet - du skal bare sørge for at lave dit farverskift som meldt i opskriften - men resultatet kan vil altid være anderledes, men da også personligt og unikt ,o)
25.12.2012 - 16:18Salve complimenti per tutti i lavori.- Il modello dello scaldacollo è eseguito con diversi colori ma non riesco a contarli...sono nove? Perchè voi ne citate tre? grazie.-
16.12.2012 - 21:57DROPS Design answered:
Buongiorno e grazie per i complimenti. A dire la verità, i colori utilizzati sono 1! Drops Delight è un filato che contiene diverse sfumature di colori e per quello il risultato viene così!
17.12.2012 - 15:31Bonjour, Tout d'abord merci pour le partage de vos superbes modèles. En ce qui concerne le tour de cou je n'arrive pas à comprendre lorsque l'anneau est vrillé comment faire pour travailler en même temps vers le haut et le bas.Que voulez vous dire par "on coud les 2 cotés opposés dans le sens contraire" Merci beaucoup pour votre réponse
05.12.2012 - 23:52DROPS Design answered:
Bonjour Madame Petit, quand tous les carrés sont assemblés en une longue bande, faites faire un demi-tour à une des extrémités et cousez-la au 1er carré, vous obtiendrez comme un 8 (möbius) qui vous permettra ainsi de crocheter ensuite à la fois en haut et en bas. Bon crochet !
06.12.2012 - 08:53