
Popular categories
Looking for a yarn?


|
|
Magic |
|
 |
 |
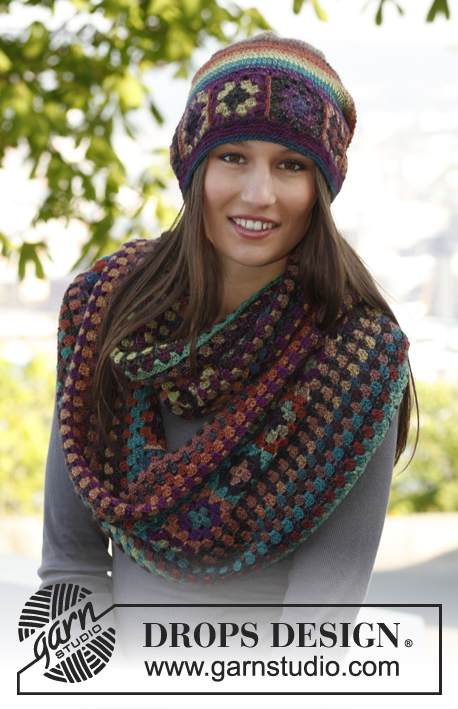
Crochet DROPS moebius neck warmer and hat with squares in ”Delight”.
DROPS 143-40 |
|
|
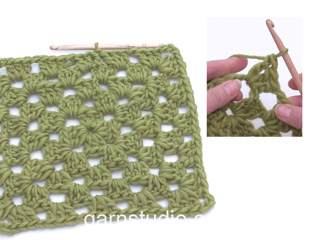
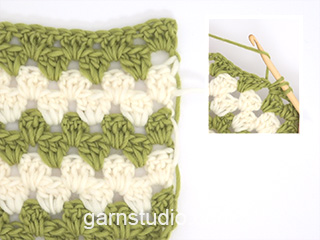
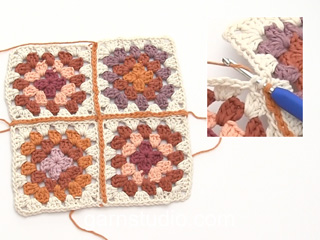
NECK WARMER: ROUNDS WITH DC: Beg every round with dc with 3 ch (= 1st dc), finish round with 1 sl st in 3rd ch from beg of round. COLOR CHANGE: To get a nice color change work last sl st on round with the new thread. Continue on to next round with the new thread. -------------------------------------------------------- SQUARE: Ch 6 with Delight on hook size 3.5 mmE/4 and form a ring with 1 sl st in 1st ch. Read ROUNDS WITH DC. ROUND 1: * Work 3 dc in ch-ring, 3 ch *, repeat from *-* a total of 4 times = 12 dc and 4 ch-spaces. Sl sts until next ch-space, cut the thread and switch to another color of the same ball (= new color each round) - READ COLOR CHANGE. ROUND 2: In every ch-space work as follows: 3 dc, 3 ch and 3 dc, 1 ch = 24 dc and 8 ch-spaces. Sl sts until next ch-space, cut the thread and switch to another color of the same ball. ROUND 3: * In next ch-space work as follows: 3 dc, 3 ch and 3 dc (= corner), ch 1, in next ch-space work 3 dc, 1 ch *, repeat from *-* the entire round = 36 dc and 12 ch-spaces. Cut and fasten the thread. Work a total of 25 squares. Work squares tog into 1 strip as follows: Place 2 and 2 squares on top of each other, insert hook through ch-space in the corner on both squares, work 1 ch and 1 sc, * ch 3, 1 sc in next ch-space on both squares *, repeat from *-*, cut and fasten the thread. Work the ends of the strip tog the same way to form a ring – NOTE: twist the strip 1 time to form a twisted ring, before working the ends tog. NECK WARMER: Worked from middle of piece = the twisted ring and out towards the outer edges - i.e. work upwards and downwards at the same time. NOTE! Beg every round with 3 ch (= 1st dc). Work 1st round along the strip as follows: In each of the 4 ch-spaces on every square work 3 dc and ch 1, finish round with 1 sl st in 3rd ch from beg of round (= 1st dc), sl st until next ch-space. Continue to work as follows: In every ch-space work 3 dc, ch 1, finish round with 1 sl st in 3rd ch from beg of round (= 1st dc), sl st until next ch-space. Continue like this until neck warmer measures approx. 36 cm / 14¼" vertically (the entire piece, not just from the middle and outwards). Cut and fasten the thread. -------------------------------------------------------- HAT: ROUNDS WITH DC: Beg every round with dc with 3 ch (= 1st dc), finish round with 1 sl st in 3rd ch from beg of round. DECREASE TIP 1: Dec 1 dc by working the next 2 dc tog as follows: Work 1 dc but wait with last pull through (= 2 sts on hook), work next dc but on last pull through, pull thread through all 3 sts on hook. ROUNDS WITH SC: Beg every round with sc with 1 ch (not counted as 1st sc) - NOTE! Work sc in back loop of every sc, finish with 1 sl st in 1st sc. DECREASE TIP 2: Dec 1 sc by working 2 sc tog as follows: * Insert hook in back loop of next sc, get thread *, repeat from *-* one more time, make 1 YO and pull thread through all 3 sts on hook. COLOR CHANGE: To get a nice color change work last sl st on round with the new thread. Continue on to next round with the new thread. -------------------------------------------------------- SQUARE: Ch 6 with Delight on hook size 3.5 mm/E/4 and form a ring with 1 sl st in 1st ch. Read ROUNDS WITH DC. ROUND 1: * Work 3 dc in ch-ring, 3 ch *, repeat from *-* a total of 4 times = 12 dc and 4 ch-spaces. Sl sts until next ch-space, cut the thread and switch to another color of the same ball (= new color each round) - READ COLOR CHANGE. ROUND 2: In every ch-space work as follows: 3 dc, 3 ch and 3 dc, 1 ch = 24 dc and 8 ch-spaces. Sl sts until next ch-space, cut the thread and switch to another color of the same ball. ROUND 3: * In next ch-space work as follows: 3 dc, 3 ch and 3 dc (= corner), ch 1, in next ch-space work 3 dc, 1 ch *, repeat from *-* the entire round = 36 dc and 12 ch-spaces. Cut and fasten the thread. Work a total of 8-9 squares. Work squares tog into 1 strip as follows: Place 2 and 2 squares on top of each other, insert hook through ch-space in the corner on both squares, work 1 ch and 1 sc, * ch 3, 1 sc in next ch-space on both squares *, repeat from *-*, cut and fasten the thread. Work the ends of the strip tog the same way to form a ring. HAT: Worked in the round. Work along one side of strip as follows: In each of the 4 ch-spaces on every square work 3 dc, finish with 1 sl st in 3rd ch (= 1st dc) from beg of round = 96-108 dc. Then work ROUNDS WITH DC - read explanation above - as follows: 3 ch (= 1st dc), skip 1st dc from previous round, 1 dc in every dc, finish round with 1 sl st in 3rd ch from beg of round. Continue until hat measures approx. 16 cm / 6¼" from bottom edge. Then dec as follows: ROUND 1: * 1 dc in each of the next 6-7 dc, dec 1 dc - READ DECREASE TIP 1 *, repeat from *-* the entire round = 84-96 dc (= 12 sts dec). ROUND 2: * 1 dc in each of the next 5-6 dc, dec 1 dc *, repeat from *-* the entire round = 72-84 dc. ROUND 3: * 1 dc in each of the next 4-5 dc, dec 1 dc *, repeat from *-* the entire round = 60-72 dc. ROUND 4: * 1 dc in each of the next 3-4 dc, dec 1 dc *, repeat from *-* the entire round = 48-60 dc. ROUND 5: * 1 dc in each of the next 2-3 dc, dec 1 dc *, repeat from *-* the entire round = 36-48 dc. ROUND 6: * 1 dc in each of the next 1-2 dc, dec 1 dc *, repeat from *-* the entire round = 24-36 dc. SIZE S/M: Work all dc on round tog 2 by 2 = 12 dc, cut the thread and sew the last dc tog with thread end. SIZE L/XL: ROUND 7: * 1 dc in next dc, dec 1 dc *, repeat from *-* the entire round = 24 dc. ROUND 8: Work all dc on round tog 2 by 2 = 12 dc, cut the thread and sew the last dc tog with thread end. EDGE: Work an edge along bottom edge of hat (along the other side of strip with squares) as follows: Work ch 1, in each of the 4 ch-spaces on every square work 4 sc = 128-144 sc, finish with 1 sl st in 1st sc from beg of round. Then work ROUNDS WITH SC - read explanation above. When edge measures approx. 1 cm / ½", dec 16-20 sc evenly on round - READ DECREASE TIP 2 = 112-124 sc. Continue until edge measures approx. 2 cm / ¾", cut and fasten the thread. The hat measures approx. 24-25 cm / 9½"-9¾" vertically. ---------------------------------------------------------- Wrist warmers – see design: 143-41 ---------------------------------------------------------- |
|
|
Have you made this or any other of our designs? Tag your pictures in social media with #dropsdesign so we can see them! Do you need help with this pattern?You'll find tutorial videos, a Comments/Questions area and more by visiting the pattern on garnstudio.com. © 1982-2024 DROPS Design A/S. We reserve all rights. This document, including all its sub-sections, has copyrights. Read more about what you can do with our patterns at the bottom of each pattern on our site. |
|


With over 40 years in knitting and crochet design, DROPS Design offers one of the most extensive collections of free patterns on the internet - translated to 17 languages. As of today we count 304 catalogs and 11422 patterns - 11417 of which are translated into English (US/in).
We work hard to bring you the best knitting and crochet have to offer, inspiration and advice as well as great quality yarns at incredible prices! Would you like to use our patterns for other than personal use? You can read what you are allowed to do in the Copyright text at the bottom of all our patterns. Happy crafting!
Comments / Questions (164)
Buongiorno, sto lavorando lo scaldacollo, con colori diversi ma la resa è comunque molto bella, e se possibile chiederei un suggerimento per chiudere diversamente il lavoro; vorrei inserire una specie di "bordo" perché ho l'impressione che così come si presenta il lavoro ai bordi (3ma + 1cat) rischia di lasciarsi un po' andare ... qualche idea? Grazie mille
26.01.2015 - 09:45DROPS Design answered:
Buonasera Katia. Potrebbe provare a lavorare gli ultimi giri con un uncinetto più piccolo in modo che questi giri risultino più sostenuti. Può anche decidere di aggiungere un eventuale bordo in un secondo momento, vedendo come si comporta il capo dopo averlo indossato alcune volte. Buon lavoro!
26.01.2015 - 22:16Rachel Gardner wrote:
The pattern only list 1 color, but it looks like there were more colors used. Can you tell me what those colors are?
20.01.2015 - 03:10DROPS Design answered:
Dear Mrs Gardner, you need only 1 colour since this has been "magic print" with different colour combinations - click here to see all available colours in the shadecard. Happy crocheting!
20.01.2015 - 10:24War is de reden voor draai in de sjaal bij het sluiten van de ring van vierkantjes?
02.12.2014 - 18:49DROPS Design answered:
Hoi Carna. Dit is een moebius sjaal. Bij een moebius ring zit ook deze draai.
03.12.2014 - 16:18I'd like to try this pattern out, but the choice of yarn seems to be wrong for it. The multi-coloured yarn suggested in the pattern would not produce even results/colour transitions as seen in the photo. Is this really correct?
18.11.2014 - 15:10DROPS Design answered:
Dear Jo, each square is worked with another colour from the same ball (cut the yarn at the end of round and start next round with next colour on ball). Happy crocheting!
19.11.2014 - 09:28Rieccomi...dopo aver fatto e unito i quadrati non ho capito da che punto bisogna iniziare la lavorazione dello scaldacollo
07.11.2014 - 23:46DROPS Design answered:
Buongiorno Ida. Dopo aver unito i quadrati, cuce le estremità dello scaldacollo formando un "otto". Adesso lavora in tondo iniziando il giro dalla cucitura, in uno degli angoli di un quadrato . Buon lavoro!
09.11.2014 - 12:19Grazie mille :-)
31.10.2014 - 10:33Ma il cambio colore si fa solo per i quadrati o anche per tutta la lavorazione?
31.10.2014 - 10:31DROPS Design answered:
Buongiorno Ida. Deve tagliare il filo solo quando lavora i quadrati. Una volta uniti i quadrati, procede senza tagliare. Il colore cambierà da solo in base alle sfumature del filato. Buon lavoro!
31.10.2014 - 11:02Ma il cambio colore si fa solo per i quadrati o anche per tutta la lavorazione?
30.10.2014 - 18:09DROPS Design answered:
Buonasera Ida, il suggerimento per il cambio di colore vale per tutti i punti in cui è necessario cambiare colore. Buon lavoro!!
30.10.2014 - 21:22Bene grazie mille quindi non è necessario prendere altro in più grazie mille ancora per tutti gli aiuti che ci fornite e credo che ci sentiremo spesso durante questo lavoro :-)
30.10.2014 - 12:10Buongiorno volevo fare questo completo...leggendo istruzioni e commenti vari ho capito che bisogna tagliare spesso il filo per poter ottenere l effetto da foto...mi domandavo ma le quatità indicate bastano oer completare il lavoro dovendo fare tutti questi tagli?
30.10.2014 - 10:11DROPS Design answered:
Buongiorno Ida. Nella quantità di filato indicata è stato tenuto conto anche del fatto che nella lavorazione si taglia spesso il filo. Buon lavoro!
30.10.2014 - 12:08