
Popular categories
Looking for a yarn?


|
|
Dalie Delight |
|
 |
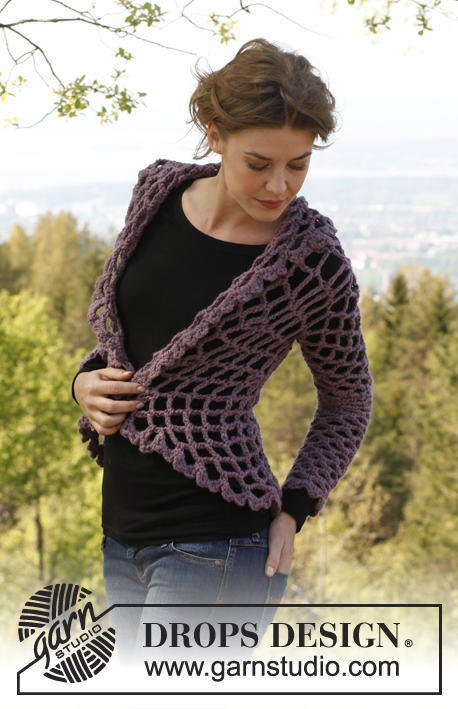 |
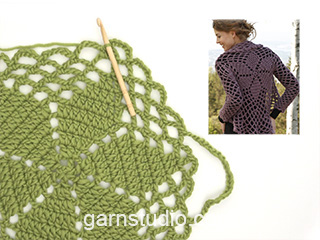
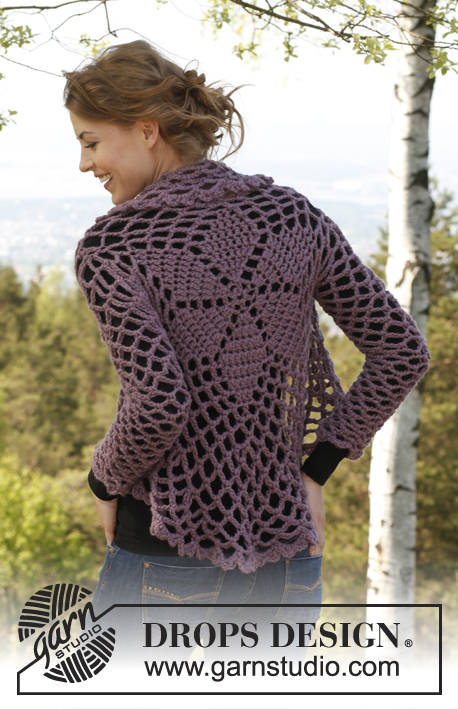
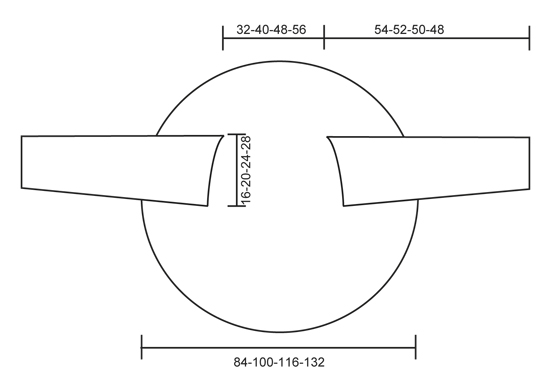
Crochet DROPS jacket worked in a circle in ”Andes”. Size: XS - XXXL.
DROPS 141-1 |
|
|
CROCHET TIP: Replace first dc on every dc round with ch 3. Finish every dc round with 1 sl st in 3rd ch from beg of round. Finish every round starting with 3 ch and a 1 sc in first ch-space with 1 sl st in 1st sc from beg of round. ---------------------------------------------------------- BODY: Worked in the round in a circle from mid back. Ch 4 with Andes on hook size 9 mm / M/13. Form a ring with 1 sl st in first ch. READ CROCHET TIP! ALL SIZES: ROUND 1: * 1 dc in ch-ring, ch 2 *, repeat from *-* 5 more times (= 6 dc in total with 2 ch between each). ROUND 2: 3 dc in first dc, ch 2, * 3 dc in next dc, ch 2 *, repeat from *-* the entire round (= 18 dc in total with 2 ch between every 3rd dc). ROUND 3: * 2 dc in first dc, 1 dc in next dc, 2 dc in next dc, ch 2 *, repeat from *-* the entire round (= 30 dc in total with 2 ch between every 5th dc). ROUND 4: * 2 dc in first dc, 1 dc in each of the next 3 dc, 2 dc in next dc, ch 2 *, repeat from *-* the entire round (= 42 dc in total with 2 ch between every 7th dc). ROUND 5: * 2 dc in first dc, 1 dc in each of the next 5 dc, 2 dc in next dc, ch 2 *, repeat from *-* the entire round (= 54 dc in total with 2 ch between every 9th dc). SIZE XS/S and M/L: ROUND 6: 1 sl st in first dc, * 1 dc in each of the next 7 dc, ch 4, 1 sc in ch-space from previous round, ch 4, skip 1 dc *, repeat from *-* the entire round. ROUND 7: 1 sl st in first dc, * 1 dc in each of the next 5 dc, ch 4, 1 sc in first ch-space, ch 5, 1 sc in next ch-space, ch 4, skip 1 dc *, repeat from *-* the entire round. ROUND 8: 1 sl st in first dc, * 1 dc in each of the next 3 dc, ch 4, 1 sc in first ch-space, ch 5, 1 sc in next ch-space, ch 5, 1 sc in next ch-space, ch 4, skip 1 dc *, repeat from *-* the entire round. ROUND 9: 1 sl st in first dc, * 1 dc in next dc, ch 4, 1 sc in first ch-space, ch 5, 1 sc in next ch-space, ch 5, 1 sc in next ch-space, ch 5, 1 sc in next ch-space, ch 4, skip 1 dc *, repeat from *-* the entire round = 30 ch-spaces. Piece measures approx. 18 cm / 7'' from the middle and out. SIZE XL/XXL and XXXL: ROUND 6: * 2 dc in first dc, 1 dc in each of the next 7 dc, 2 dc in next dc, ch 2 *, repeat from *-* the entire round (= 66 dc in total with 2 ch between every 11th dc). ROUND 7: 1 sl st in first dc, * 1 dc in each of the next 9 dc, ch 4, 1 sc in ch-space from previous round, ch 4, skip 1 dc *, repeat from *-* the entire round. ROUND 8: 1 sl st in first dc, * 1 dc in each of the next 7 dc, ch 4, 1 sc in first ch-space, ch 5, 1 sc in next ch-space, ch 4, skip 1 dc *, repeat from *-* the entire round. ROUND 9: 1 sl st in first dc, * 1 dc in each of the next 5 dc, ch 4, 1 sc in first ch-space, ch 5, 1 sc in next ch-space, ch 5, 1 sc in next ch-space, ch 4, skip 1 dc *, repeat from *-* the entire round. ROUND 10: 1 sl st in first dc, * 1 dc in each of the next 3 dc, ch 4, 1 sc in first ch-space, ch 5, 1 sc in next ch-space, ch 5, 1 sc in next ch-space, ch 5, 1 sc in next ch-space, ch 4, skip 1 dc *, repeat from *-* the entire round. ROUND 11: 1 sl st in first dc, * 1 dc in next dc, ch 4, 1 sc in first ch-space, ch 5, 1 sc in next ch-space, ch 5, 1 sc in next ch-space, ch 5, 1 sc in next ch-space, ch 5, 1 sc in next ch-space, ch 4, skip 1 dc *, repeat from *-* the entire round = 36 ch-spaces. Piece measures approx. 22 cm / 8 3/4'' from the middle and out. SIZE XS/S: ROUND 10: ch 3, 1 sc in first ch-space, * ch 6, 1 sc in next ch-space *, repeat from *-* 3 more times (= 4 ch-spaces), ch 25, skip 3 ch-spaces (= armhole), 1 sc in next ch-space, repeat from *-* 14 times, ch 25, skip 3 ch-spaces (= armhole), 1 sc in next ch-space, repeat from *-* 4 times but finish with 1 sl st in first sc from beg of round. ROUND 11: ch 3, 1 sc in first ch-space, * ch 6, 1 sc in next ch-space *, repeat from *-* the entire round but over the 25 ch worked over each armhole, work as follows: ch 6, 1 sc in 4th ch, ch 6, skip ch 5, 1 sc in next ch, ch 6, skip ch 5, 1 sc in next ch, ch 6, skip ch 5, 1 sc in next ch, ch 6, 1 sc in next ch-space (= 30 ch-spaces in total on round). ROUND 12: ch 3, 1 sc in first ch-space, * ch 6, 1 sc in next ch-space *, repeat from *-* the entire round – NOTE: But in every 5th ch-space work 1 extra ch-space (= ch 6 + 1 sc) = 36 ch-spaces in total. ROUND 13: ch 3, 1 sc in first ch-space, *6 ch, 1 sc in next ch-space*, repeat from *-* the entire round. ROUND 14: Work as 12th round but work 1 extra ch-space in every 6th ch-space = 42 ch-spaces in total. ROUND 15 and every uneven numbered round: Work as 13th round. ROUND 16 and every even numbered round: Work as 12th round but with 1 ch-space more between inc every time. Work until there are 60 ch-spaces in total on round. SIZE M/L: ROUND 10: ch 3, 1 sc in first ch-space, * ch 6, 1 sc in next ch-space *, repeat from *-* the entire round. NOTE: But in every 5th ch-space work 1 extra ch-space (= ch 6 + 1 sc) = 36 ch-spaces in total. ROUND 11: ch 3, 1 sc in first ch-space, *6 ch, 1 sc in next ch-space*, repeat from *-* the entire round. ROUND 12: ch 3, 1 sc in first ch-space, * ch 6, 1 sc in next ch-space *, repeat from *-* 4 more times (= 5 ch-spaces), work 31 ch, skip 4 ch-spaces (= armhole), 1 sc in next ch-space, repeat from *-* 16 times, 31 ch, skip 4 ch-spaces (= armhole), 1 sc in next ch-space, repeat from *-* 5 times but finish with 1 sl st in first sc from beg of round. ROUND 13: ch 3, 1 sc in first ch-space, * ch 6, 1 sc in next ch-space *, repeat from *-* the entire round but over the 31 ch worked over each armhole, work as follows: ch 6, 1 sc in 4th ch, * ch 6, skip ch 5, 1 sc in next ch *, repeat from *-* 3 more times, ch 6, 1 sc in next ch-space (= 36 ch-spaces in total on round). ROUND 14: ch 3, 1 sc in first ch-space, * ch 6, 1 sc in next ch-space *, repeat from *-* the entire round – NOTE: But in every 6th ch-space work 1 extra ch-space (= ch 6 + 1 sc) = 42 ch-spaces in total. ROUND 15: ch 3, 1 sc in first ch-space, *6 ch, 1 sc in next ch-space*, repeat from *-* the entire round. ROUND 16: Work as 14th round but work 1 extra ch-space in every 7th ch-space = 48 ch-spaces in total. ROUND 17 and every uneven numbered round: Work as 15th round. ROUND 18 and every even numbered round: Work as 14th round but with 1 ch-space more between inc every time. Work until there are 72 ch-spaces in total on round. SIZE XL/XXL and XXXL: ROUND 12: ch 3, 1 sc in first ch-space, * ch 6, 1 sc in next ch-space *, repeat from *-* the entire round. NOTE: But in every 6th ch-space work 1 extra ch-space (= ch 6 + 1 sc) = 42 ch-spaces in total. ROUND 13: ch 3, 1 sc in first ch-space, *6 ch, 1 sc in next ch-space*, repeat from *-* the entire round. SIZE XL/XXL: ROUND 14: ch 3, 1 sc in first ch-space, * ch 6, 1 sc in next ch-space *, repeat from *-* 5 more times (= 6 ch-spaces), ch 37, skip 5 ch-spaces (= armhole), 1 sc in next ch-space, repeat from *-* 18 times, ch 37, skip 5 ch-spaces (= armhole), 1 sc in next ch-space, repeat from *-* 6 times but finish with 1 sl st in first sc from beg of round. ROUND 15: ch 3, 1 sc in first ch-space, * ch 6, 1 sc in next ch-space *, repeat from *-* the entire round but over the 37 ch worked over each armhole, work as follows: ch 6, 1 sc in 4th ch, * ch 6, skip ch 5, 1 sc in next ch *, repeat from *-* 4 more times, ch 6, 1 sc in next ch-space (= 42 ch-spaces in total on round). ROUND 16: ch 3, 1 sc in first ch-space, * ch 6, 1 sc in next ch-space *, repeat from *-* the entire round – NOTE: But in every 7th ch-space work 1 extra ch-space (= ch 6 + 1 sc) = 48 ch-spaces in total. ROUND 17: ch 3, 1 sc in first ch-space, *ch 6, 1 sc in next ch-space*, repeat from *-* the entire round. ROUND 18: Work as 16th round but work 1 extra ch-space in every 8th ch-space = 54 ch-spaces in total. ROUND 19 and every uneven numbered round: Work as 17th round. ROUND 20 and every even numbered round: Work as 16th round but with 1 ch-space more between inc every time. Work until there are 84 ch-spaces in total on round. SIZE XXXL: ROUND 14: ch 3, 1 sc in first ch-space, * ch 6, 1 sc in next ch-space *, repeat from *-* the entire round. NOTE: But in every 7th ch-space work 1 extra ch-space (= ch 6 + 1 sc) = 48 ch-spaces in total. ROUND 15: ch 3, 1 sc in first ch-space, *6 ch, 1 sc in next ch-space*, repeat from *-* the entire round. ROUND 16: ch 3, 1 sc in first ch-space, * ch 6, 1 sc in next ch-space *, repeat from *-* 6 more times (= 7 ch-spaces), ch 43, skip 6 ch-spaces (= armhole), 1 sc in next ch-space, repeat from *-* 20 times, ch 43, skip 6 ch-spaces (= armhole), 1 sc in next ch-space, repeat from *-* 7 times but finish with 1 sl st in first sc from beg of round. ROUND 17: ch 3, 1 sc in first ch-space, * ch 6, 1 sc in next ch-space *, repeat from *-* the entire round but over the 43 ch worked over each armhole, work as follows: ch 6, 1 sc in 4th ch, * ch 6, skip ch 5, 1 sc in next ch *, repeat from *-* 5 more times, ch 6, 1 sc in next ch-space (= 48 ch-spaces in total on round). ROUND 18: ch 3, 1 sc in first ch-space, * ch 6, 1 sc in next ch-space *, repeat from *-* the entire round – NOTE: But in every 8th ch-space work 1 extra ch-space (= ch 6 + 1 sc) = 54 ch-spaces in total. ROUND 19: ch 3, 1 sc in first ch-space, ch 6, 1 sc in next ch-space, repeat from *-* the entire round. ROUND 20: Work as 18th round but work 1 extra ch-space in every 9th ch-space = 60 ch-spaces in total. ROUND 21 and every uneven numbered round: Work as 19th round. ROUND 22 and every even numbered round: Work as 20th round but with 1 ch-space more between inc every time. Work until there are 96 ch-spaces in total on round. ALL SIZES: Work last round as follows: ch 3, 1 sc in first ch-space, * 1 picot (= ch 3, 1 dc in first ch), 1 sc in same ch-space, 1 picot, 1 sc in next ch-space *, repeat from *-* the entire round. Cut and fasten the thread. Piece measures approx. 42-50-58-66 cm / 16½"-19 3/4"-22 3/4"-26" from the middle and out. SLEEVE: The sleeves are worked from armholes and down. Work as follows around one armhole: 1 sc in sc at the bottom of armhole (i.e. in the side with the longest distance between armholes), ch 6, skip the half ch-space and work 1 sc in next whole ch-space, * ch 6, 1 sc in next ch-space *, repeat from *-* 1-2-3-4 more times, ch 6, 1 sc in sc in the other end of armhole, ch 6, skip the half ch-space and work 1 sc in next whole ch-space, repeat from *-* 2-3-4-5 times, finish with 6 ch and 1 sl st in first sc on round = 8-10-12-14 ch-spaces. Work 4 more rounds with 6 ch in every ch-space and 1 sc in every ch-space – every round beg with ch 3 and 1 sc at the top of first ch-space. Then work 6 rounds with 5 ch in every ch-space. Then ch 4 in every ch-space (now every round beg with only 2 ch) until sleeve measures 53-51-49-47 cm / 21"-20"-19 1/4"-18½" (shorter measurements in the larger sizes because of wider shoulders, hold piece up when measuring so that it stretches to correct measurements). Work last round as follows: ch 2, 1 sl st at the top of first ch-space, * ch 3, 1 dc in first ch (= 1 picot), 1 sc in next ch-space *, repeat from *-* the entire round. Work another sleeve the same way in the other side. |
|
|
|
|
Have you made this or any other of our designs? Tag your pictures in social media with #dropsdesign so we can see them! Do you need help with this pattern?You'll find tutorial videos, a Comments/Questions area and more by visiting the pattern on garnstudio.com. © 1982-2024 DROPS Design A/S. We reserve all rights. This document, including all its sub-sections, has copyrights. Read more about what you can do with our patterns at the bottom of each pattern on our site. |
|


With over 40 years in knitting and crochet design, DROPS Design offers one of the most extensive collections of free patterns on the internet - translated to 17 languages. As of today we count 304 catalogs and 11422 patterns - 11417 of which are translated into English (US/in).
We work hard to bring you the best knitting and crochet have to offer, inspiration and advice as well as great quality yarns at incredible prices! Would you like to use our patterns for other than personal use? You can read what you are allowed to do in the Copyright text at the bottom of all our patterns. Happy crafting!
Comments / Questions (186)
Ik raak in de war bij het einde van de 12de toer (maat xl/xxl en xxxl) in het begin haak je 3 lossen, 1 vaste in de 1ste lossenlus, daarna 6 lossen, 1vaste. maar de laatste 6l 1v weet ik niet of ik die vaste in het kleine 3l lusje moet haken of die juist moet overslaan. toer 13 is hetzelfde verhaal.
01.01.2013 - 23:40DROPS Design answered:
Je moet eindigen met 1 hv in de 3e l van het begin van de toer zoals vermeld in de TIP VOOR HET HAKEN.
07.01.2013 - 15:41Eine wirklich schöne Jacke, bloß leider komme ich mit den angegebenen 400g für Größe xs/s nicht aus. Das ist wirklich sehr ärgerlich. Die Anleitung habe ich genau umgesetzt und die Jacke passt auch gut. Es fehlen ca. 30g.
29.12.2012 - 17:34Ärmhålen blir för stora! 31 luftmaskor och sedan hoppa över fyra bågar? Det måste stå fel för modellen har inte stora ärmar.. Jag har fårr repa upp tre nystan för jag trodde det skulle lösa sig när jag började med ärmen.
24.12.2012 - 18:47Bonjour, est-ce normal d'avoir après le rang 10 une sorte de petit arceau au début de chaque rang à cause des 3 mailles en l'air et de la ms par lesquelles on commence ? Ce n'est pas joli du tout car cela fait des épaisseurs...j'ai refait 3 fois...
23.12.2012 - 23:04Ik loop ook vast na toer 9. WIE KAN HET GOED UITLEGGEN? Start de toer met 3l,1v in de eerste lus van de vorige toer. Dan 6l,1v in elke lus. Met welke steek eindig je de toer en in welke steek. En hoe ga ik verder. Ik heb het vest nu 10x uitgehaald, ik wil nu verder. Ik heb ook al met 4 anderen naar het patroon gekeken en niemand kan me helpen!
22.12.2012 - 21:50DROPS Design answered:
Het patroon klopt. Ik heb het nu ook zelf nagehaakt. Je vervangt in ELKE TOER het eerste stk door 3 l en eindigt met 1 hv in de 3e l van het begin van de toer. Toer 10: 1 hv in het eerste stk van de vorige toer *1 stk in elke van de 3 volgende stk (= 3 l en 2 stk), 4 l, 1 hv in de eeste l-lus ... etc tot *(je staat nu bij het volgende bloemblad). Herhaal weer *-*. In toer 9 had je 5 stk per blad en in toer 10 heb je 3 stk per blad. Eindig met 1 hv in de 3e l van het begin.
25.12.2012 - 17:22Ich habe eine Frage zu Reihe 18 bei Gr. M/L.Ich habe nach Reihe 17 genau 48 Lm-Bögen und ich verstehe nicht, was ich machen soll.Ich häkle in jeden 6. Lm-Bogen einen zusätzlichen Bogen. Wo soll ich wie viele Lm-Bogen dazugeben (wie viele Lm-Bögen sind es insgesamt nach Reihe 18, wie viele nach Reihe 20?Ich komme einfach nicht auf 72.Danke
26.11.2012 - 00:01DROPS Design answered:
Liebe Dominique, dann haben Sie also 8 Lm-Bogen mehr (wenn Sie bei 48 Bögen in jeden 6.Lm –Bogen 2 Lm-Bogen häkeln). Darf ich Sie bitten, sich für detailliertere Beratung sind an den Laden zu wenden, in dem Sie die Wolle gekauft haben. Gutes Gelingen!
26.11.2012 - 12:12Like several others I am confused with pattern from round 10. I am following US instructions. Ch3, 1 sc in first chain space. I have finished body and I have a distinct line of small spaces which pulls on the collar on that side of the jacket. I am now feeling unhappy that I may have to undo and do again. But I don't know what it is that is wrong. Please can you explain to me. Love pattern though
09.11.2012 - 01:17DROPS Design answered:
Dear Cindy, at the end of row 9 (size XS/S and M/L), you should finish with 1 sl st in 3rd ch from beg of round. You then start round 10 with ch3, 1 sc in first ch-space, then continue with *ch 6, 1 sc in next ch-space* as indicated for right size. Happy crocheting!
13.11.2012 - 15:51Like several others I am confused with pattern from round 10. I am following US instructions. Ch3, 1 sc in first chain space. I have finished body and I have a distinct line of small spaces which pulls on the collar on that side of the jacket. I am now feeling unhappy that I may have to undo and do again. But I don't know what it is that is wrong. Please can you explain to me. Love pattern though
08.11.2012 - 13:08Je ne comprends pas,on commence avec 3 ml et on finit comment le tour??????? Merci pour votre aide.
04.11.2012 - 09:36DROPS Design answered:
Bonjour Madame Lebren, On termine chaque tour par 1 mc dans la 3ème ml du début du tour (cf "Astuce crochet"). Bon crochet !
05.11.2012 - 09:51Hello, Round ten and on where we start doing the chain 3 single crochet in the begining of the round, i am having a hard time understanding how to finish the rounds from round 10 on and where the chain 3 single crochet at the begining of each round comes into play its starting to look like i have a large line where you can distinctly tell where im begining and im wondering if im doing it wrong... Thanks, Amanda
26.10.2012 - 02:24