
Popular categories
Looking for a yarn?


|
|||||||||||||
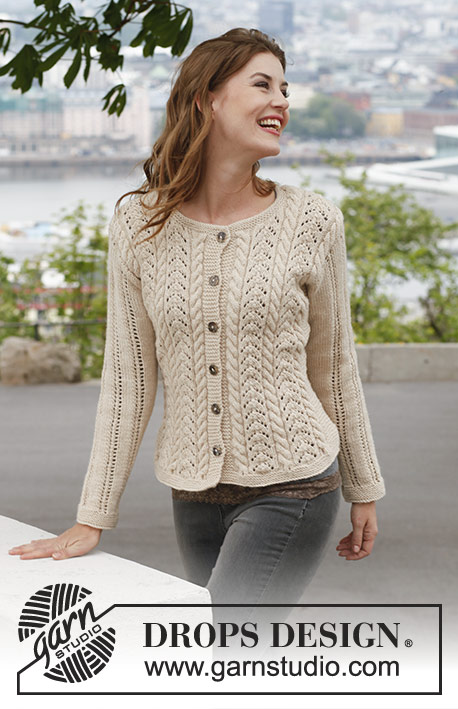
Marianna |
|||||||||||||
 |
 |
||||||||||||
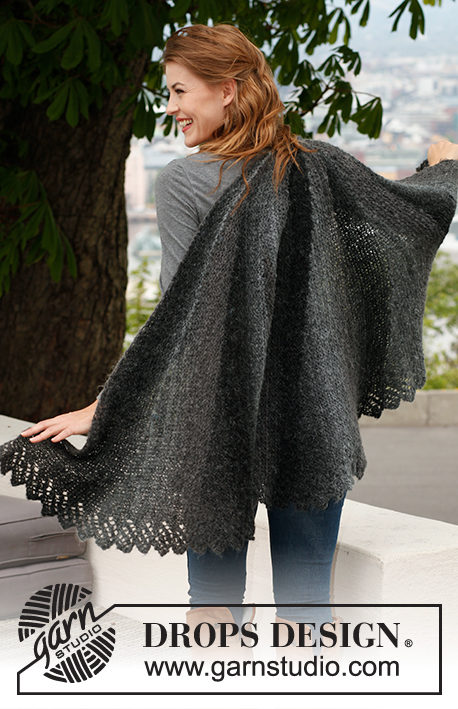
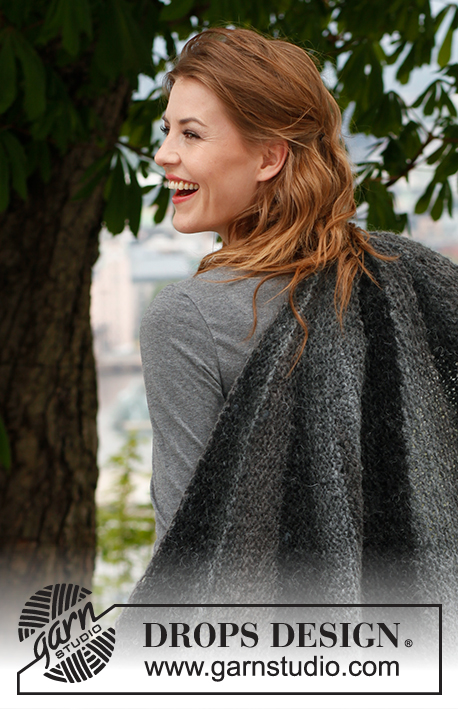
Knitted DROPS shawl with short rows in "Verdi".
DROPS 140-3 |
|||||||||||||
|
PATTERN: See diagram A.1. Diagram shows all rows in pattern from RS. GARTER ST (back and forth on needle): K sts on all rows. KNITTING TIP: When turning mid piece, slip first st. Tighten thread and continue as before. This is done to avoid holes at the turns. -------------------------------------------------------- SHAWL: Worked back and forth on circular needle. Cast on 92 sts on circular needle size 7 mm/US 10.75 with Verdi. Work as follows – from RS: diagram A.1 over the first 8 sts, then work in GARTER ST over the other sts - see explanation above. AT THE SAME TIME work short rows as follows - read KNITTING TIP. NOTE! Sts in A.1 are always counted as 8 sts: * 1 row over the first 8 sts (= A.1), turn and work back, 1 row over A.1 + 3 sts, turn and work back, 1 row over A.1 + 6 sts, turn and work back, 1 row over A.1 + 9 sts, turn and work back. Continue with short rows by working 3 sts more on every turn until 2 rows have been worked over all sts *, repeat from *-* until piece measures approx. 205 cm/ 81" around the outer edge of the half circle (approx. 8 repetitions with short rows have been worked). Bind off. Tighten tog in the middle by pulling a thread through the inner sts and tighten tog. |
|||||||||||||
Diagram explanations |
|||||||||||||
|
|||||||||||||

|
|||||||||||||
|
Have you made this or any other of our designs? Tag your pictures in social media with #dropsdesign so we can see them! Do you need help with this pattern?You'll find tutorial videos, a Comments/Questions area and more by visiting the pattern on garnstudio.com. © 1982-2024 DROPS Design A/S. We reserve all rights. This document, including all its sub-sections, has copyrights. Read more about what you can do with our patterns at the bottom of each pattern on our site. |
|||||||||||||


With over 40 years in knitting and crochet design, DROPS Design offers one of the most extensive collections of free patterns on the internet - translated to 17 languages. As of today we count 304 catalogs and 11422 patterns - 11417 of which are translated into English (US/in).
We work hard to bring you the best knitting and crochet have to offer, inspiration and advice as well as great quality yarns at incredible prices! Would you like to use our patterns for other than personal use? You can read what you are allowed to do in the Copyright text at the bottom of all our patterns. Happy crafting!
Comments / Questions (89)
Bonjour ma maman souhaite faire ce châle mais ne comprends pas trop les explications, j'essaye donc de les comprendre. Pour démarrer, voici ce que je comprends, mais est-ce bien cela: Tricoter les 8 premières mailles en suivant le point fantaisie du diagramme puis les 84 mailles restantes en point mousse, tourner et tricoter le rang en point mousse puis sur le 3ème rang attaquer les rangs raccourcis. Merci d'avance Estelle
18.11.2013 - 14:52DROPS Design answered:
Bonjour Estelle, pour créer la forme du châle, on tricote plus de rangs sur les mailles extérieures que sur celles de l'intérieur, ainsi, on tricote 2 rangs sur 8 m (A1), puis 2 rangs sur A1 + 3m, puis 2 rangs sur A1 + 6 m et ainsi de suite en tricotant toujours 3 m de plus à chaque nouveau rang raccourcis jusqu'à ce que vous ayez tricoté 2 rangs sur toutes les mailles, puis reprenez la série complète depuis le début. Bon tricot!
18.11.2013 - 14:57Ben begonnen met patroon verkorte toeren en dan 2 toeren over alle steken,klopt dit want heb nu 7 kant patronen gebreid en maar 8 toeren over alle steken? Hoor graag van u en alvast bedankt.
27.10.2013 - 18:38DROPS Design answered:
Hoi Sandra. Het patroon is correct. Je breit voor het keren steeds 3 st meer per keer en eindigt met 1 nld heen en 1 nld terug over alle st. Als je deze werkwijze volgt dan wordt het model juist.
28.10.2013 - 19:05Bonjour, si je comprend bien les explication de votre châle; on monte 92m et on tricote 8m de A1 puis on tricote les autres m au point mousse; au 3ème rang on fait les 8m de A1+ 3M point mousse et on tourne et ainssi de suite. est ce bien ça ? merci
12.10.2013 - 23:50DROPS Design answered:
Bonjour Mme Durand, le châle se tricote en point fantaisie A1 sur les 8 première m et au point mousse sur les autres mailles. Pour lui donner sa forme, on tricote des rangs raccourcis tels que décrits dans la série de *à*, c'est-à- dire : 2 rangs sur les 8 m de A1, 2 rangs sur A1 + 3 m, 2 rangs sur A1+6 m, et ainsi de suite en tricotant toujours 3 m en plus à chaque fois sur l'endroit jusqu'à ce que vous ayez tricoté 2 rangs sur toutes les mailles = 1 série. Bon tricot!
14.10.2013 - 08:54Ik heb nog nooit met verkorte toeren gewerkt, het is mij niet duidelijk hoe ik tegelijkertijd ribbelsteken en verkorte toeren kan toepassen... Ik heb het patroon uitvoerig bestudeerd maar kom er echt niet uit... Wie kan mij helpen..
12.10.2013 - 17:35DROPS Design answered:
Hoi Kitty. Kijk hier in deze video hoe je verkorte toeren breit. In de video wordt er wel in tricotst gebreid, maar de werkwijze is precies hetzelfde met ribbelst. Je breit dan maar elke nld recht:
16.10.2013 - 13:38Cual es la forma final del chal una vez terminado? El patrón sólo muestra el dibujo de los picos y no se ve el resultado del chal acabado.
14.09.2013 - 08:05DROPS Design answered:
Hola Eulalia! La forma final es la de una media luna
14.09.2013 - 11:12Bonjour, j'espère que ce sera la dernière fois que je demande des explications. 8m+3m nouvelles 8m+6m nouvelles 8m+9m nouvelles aller retour et je tricote les 92m cela fait un gros trou? peut-on voir le point à la loupe? Merci ou bien un schéma pour surtout le rajout des mailles en plus ou bien on prend sur les 92 mailles
30.07.2013 - 10:23DROPS Design answered:
Bonjour Patricia, vous tricotez 2 rangs sur les mailles indiquées (celles de A.1) et à chaque fois, vous tricotez 3 m en plus, donc A1 + 3 m, puis A1 + 6 m, puis A1 + 9 m, puis A1 + 12 m et ainsi de suite. Vous continuez ces rangs raccourcis en tricotant toujours 3 m en plus à chaque nouvel aller-retour jusqu'à ce que toutes les 92 m aient été tricotées. Bon tricot !
30.07.2013 - 11:07Bonjour, j'ai compris les rangs raccourcis, mais c'est les mailles à rajouter. A1 plus 3 m des 92 mailles je tourne et est-ce que on augmente de 3 mailles ou on les prends des 92 mailles A1 +3m des 92 A1 =6m des 92m A1=9m des 92m un rang entier sur les 92m plus 3m à la fin du rang 92m???
27.07.2013 - 12:16DROPS Design answered:
Bonjour Mme Venedictoff, A1 est compté comme 8 m, et vous montez un total de 92 m, mais pour créer la forme voulue, vous allez tricoter davantage de rangs sur les mailles de l'extérieur, ainsi ce sera d'abord 2 rangs sur les m de A1 puis vous tricotez 3 m en plus à chaque fois, soit 2 rangs sur A1 + 3 m, puis 2 rangs sur A1 + 6 m puis 2 rangs sur A1 + 9 m et ainsi de suite jusqu'à ce que vous ayez tricoté 2 rangs sur toutes les 92 m montées au début du châle. Bon tricot !
29.07.2013 - 09:08Bonjour, je bute aussi sur vos explications. Auriez-vous une vidéo de démonstration? Merci
26.07.2013 - 15:56DROPS Design answered:
Bonjour Mme Venedictoff, pour les rangs raccourcis, suivez les indications du modèle et la vidéo ci-dessous. Pour toute aide complémentaire, n'hésitez pas à demander de l'aide au magasin où vous avez acheté votre laine ou bien sur le forum DROPS. Bon tricot !
26.07.2013 - 16:33Hej! Min kil ser mycket bredare ut än en kil på bilden. För att jag ska komma över hela raden maskor jag lagt upp minst en gång så måste jag sticka diagrammet A1 1,5 gång. Jag känner alltså som att en av mina kilar blir som tre stycken på bilden. Vad gör jag fel? Det känns som att halva A1 ska bli en kil så att säga, men det blir alltså inte min, då har jag bara kommit ca 30 maskor in... Vore tacksam för svar! Amanda
15.06.2013 - 08:45DROPS Design answered:
Men diagrammet A1 strikkes yderst i den ene side på hver pind, og vendepindene gør kilerne. Så der skal ikke være et bestemt antal rapporter i A1
09.10.2013 - 10:42Bonjour,je ne comprends pas les explications. A quel moment nous tricotons un rang entier? D'après vos explications: 1 rang 1 on tourne un autre rang on tourne etc. A quel moment tricote t'on un rang jusqu'au bout?
08.06.2013 - 15:56DROPS Design answered:
Bonjour Mme Lacure, on tricote des rangs raccourcis sur les mailles de A1 + 3 m en plus tous les 2 rangs jusqu'à ce que vous ayez tricoté 2 rangs sur toutes les mailles. Bon tricot!
10.06.2013 - 08:47