
Popular categories
Looking for a yarn?


|
|||||||||||||
Marianna |
|||||||||||||
 |
 |
||||||||||||
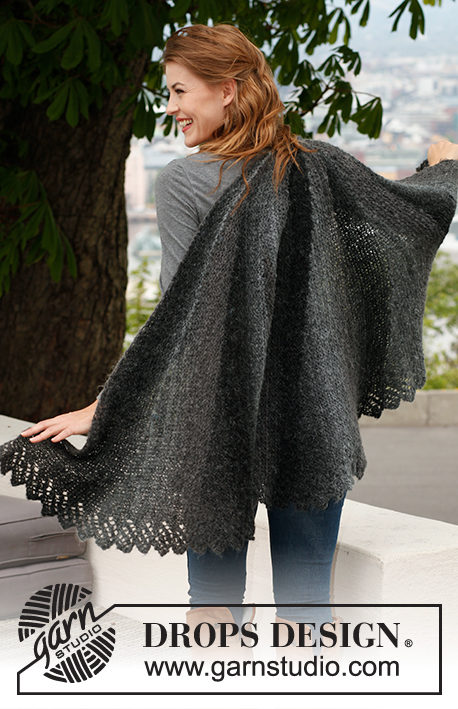
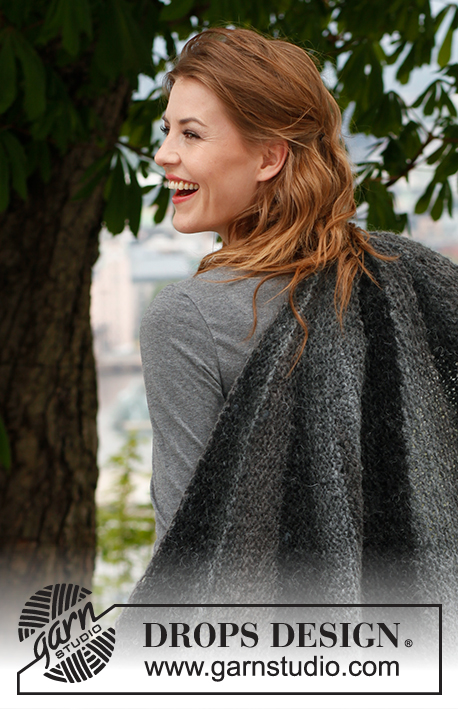
Knitted DROPS shawl with short rows in "Verdi".
DROPS 140-3 |
|||||||||||||
|
PATTERN: See diagram A.1. Diagram shows all rows in pattern from RS. GARTER ST (back and forth on needle): K sts on all rows. KNITTING TIP: When turning mid piece, slip first st. Tighten thread and continue as before. This is done to avoid holes at the turns. -------------------------------------------------------- SHAWL: Worked back and forth on circular needle. Cast on 92 sts on circular needle size 7 mm/US 10.75 with Verdi. Work as follows – from RS: diagram A.1 over the first 8 sts, then work in GARTER ST over the other sts - see explanation above. AT THE SAME TIME work short rows as follows - read KNITTING TIP. NOTE! Sts in A.1 are always counted as 8 sts: * 1 row over the first 8 sts (= A.1), turn and work back, 1 row over A.1 + 3 sts, turn and work back, 1 row over A.1 + 6 sts, turn and work back, 1 row over A.1 + 9 sts, turn and work back. Continue with short rows by working 3 sts more on every turn until 2 rows have been worked over all sts *, repeat from *-* until piece measures approx. 205 cm/ 81" around the outer edge of the half circle (approx. 8 repetitions with short rows have been worked). Bind off. Tighten tog in the middle by pulling a thread through the inner sts and tighten tog. |
|||||||||||||
Diagram explanations |
|||||||||||||
|
|||||||||||||

|
|||||||||||||
|
Have you made this or any other of our designs? Tag your pictures in social media with #dropsdesign so we can see them! Do you need help with this pattern?You'll find tutorial videos, a Comments/Questions area and more by visiting the pattern on garnstudio.com. © 1982-2024 DROPS Design A/S. We reserve all rights. This document, including all its sub-sections, has copyrights. Read more about what you can do with our patterns at the bottom of each pattern on our site. |
|||||||||||||


With over 40 years in knitting and crochet design, DROPS Design offers one of the most extensive collections of free patterns on the internet - translated to 17 languages. As of today we count 304 catalogs and 11422 patterns - 11417 of which are translated into English (US/in).
We work hard to bring you the best knitting and crochet have to offer, inspiration and advice as well as great quality yarns at incredible prices! Would you like to use our patterns for other than personal use? You can read what you are allowed to do in the Copyright text at the bottom of all our patterns. Happy crafting!
Comments / Questions (89)
Und wächst und wächst.. bin gestern mit dem Tuch fertig geworden. und seit dem wächst und wächst es! Durch die lockere Strickweise hängt es immer mehr aus. Die Spitzen hängen vorne mittlerweile bis zu den Knien runter. Aufziehen kommt aufgrund des "flusseligen" Fadens nicht in Frage, also wird es so getragen. Da noch fast die Hälfte des Garns übrig ist, starte ich vielleicht noch einen zweiten Versuch mit deutlich weniger Maschen.
10.05.2013 - 14:29Francine wrote:
J'ai ajouté 3 m après chaque rg de A1, donc 10 fois (rg avec jettés et m env)les autres rg sont des retours.Je fais une autre séquence de A1 et ajoute 3m à partir de la 30e m ajoutées à l'autre séquences?Lorsque les 92m ont été tricotées j'ai 7 séquence de A1,mon châle fini en pointe.Si je recommence une autre séquence de A1 est ce que je monte mes m jusqu'à la fin? sinon je me retrouve avec une autre série de 8XA1 qui fini en pointe je n'arriverai jamais à avoir 205cm ?
04.03.2013 - 13:33DROPS Design answered:
Bonjour Francine, vous devez tricoter A1 sur les mailles de l'extérieur et en même temps, tous les 2 rangs, tricoter 3 m en plus côté "pointe/intérieur du châle (milieu encolure dos). Bon tricot !
04.03.2013 - 16:08Hallo, Ich verstehe nicht genau wann ich die verkürzte Reihe stricken muss. Direkt nach A.1? Wenn nach A.1 direkt die Wendung kommt wann stricke ich die 92 Maschen dann zu ende? Vielen Dank
14.02.2013 - 18:06DROPS Design answered:
Hallo Lisa, es werden immer 3 M mehr gestrickt, bis Sie wieder über alle 92 M stricken. Ich empfehle Ihnen auch, unseren Video zu den verkürzten Reihen anzuschauen.
16.02.2013 - 19:23Leider ist die Anleitung für mich unverständlich. Wann soll denn was passieren?
26.01.2013 - 16:24DROPS Design answered:
Liebe Frau Scannell, bitte schreiben Sie uns genau, welche Stelle Sie nicht verstehen. Wenn Sie die ganze Anleitung erklärt haben müssen, wenden Sie sich bitte an den Laden, in dem Sie die Wolle gekauft haben.
27.01.2013 - 16:28Hej! jag håller på att sticka den här sjalen. Jätte härligt garn att sticka i . Det jag undrar är : 1. Ska man öka en maska i A1? Dvs att när man stickat vändnings varvet och börjat på ett nytt varv med A1 2: Minskas det av maskor när jag stickar? När jag hade stickat inne på rapport två, var det bara 82 maskor på stickan. Stämmer det. Jag håller på att repa upp nu. Men måste få ett svar. Tack på förhand Mia
03.01.2013 - 09:46DROPS Design answered:
Ja du ökar 1 m på varje mönstervarv (1+3+5+7) i A.1, men de 4 ökade maskorna maskas av igen på varv 9, sedan samma igen från v 11 osv...
29.01.2013 - 10:26Fannie wrote:
Bonjour, J'aurais besoin d'aide, je voudrais faire ce modèle, mais je ne suis pas certaine de comprendre. De ce que j'en comprend, il faut tourner le travail après les 8 première mailles, mais ça me semble étrange. De plus, je me demandais dans quel sens je dois lire le diagramme. Merci beaucoup
28.12.2012 - 18:30DROPS Design answered:
Bonjour Fannie, on tricote des rangs raccourcis pour donner la forme de demi-cercle au châle, ainsi, on tricote plus de rangs sur les mailles de l'extérieur du châle que sur celles du milieu dos. La vidéo sur les rangs raccourcis devrait vous aider à visualiser comment faire. le diagramme représente toutes les mailles, tous les rangs du point fantaisie, 1 case = 1m x 1 rang et se lit en commençant en bas à droite vers la gauche sur l'endroit, puis de gauche à droite sur l'envers. Bon tricot !
29.12.2012 - 19:13Wirklich ein ganz tolles Tuch. Leider entzieht es sich mir. Wird gleich nach dem Anschlagen mit dem Muster begonnen oder erst eine Reihe rechts gestrickt. Sind im Diagramm nur die Hinreihen dargestellt oder Hin- und Rückreihe.
25.12.2012 - 20:28DROPS Design answered:
Liebe Inge, es wird bereits in der 1. R mit dem Muster begonnen und im Diagramm sind Hin-und Rückreihen dargestellt. Viel Spass beim Stricken!
26.12.2012 - 09:04Je ne comprends pas bien vos explications En effet j'ai monté les 92mailles puis j'ai fait les rangs raccourcis en augmentant de 3 mailles par rang, mais je ne comprends pas ce que vous voulez dire par continuer jusqu'à ce 2 rangs aient été tricotés sur toutes les mailles, et de plus je ne comprends pas ce que je dois faire une fois que j'ai augmenté les rangs jusqu'au 92 mailles de départ, J'ai demandé de l'aide à mon revendeur mais sans sucés merci de votre aide
10.12.2012 - 17:36DROPS Design answered:
Bonjour Madame Eveno, pour créer l'arrondi, on tricote 2 rangs sur les 8 m de A1 + 3 m, puis 2 rangs sur les 8 m de A1 + 6 m, et on tricote toujours 3 m en plus jusqu'à ce que l'on ait fait 2 rangs sur toutes les mailles. Et on reprend alors au début de la séquence rangs raccourcis. Bon tricot !
10.12.2012 - 18:08Je ne comprends pas bien vos explications En effet j'ai monté les 92mailles puis j'ai fait les rangs raccourcis en augmentant de 3 mailles par rang, mais je ne comprends pas ce que vous voulez dire par continuer jusqu'à ce 2 rangs aient été tricotés sur toutes les mailles, et de plus je ne comprends pas ce que je dois faire une fois que j'ai augmenté les rangs jusqu'au 92 mailles de départ, J'ai demandé de l'aide à mon revendeur mais sans sucés
10.12.2012 - 17:35Svårtytt mönster I vilken ända börjar man på sjalen Marianna? Kommer ingen vart
09.12.2012 - 10:36DROPS Design answered:
Man börjar med 92 m, om du tittar på bilden så är det m från ena handen upp till nacken. Sedan blir vidden och mönstret i ena sidan när du stickar vändningar enligt beskrivningen. Lycka till!
13.12.2012 - 09:46