
Popular categories
Looking for a yarn?


|
|||||||||||||||||||
Champagne |
|||||||||||||||||||
 |
 |
||||||||||||||||||
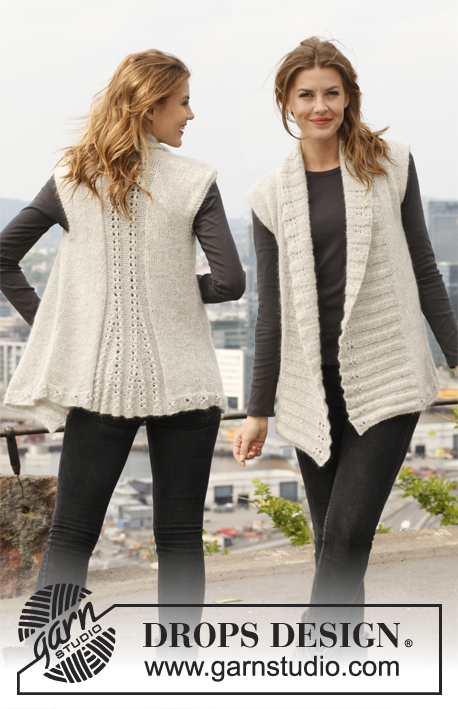
Knitted DROPS jacket with cables and lace pattern in ”Lima”. Size: S - XXXL.
DROPS 140-1 |
|||||||||||||||||||
|
GARTER ST (back and forth on needle): K sts on all all rows. PATTERN: See diagrams A.1 to A.3. Diagrams show all rows in pattern from RS. BUTTONHOLES: Bind off for buttonholes on right band from RS. 1 buttonhole = K tog 3rd and 4th st from mid front, then make 1 YO. Bind off for buttonholes when piece measures: SIZE S: 8, 16, 24, 31, 38 and 45 cm / 3⅛", 6¼", 9½", 12¼", 15" and 17¾". SIZE M: 8, 16, 24, 32, 40 and 47 cm / 3⅛", 6¼", 9½", 12½", 15¾" and 18½". SIZE L: 8, 17, 25, 33, 41 and 49 cm / 3⅛", 6¾", 9¾", 13", 16⅛" and 19¼". SIZE XL: 8, 17, 26, 35, 43 and 51 cm / 3⅛", 6¾", 10¼", 13¾", 17" and 20". SIZE XXL: 8, 16, 24, 32, 39, 46 and 53 cm / 3⅛", 6¼", 9½", 12½", 15¼", 18" and 21". SIZE XXXL: 8, 16, 24, 32, 40, 48 and 55 cm / 3⅛", 6¼", 9½", 12½", 15¾", 19" and 21⅝". ---------------------------------------------------------- BACK PIECE: Cast on 86-94-102-116-124-136 sts on needle size 4 mm / US 6 with Lima. Work 8 rows in GARTER ST - see explanation above. Switch to needle size 4.5 mm / US 7. K 1 row from RS while AT THE SAME TIME inc 20-20-20-28-28-28 sts evenly = 106-114-122-144-152-164 sts. K 1 row from WS. Then work as follows from RS: 1 edge st, 9-13-17-9-13-19 sts in garter st, * A.1, A.2 *, repeat from *-* a total of 2-2-2-3-3-3 times, finish with the first 10 sts in A.1, 9-13-17-9-13-19 sts in garter st and 1 edge st. When piece measures 6 cm / 2⅜", dec 1 st in each side, repeat dec every 2 cm / ¾" 5 more times = 94-102-110-132-140-152 sts. When piece measures 22 cm / 8¾", inc 1 st in each side, repeat inc every 2½-2½-2½-2½-3-3 cm / ⅞"-⅞"-⅞"-⅞"-1⅛"-1⅛" 5 more times - work the inc sts in garter st = 106-114-122-144-152-164 sts. When piece measures 36-37-38-39-40-41 cm / 14¼"-14½"-15"-14¼"-15¾"-16⅛", bind off for armholes in each side as follows: 3 sts 1 time, 2 sts 2-3-5-2-3-5 times and 1 st 3-5-5-3-5-7 times = 86-86-86-124-124-124 sts. Continue in pattern. When piece measures 53-55-57-59-61-63 cm / 21"-21⅝"-22½"-23¼"-24"-24¾", dec 4 sts over each of the 1-1-1-3-3-3 middle cables = 82-82-82-112-112-112 sts. When piece measures 54-56-58-60-62-64 cm / 21¼"-22"-22¾"-23⅝"-24⅜"-25¼", bind off the middle 26-26-26-34-34-34 sts for neck = 28-28-28-39-39-39 sts remain on each shoulder. When piece measures 55-57-59-61-63-65 cm / 21⅝"-22½"-23¼"-24"-24¾"-25½", dec 4 sts over each of the 2 cables on the shoulder = 20-20-20-31-31-31 sts. Bind off when piece measures 56-58-60-62-64-66 cm / 22"-22¾"-23⅝"-24⅜"-25¼"-26". RIGHT FRONT PIECE: Cast on 52-56-60-67-71-77 sts on needle size 4 mm / US 6 with Lima. Work 8 rows in garter st. Switch to needle size 4.5 mm / US 7. K 1 row from RS while at the same time inc 12-12-12-16-16-16 sts evenly = 64-68-72-83-87-93 sts. K 1 row from WS. Work as follows – from RS: 6 sts in garter st (= band), A.1 over the next 38-38-38-57-57-57 sts, finish with the first 10 sts in A.1, 9-13-17-9-13-19 sts in garter st and 1 edge st. When piece measures 6 cm / 2⅜", beg dec in the side as on back piece = 58-62-66-77-81-87 sts. AT THE SAME TIME when piece measures 8 cm / 3⅛", beg to bind off for buttonholes on band – see explanation above. When piece measures 22 cm / 8¾", beg inc in the side as on back piece - work the inc sts in garter st = 64-68-72-83-87-93 sts. When piece measures 36-37-38-39-40-41 cm / 14¼"-14½"-15"-14¼"-15¾"-16⅛", bind off for armhole in the side as on back piece = 54-54-54-73-73-73 sts. Continue in pattern. When piece measures 46-48-50-52-54-56 cm / 18"-19"-19¾"-20½"-21¼"-22", dec 4 sts over cable towards mid front, on next row from RS, slip 12-12-12-16-16-16 sts towards mid front on a stitch holder for neck (work them first), then bind off on every row from neck: 2 sts 4 times and 1 st 2 times. NOTE! In sizes XL-XXL-XXXL dec 4 sts over the second cable towards mid front before binding off = 28-28-28-39-39-39 sts remain on shoulder. When piece measures 55-57-59-61-63-65 cm / 21⅝"-22½"-23¼"-24"-24¾"-25½", dec 4 sts over each of the 2 cables on the shoulder = 20-20-20-31-31-31 sts. Bind off when piece measures 56-58-60-62-64-66 cm / 22"-22¾"-23⅝"-24⅜"-25¼"-26". LEFT FRONT PIECE: Cast on and work as right front piece but reversed. Instead of A.1 work A.2. Do not bind off for buttonholes. SLEEVE: Worked back and forth on needle. Cast on 47-49-51-53-55-57 sts on needle size 4 mm / US 6 with Lima. Work 12 rows in garter st. Switch to needle size 4.5 mm / US 7 and work as follows - from RS: 1 edge st, 5-6-7-8-9-10 sts in stockinette st * A.3, 5 sts in stockinette st *, repeat from *-* 4 times and finish with A.3, 5-6-7-8-9-10 sts in stockinette st and 1 edge st. When piece measures 8 cm / 3⅛", inc 1 st in each side, repeat inc every 3½-3-2½-2-2-1½ cm / 1¼"-1⅛"-⅞"-¾"-¾"-½" 11-13-15-16-18-19 more times = 71-77-83-87-93-97 sts. Work the inc sts in stockinette st. When piece measures 49-49-49-46-46-44 cm / 19¼"-19¼"-19¼"-18"-18"-17¼" (shorter measurements in the larger sizes because of longer sleeve cap and broader shoulder width) bind off for sleeve cap at beg of every row in each side as follows: 4 sts 1 time, 2 sts 3 times, 1 st 1-2-3-3-4-7 times, then bind off 2 sts in each side until piece measures 57-58-59-56-57-58 cm / 22½"-22¾"-23¼"-22"-22½"-22¾", bind off 3 sts in each side, then bind off the remaining sts, piece measures approx. 58-59-60-57-58-59 cm / 22¾"-23¼"-23½"-22½"-22¾"-23¼". Knit another sleeve. ASSEMBLY: Sew the shoulder seams. Sew in sleeves and sew under arm and side seams in one inside 1 edge st. NECK: Pick up approx. 100-120 sts around the neck (including sts on stitch holders) on needle size 4 mm / US 6. Work 6 rows in garter st, bind off. Sew on buttons. |
|||||||||||||||||||
Diagram explanations |
|||||||||||||||||||
|
|||||||||||||||||||

|
|||||||||||||||||||

|
|||||||||||||||||||
|
Have you made this or any other of our designs? Tag your pictures in social media with #dropsdesign so we can see them! Do you need help with this pattern?You'll find tutorial videos, a Comments/Questions area and more by visiting the pattern on garnstudio.com. © 1982-2024 DROPS Design A/S. We reserve all rights. This document, including all its sub-sections, has copyrights. Read more about what you can do with our patterns at the bottom of each pattern on our site. |
|||||||||||||||||||


With over 40 years in knitting and crochet design, DROPS Design offers one of the most extensive collections of free patterns on the internet - translated to 17 languages. As of today we count 304 catalogs and 11422 patterns - 11417 of which are translated into English (US/in).
We work hard to bring you the best knitting and crochet have to offer, inspiration and advice as well as great quality yarns at incredible prices! Would you like to use our patterns for other than personal use? You can read what you are allowed to do in the Copyright text at the bottom of all our patterns. Happy crafting!
Comments / Questions (232)
Hi, Thanks for the pattern. I'm knitting size S. When binding off for the armhole in the right front piece the total number of stitches to bind off is 10 (3 sts 1 time, 2 sts 2 times and 1 st 3 times). Since the band consists of just 6 stitches in garter stitch, it means that I have to bind off 4 stitches from one of the cables (2 stitches near the cable, and 2 stitches on the cable itself). How can I do it and still continue knitting the cable in the following rows?
04.03.2023 - 11:19DROPS Design answered:
Dear Lilach, when binding off for the armhole in the front piece you only bind off on one side of the piece. You don't bind off on the side with the band, you bind off where the armhole would be located, on the other side of the piece (where there is an edge stitch and 9 stitches in garter stitch). Happy knitting!
05.03.2023 - 20:55Gracias. Acabo de entender las explicaciones del patrón de la chaqueta Champangne
03.03.2023 - 16:05En la chaqueta Drops Champagne no caben 5 repeticiones de los diagramas , cada uno de 19 puntos, en los 86 puntos que marca el patrón. Hay alguna modificación?\r\nGracias.
03.03.2023 - 15:56Hej\r\nJeg er nået til halsen midtfor på forstykke hvor der skal tages 4 masker ind over snoningen. Som jeg forstår det, skal snoningens 6 masker dermed reduceres til 2 - er det korrekt? Når jeg ser på fotoet, ser det bare ikke sådan ud, så jeg er noget forvirret. Hvad skal jeg gøre? Tak for hjælpen.
15.05.2022 - 21:58DROPS Design answered:
Hei Anette. Her har det nok blitt vurdert i ettertid (etter at bildet ble tatt) at det blir penest med å felle masker over fletten, slik at fletten "lukker" seg når det skal felles av. Om du ønsker å ha fletten slik du ser på bildet kan du felle før og etter fletten. mvh DROPS Design.
16.05.2022 - 11:38Jeg vil høre om der er noget i vejen for at strikke forstykker og rygstykke sammen op til ærmegab i stedet for 3 separate dele? Venlig hilsen Anette
15.02.2022 - 12:06DROPS Design answered:
Hej Anette, det kan du absolut gøre :)
15.02.2022 - 14:10Bonjour, Dans ce modèle, je ne comprends pas pour le devant droit :A 46cm de hauteur totale diminuer 4 mailles au dessus de la torsade côté milieu devant ? est-ce la torsade du milieu du devant ou la 1ère torsade à côté des mailles bordures? Merci pour votre réponse. Cordialement.
11.10.2021 - 16:37DROPS Design answered:
Bonjour Mme Mevel, on diminue dans la 1ère torsade côté bordure devant/encolure autrement dit la première torsade après les mailles de bordure devant (devant droit)/la dernière torsade avant les mailles de bordure devant (devant gauche). Bon tricot!
12.10.2021 - 08:27Bonjour, Je n'ai pas trouvé l'endroit où il est indiqué combien de pelotes il faut selon la taille choisie (sur aucun de vos modèles). Pourriez vous m'indiquer où trouver cette indications ? Cordialement. Carole
22.08.2021 - 14:09DROPS Design answered:
Bonjour Carole, au debut vous avez toujours la secion 'Fournitures' où vous trouverez le poids de fil requis, p.ex. dans ce modele precis, pour la premiere taille S, vous avez besoin de 550 g (11 pelotes de DROPS Lima). Bon tricot!
22.08.2021 - 20:25Bonjour, je fais la grandeur M. Devant gauche : rabattre tous les rangs à partir de l'encolure : 4 fois 2 m et 2 fois 1 m. Le rabattage se fait donc sur les rangs envers donc à tous les deux rangs? Merci de vos éclaircissements.
10.12.2020 - 02:20DROPS Design answered:
Bonjour Manon, tout à fait, les mailles de l'encolure du devant gauche seront rabattues en début de rang, tous les rangs sur l'envers (= tous les 2 rangs à partir de l'encolure). Bon tricot!
10.12.2020 - 09:13Bonjour, je suis à faire le dos en grandeur M. À 53-55-57-59-61-63 cm de hauteur totale, diminuer 4 m au-dessus de la torsades centrales . J'ai 6 mailles dans la torsades comment dois-je faire pour réduire 4 mailles. Est-ce que la diminution ce fait sur le même rang. Merci de votre aide.
25.11.2020 - 19:15DROPS Design answered:
Bonjour Manon, tricotez ensemble la 2ème m env et la 1ère ens à l'end, 2 fois 2 m ens à l'end et tricotez ensemble la dernière m end et la 1ère m env = vous aurez diminué 4 m au-dessus de la torsade - répétez sur l'autre torsade - on diminue ainsi pour conserver la bonne largeur (il faut plus de mailles en torsades qu'en jersey pour la même largeur). Bonne continuation!
26.11.2020 - 09:54Je fais ce modèle en taille L .j'ai rabattu les mailles pour les emmanchures et suis arrivé au stade : a 57 cm de hauteur totale, diminuer 4 m au dessus de chacune des 1 torsades centrales = 82 m. Je ne comprends pas, pouvez vous m'aider. Je suis fan de vos modèles et ne suis jamais déçue.
28.10.2019 - 20:03DROPS Design answered:
Bonjour Mme Fouere et merci. On a besoin de davantage de mailles pour les torsades, pour ne pas déformer le bord en rabattant les mailles, on va diminuer 4 mailles dans la torsade centrale (en taille L) en tricotant 4 fois 2 m ens à l'end au-dessus de ces mailles, on diminue ainsi 4 mailles et il en reste 82. Bon tricot!
04.11.2019 - 13:13