
Popular categories
Looking for a yarn?


|
|||||||
Splash |
|||||||
 |
 |
||||||
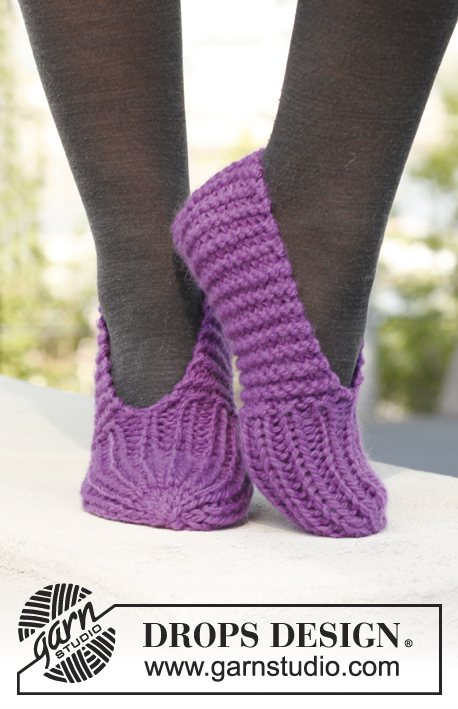
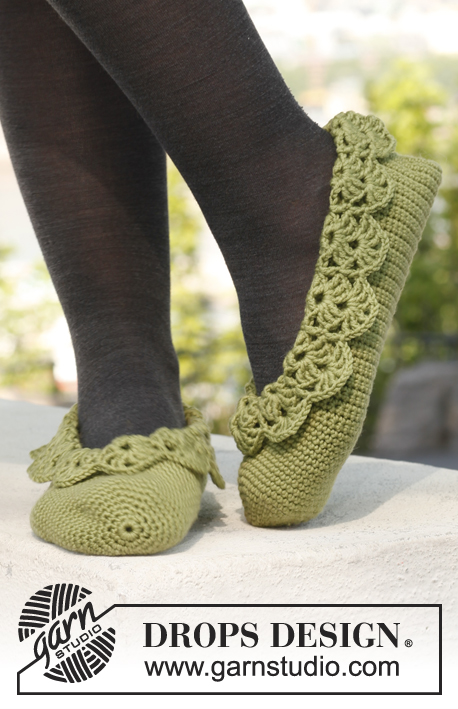
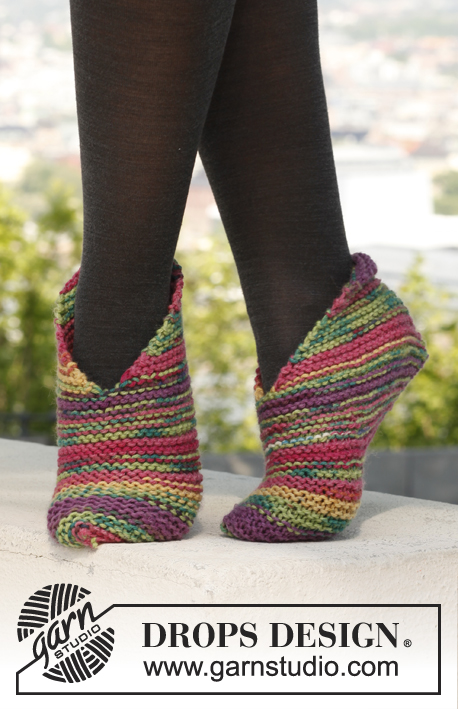
Knitted DROPS slippers with 1 thread \"Big Fabel\" og 2 threads \"Fabel\".
DROPS 142-39 |
|||||||
|
GARTER ST (back and forth on needle): K sts on all rows. DIAGRAM: See diagrams A-1 and A-2 for assembly. ---------------------------------------------------------- SLIPPER: Worked from the toes and to the heel, the entire slipper is worked in garter st. Cast on 19-21-23 sts with 1 thread Big Fabel or 2 threads Fabel and work in garter st back and forth, AT THE SAME TIME inc 1 st (work 2 sts in 1 st) in each side every other row a total of 20-22-23 times = 59-65-69 sts. Piece measures approx. 13-14-15 cm / 5"-5½"-6". Work as before over the first 29-32-34 sts, bind off 1 st, work the remaining 29-32-34 sts on left needle. From now the piece is worked in two parts separately. Continue in garter st and dec 1 st (K 2 tog) in each side every other row a total of 12-14-15 times = 5-4-4 sts remain. Then dec as follows: Size 5/6½: K 2 tog, K 1, K 2 tog. Work 1 row. On next row slip 1 st as if to K, K 2 tog, psso. Size 7½/8½ - 9/10: K 2 tog 2 times. Work 1 row. On next row K 2 tog. Cut the thread and pull it through the last st. Finish the other side the same way. Piece measures approx. 21-23-26 cm / 8 1/4"-9"-10 1/4" in total. ASSEMBLY: See diagrams A-1 and A-2 for illustration. Fold the slipper double and sew neatly tog in front loop of outermost st from point 1 through point 2 to point 3. Fold the edge down 2 cm / 3/4'' at the back and sew a small stitch to hold the fold down. |
|||||||
Diagram explanations |
|||||||
|
|||||||

|
|||||||
|
Have you made this or any other of our designs? Tag your pictures in social media with #dropsdesign so we can see them! Do you need help with this pattern?You'll find tutorial videos, a Comments/Questions area and more by visiting the pattern on garnstudio.com. © 1982-2024 DROPS Design A/S. We reserve all rights. This document, including all its sub-sections, has copyrights. Read more about what you can do with our patterns at the bottom of each pattern on our site. |
|||||||


With over 40 years in knitting and crochet design, DROPS Design offers one of the most extensive collections of free patterns on the internet - translated to 17 languages. As of today we count 304 catalogs and 11422 patterns - 11417 of which are translated into English (US/in).
We work hard to bring you the best knitting and crochet have to offer, inspiration and advice as well as great quality yarns at incredible prices! Would you like to use our patterns for other than personal use? You can read what you are allowed to do in the Copyright text at the bottom of all our patterns. Happy crafting!
Comments / Questions (27)
Would love to make these but am confused by the gauges. In yarn group C, does 19-16 mean 4 to 4.75 stitches per inch? Fairly new to knitting and never used Drops before. Thanks in advance for any help.
08.02.2014 - 01:29DROPS Design answered:
Dear Christine, these slippers are worked on a tighter tension ie 19 sts = 4", with needle size 6 (US) or size required to get the correct tension. Do not hesitate to take larger/smaller needle if required. Happy knitting!
08.02.2014 - 10:09Schöne Anleitung! Ich habe eine Frage zu "Ab hier wird die Arbeit getrennt" Nach der Zeichnung scheint es sich wirklich zu trennen, aber ich soll nur in jeder 2.Reihe abnehmen. Stricke ich dann um das "Loch" in der Mitte nicht und lege die Machen nur auf die rechte Nadel? Ansonsten wird doch alles zusammengestricktt... Vielen Dank!!
20.05.2013 - 20:52DROPS Design answered:
Liebe Rufuscata, der Hausschuh muss eine Öffnung zum Hineinschlüpfen haben, daher kann er nicht ganz in Runden gestrickt werden. Nach dem Teilen stricken Sie in Hin-und Rückreihen, wobei Sie bei der abgenommenen Masche (Öffnung) jeweils wenden.
21.05.2013 - 08:35Ik maakte 40-42. Maar misschien heb ik te los gebreid, want ze zitten best los en ik heb maat 42... Ik benniet zo goed in stekenproeven ;-)
07.04.2013 - 12:30For the biggest size 100 grams is not enough. Too bad. I am still debating whether I will buy more yarn or just finish it with another colour...
09.03.2013 - 13:02DROPS Design answered:
That is sad to hear! Did you check your gauge? The sample in this picture was knit with well under 100 grams, but we will let design know. Can you tell me what size you were making?
15.03.2013 - 08:38Achtung: Für die größte Schuhgröße reichen 100 g Wolle leider absolut nicht aus! Sehr ärgerlich!
15.02.2013 - 23:44DROPS NADEL ODER RUNDNADEL (40 cm) NR 4 – oder die benötigte Nadelstärke, um folgende Maschenprobe zu erhalten 19 M x 31 R im Perlmuster = 10 x 10 cm. Perlmuster? oder Krausrippe? Die Anleitung ist im Muster "Krausrippe" beschrieben
12.02.2013 - 13:46DROPS Design answered:
Vielen Dank für den Hinweis, wir haben es gleich korrigiert!
12.02.2013 - 20:23These were a quick, easy knit - I made them over the weekend and they are keeping my feet cozy now
01.01.2013 - 16:39Oana wrote:
Great pattern! I just knitted a pair and they look great on feet. Thank you for sharing!
04.07.2012 - 13:02Hur kan garnkostnaden bli 504 kr om det bara går åt 100 gram Big Fabel som kostar ca. 58 kr/100 g???
20.06.2012 - 08:46Deze zie ik mij wel te breien; zal wel met geen rondbreinaald zijn zeker ?? Tof die slof !
16.06.2012 - 09:57