DROPS Vivaldi
DROPS Vivaldi
56% Mohair, 30% Polyamide, 14% Wool
Discontinued
find alternatives
DROPS Silke-Tweed
DROPS Silke-Tweed
52% Silk, 48% Wool
Discontinued
find alternatives
DROPS SS24

DROPS 76-22

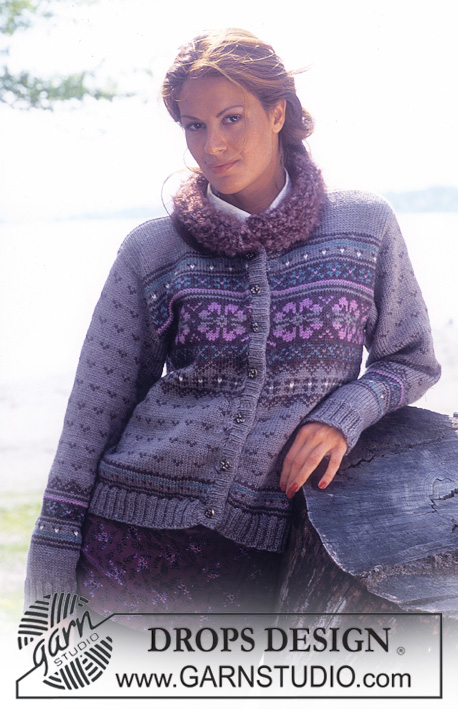
Knitted jacket in "Vivaldi" and "Silke-Tweed" with wave pattern and blackberry pattern. Lace-knitted scarf in "Vivaldi".

DROPS 76-22
DROPS design: Pattern no OO-012
--------------------------------------------------------

Sizes: XS/S - S/M - M/L - XL
Materials: DROPS Vivaldi from Garnstudio
200-200-200-250 g colour no 06, off white.
and use: DROPS Silke-Tweed from Garnstudio
50-50-50-50 g colour no 17, off white.

DROPS Circular needle and needle size 4 mm.
DROPS Crochet hook size 2.5 mm.
DROPS Wooden buttons, no 503: 4 items.
-------------------------------------------------------

-------------------------------------------------------

Alternative Yarn – See how to change yarns here
Yarn Groups A to F – Use the same pattern and change the yarn here
Yarn usage using an alternative yarn – Use our yarn converter here

-------------------------------------------------------

DROPS Vivaldi
DROPS Vivaldi
56% Mohair, 30% Polyamide, 14% Wool
Discontinued
find alternatives
DROPS Silke-Tweed
DROPS Silke-Tweed
52% Silk, 48% Wool
Discontinued
find alternatives

Pattern instructions

NOTE: This pattern is written in British English. All measurements in charts are in cm. For conversion from cm to inches - click here. There are different terms for crocheting in British and American English. If this pattern includes crochet, click for "crochet terms" here. For this pattern in American English, please click here.
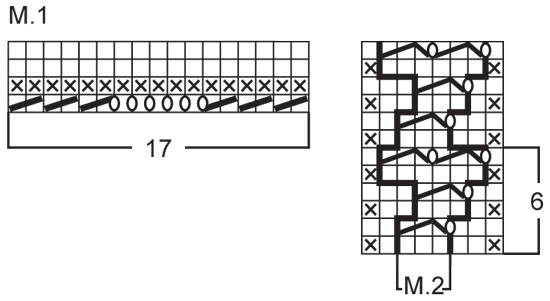
Knitting tension: 19 stitches x 26 rows with Vivaldi , needle size 4 mm and stocking stitch = 10 x 10 cm. 20 stitches with M.1 and Vivaldi and needle size 4 mm = 10 cm. Remember needle size is only a guide!

Ridge/Garter stitch (back and forth on needle): 1 ridge = Knit 2 rows.

Pattern: See diagrams M.1 and M.2. The pattern in the diagram is seen from the right side. NOTE: M.2 is a lace pattern, similar to netting. The diagram is drawn with edge stitches. These edge stitches are in addition to the band stitches in each side and the pattern is worked as follows on body:
Row 2 in diagram: 3 edge stitches in stocking stitch, M.2 over the next 144-159-174-189 stitches, 2 edge stitches in stocking stitch.
Row 4 in diagram: 2 edge stitches in stocking stitch, M.2 over the next 144-159-174-189 stitches, 3 edge stitches in stocking stitch.
Row 6 in diagram: 1 edge stitch in stocking stitch, M.2 over the next 147-162-177-192 stitches, 1 edge stitch in stocking stitch.

Band: The band is worked in garter stitch upwards and continues along neckline - to make sure the band is neat, it should be worked a little tightly.

Decrease tip (for neck): Decrease on inside of 4 edge stitches in garter stitch. All decreases are worked from the right side! 
Decrease as follows after the 4 edge stitches: Slip 1 stitch as if to knit, K1, pass the slipped stitch over. Decrease as follows before the 4 edge stitches: K2 together.

Buttonholes: Work 4 buttonholes on right band. 1 buttonhole = Cast off third and fourth stitch from edge, cast on 2 new stitches over the cast off stitches on next row.

Work buttonholes when piece measures:
For all sizes: 4, 12, 20 and 28 cm.

NOTE: The last buttonhole is worked when you have 1 ridge left before starting decreases for neck.
-----------------------------------------------------------

Body: The jacket is worked back and forth with circular needle from mid front. Cast on 178-195-212-229 stitches (incl. 4 band stitches in each side towards mid front) with circular needle size 4 mm and Vivaldi, work 1 ridge. Continue with M.1 (row 1 = right side), but 4 band stitches in each side towards mid front are worked in garter stitch - see description for bands above. NOTE: Remember buttonholes on right band - see description above. Remember the knitting tension! When piece measures 14 cm change to Silke-Tweed. Purl 1 row from right side. Continue with stocking stitch at the same time as you decrease 11-12-13-14 stitches evenly on 2nd row = 167-183-199-215 stitches. When piece measures 17 cm - adjust to after 1 purled row from wrong side - decrease 10-11-12-13 stitches evenly on row = 157-172-187-202 stitches. Change to Vivaldi and purl 1 row from the wrong side. Then continue with M.2 - see description above - NOTE: begin with row 2 in diagram = right side (only this one time) - the 4 band stitches in each side are continued in garter stitch. When piece measures 28 cm, purl 1 row from right side.

Read the whole of the next section before continuing!
Continue with stocking stitch and Vivaldi to finished length.
At the same time increase 7-8-13-14 stitches evenly on 2nd row of stocking stitch = 164-180-200-216 stitches (NOTE: do not increase over band stitches). Now insert 1 marker thread 43-47-52-56 stitches in from each side = 78-86-96-104 stitches between marker threads on back piece.

Neckline: When piece measures 29 cm decrease for V-neck in each side towards mid front - see Decrease tip: Decrease every 4th row: 1 stitch 14 times.

Armhole: When piece measures 34-35-36-37 cm cast off 6-6-8-8 stitches in each side for armholes (= 3-3-4-4 stitches on each side of marker threads). Each part is finished separately.

Right front piece: Continue to decrease for neck, at the same time decrease for armhole in the side every 2nd row: 3 stitches 0-0-1-1 time, 2 stitches 0-1-1-2 times and 1 stitch 2-2-3-3 times. After all decreases for armholes and V-neck, there are 24-26-26-28 stitches left on shoulder. Cast off the remaining stitches when piece measures 54-56-58-60 cm.

Left front piece: Worked as right, but with decreases for armhole and neck in opposite side.

Back piece: = 72-80-88-96 stitches. Continue to decrease for armholes in each side as for front piece = 68-72-72-76 stitches left on needle. When piece measures 51-53-55-57 cm work 2 ridges over the middle 24 stitches, then cast off the middle 16 stitches for neck. Then decrease towards neck every 2nd row: 1 stitch 2 times - see Decrease tip = 24-26-26-28 stitches left on each shoulder. Cast off the remaining stitches when piece measures 54-56-58-60 cm.

Sleeve: Cast on 53-53-70-70 stitches (incl. 1 edge stitch in each side) with needle size 4 mm and Vivaldi and work 1 ridge. Continue with M.1 (row 1 = right side), but 1 edge stitch in each side is not worked in pattern. When piece measures 12 cm - adjust to after 1 purled row from wrong side - change to Silke-Tweed and purl 1 row from right side. Continue with stocking stitch, at the same time decrease 9-6-17-17 stitches evenly on row = 44-47-53-53 stitches.

Read the whole of the next section before continuing:
When piece measures 16 cm - adjust to after 1 purled row from the wrong side - change back to Vivaldi. Purl 1 row from right side. Then continue with M.2 (row 1 = wrong side). NOTE: Row 2 in M.2 is worked as follows: 3 edge stitches in stocking stitch, M.2 over the next 39-42-48-48 stitches, 2 edge stitches in stocking stitch. At the same time, when piece measures 16 cm - adjust to after row 2 in M.2 - increase 1 stitch in each side every 2.5-2.5-2.5-2 cm a total of 14-14-13-15 times = 72-75-79-83 stitches. NOTE: The increased stitches in M.2 are worked in stocking stitch and not in pattern. When piece measures 21 cm - purl 1 row from right side. Then continue with stocking stitch to finished length. At the same time, when piece measures 52-51-48-47 cm decrease for sleeve cap in each side every 2nd row: 4 stitches 1 time and 3 stitches 1-2-0-0 times, then 2 stitches in each side until piece measures 57 cm, then 3 stitches 1 time in each side. Cast off the remaining stitches, piece measures approx. 58 cm.

Assembly: Sew shoulder seams.

Crochet edges: Neck: Work an edge with hook size 2.5 mm and Silke-Tweed as follows: Begin on left front piece (when garment is work) where the lace pattern ends and work from right to left. Crochet inside the 4 edge stitches in row of cast-off stitches along neckline; the crochet edge lies inside the 4 edge stitches out towards the armhole.

Start with 1 double crochet in first stitch/row, * 5 chain stitches, skip 2 stitches/rows, 1 double crochet in next stitch/row *, repeat from *-* around neck as far as where the lace pattern ends in right side. Finish with 1 slip stitch in last stitch/row.
Picot edge at bottom of body and sleeves: Crochet with hook size 2.5 mm and Silke-Tweed as follows around the ridge: 1 double crochet in first stitch, * 3 chain stitches, 1 double crochet in 3rd chain stitch from hook, skip 1 stitch, 1 double crochet in next stitch *, repeat from *-* and finish with 1 slip stitch in last stitch. Sew sleeve seams inside the 1 edge stitch. Sew in sleeves and sew on buttons.

LACE SCARF - see pattern under pattern no 13-76.

Diagram

symbols = knit from right side, purl from wrong side.
symbols = purl from right side, knit from wrong side.
symbols = 1 yarn over.
symbols = Work as follows from right side: K2 together.
symbols = Work as follows from right side: slip 1 stitch as if to knit, K2 , pass slipped stitch over the 2 knitted stitches.
diagram
diagram

Each of our patterns has specific tutorial videos to help you.

Do you have a question? See a list of frequently asked questions (FAQ)

Knitting tension is what determines the final measurements of your work, and is usually measured per 10 x 10 cm. It is provided like so: number of stitches in width x number of rows in height - eg: 19 stitches x 26 rows = 10 x 10 cm.

The knitting tension is very individual; some people knit/crochet loosely while others work tightly. You adjust the knitting tension with the needle size, which is why the suggested needle size is only meant as a guide! You need to adjust this (up or down) to ensure that YOUR knitting tension matches the knitting tension provided in the pattern. If you work with a different knitting tension than provided you will have a different yarn consumption, and your work will have different measurements than what the pattern suggests.

The knitting tension also determines which yarns can replace each other. As long as you achieve the same knitting tension you can replace one yarn with another.

See DROPS lesson: How to measure your tension/gauge

See DROPS video: How to make a gauge tension swatch

The required amount of yarn is provided in grams, eg: 450 g. To calculate how many balls you’ll need you first need to know how many grams are in 1 ball (25g, 50g or 100g). This information is available if you click on the individual yarn quality on our pages. Divide the amount required with the amount of each ball. For example, if each ball is 50g (the most common amount), the calculation will be as follows: 450 / 50 = 9 balls.

The important thing when changing from one yarn to another is that the knitting/crochet tension remains the same. This is so that the measurements of the finished piece will be the same as on the sketch provided. It is easier to achieve the same knitting tension using yarns from the same yarn group. It is also possible to work with multiple strands of a thinner yarn to achieve the knitting tension of a thicker one. Please try our yarn converter. We recommend you to always work a test swatch.

Please NOTE: when changing yarn the garment might have a different look and feel to the garment in the photo, due to individual properties and qualities of each yarn.

See DROPS lesson: Can I use a different yarn than the one mentioned in the pattern?

All our yarns are categorised into yarn groups (from A to F) according to thickness and knitting tension – group A contains the thinnest yarns and group F the thickest. This makes it easier for you to find alternative yarns to our patterns, should you wish to switch yarn. All yarns within the same group have a similar knitting tension and can easily replace each other. However, different yarn qualities have different structures and properties which will give the finished work a unique look and feel.

Click here for an overview of the yarns in each yarn group

At the top of all our patterns you’ll find a link to our yarn calculator, which is a helpful tool should you wish to use a different yarn than suggested. By filling in the yarn quality you wish to replace, the amount (in your size) and number of strands, the calculator will present good alternative yarns with the same knitting tension. Additionally it will tell you how much you’ll require in the new qualities and whether you’ll need to work with multiple strands. Most skeins are 50g (some are 25g or 100g).

If the pattern is worked with multiple colours, every colour will have to be calculated separately. Similarly, if the pattern is worked with several strands of different yarns (for example 1 strand Alpaca and 1 strand Kid-Silk) you will have to find alternatives for each, individually.

Click here to see our yarn calculator

Since different yarns have different qualities and textures we have chosen to keep the original yarn in our patterns. However, you can easily find options among our available qualities by using our yarn calculator, or simply pick a yarn from the same yarn group.

It is possible that some retailers still have discontinued yarns in stock, or that someone has a few skeins at home that they would like to find patterns for.

The yarn calculator will provide both alternative yarn as well as required amount in the new quality.

If you think it's hard to decide what size to make, it can be a good idea to measure a garment you own already and like the size of. Then you can pick the size by comparing those measures with the ones available in the pattern's size chart.

You'll find the size chart at the bottom of the pattern.

See DROPS lesson: How to read size chart

The needle size provided in the pattern serves only as a guide, the important thing is to follow the knitting tension. And since knitting tension is very individual, you will have to adjust the needle size to ensure that YOUR tension is the same as in the pattern – maybe you’ll have to adjust 1, or even 2 needle sizes, up or down to achieve the correct tension. For this, we recommend that you work test swatches.

Should you work with a different knitting tension than the one provided, the measurements of the finished garment might deviate from the measurement sketch.

See DROPS lesson: How to measure your tension/gauge

See DROPS video: How to make a tension/gauge swatch

Working a garment top-down provides more flexibility and room for personal adjustment. For example it is easier to try the garment on while working, as well as making adjustments to length of yoke and shoulder caps.

The instructions are carefully explaining every step, in the correct order. Diagrams are adjusted to the knitting direction and are worked as usual.

The diagram depicts all rows/rounds, and every stitch seen from the right side. It is read from bottom to top, from right to left. 1 square = 1 stitch.

When working back and forth, every other row is worked from the right side and every other row is worked from the wrong side. When working from the wrong side, the diagram will have to be worked reversed: from left to right, knit stitches are purled, purl stitches are knit etc.

When working in the round every round is worked from the right side and the diagram are worked from right to left on all rounds.

See DROPS lesson: How to read knitting diagrams

The diagram depicts all rows/rounds, and every stitch seen from the right side. It is worked from bottom to top, from right to left.

When working back and forth every other row is worked from the right side: from right to left and every other row is worked from the wrong side: from left to right.

When working in the round, every row in the diagram are worked from the right side, from right to left.

When working a circular diagram you start in the middle and work your way outwards, counter clockwise, row by row.

The rows usually start with a given number of chain stitches (equivalent to the height of the following stitch), this will either be depicted in the diagram or explained in the pattern.

See DROPS lesson: How to read crochet diagrams

Instructions for working several diagrams after each other on the same row/round, will often be written like so: “work A.1, A.2, A.3 a total of 0-0-2-3-4 times". This means you work A.1 once, then A.2 is worked once, and A.3 is repeated (in width) the number of times provided for your size – in this case like so: S = 0 times, M = 0 times, L=2 times, XL= 3 times and XXL = 4 times.

The diagrams are worked as usual: begin with the first row in A.1, then work the first row in A.2 etc.

See DROPS lesson: How to read knitting diagrams

See DROPS lesson: How to read crochet diagrams

The total width of the garment (from wrist-to-wrist) will be larger in the larger sizes, despite the actual sleeves being shorter. The larger sizes have longer sleeve caps and wider shoulders, so there will be a good fit in all sizes.

The measurement sketch/schematic drawing provides information regarding the full length of the garment. If it’s a jumper or a jacket the length is measured from the highest point on the shoulder closest to the neckline, and straight down to the bottom of the garment. It is NOT measured from the tip of shoulder. Similarly, the length of yoke is measured from the highest point on the shoulder and down to where yoke is split into body and sleeves.

On a jacket measures are never taken along bands, unless specifically stated. Always measure inside band stitches when measuring the length.

See DROPS lesson: How to read a schematic drawing

Diagrams are often repeated on the round or in height. 1 repeat is the diagram the way it appears in the pattern. If it says to work 5 repeats of A.1 in the round, then you work A.1 a total of 5 times after/next to each other in the round. If it says to work 2 repeats of A.1 vertically/in height you work the entire diagram once, then begin again at the start and work the entire diagram one more time.

Chain stitches are slightly narrower than other stitches and to avoid working the cast-on edge too tight, we simply chain more stitches to begin with. The stitch count will be adjusted on the following row to fit the pattern and measurement sketch.

The rib edge is more elastic and will contract slightly compared to, for example, stocking stitch. By increasing before the rib edge, you avoid a visible difference in width between the rib edge and the rest of the body.

It’s very easy to cast off too tightly, and by making yarn overs while casting off (and simultaneously casting these off) you avoid a too tight cast off edge.

See DROPS video: How to bind off with yarn overs (yo)

To achieve an even increase (or decrease) you can increase on, for example: every 3rd and 4th row alternately, like so: work 2 rows and increase on the 3rd row, work 3 rows and increase on the 4th. Repeat this until the increase is complete.

See DROPS lesson: Increase or decrease 1 st on every 3rd and 4th row alternately

Should you prefer to work in the round instead of back and forth, you may of course adjust the pattern. You’ll need to add steeks mid-front (usually 5 stitches), and follow the instructions. When you would normally turn and work from the wrong side, simply work across the steek and continue in the round. At the end you’ll cut the piece open, pick up stitches to work bands, and cover the cut edges.

See DROPS video: How to knit steeks and cut open

Should you prefer to work back and forth instead of in the round, you may of course adjust the pattern so you work the pieces separately and then assemble them at the end. Divide the stitches for the body in 2, add 1 edge stitch in each side (for sewing) and work the front and back pieces separately.

See DROPS lesson: Can I adapt a pattern for circular needles into straight needles?

Pattern repeats can vary slightly in the different sizes, in order to get the correct proportions. If you’re not working the exact same size as the garment in the photo, yours might deviate slightly. This has been carefully developed and adjusted so that the complete impression of the garment is the same in all sizes.

Make sure to follow instructions and diagrams for your size!

If you have found a pattern you like which is available in women’s size it’s not very difficult to convert it to men’s size. The biggest difference will be the length of sleeves and body. Start working on the women size that you think would fit across the chest. The additional length will be worked right before you cast off for the armhole/sleeve cap. If the pattern is worked top-down you can add the length right after the armhole or before the first decrease on sleeve.

Regarding additional yarn amount, this will depend on how much length you add, but it is better with a skein too many than too few.

All yarns will have excess fibres (from production) that might come off as lint or shedding. Brushed yarns (ie hairier yarns) have more of these loose, excess fibres, causing more shedding.

Shedding also depends on what is worn under or over the garment, and whether this pulls at the yarn fibres. It’s therefore not possible to guarantee that there will be no shedding

Below are some tips on how to get the best result when working with hairier yarns:

1. When the garment is finished (before you wash it) shake it vigorously so the looser hairs come off. NOTE: do NOT use a lint roller, brush or any method that pulls at the yarn.

2. Place the garment in a plastic bag and put it in your freezer - the temperature will cause the fibres to become less attached to each other, and excess fibres will come off easier.

3. Leave in the freezer for a few hours before taking it out and shaking it again.

4. Wash the garment according to the instructions on the yarn label.

Pilling is a natural process that happens to even the most exclusive of fibers. It's a natural sign of wear and tear that is hard to avoid, and that is most visible in high friction areas of your garment like a sweater's arms and cuffs.

You can make your garment look as new by removing the pilling, using a fabric comb or a pill/lint remover.

Still can't find the answer you need? Then scroll down and leave your question so one of our experts can try to help you. This will be done normally within 5 to 10 working days.
In the meantime, you can read the questions and answers that others have left to this pattern or join the DROPS Workshop on Facebook to get help from fellow knitters/crocheters!

You might also like...

Post a comment to pattern DROPS 76-22

We would love to hear what you have to say about this pattern!

If you want to leave a question, please make sure you select the correct category in the form below, to speed up the answering process. Required fields are marked *.

Comments / Questions (2)

country flag Monika wrote:

Liebes Drops-Team, kann es sein,dass die deutschen Anleitungen 76-21 und 76-22 vertauscht wurden ? Aber die Diagramme könnten richtig sein.

21.03.2012 - 17:40

DROPS Design answered:

Das haben Sie richtig erkannt. Die Anleitungen sind jetzt richtig.

22.03.2012 - 09:10

country flag Monika wrote:

Liebes Drops-Team, kann es sein , dass die deutsche Anleitung nicht zu diesem Foto gehört ?

21.03.2012 - 17:20

DROPS Design answered:

Das haben Sie richtig erkannt. Die Anleitungen sind jetzt richtig.

22.03.2012 - 09:10