DROPS Lima
DROPS Lima
65% Wool, 35% Alpaca
from 3.30 $ /50g
Get the yarn to make this pattern from 39.60$.

The yarn cost is calculated from the pattern’s smallest size and the yarn’s cheapest product type. Looking for an even better price? You might find it on the DROPS Deals!

DROPS SS24

Celtic Ballad

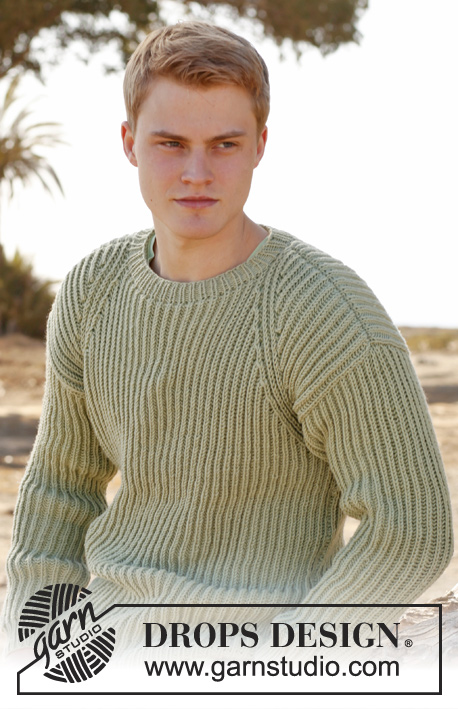
Men's knitted sweater in DROPS Lima or DROPS Merino Extra Fine with raglan and double seed st. Size: S - XXXL.

DROPS Extra 0-851
DROPS design: Pattern no LI-015
Yarn group B
-----------------------------------------------------------
Size: S - M - L - XL - XXL - XXXL
Finished measurements:
Bust: 92-100-108-118-128-142 cm / 36 1/4"-39½"-42½"-46½"-50½"-55 3/4"
Full length: 62-64-66-68-70-72 cm / 24 3/8''-25¼''-26''-26¾''-27½''-28 3/8''

Materials: DROPS LIMA from Garnstudio
600-650-750-800-800-900 g color no 0100, off white


Or use:
DROPS Merino Extra Fine from Garnstudio
600-650-750-800-800-900 g colour no 01, off white

DROPS DOUBLE POINTED NEEDLES and CIRCULAR NEEDLE (80 cm / 32'') SIZE 4 mm / US 6 - or size needed to get 21 sts x 28 rows in stockinette st = 10 x 10 cm / 4'' x 4''.
DROPS DOUBLE POINTED NEEDLES and CIRCULAR NEEDLE (80 cm / 32'') SIZE 3.5 mm / US 4 - for rib.

-------------------------------------------------------

Alternative Yarn – See how to change yarns here
Yarn Groups A to F – Use the same pattern and change the yarn here
Yarn usage using an alternative yarn – Use our yarn converter here

-------------------------------------------------------

DROPS Lima
DROPS Lima
65% Wool, 35% Alpaca
from 3.30 $ /50g
Get the yarn to make this pattern from 39.60$.

The yarn cost is calculated from the pattern’s smallest size and the yarn’s cheapest product type. Looking for an even better price? You might find it on the DROPS Deals!

Pattern instructions

NOTE: This pattern is written in American English. All measurements in charts are in cm. For conversion from inches to cm - click here. There are different terms for crocheting in American and British English. If this pattern includes crochet, click for "crochet terms" here. For this pattern in British English, please click here.
PATTERN:
See diagrams A.1 and A.2. Diagrams show pattern from RS.

RAGLAN:
From RS:
Beg 3 sts before marker: P 2 tog, K 2 (marker is between these 2 sts), P 2 twisted tog.

From WS:
Beg 3 sts before marker: K 2 twisted tog, P 2 (marker is between these 2 sts), K 2 tog.

KNITTING TIP:
If knitting gauge is incorrect in height and the knitting is too tight, the raglan dec will be too short and the armholes too small. This can be adjusted by working 1 extra row without dec evenly spaced between dec.
--------------------------------------------------------

BODY:
Worked in the round on circular needle from bottom up. Cast on 232-252-272-296-320-360 sts on circular needle size 3.5 mm / US 4 with Lima. Work rib = K 2/P 2 for 4 cm / 1½''. Switch to circular needle size 4 mm / US 6 and K next round – AT THE SAME TIME dec 48-52-56-60-64-72 sts evenly = 184-200-216-236-256-288 sts. Continue in stockinette st. REMEMBER THE GAUGE! Insert a marker in each side = 92-100-108-118-128-144 sts between markers. When piece measures 6 cm / 2½'', inc 1 st on each side of both markers (= 4 inc). Repeat inc when piece measures 15-16-17-18-19-20 cm / 6''-6¼''-6¾''-7''-7½''-8'' / 6''-6¼''-6¾''-7''-7½''-8'' and 24-25-26-27-28-29 cm / 9½''-9 3/4''-10 1/4''-10 5/8''-11''-11 3/8'' = 196-212-228-248-268-300 sts. When piece measures 26-27-28-29-30-31 cm / 10¼''-10 5/8''-11''-11 3/8''-11¾''-12¼'', work according to A.1, when A.1 has been worked one time vertically, work according to A.2. Work A.2 for 10 cm / 4'', then work A.1 one time. Continue with A.2. When piece measures 44-45-46-47-48-49 cm / 17 1/4''-17 3/4''-18''-18½''-19''-19 1/4'', bind off 4 sts on each side of every marker = 90-98-106-116-126-142 sts on front and back piece. Put piece aside and knit the sleeves.

SLEEVE:
Worked in the round on double pointed needles.
Cast on 68-68-72-72-76-76 sts on double pointed needles size 3.5 mm / US 4 with Lima. Work rib = K 2/P 2 for 4 cm / 1½''. Switch to double pointed needles size 4 mm / US 6 and K next round – AT THE SAME TIME dec 14-12-14-12-14-12 sts evenly = 54-56-58-60-62-64 sts. Insert a marker at beg of round = mid under sleeve. When piece measures 8 cm / 3 1/8'', inc 1 st on each side of marker. Repeat inc every 11-8-7-6-4-3½ cm / 4½"-3 1/8"-2 3/4"-2 3/8"-1½"-1 1/4", 4-5-6-7-10-11 more times = 64-68-72-76-84-88 sts. AT THE SAME TIME when piece measures 37-37-36-36-35-35 cm / 14½"-14½"-14 1/4"-14 1/4"-13 3/4"-13 3/4", work according to A.1, when A.1 has been worked one time vertically, work according to A.2. Work A.2 for 10 cm / 4'', then work A.1 one time. Continue with A-2 - work the inc sts in pattern. When piece measures 55-55-54-54-53-53 cm / 21 5/8"-21 5/8"-21 1/4"-21 1/4"-21"-21" (shorter measurements in the larger sizes because of broader shoulder width), adjust so that you are on same round in A.2 as on body, bind off 4 sts on each side of marker = 56-60-64-68-76-80 sts. Put piece aside and knit another sleeve.

YOKE:
READ ALL OF THE FOLLOWING SECTION BEFORE CONTINUING:
Slip sleeves on to same circular needle as body where armholes were bind off = 292-316-340-368-404-444 sts. Continue with A.2, AT THE SAME TIME when piece measures 46-47-48-49-50-51 cm / 18''-18½''-19''-19¼''-19¾''-20'', beg dec for RAGLAN - see explanation above and READ KNITTING TIP. Insert a marker in all transitions between sleeves and body (= 4 markers). 1st marker = in transition between left sleeve and front piece.
Dec differently on body and on sleeves.
Dec as follows after 2nd and 4th marker and before 3rd and 1st marker (= dec on sleeves)
Dec every 4 rows: 7-7-6-6-4-2 times and then every other row: 12-14-17-19-25-29 times.
Dec as follows after 1st and 3rd marker and before 2nd and 4th marker (= dec on front and back piece).
Dec every other row: 24-24-25-25-25-22 times and then every row: 3-5-6-9-12-21 times.

NECK:
AT THE SAME TIME when piece measures 59-61-63-65-67-69 cm / 23¼''-24''-24¾''-25½''-26 3/8''-27 1/8'', bind off the middle 10-14-18-22-26-30 sts on front piece and then work back and forth on needle. Continue with pattern and Raglan - AT THE SAME TIME bind off for neck in each side every other row as follows: 2 sts 2 times and 1 st 4 times. After all dec for raglan and bind offs for neck, 82-86-90-94-98-102 sts remain on needle. K 1 row while at the same time dec 12-14-16-18-20-22 sts evenly = 70-72-74-76-78-80 sts.

NECK EDGE:
Worked in the round. Pick up 54-56-58-60-62-64 sts around the neck on needle size 3.5 mm / US 4 = 124-128-132-136-140-144 sts on needle. K 2 rounds and P 2 rounds , then work rib K 2/P 2. Continue like this and loosely bind off with K over K and P over P when rib measures 3.5 cm / 1 1/4" (in total including the first 4 rounds).

ASSEMBLY:
Sew the openings under the sleeves tog.

Diagram

All measurements in charts are in cm.

symbols = K from RS, P from WS
symbols = P from RS, K from WS
diagram

Each of our patterns has specific tutorial videos to help you.

Do you have a question? See a list of frequently asked questions (FAQ)

Knitting tension is what determines the final measurements of your work, and is usually measured per 10 x 10 cm. It is provided like so: number of stitches in width x number of rows in height - eg: 19 stitches x 26 rows = 10 x 10 cm.

The knitting tension is very individual; some people knit/crochet loosely while others work tightly. You adjust the knitting tension with the needle size, which is why the suggested needle size only serve as a guide! You need to adjust this (up or down) to ensure that YOUR knitting tension matches the knitting tension provided in the pattern. If you work with a different knitting tension than provided you will have a different yarn consumption, and your work will have different measurements than what the pattern suggests.

The knitting tension also determines which yarns can replace each other. As long as you achieve the same knitting tension you can replace one yarn with another.

See DROPS lesson: How to measure your tension/gauge

See DROPS video: How to make a gauge tension swatch

The required amount of yarn is provided in grams, eg: 450 g. To calculate how many balls you’ll need you first need to know how many grams are in 1 ball (25g, 50g or 100g). This information is available if you click on the individual yarn quality on our pages. Divide the amount required with the amount of each ball. For example, if each ball is 50g (the most common amount), the calculation will be as follows: 450 / 50 = 9 balls.

The important thing when changing from one yarn to another is that the knitting/crochet tension remains the same. This is so that the measurements of the finished piece will be the same as on the sketch provided. It is easier to achieve the same knitting tension using yarns from the same yarn group. It is also possible to work with multiple strands of a thinner yarn to achieve the knitting tension of a thicker one. Please try our yarn converter. We recommend you to always work a test swatch.

Please NOTE: when changing yarn the garment might have a different look and feel to the garment in the photo, due to individual properties and qualities of each yarn.

See DROPS lesson: Can I use a different yarn than the one mentioned in the pattern?

All our yarns are categorised into yarn groups (from A to F) according to thickness and knitting tension – group A contains the thinnest yarns and group F the thickest. This makes it easier for you to find alternative yarns to our patterns, should you wish to switch yarn. All yarns within the same group have a similar knitting tension and can easily replace each other. However, different yarn qualities have different structures and properties which will give the finished work a unique look and feel.

Click here for an overview of the yarns in each yarn group

At the top of all our patterns you’ll find a link to our yarn converter, which is a helpful tool should you wish to use a different yarn than suggested. By filling in the yarn quality you wish to replace, the amount (in your size) and number of strands, the converter will present good alternative yarns with the same knitting tension. Additionally it will tell you how much you’ll require in the new qualities and whether you’ll need to work with multiple strands. Most skeins are 50g (some are 25g or 100g).

If the pattern is worked with multiple colours, every colour will have to be converted separately. Similarly, if the pattern is worked with several strands of different yarns (for example 1 strand Alpaca and 1 strand Kid-Silk) you will have to find alternatives for each, individually.

Click here to see our yarn converter

Since different yarns have different qualities and textures we have chosen to keep the original yarn in our patterns. However, you can easily find options among our available qualities by using our yarn converter, or simply pick a yarn from the same yarn group.

It is possible that some retailers still have discontinued yarns in stock, or that someone has a few skeins at home that they would like to find patterns for.

The yarn converter will provide both alternative yarn as well as required amount in the new quality.

If you think it's hard to decide what size to make, it can be a good idea to measure a garment you own already and like the size of. Then you can pick the size by comparing those measures with the ones available in the pattern's size chart.

You'll find the size chart at the bottom of the pattern.

See DROPS lesson: How to read size chart

The needle size provided in the pattern serves only as a guide, the important thing is to follow the knitting tension. And since knitting tension is very individual, you will have to adjust the needle size to ensure that YOUR tension is the same as in the pattern – maybe you’ll have to adjust 1, or even 2 needle sizes, up or down to achieve the correct tension. For this, we recommend that you work test swatches.

Should you work with a different knitting tension than the one provided, the measurements of the finished garment might deviate from the measurement sketch.

See DROPS lesson: How to measure your tension/gauge

See DROPS video: How to make a gauge tension swatch

Working a garment top-down provides more flexibility and room for personal adjustment. For example it is easier to try the garment on while working, as well as making adjustments to length of yoke and shoulder caps.

The instructions are carefully explaining every step, in the correct order. Diagrams are adjusted to the knitting direction and are worked as usual.

The diagram depicts all rows/rounds, and every stitch seen from the right side. It is read from bottom to top, from right to left. 1 square = 1 stitch.

When working back and forth, every other row is worked from the right side and every other row is worked from the wrong side. When working from the wrong side, the diagram will have to be worked reversed: from left to right, knit stitches are purled, purl stitches are knit etc.

When working in the round every round is worked from the right side and the diagram are worked from right to left on all rounds.

See DROPS lesson: How to read knitting diagrams

The diagram depicts all rows/rounds, and every stitch seen from the right side. It is worked from bottom to top, from right to left.

When working back and forth every other row is worked from the right side: from right to left and every other row is worked from the wrong side: from left to right.

When working in the round, every row in the diagram are worked from the right side, from right to left.

When working a circular diagram you start in the middle and work your way outwards, counter clockwise, row by row.

The rows usually start with a given number of chain stitches (equivalent to the height of the following stitch), this will either be depicted in the diagram or explained in the pattern.

See DROPS lesson: How to read crochet diagrams

Instructions for working several diagrams after each other on the same row/round, will often be written like so: “work A.1, A.2, A.3 a total of 0-0-2-3-4 times". This means you work A.1 once, then A.2 is worked once, and A.3 is repeated (in width) the number of times provided for your size – in this case like so: S = 0 times, M = 0 times, L=2 times, XL= 3 times and XXL = 4 times.

The diagrams are worked as usual: begin with the first row in A.1, then work the first row in A.2 etc.

See DROPS lesson: How to read knitting diagrams

See DROPS lesson: How to read crochet diagrams

The total width of the garment (from wrist-to-wrist) will be larger in the larger sizes, despite the actual sleeves being shorter. The larger sizes have longer sleeve caps and wider shoulders, so there will be a good fit in all sizes.

The measurement sketch/schematic drawing provides information regarding the full length of the garment. If it’s a jumper or a jacket the length is measured from the highest point on the shoulder (usually closest to the neckline), and straight down to the bottom of the garment. It is NOT measured from the tip of shoulder. Similarly, the length of yoke is measured from the highest point on the shoulder and down to where yoke is split into body and sleeves.

See DROPS lesson: How to read a schematic drawing

Diagrams are often repeated on the round or in height. 1 repeat is the diagram the way it appears in the pattern. If it says to work 5 repeats of A.1 in the round, then you work A.1 a total of 5 times after/next to each other in the round. If it says to work 2 repeats of A.1 vertically/in height you work the entire diagram once, then begin again at the start and work the entire diagram one more time.

Chain stitches are slightly narrower than other stitches and to avoid working the cast-on edge too tight, we simply chain more stitches to begin with. The stitch count will be adjusted on the following row to fit the pattern and measurement sketch.

The rib edge is more elastic and will contract slightly compared to, for example, stocking stitch. By increasing before the rib edge, you avoid a visible difference in width between the rib edge and the rest of the body.

It’s very easy to cast off too tightly, and by making yarn overs while casting off (and simultaneously casting these off) you avoid a too tight cast off edge.

See DROPS video: How to bind off with yarn overs (yo)

To achieve an even increase (or decrease) you can increase on, for example: every 3rd and 4th row alternately, like so: work 2 rows and increase on the 3rd row, work 3 rows and increase on the 4th. Repeat this until the increase is complete.

See DROPS lesson: Increase or decrease 1 st on every 3rd and 4th row alternately

Should you prefer to work in the round instead of back and forth, you may of course adjust the pattern. You’ll need to add steeks mid-front (usually 5 stitches), and follow the instructions. When you would normally turn and work from the wrong side, simply work across the steek and continue in the round. At the end you’ll cut the piece open, pick up stitches to work bands, and cover the cut edges.

See DROPS video: How to knit steeks and cut open

Should you prefer to work back and forth instead of in the round, you may of course adjust the pattern so you work the pieces separately and then assemble them at the end. Divide the stitches for the body in 2, add 1 edge stitch in each side (for sewing) and work the front and back pieces separately.

See DROPS lesson: Can I adapt a pattern for circular needles into straight needles?

Pattern repeats can vary slightly in the different sizes, in order to get the correct proportions. If you’re not working the exact same size as the garment in the photo, yours might deviate slightly. This has been carefully developed and adjusted so that the complete impression of the garment is the same in all sizes.

Make sure to follow instructions and diagrams for your size!

If you have found a pattern you like which is available in women’s size it’s not very difficult to convert it to men’s size. The biggest difference will be the length of sleeves and body. Start working on the women size that you think would fit across the chest. The additional length will be worked right before you cast off for the armhole/sleeve cap. If the pattern is worked top-down you can add the length right after the armhole or before the first decrease on sleeve.

Regarding additional yarn amount, this will depend on how much length you add, but it is better with a skein too many than too few.

All yarns will have excess fibres (from production) that might come off as lint or shedding. Brushed yarns (ie hairier yarns) have more of these loose, excess fibres, causing more shedding.

Shedding also depends on what is worn under or over the garment, and whether this pulls at the yarn fibres. It’s therefore not possible to guarantee that there will be no shedding

Below are some tips on how to get the best result when working with hairier yarns:

1. When the garment is finished (before you wash it) shake it vigorously so the looser hairs come off. NOTE: do NOT use a lint roller, brush or any method that pulls at the yarn.

2. Place the garment in a plastic bag and put it in your freezer - the temperature will cause the fibres to become less attached to each other, and excess fibres will come off easier.

3. Leave in the freezer for a few hours before taking it out and shaking it again.

4. Wash the garment according to the instructions on the yarn label.

Pilling is a natural process that happens to even the most exclusive of fibers. It's a natural sign of wear and tear that is hard to avoid, and that is most visible in high friction areas of your garment like a sweater's arms and cuffs.

You can make your garment look as new by removing the pilling, using a fabric comb or a pill/lint remover.

Still can't find the answer you need? Then scroll down and leave your question so one of our experts can try to help you. This will be done normally within 5 to 10 working days.
In the meantime, you can read the questions and answers that others have left to this pattern or join the DROPS Workshop on Facebook to get help from fellow knitters/crocheters!

You might also like...

Post a comment to pattern DROPS Extra 0-851

We would love to hear what you have to say about this pattern!

If you want to leave a question, please make sure you select the correct category in the form below, to speed up the answering process. Required fields are marked *.

Comments / Questions (143)

country flag Frustrated & Annoyed wrote:

I have just spent 20 minutes undoing 600 gms of highly expensive cashmere from the neck down! Worse pattern I have ever used and I have been knitting for over 50 years!

27.12.2023 - 14:51

country flag Esther wrote:

Mi sembra che il numero di maglie previsto per le maniche sia troppo basso ! Potrei sapere se è esatto? Gtazie

11.11.2023 - 21:42

DROPS Design answered:

Buongiorno Esther, il numero di maglie è corretto: non ci sono correzioni in merito. Buon lavoro!

12.11.2023 - 11:58

country flag Esther wrote:

Buonasera non mi sembra esatto il numero di maglie previste per lavorare le maniche Per esempio la prima taglia dopo tutti gli aumenti ha solo 64 maglie che equivalgono solo a cm 30,5 mi sembra poco è comunque non ritorna neanche con le misure indicate da voi Grazie attendo chiarimenti

11.11.2023 - 21:41

DROPS Design answered:

Buongiorno Esther, il numero di maglie è corretto: non ci sono correzioni in merito. Buon lavoro!

12.11.2023 - 11:58

country flag Marion wrote:

Bonjour ! J’ai un petit doute sur la manière de procédé après avoir mis sur la même aiguille les 2 manches et le dos/devant, faut-il continuer en A2 normalement (sans commencer les diminutions) jusqu’à avoir une pièce de 47cm ? Merci d’avance pour votre réponse !

16.10.2023 - 17:10

DROPS Design answered:

Bonjour Marion, effectivement, on tricote d'abord 2 cm de A.2 avant de commencer à diminuer pour le raglan. Bon tricot!

17.10.2023 - 09:09

country flag Hanne Thune wrote:

Jeg kan ikke se hvordan jeg skal tage så mange masker ind på raglan. Er nået til 28 gange og der er kun 27 masker tilbage på ærmerne. Der mangler altså stadig indtagning på hv. 2 pind 22 gange og på hver pind 21 gange. Arb måler 67/68 cm. Og skal også lukke til hals mm. Kan simpelt hen ikke forstå opskriften. Venlig hilsen Hanne

03.02.2023 - 16:55

DROPS Design answered:

Hei Hanne. Vi skal hjelpe deg så godt vi kan, men hvilken str. strikker du? mvh DROPS Design

06.02.2023 - 08:31

country flag Caroline wrote:

Bonjour,\r\n\r\nJe tricote le modèle en large, pour les augmentations des manches, il est indiqué de commencer à augmenter dès 8cm, 7 fois à chaque 7 cm, donc 57cm de longueur. Il est cependant indiqué d\\\'assembler les manches au corps à partir de 54cm. Pouvez-vous expliquer svp, car l\\\'endroit où les augmentations sont est aussi l\\\'endroit où l\\\'on rabat les mailles pour l\\\'assemblage.\r\n\r\nMerci de votre aide! Bonne fin de semaine

22.10.2022 - 00:50

country flag Barbara wrote:

Salve, non riesco a capire la spiegazione del diagramma A1 e A2. Lavorando in tondo non capisco: 1 m diritto sul diritto del lavoro, 1 rovescio m sul rovescio; 1 m rovescio sul diritto del lavoro, 1 m diritto sul rovescio del lavoro. Spero di essermi spiegata. Grazie mille !!

12.09.2022 - 23:26

DROPS Design answered:

Buonasera Barbara, durante la lavorazione in tondo segua sempre le indicazioni per il diritto del lavoro, quando il lavoro viene diviso seguirà entrambe. Buon lavoro!

14.09.2022 - 19:38

country flag Erin Lucas wrote:

Hi, I'm making the medium size of this jumper I'm not sure where to place markers /increase in the body section. It says to insert a marker in each side, does this mean a stitch marker at the start of the round and at halfway, or should I place a marker at 50sts, and again after 100sts, leaving 50sts to the end of the round?

19.08.2022 - 00:25

DROPS Design answered:

Dear Erin, you should add a marker at the beginning of the round (first side of the jumper) then insert the 2nd marker halfway = after 100 stitches to mark the 2nd side - rounds begin on the side of the jumper. Happy knitting!

19.08.2022 - 08:55

country flag Lidiah wrote:

Grazie per il chiarimento, era quello che intendevo dire nella mia prima domanda.

07.06.2022 - 09:31

country flag Lidiah wrote:

Buongiorno, ma se si continua a lavorare il motivo grana di riso anche nei ferri in cui non ci sono le diminuzioni, come fa ad uscire la "striscia" a maglia rasata del raglan? grazie

06.06.2022 - 22:58

DROPS Design answered:

Buonasera Lidiah, deve lavorare a diritto le maglie ai lati del segnapunti: ci dev'essere 1 maglia diritto, segnapunti, 1 maglia diritto. Buon lavoro!

06.06.2022 - 23:23