
Popular categories
Looking for a yarn?


|
|
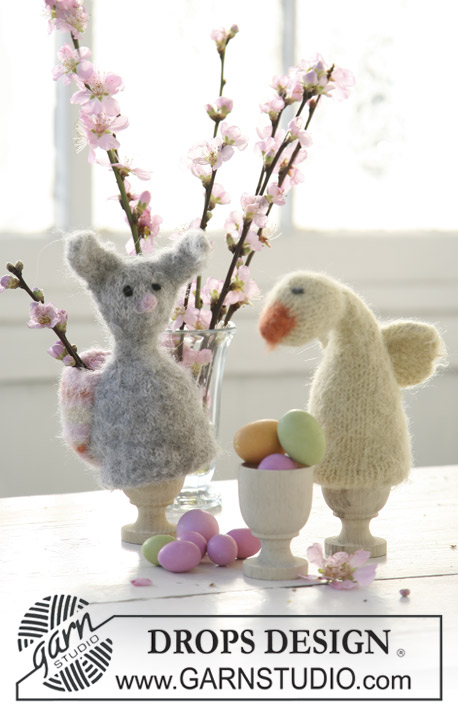
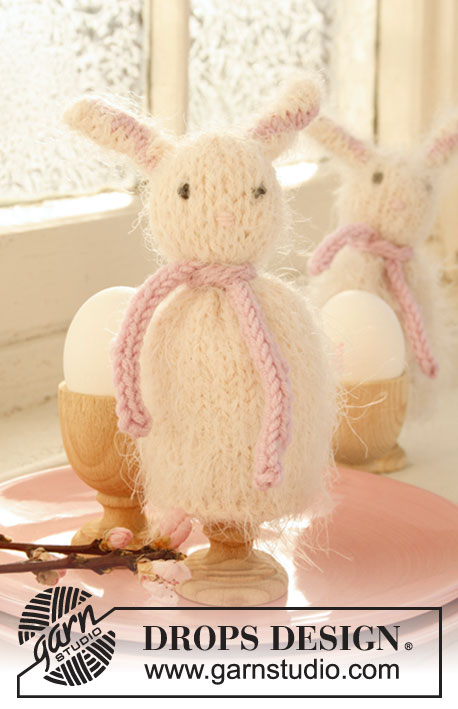
Truls og Trine |
|
 |
 |
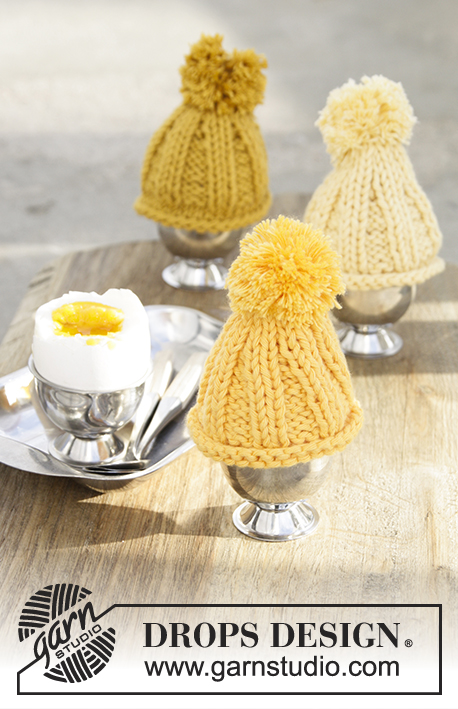
Knitted DROPS egg warmers for Easter in ”BabyMerino”.
DROPS Extra 0-838 |
|
|
STRIPES: Work alternately 3 rounds light old pink/old pink or light yellow/yellow. INCREASE TIP: Inc by making one YO, on next round K YO twisted to avoid holes. ---------------------------------------------------------- BUNNY: Worked in the round on double pointed needles. Cast on 48 sts on double pointed needles size 2.5 mm / US 1or2 with old pink. K 1 round, then work rib = K 2/P 2. When piece measures 2 cm / ¾", continue in stockinette st - read stripes above. When piece measures 7 cm / 2¾", insert 6 markers in the piece, 8 sts apart. Continue with stripes, AT THE SAME TIME dec 1 st (by K2 tog) on the left side of every marker (= 6 dec per round), repeat dec on every round until 12 sts remain on round. Switch to light beige. HEAD: ROUND 1: K all sts = 12 sts. ROUND 2: * 1 YO, K 2 *, repeat from *-* = 18 sts. READ INCREASE TIP! ROUND 3: K all sts = 18 sts. ROUND 4: * 1 YO, K 1 *, repeat from *-* = 36 sts. ROUND 5 to 21: K all sts. ROUND 22: * K 1, K 2 tog* = 24 sts. ROUND 23: K all sts = 24 sts. ROUND 24: K2 tog around = 12 sts. ROUND 25: K all sts = 12 sts. ROUND 26: K2 tog around = 6 sts. Cut the yarn and pull it through the remaining sts, tighten tog and fasten. EAR: Worked back and forth on double pointed needles. Cast on 9 sts on needle size 2.5 mm / US 1or2 with light beige. Row 1 to 14: K all sts. Row 15: K 1, K 2 tog, K 3, K 2 tog, K 1 = 7 sts. Row 16: K all sts. Row 17: K 1, K 2 tog, K 1, K 2 tog, K 1 = 5 sts. Row 18: K all sts. Row 19: K 1, slip 1 st as if to K, K 2 tog, psso, K 1 = 3 sts. Row 20: K all sts. Row 21: Slip 1 st as if to K, K 2 tog, psso = 1 st. Cut the yarn and pull it through the last st. SCARF: Worked back and forth on double pointed needles. Cast on 4 sts on double pointed needles size 2.5 mm / US 1or2 with light old pink. Work as follows: * K 1, place yarn in front of piece (towards you), slip 1 st as if to P, place yarn behind piece (from you) *, repeat from *-* on more time and on all rows. This becomes a ribbon worked in the round. Bind off when piece measures approx. 20 cm / 8". ASSEMBLY: Fill the head with poly stuffing, tie a string around the head and tighten. Embroider eyes with gray and nose with light old pink. Fold the ears double at the bottom and fasten. Tie the scarf around the neck. CHICKEN: Worked in the round on double pointed needles. Cast on 48 sts on double pointed needles size 2.5 mm / US 1or2 with yellow. K 1 round, then work rib = K 2/P 2. When piece measures 2 cm / ¾", continue in stockinette st - read stripes above. When piece measures 7 cm / 2¾", insert 6 markers in the piece, 8 sts apart. Continue with stripes, AT THE SAME TIME dec 1 st (by K2 tog) on the left side of every marker (= 6 dec per round), repeat dec on every round until 12 sts remain on round. Switch to yellow. HEAD: ROUND 1: K all sts = 12 sts. ROUND 2: * 1 YO, K 2 *, repeat from *-* = 18 sts. READ INCREASE TIP! ROUND 3: K all sts = 18 sts. ROUND 4: * 1 YO, K 1 *, repeat from *-* = 36 sts. ROUND 5 to 7: K all sts. ROUND 8: * 1 YO, K 6 *, repeat from *-* = 42 sts. ROUND 9 to 14: K all sts. ROUND 15: * K 5, K 2 tog *, repeat from *-* = 36 sts. ROUND 16: K all sts. ROUND 17: * K 1, K 2 tog* = 24 sts. ROUND 18: K all sts = 24 sts. ROUND 19: K2 tog around = 12 sts. ROUND 20: K all sts = 12 sts. ROUND 21: K2 tog around = 6 sts. Cut the yarn and pull it through the remaining sts, tighten tog and fasten. SCARF: Work as the bunny's scarf but in orange. ASSEMBLY: Fill the head with poly stuffing, tie a string around the head and tighten. Embroider eyes with gray. Tie the scarf around the neck. COCK'S COMB: Cast on 27 sts on needle size 2.5 mm / US 1or2 with orange. K 1 row, on next row K3 tog across = 9 sts. K 1 row, on next row K3 tog across = 3 sts. K 1 row, on next row cut the yarn and pull it through the last sts. Tighten the cock's comb tog and fasten it mid on top of head. BEAK: Cast on 9 sts on needle size 2.5 mm / US 1or2 with orange. K 1 row, on next row K3 tog across = 3 sts. K 1 row, on next row cut the yarn and pull it through the last sts. Tighten the beak tog and fasten it mid at the front of head. |
|
|
Have you made this or any other of our designs? Tag your pictures in social media with #dropsdesign so we can see them! Do you need help with this pattern?You'll find tutorial videos, a Comments/Questions area and more by visiting the pattern on garnstudio.com. © 1982-2024 DROPS Design A/S. We reserve all rights. This document, including all its sub-sections, has copyrights. Read more about what you can do with our patterns at the bottom of each pattern on our site. |
|


With over 40 years in knitting and crochet design, DROPS Design offers one of the most extensive collections of free patterns on the internet - translated to 17 languages. As of today we count 304 catalogs and 11422 patterns - 11417 of which are translated into English (US/in).
We work hard to bring you the best knitting and crochet have to offer, inspiration and advice as well as great quality yarns at incredible prices! Would you like to use our patterns for other than personal use? You can read what you are allowed to do in the Copyright text at the bottom of all our patterns. Happy crafting!
Comments / Questions (12)
Kann es sein das Hahnenkamm und Schnabel doch rund gestrickt werden ? Ich hab es in Hin-und Rückreihen probiert aber es klappt nicht. über eine rückmeldung würde ich mich sehr freuen. Liebe Grüße Melanie
03.06.2013 - 11:29DROPS Design answered:
Hallo Melanie, es wird so gestrickt, wie es in der Anleitung beschireben ist, nämlich in Reihen.
04.06.2013 - 09:58Stickt man die augen und nase nicht besser vor dem füllen des kopfes auf ? so kann man den faden ja schlecht vernähen. Liebe Grüße Melanie
23.05.2013 - 20:45DROPS Design answered:
Hallo Melanie, man sieht die Position der Augen deutlicher, wenn man den Kopf erst füllt. Den Faden können Sie nach innen ziehen.
24.05.2013 - 10:39Dazu nochmal eine kleine frage : es ist doch so das ich danndurch die 3 letzten maschen auf der nadel den faden ziehe und etwas zusammenziehe ? und dann am kopf befestige ? Liebe grüße Melanie
23.05.2013 - 15:05DROPS Design answered:
Hallo Melanie, ja genau.
24.05.2013 - 10:36Brauche dringend nochmal Hilfe. nachdem ich hahnenkamm und schnabel gestrickt habe, hab ich mit dem durchziehen der fäden ein problem. in welcher richtung muß ich den faden durchziehen ? einfach zurück oder wie beim rundstricken ? liebe grüße Melanie .
23.05.2013 - 01:31DROPS Design answered:
Liebe Melanie, machen Sie das wie beim Rundstricken.
23.05.2013 - 09:14Nochmals vielen Dank für die schnelle Antwort. Gibt es für das zusammenziehen noch einen tipp oder ein video ? Liebe grüße melanie
16.05.2013 - 09:10DROPS Design answered:
Liebe Melanie, das gibt es leider noch nicht, aber ich habe Ihren Wunsch an das Videoteam weitergeleitet. Ziehen Sie mit einer Wollnadel einen Faden quer durch das Gestrick, ziehen Sie ihn vorsichtig bis zur gewünschten Form fest und verknoten Sie ihn.
17.05.2013 - 13:54Wird der kopf eigentlich nach dem ausstopfen mit watte vernäht oder nur mit dem verknoteten schal verschlossen ? Gruß melanie
15.05.2013 - 10:07DROPS Design answered:
Liebe Melanie, es wird mit einem Faden zusammengezogen. Wir haben dies nun in der Anleitung ergänzt, unsere Übersetzerin hatte diesen Zusatz vergessen.
16.05.2013 - 08:53Wird der Hahnenkamm in Runden oder hin-und zurückgestrickt ?Bei Hin-und zurück müßte ich dann die 3 Maschen links zusammenstricken ? im video sieht man nur 3 maschen reckts zusammen. Liebe Grüße Melanie
15.05.2013 - 08:11DROPS Design answered:
Liebe Melanie, es wird in Hin-und Rück-R gestrickt, aber alle M werde rechts gestrickt, wie in der Anleitung beschrieben. Sie müssen also wirklich je 3 M. zusammenstricken.
16.05.2013 - 08:48Bei mir bilden sich bei den zunahmen mit umschlag immer kleine löcher.kann man das irgendwie verhindern oder ist das normal ? Gruß melanie
02.05.2013 - 10:01DROPS Design answered:
Liebe Melanie, in diesem Video zeigen wir, wie Sie durch verschränktes Abstricken des Umschlags ein grösseres Loch vermeiden können:
03.05.2013 - 08:49Bei dieser anleitung strickt man immer 3 reihen und wechselt dann die farbe. Sollte man die fäden erst nach den 3 reihen miteinander verdrehen(auf der rückseite) oder nach jeder ? Liebe grüße Melanie
16.04.2013 - 02:13DROPS Design answered:
Liebe Melanie, ja der Faden wird pro Farbwechsel nur 1 x verkreuzt.
17.04.2013 - 07:56Habe den Farbwechsel gestrickt wie im video, bei mir sieht man aber trotzdem einen kleinen Übergang. Ist das normal oder gibt es noch einen Tipp. Liebe Grüße Melanie
14.04.2013 - 15:04DROPS Design answered:
Liebe Melanie, einen ganz kleinen Übergang sieht man möglicherweise trotzdem (siehe Text im Video).
15.04.2013 - 07:42