DROPS Muskat
DROPS Muskat
100% Cotton
from 2.15 € /50g
Get the yarn to make this pattern from 15.05€.

The yarn cost is calculated from the pattern’s smallest size and the yarn’s cheapest product type. Looking for an even better price? You might find it on the DROPS Deals!

DROPS SS24

Prudence

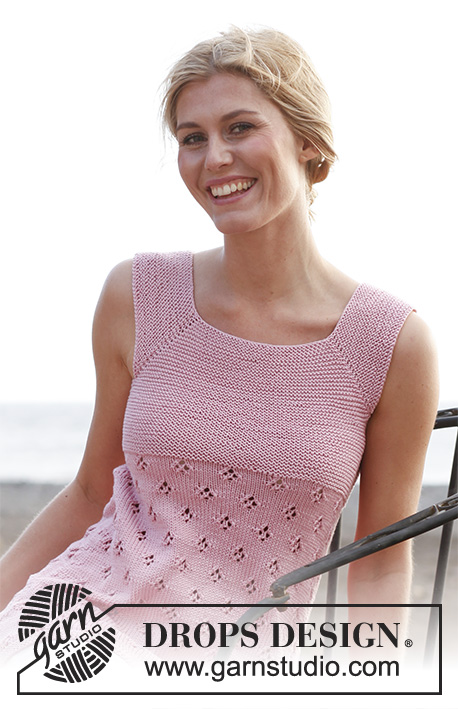
Knitted DROPS tunic in garter st and with lace pattern, worked top down in ”Muskat”. Size: S - XXXL.

DROPS 138-2
DROPS design: Pattern no R-606
--------------------------------------------------------
Size: S - M - L - XL - XXL - XXXL
Measurements on chart might appear small but the garment will be very elastic so knit it in the size you normally use.

Materials: DROPS MUSKAT from Garnstudio
350-400-450-500-550-600 g colour no 06, light pink.

DROPS CIRCULAR NEEDLE (80 cm) SIZE 3 mm - or size needed to get 22 sts x 44 rows in garter st = 10 x 10 cm.
DROPS CIRCULAR NEEDLE (80 cm) SIZE 3.5 mm - or size needed to get 22 sts x 30 rows in stocking st = 10 x 10 m.

-------------------------------------------------------

Alternative Yarn – See how to change yarns here
Yarn Groups A to F – Use the same pattern and change the yarn here
Yarn usage using an alternative yarn – Use our yarn converter here

-------------------------------------------------------

DROPS Muskat
DROPS Muskat
100% Cotton
from 2.15 € /50g
Get the yarn to make this pattern from 15.05€.

The yarn cost is calculated from the pattern’s smallest size and the yarn’s cheapest product type. Looking for an even better price? You might find it on the DROPS Deals!

Pattern instructions

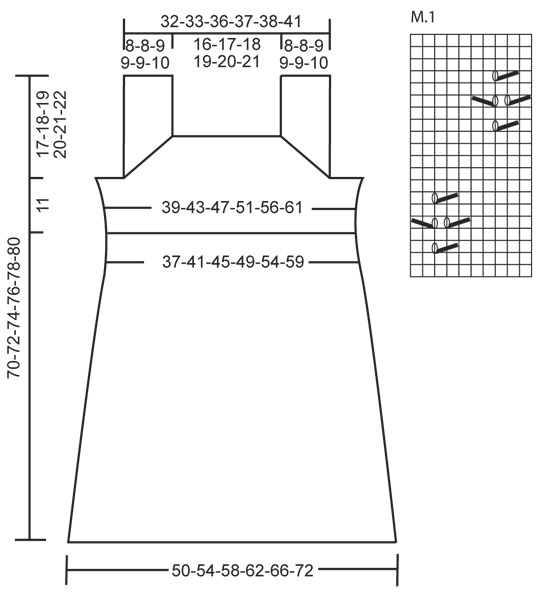
GARTER ST (in the round on circular needle):
* K 1 round and P 1 round *, repeat from *-*.

PATTERN:
See diagram M.1 – the diagram shows 1 repetition of the pattern.

DECREASE TIP (applies to side dec):
Dec as follows when 2 sts remain before marker: K 2 tog.
Dec as follows after marker: K 2 twisted tog (i.e. work in back loop of st instead of front).

INCREASE TIP (applies to side inc):
Work until 1 st remains before marker, make 1 YO, work 2 sts and make 1 YO. On next round K YOs twisted to avoid holes (i.e. work in back loop of st instead of front). Work inc sts in stocking st until they can be worked in one whole repetition of diagram M.1.
--------------------------------------------------------

TUNIC:
Worked in the round, top down.
The garment is the same depth around the neck both on back and front piece.

Cast on 150-162-168-180-194-198 sts on circular needle size 3 mm with Muskat. Insert 4 markers in the corner sts as follows: 1st marker in the 40th-44th-45th-49th-54th-54th st, 2nd marker in the 75th-81st-84th-90th-97th-99th st, 3rd marker in the 115th-125th-129th-139th-151st-153rd st and 4th marker in the last st, (sts between 1st and 2nd marker (34-36-38-40-42-44 sts) = front piece, sts between 3rd and 4th marker (34-36-38-40-42-44 sts) = back piece and sts between 2nd and 3rd marker and between 4th and 1st marker (39-43-44-48-53-53 sts) = straps).
READ ALL OF THE FOLLOWING SECTION BEFORE CONTINUING!
Work in GARTER ST in the round - see explanation above (NOTE: 1st round = P) - AT THE SAME TIME on 1st round, inc 1 st by making 1 YO on each side of the 4 sts with markers (= 8 inc) – NOTE: Round beg by making 1 YO which will be the inc on one side of the last marker, the other YO at this marker is made at the end of round when only 1 st remains (= corner st with marker). This is done to make the transitions between rounds in the middle of a corner. On next round K YOs twisted (i.e. work in back loop of st instead of front) to avoid holes. Repeat inc every other round a total of 18-18-20-20-20-22 times = 294-306-328-340-354-374 sts. K 1 round after last inc.
REMEMBER THE KNITTING TENSION!
Work next round as follows: LOOSELY cast off the first 75-79-84-88-93-97 sts for strap - cast off with P, P the next 72-74-80-82-84-90 sts (= front piece, the first of these sts is already on the right needle), LOOSELY cast off the next 75-79-84-88-93-97 sts for strap - cast off with P and P the last 72-74-80-82-84-90 sts (= back piece, the first of these sts is already on the right needle). Work next round as follows: Cast on 14-20-24-30-38-44 new sts (= under sleeve, insert a marker in the middle of these), K 72-74-80-82-84-90 sts, cast on 14-20-24-30-38-44 new sts (= under the other sleeve, insert a marker in the middle of these) and K 72-74-80-82-84-90 sts = 172-188-208-224-244-268 sts. Remove the 4 corner markers.
NOW MEASURE PIECE FROM HERE! K until first marker (i.e. 7-10-12-15-19-22 sts) – now round beg here. Continue in garter st in the round – AT THE SAME TIME when piece measures 4 cm, dec 1 st on each side of markers in the sides - READ DECREASE TIP! Repeat dec when piece measures 8 cm = 164-180-200-216-236-260 sts.
When piece measures 11 cm, switch to circular needle size 3.5 mm. Continue to work as follows: 1-0-0-4-4-0 sts in stocking st, diagram M.1 over 80-90-100-100-110-130 sts, 2-0-0-8-8-0 sts in stocking st, diagram M.1 over 80-90-100-100-110-130 sts and 1-0-0-4-4-0 sts in stocking st. When piece measures 14 cm (from armhole incl rounds in garter st), inc 1 st on each side of markers in each side - READ INCREASE TIP! Repeat inc every 2½ cm a total of 14 times = 220-236-256-272-292-316 sts. When piece measures approx. 51-52-53-54-55-56 cm from armhole - adjust after 1 whole repetition of diagram M.1 – switch to circular needle size 3 mm. Work in garter st in the round for 2 cm, then LOOSELY cast off; use circular needle 3.5 mm for cast off - it is very important that the cast off edge is not too tight.

Diagram

symbols = K
symbols = K 2 tog, 1 YO
symbols = 1 YO, slip 1 st as if to K, K 1, psso
diagram
Do you have a question? See a list of frequently asked questions (FAQ)

Knitting tension is what determines the final measurements of your work, and is usually measured per 10 x 10 cm. It is provided like so: number of stitches in width x number of rows in height - eg: 19 stitches x 26 rows = 10 x 10 cm.

The knitting tension is very individual; some people knit/crochet loosely while others work tightly. You adjust the knitting tension with the needle size, which is why the suggested needle size is only meant as a guide! You need to adjust this (up or down) to ensure that YOUR knitting tension matches the knitting tension provided in the pattern. If you work with a different knitting tension than provided you will have a different yarn consumption, and your work will have different measurements than what the pattern suggests.

The knitting tension also determines which yarns can replace each other. As long as you achieve the same knitting tension you can replace one yarn with another.

See DROPS lesson: How to measure your tension/gauge

See DROPS video: How to make a gauge tension swatch

The required amount of yarn is provided in grams, eg: 450 g. To calculate how many balls you’ll need you first need to know how many grams are in 1 ball (25g, 50g or 100g). This information is available if you click on the individual yarn quality on our pages. Divide the amount required with the amount of each ball. For example, if each ball is 50g (the most common amount), the calculation will be as follows: 450 / 50 = 9 balls.

The important thing when changing from one yarn to another is that the knitting/crochet tension remains the same. This is so that the measurements of the finished piece will be the same as on the sketch provided. It is easier to achieve the same knitting tension using yarns from the same yarn group. It is also possible to work with multiple strands of a thinner yarn to achieve the knitting tension of a thicker one. Please try our yarn converter. We recommend you to always work a test swatch.

Please NOTE: when changing yarn the garment might have a different look and feel to the garment in the photo, due to individual properties and qualities of each yarn.

See DROPS lesson: Can I use a different yarn than the one mentioned in the pattern?

All our yarns are categorised into yarn groups (from A to F) according to thickness and knitting tension – group A contains the thinnest yarns and group F the thickest. This makes it easier for you to find alternative yarns to our patterns, should you wish to switch yarn. All yarns within the same group have a similar knitting tension and can easily replace each other. However, different yarn qualities have different structures and properties which will give the finished work a unique look and feel.

Click here for an overview of the yarns in each yarn group

At the top of all our patterns you’ll find a link to our yarn calculator, which is a helpful tool should you wish to use a different yarn than suggested. By filling in the yarn quality you wish to replace, the amount (in your size) and number of strands, the calculator will present good alternative yarns with the same knitting tension. Additionally it will tell you how much you’ll require in the new qualities and whether you’ll need to work with multiple strands. Most skeins are 50g (some are 25g or 100g).

If the pattern is worked with multiple colours, every colour will have to be calculated separately. Similarly, if the pattern is worked with several strands of different yarns (for example 1 strand Alpaca and 1 strand Kid-Silk) you will have to find alternatives for each, individually.

Click here to see our yarn calculator

Since different yarns have different qualities and textures we have chosen to keep the original yarn in our patterns. However, you can easily find options among our available qualities by using our yarn calculator, or simply pick a yarn from the same yarn group.

It is possible that some retailers still have discontinued yarns in stock, or that someone has a few skeins at home that they would like to find patterns for.

The yarn calculator will provide both alternative yarn as well as required amount in the new quality.

If you think it's hard to decide what size to make, it can be a good idea to measure a garment you own already and like the size of. Then you can pick the size by comparing those measures with the ones available in the pattern's size chart.

You'll find the size chart at the bottom of the pattern.

See DROPS lesson: How to read size chart

The needle size provided in the pattern serves only as a guide, the important thing is to follow the knitting tension. And since knitting tension is very individual, you will have to adjust the needle size to ensure that YOUR tension is the same as in the pattern – maybe you’ll have to adjust 1, or even 2 needle sizes, up or down to achieve the correct tension. For this, we recommend that you work test swatches.

Should you work with a different knitting tension than the one provided, the measurements of the finished garment might deviate from the measurement sketch.

See DROPS lesson: How to measure your tension/gauge

See DROPS video: How to make a tension/gauge swatch

Working a garment top-down provides more flexibility and room for personal adjustment. For example it is easier to try the garment on while working, as well as making adjustments to length of yoke and shoulder caps.

The instructions are carefully explaining every step, in the correct order. Diagrams are adjusted to the knitting direction and are worked as usual.

The diagram depicts all rows/rounds, and every stitch seen from the right side. It is read from bottom to top, from right to left. 1 square = 1 stitch.

When working back and forth, every other row is worked from the right side and every other row is worked from the wrong side. When working from the wrong side, the diagram will have to be worked reversed: from left to right, knit stitches are purled, purl stitches are knit etc.

When working in the round every round is worked from the right side and the diagram are worked from right to left on all rounds.

See DROPS lesson: How to read knitting diagrams

The diagram depicts all rows/rounds, and every stitch seen from the right side. It is worked from bottom to top, from right to left.

When working back and forth every other row is worked from the right side: from right to left and every other row is worked from the wrong side: from left to right.

When working in the round, every row in the diagram are worked from the right side, from right to left.

When working a circular diagram you start in the middle and work your way outwards, counter clockwise, row by row.

The rows usually start with a given number of chain stitches (equivalent to the height of the following stitch), this will either be depicted in the diagram or explained in the pattern.

See DROPS lesson: How to read crochet diagrams

Instructions for working several diagrams after each other on the same row/round, will often be written like so: “work A.1, A.2, A.3 a total of 0-0-2-3-4 times". This means you work A.1 once, then A.2 is worked once, and A.3 is repeated (in width) the number of times provided for your size – in this case like so: S = 0 times, M = 0 times, L=2 times, XL= 3 times and XXL = 4 times.

The diagrams are worked as usual: begin with the first row in A.1, then work the first row in A.2 etc.

See DROPS lesson: How to read knitting diagrams

See DROPS lesson: How to read crochet diagrams

The total width of the garment (from wrist-to-wrist) will be larger in the larger sizes, despite the actual sleeves being shorter. The larger sizes have longer sleeve caps and wider shoulders, so there will be a good fit in all sizes.

The measurement sketch/schematic drawing provides information regarding the full length of the garment. If it’s a jumper or a jacket the length is measured from the highest point on the shoulder closest to the neckline, and straight down to the bottom of the garment. It is NOT measured from the tip of shoulder. Similarly, the length of yoke is measured from the highest point on the shoulder and down to where yoke is split into body and sleeves.

On a jacket measures are never taken along bands, unless specifically stated. Always measure inside band stitches when measuring the length.

See DROPS lesson: How to read a schematic drawing

Diagrams are often repeated on the round or in height. 1 repeat is the diagram the way it appears in the pattern. If it says to work 5 repeats of A.1 in the round, then you work A.1 a total of 5 times after/next to each other in the round. If it says to work 2 repeats of A.1 vertically/in height you work the entire diagram once, then begin again at the start and work the entire diagram one more time.

Chain stitches are slightly narrower than other stitches and to avoid working the cast-on edge too tight, we simply chain more stitches to begin with. The stitch count will be adjusted on the following row to fit the pattern and measurement sketch.

The rib edge is more elastic and will contract slightly compared to, for example, stocking stitch. By increasing before the rib edge, you avoid a visible difference in width between the rib edge and the rest of the body.

It’s very easy to cast off too tightly, and by making yarn overs while casting off (and simultaneously casting these off) you avoid a too tight cast off edge.

See DROPS video: How to bind off with yarn overs (yo)

To achieve an even increase (or decrease) you can increase on, for example: every 3rd and 4th row alternately, like so: work 2 rows and increase on the 3rd row, work 3 rows and increase on the 4th. Repeat this until the increase is complete.

See DROPS lesson: Increase or decrease 1 st on every 3rd and 4th row alternately

Should you prefer to work in the round instead of back and forth, you may of course adjust the pattern. You’ll need to add steeks mid-front (usually 5 stitches), and follow the instructions. When you would normally turn and work from the wrong side, simply work across the steek and continue in the round. At the end you’ll cut the piece open, pick up stitches to work bands, and cover the cut edges.

See DROPS video: How to knit steeks and cut open

Should you prefer to work back and forth instead of in the round, you may of course adjust the pattern so you work the pieces separately and then assemble them at the end. Divide the stitches for the body in 2, add 1 edge stitch in each side (for sewing) and work the front and back pieces separately.

See DROPS lesson: Can I adapt a pattern for circular needles into straight needles?

Pattern repeats can vary slightly in the different sizes, in order to get the correct proportions. If you’re not working the exact same size as the garment in the photo, yours might deviate slightly. This has been carefully developed and adjusted so that the complete impression of the garment is the same in all sizes.

Make sure to follow instructions and diagrams for your size!

If you have found a pattern you like which is available in women’s size it’s not very difficult to convert it to men’s size. The biggest difference will be the length of sleeves and body. Start working on the women size that you think would fit across the chest. The additional length will be worked right before you cast off for the armhole/sleeve cap. If the pattern is worked top-down you can add the length right after the armhole or before the first decrease on sleeve.

Regarding additional yarn amount, this will depend on how much length you add, but it is better with a skein too many than too few.

All yarns will have excess fibres (from production) that might come off as lint or shedding. Brushed yarns (ie hairier yarns) have more of these loose, excess fibres, causing more shedding.

Shedding also depends on what is worn under or over the garment, and whether this pulls at the yarn fibres. It’s therefore not possible to guarantee that there will be no shedding

Below are some tips on how to get the best result when working with hairier yarns:

1. When the garment is finished (before you wash it) shake it vigorously so the looser hairs come off. NOTE: do NOT use a lint roller, brush or any method that pulls at the yarn.

2. Place the garment in a plastic bag and put it in your freezer - the temperature will cause the fibres to become less attached to each other, and excess fibres will come off easier.

3. Leave in the freezer for a few hours before taking it out and shaking it again.

4. Wash the garment according to the instructions on the yarn label.

Pilling is a natural process that happens to even the most exclusive of fibers. It's a natural sign of wear and tear that is hard to avoid, and that is most visible in high friction areas of your garment like a sweater's arms and cuffs.

You can make your garment look as new by removing the pilling, using a fabric comb or a pill/lint remover.

Still can't find the answer you need? Then scroll down and leave your question so one of our experts can try to help you. This will be done normally within 5 to 10 working days.
In the meantime, you can read the questions and answers that others have left to this pattern or join the DROPS Workshop on Facebook to get help from fellow knitters/crocheters!

Post a comment to pattern DROPS 138-2

We would love to hear what you have to say about this pattern!

If you want to leave a question, please make sure you select the correct category in the form below, to speed up the answering process. Required fields are marked *.

Comments / Questions (69)

country flag Karen wrote:

Bonjour, Je suis a tricoter les aug. à 14 cm. Tricoter les augmentations en jersey jusqu'à ce qu'elles puissent être intégrées à un motif complet de M.1 J'ai de la difficulté à intégrer le motif avec les aug. Comment dois-je procéder ? Merci beaucoup.

11.03.2021 - 02:50

DROPS Design answered:

Bonjour Karen, lorsque vous augmentez sur les côtés, vous allez élargir le motif sur les mailles du devant et du dos (le motif ne tombe pas juste en largeur tout le tour), autrement dit, au début du dos/devant, tricotez les augmentations comme un nouveau motif en lisant le diagramme de gauche à droite, à la fin du devant/dos, tricotez les augmentations comme un nouveau motif, de droite à gauche, - veillez à toujours bien avoir 8 mailles (1er et 3ème rang du motif ajouré) / 9 mailles (2ème rang du motif ajouré) entre chaque nouveau motif, comme avant. Bon tricot!

11.03.2021 - 08:24

country flag Manon wrote:

Bonjour, je suis à rabattre pour les bretelles. Tricoter ensuite le tour suivant ainsi : rabattre SOUPLEMENT les 75-79-84-88-93-97 premières mailles pour la bretelle. Quelle est la première maille à rabattre, la maille avec le marqueur ou la maille suivante? Je ne suis pas sûr de savoir où commencer à rabattre. Merci

02.02.2021 - 01:30

DROPS Design answered:

Bonjour Manon, le tour commence comme précédemment, autrement dit, la première des mailles à rabattre pour la première bretelle, c'est la première maille du tour (= tricotez les 2 premières mailles, rabattez la 1ère par-dessus la 2ème, et ainsi de suite). Bon tricot!

02.02.2021 - 10:41

country flag Sue wrote:

Good Morning..I am the part where I start M1..I have taken it aprt 3 times now.Could you please explain how M1 is done. No need to explain the completed knitted rows just the eyelet part.Thank-you so much for answering my question again.Have an awesome day !

05.05.2020 - 16:44

DROPS Design answered:

Dear Sue, this lesson explains how to read knitting diagram, eg, on row 3, you will work: *knit 6, Knit 2 tog, yarn over, knit 2* and repeat from *-*. You should always have 10 sts in each M.1, make sure to add markers between repeats so that you can always check number of sts (depending on your size you will have to work some sts in stocking sts on the sides or M.1 in the round). Happy knitting!

05.05.2020 - 17:02

country flag Sue wrote:

Toni I am confused from at the beginning where it says to start a YO.Do I YO then purl or do I purl then YO.The same as when I get to the markers,is it YO then purl last stitch or purl the last stitch then YO.Same for when I pass the marker.Thank-you for your help.

13.04.2020 - 19:50

DROPS Design answered:

Dear Sue, you will increase on each side of each of the 4 stitches with a marker, on the increase round, start with 1 yarn over before first stitch, then work to the next stitch with a marker and work (YO, Purl the stitch with the marker, YO), repeat these at each marker and finish with YO, Purl the last stitch = you have now 8 yarn overs on the needle = 1 yarn over on each side of each stitch with a marker. Happy knitting!

14.04.2020 - 13:21

country flag Toni wrote:

Your patterns are anything except easy to understand. I am an intermediate knitter. I’ve made personalized dolls, pleated skirts, shrugs, socks, sweater coats, as well as crochet items, and I can not follow your simplest knit patterns. I was excited about trying this one and I can’t even read through the pattern without getting confused. Any chance you have this as a tutorial on video? Please help me. Your patterns are so cute but not if I can’t duplicate them.

21.03.2020 - 08:27

DROPS Design answered:

Dear Toni, can you please tell us more? Which part of the pattern you don't understand for example, so that we can try to help you.

23.03.2020 - 09:13

country flag Akou wrote:

Bonjour Est il possible de tricoter ce modèle avec des aiguilles droites ? Si oui pouvez vous me dire comment adapter les explications. Merci

06.03.2020 - 09:45

DROPS Design answered:

Bonjour Mme Akou, vous trouverez ici comment adapter un modèle sur aiguilles droites, n'hésitez pas à vous adresser à votre magasin pour toute assistance complémentaire. Bon tricot!

06.03.2020 - 10:10

country flag Iwona wrote:

Czy funkcja TWOJE ULUBIONE WZORY nie działa ?

28.07.2019 - 19:04

DROPS Design answered:

Witam! Funkcja ulubione wzory już działa, proszę sprawdzić. Pozdrawiamy!

01.08.2019 - 12:45

country flag Iwona wrote:

Czy funkcja TWOJE ULUBIONE WZORY nie działa ?

16.07.2019 - 14:02

DROPS Design answered:

Witaj Iwono! Sprawdziłam osobiście i nie działa. Już to sprawdzamy. Chwilkę to może potrwać ze względu na urlopy. Zobacz za kilka dni na stronie, a jak dalej nie będzie działać, przypomnij się. Pozdrawiamy!

17.07.2019 - 16:40

country flag Carmen wrote:

168 maschen anschl. 4 mark. 1 mark. 45m. 2 mark. 84 m. 3 mark. 129 m. 4.mark. In die letzte m. Zwischen 1. U. 2.mark. 38 m vorderteil. Zwuschen 3. U. 4 mark. 38 = rueckteil m. Zwischen 2. U 3.mark. Und zwischen der 4. U. 1 mark. 43 =, traeger ich verstehe nicht wie ich die markierungen anbringen muss

26.05.2019 - 14:04

DROPS Design answered:

Liebe Carmen, so sollen die 168 M aussehen: Erste Masche = 44 M (träger), 1 M mit 1. Mark, 38 M (=Vorderteil), 1 M mit 2. Mark, 44 M (= träger), 1 M mit 3. Mark, 39 M (= Rückenteil), 1 M mit 4. Mark, es sind jetzt: 44+1+38+1+44+1+38+1=168 M. Viel Spaß beim stricken!

27.05.2019 - 11:10

country flag Giovanna wrote:

È possibile avere le spiegazioni per lavorare con i ferri normali? Grazie

02.04.2019 - 14:23

DROPS Design answered:

Buogiorno Giovanna. Purtroppo in questa sede non riusciamo a darle un aiuto così personalizzato. In questa pagina trova qualche indicazione su come adattare ai ferri dritti un modello pensato per essere lavorato in tondo. Per un’assistenza migliore, può rivolgersi, anche via mail, al suo rivenditore Drops di fiducia. Buon lavoro!

02.04.2019 - 15:07