DROPS Alpaca Bouclé
DROPS Alpaca Bouclé
80% Alpaca, 15% Wool, 5% Polyamide
from 5.00 $ /50g
DROPS Cotton Viscose
54% Cotton, 46% Viscose
Discontinued
find alternatives
DROPS SS24

Seaside Horizons

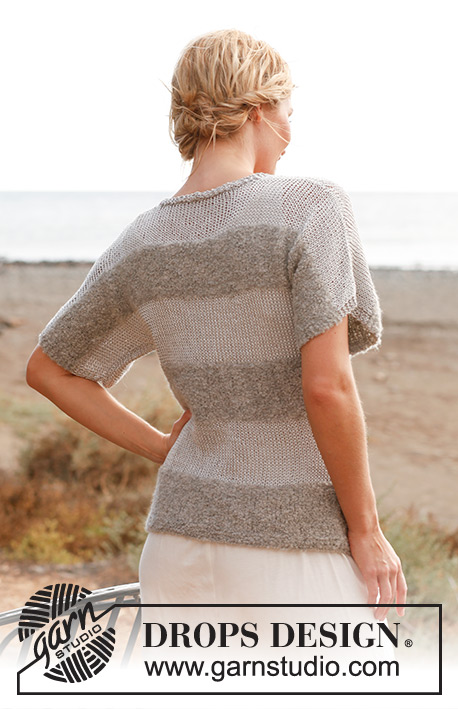
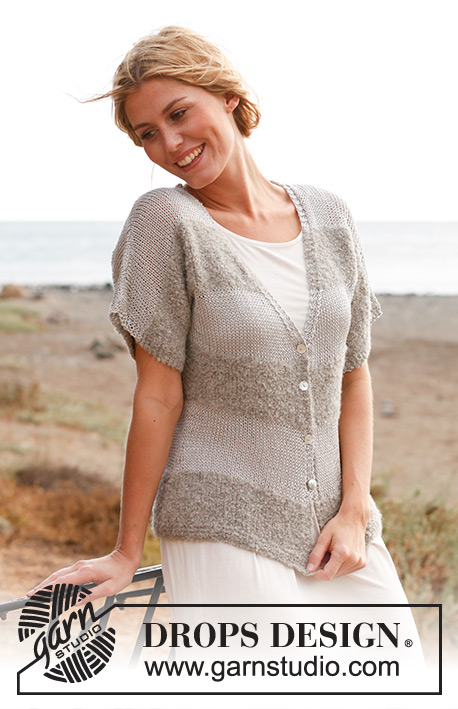
Knitted DROPS jacket in ”Alpaca Bouclé” and “Cotton Viscose”. Size: S - XXXL.

DROPS 137-22
DROPS design: Pattern no AB-015
Yarn group A and C
--------------------------------------------------------
Size: S - M - L - XL - XXL - XXXL
Finished measurements:
Bust: 84-92-98-110-122-134 cm / 33"-36¼"-38½"-43½"-48"-52¾"
Full length: 54-57-60-63-66-69 cm / 21¼"-22½"-23⅝"-24¾"-26"-27⅛"

Materials: DROPS ALPACA BOUCLÉ from Garnstudio
Color no 5110m, light gray:
100-100-150-150-150-200 g
And use: DROPS COTTON VISCOSE from Garnstudio
Color no 18, pearl gray:
100-150-150-150-150-200 g

DROPS CIRCULAR NEEDLE size 5 mm / US 8 (80 cm / 32") - or size needed to get 17 sts x 22 rows in stockinette st = 10 x 10 cm / 4" x 4" with Alpaca Bouclé.
DROPS CIRCULAR NEEDLE size 4.5 mm / US 7 (80 cm / 32") - for edge in garter st.

DROPS MOTHER-OF-PEARL BUTTONS NO 522: 4 pieces for all sizes

-------------------------------------------------------

Alternative Yarn – See how to change yarns here
Yarn Groups A to F – Use the same pattern and change the yarn here
Yarn usage using an alternative yarn – Use our yarn converter here

-------------------------------------------------------

DROPS Alpaca Bouclé
DROPS Alpaca Bouclé
80% Alpaca, 15% Wool, 5% Polyamide
from 5.00 $ /50g
DROPS Cotton Viscose
54% Cotton, 46% Viscose
Discontinued
find alternatives

Pattern instructions

NOTE: This pattern is written in American English. All measurements in charts are in cm. For conversion from inches to cm - click here. There are different terms for crocheting in American and British English. If this pattern includes crochet, click for "crochet terms" here. For this pattern in British English, please click here.
GARTER ST (back and forth on needle): K all rows.

STRIPES:
* Work 9-9½-10-10½-11-11½ cm / 3½"-3¾"-4"-4¼"-4⅜"-4½" with Alpaca Bouclé, then 9-9½-10-10½-11-11½ cm / 3½"-3¾"-4"-4¼"-4⅜"-4½" with Cotton Viscose *, repeat from *-* a total of 3 times (= 6 stripes vertically in total).

DECREASE TIP 1 (applies to body):
Dec 1 st from RS on each side of marker as follows: Work until 2 sts remain before marker, slip 1 st as if to K, K 1, psso, (marker), K tog the next 2 sts.

DECREASE TIP 2 (applies to neck on front piece):
Dec 1 st from RS inside 4 sts in garter st on band.
After 4 sts in garter st: Slip 1 st as if to K, K 1, psso.
Before 4 sts in garter st: K 2 tog.

INCREASE TIP:
Inc 1 st on each side of marker as follows: Work until 1 st remains before marker, make 1 YO, K 2 sts and make 1 YO. On next row work YOs twisted (i.e. work in back loop of st instead of front) to avoid holes.

BUTTON HOLES:
Bind off for 4 button holes from RS on right front piece.
1 button hole = K tog 3rd and 4th st from mid front and make 1 YO, on next row K YO. Bind off for button holes when piece measures:
SIZE S: 9, 16, 23, 30 cm / 3½",6¼",9",11¾".
SIZE M: 11, 18, 25, 32 cm / 4⅜",7",9¾",12½".
SIZE L: 13, 20, 27, 34 cm / 5⅛",8",10⅝",13⅜".
SIZE XL: 12, 20, 28, 36 cm / 4¾",8",11",14¼".
SIZE XXL: 14, 22, 30, 38 cm / 5½",8¾",11¾",15".
SIZE XXXL: 13, 22, 31, 40 cm / 5⅛",8¾",12¼",15¾".

MEASURING TIP:
Measure piece from cast on edge and up to the shoulder on the longer piece.
--------------------------------------------------------

BODY:
Worked back and forth in STRIPES - Read explanation above. Cast on 160-172-184-204-224-244 sts on circular needle size 4.5 mm / US 7 with Alpaca Bouclé. Work 6 rows in garter st - see explanation above (1st row = RS).
Switch to circular needle size 5 mm / US 8 - but work the outermost 4 sts in each side in garter st (= bands mid front). Continue to work like this until piece measures 3-3-3-4-4-4 cm / 1⅛"-1⅛"-1⅛"-1½"-1½"-1½". REMEMBER THE GAUGE!
Insert 2 markers in the piece after 42-45-48-53-58-63 sts in from each side (= 76-82-88-98-108-118 sts between markers on back piece). Move the markers upwards when working.
On next row from RS, dec 1 st on each side of every marker - Read DECREASE TIP 1 above = 4 sts dec. Repeat dec every 1½-2-2-2½-2½-3 cm / ½"-¾"-¾"-⅞"-⅞"-1⅛" a total of 6 times = 136-148-160-180-200-220 sts.
AT THE SAME TIME when piece measures 9-11-13-12-14-13 cm / 3½"-4⅜"-5⅛"-4¾"-5½"-5⅛", bind off for 1st button hole on right band - see BUTTON HOLES above.
Continue to work until piece measures 15-17-19-21-23-25 cm / 6"-6¾"-7½"-8¼"-9"-9¾". On next row, inc 1 st on each side of every marker - Read INCREASE TIP above = 4 new sts.
Repeat inc every 4 cm / 1½" a total of 4 times = 152-164-176-196-216-236 sts.
Continue to work until piece measures 30-32-34-36-38-40 cm / 11¾"-12½"-13⅜"-14¼"-15"-15¾. Now divide the piece at the markers and finish each part separately.

BACK PIECE:
= 72-78-84-94-104-114 sts. Then cast on 1 new st in each side on the next 2 rows from RS, then cast on 21-20-19-16-13-10 new sts in each side for sleeve = 118-122-126-130-134-138 sts.
Continue in stockinette st and stripes but work the outermost 4 sts in each side in garter st (= edge sts on sleeves).
When piece measures 51-54-57-60-63-66 cm / 20"-21¼"-22½"-23⅝"-24¾"-26", bind off for diagonal shoulder in each side at beg of every row as follows: bind off the first 10 sts at beg of the next 6 rows - AT THE SAME TIME when piece measures 52-55-58-61-64-67 cm / 20½"-21⅝"-22¾"-24"-25¼"-26⅜", bind off the middle 20-20-22-22-24-24 sts for neck and finish each shoulder separately - See MEASURING TIP above.
On next row bind off 1 st towards the neck. When all bind offs are done, 18-20-21-23-24-26 sts remain on each shoulder.
On next row from RS loosely bind off all sts (piece now measures approx. 54-57-60-63-66-69 cm / 21¼"-22½"-23⅝"-24¾"-26"-27⅛"). READ ALL OF THE FOLLOWING SECTION BEFORE CONTINUING.

RIGHT FRONT PIECE:
= 40-43-46-51-56-61 sts. Inc and cast on new sts for sleeve in the side as on back piece. When piece measures 31-33-35-37-39-41 cm / 12¼"-13"-13¾"-14½"-15¼-16⅛", dec 1 st inside the 4 sts in garter st on band - Read DECREASE TIP 2 above - as follows: Dec on every row from RS (= every other row) a total of 3 times, then on every other row from RS (= every 4th row) a total of 8-8-9-9-10-10 times = 52-54-55-57-58-60 sts remain on each shoulder.
When piece measures 51-54-57-60-63-66 cm / 20"-21¼"-22½"-23⅝"-24¾"-26", bind off for diagonal shoulder as on back piece - but at beg of every row from WS =22-24-25-27-28-30 sts remain on shoulder.
On next row from WS (piece measures approx. 54-57-60-63-66-69 cm / 21¼"-22½"-23⅝"-24¾"-26"-27⅛"), bind off the first 18-20-21-23-24-26 sts = 4 sts in garter st remain on needle for collar.
Continue in garter st over these sts until collar measures 8-8-9-9-10-10 cm / 3⅛"-3⅛"-3½"-3½"-4"-4" from the shoulder. Loosely bind off all sts.

LEFT FRONT PIECE:
Work as right front piece but reversed.

ASSEMBLY:
Graft or sew shoulder seams with neat stitches, sew collar tog mid back and fasten it to the back of neck. Sew the openings under the sleeves. Sew the buttons on to the left band.

Diagram

All measurements in charts are in cm.

diagram measurements
Do you have a question? See a list of frequently asked questions (FAQ)

Knitting tension is what determines the final measurements of your work, and is usually measured per 10 x 10 cm. It is provided like so: number of stitches in width x number of rows in height - eg: 19 stitches x 26 rows = 10 x 10 cm.

The knitting tension is very individual; some people knit/crochet loosely while others work tightly. You adjust the knitting tension with the needle size, which is why the suggested needle size only serve as a guide! You need to adjust this (up or down) to ensure that YOUR knitting tension matches the knitting tension provided in the pattern. If you work with a different knitting tension than provided you will have a different yarn consumption, and your work will have different measurements than what the pattern suggests.

The knitting tension also determines which yarns can replace each other. As long as you achieve the same knitting tension you can replace one yarn with another.

See DROPS lesson: How to measure your tension/gauge

See DROPS video: How to make a gauge tension swatch

The required amount of yarn is provided in grams, eg: 450 g. To calculate how many balls you’ll need you first need to know how many grams are in 1 ball (25g, 50g or 100g). This information is available if you click on the individual yarn quality on our pages. Divide the amount required with the amount of each ball. For example, if each ball is 50g (the most common amount), the calculation will be as follows: 450 / 50 = 9 balls.

The important thing when changing from one yarn to another is that the knitting/crochet tension remains the same. This is so that the measurements of the finished piece will be the same as on the sketch provided. It is easier to achieve the same knitting tension using yarns from the same yarn group. It is also possible to work with multiple strands of a thinner yarn to achieve the knitting tension of a thicker one. Please try our yarn converter. We recommend you to always work a test swatch.

Please NOTE: when changing yarn the garment might have a different look and feel to the garment in the photo, due to individual properties and qualities of each yarn.

See DROPS lesson: Can I use a different yarn than the one mentioned in the pattern?

All our yarns are categorised into yarn groups (from A to F) according to thickness and knitting tension – group A contains the thinnest yarns and group F the thickest. This makes it easier for you to find alternative yarns to our patterns, should you wish to switch yarn. All yarns within the same group have a similar knitting tension and can easily replace each other. However, different yarn qualities have different structures and properties which will give the finished work a unique look and feel.

Click here for an overview of the yarns in each yarn group

At the top of all our patterns you’ll find a link to our yarn converter, which is a helpful tool should you wish to use a different yarn than suggested. By filling in the yarn quality you wish to replace, the amount (in your size) and number of strands, the converter will present good alternative yarns with the same knitting tension. Additionally it will tell you how much you’ll require in the new qualities and whether you’ll need to work with multiple strands. Most skeins are 50g (some are 25g or 100g).

If the pattern is worked with multiple colours, every colour will have to be converted separately. Similarly, if the pattern is worked with several strands of different yarns (for example 1 strand Alpaca and 1 strand Kid-Silk) you will have to find alternatives for each, individually.

Click here to see our yarn converter

Since different yarns have different qualities and textures we have chosen to keep the original yarn in our patterns. However, you can easily find options among our available qualities by using our yarn converter, or simply pick a yarn from the same yarn group.

It is possible that some retailers still have discontinued yarns in stock, or that someone has a few skeins at home that they would like to find patterns for.

The yarn converter will provide both alternative yarn as well as required amount in the new quality.

If you think it's hard to decide what size to make, it can be a good idea to measure a garment you own already and like the size of. Then you can pick the size by comparing those measures with the ones available in the pattern's size chart.

You'll find the size chart at the bottom of the pattern.

See DROPS lesson: How to read size chart

The needle size provided in the pattern serves only as a guide, the important thing is to follow the knitting tension. And since knitting tension is very individual, you will have to adjust the needle size to ensure that YOUR tension is the same as in the pattern – maybe you’ll have to adjust 1, or even 2 needle sizes, up or down to achieve the correct tension. For this, we recommend that you work test swatches.

Should you work with a different knitting tension than the one provided, the measurements of the finished garment might deviate from the measurement sketch.

See DROPS lesson: How to measure your tension/gauge

See DROPS video: How to make a gauge tension swatch

Working a garment top-down provides more flexibility and room for personal adjustment. For example it is easier to try the garment on while working, as well as making adjustments to length of yoke and shoulder caps.

The instructions are carefully explaining every step, in the correct order. Diagrams are adjusted to the knitting direction and are worked as usual.

The diagram depicts all rows/rounds, and every stitch seen from the right side. It is read from bottom to top, from right to left. 1 square = 1 stitch.

When working back and forth, every other row is worked from the right side and every other row is worked from the wrong side. When working from the wrong side, the diagram will have to be worked reversed: from left to right, knit stitches are purled, purl stitches are knit etc.

When working in the round every round is worked from the right side and the diagram are worked from right to left on all rounds.

See DROPS lesson: How to read knitting diagrams

The diagram depicts all rows/rounds, and every stitch seen from the right side. It is worked from bottom to top, from right to left.

When working back and forth every other row is worked from the right side: from right to left and every other row is worked from the wrong side: from left to right.

When working in the round, every row in the diagram are worked from the right side, from right to left.

When working a circular diagram you start in the middle and work your way outwards, counter clockwise, row by row.

The rows usually start with a given number of chain stitches (equivalent to the height of the following stitch), this will either be depicted in the diagram or explained in the pattern.

See DROPS lesson: How to read crochet diagrams

Instructions for working several diagrams after each other on the same row/round, will often be written like so: “work A.1, A.2, A.3 a total of 0-0-2-3-4 times". This means you work A.1 once, then A.2 is worked once, and A.3 is repeated (in width) the number of times provided for your size – in this case like so: S = 0 times, M = 0 times, L=2 times, XL= 3 times and XXL = 4 times.

The diagrams are worked as usual: begin with the first row in A.1, then work the first row in A.2 etc.

See DROPS lesson: How to read knitting diagrams

See DROPS lesson: How to read crochet diagrams

The total width of the garment (from wrist-to-wrist) will be larger in the larger sizes, despite the actual sleeves being shorter. The larger sizes have longer sleeve caps and wider shoulders, so there will be a good fit in all sizes.

The measurement sketch/schematic drawing provides information regarding the full length of the garment. If it’s a jumper or a jacket the length is measured from the highest point on the shoulder (usually closest to the neckline), and straight down to the bottom of the garment. It is NOT measured from the tip of shoulder. Similarly, the length of yoke is measured from the highest point on the shoulder and down to where yoke is split into body and sleeves.

See DROPS lesson: How to read a schematic drawing

Diagrams are often repeated on the round or in height. 1 repeat is the diagram the way it appears in the pattern. If it says to work 5 repeats of A.1 in the round, then you work A.1 a total of 5 times after/next to each other in the round. If it says to work 2 repeats of A.1 vertically/in height you work the entire diagram once, then begin again at the start and work the entire diagram one more time.

Chain stitches are slightly narrower than other stitches and to avoid working the cast-on edge too tight, we simply chain more stitches to begin with. The stitch count will be adjusted on the following row to fit the pattern and measurement sketch.

The rib edge is more elastic and will contract slightly compared to, for example, stocking stitch. By increasing before the rib edge, you avoid a visible difference in width between the rib edge and the rest of the body.

It’s very easy to cast off too tightly, and by making yarn overs while casting off (and simultaneously casting these off) you avoid a too tight cast off edge.

See DROPS video: How to bind off with yarn overs (yo)

To achieve an even increase (or decrease) you can increase on, for example: every 3rd and 4th row alternately, like so: work 2 rows and increase on the 3rd row, work 3 rows and increase on the 4th. Repeat this until the increase is complete.

See DROPS lesson: Increase or decrease 1 st on every 3rd and 4th row alternately

Should you prefer to work in the round instead of back and forth, you may of course adjust the pattern. You’ll need to add steeks mid-front (usually 5 stitches), and follow the instructions. When you would normally turn and work from the wrong side, simply work across the steek and continue in the round. At the end you’ll cut the piece open, pick up stitches to work bands, and cover the cut edges.

See DROPS video: How to knit steeks and cut open

Should you prefer to work back and forth instead of in the round, you may of course adjust the pattern so you work the pieces separately and then assemble them at the end. Divide the stitches for the body in 2, add 1 edge stitch in each side (for sewing) and work the front and back pieces separately.

See DROPS lesson: Can I adapt a pattern for circular needles into straight needles?

Pattern repeats can vary slightly in the different sizes, in order to get the correct proportions. If you’re not working the exact same size as the garment in the photo, yours might deviate slightly. This has been carefully developed and adjusted so that the complete impression of the garment is the same in all sizes.

Make sure to follow instructions and diagrams for your size!

If you have found a pattern you like which is available in women’s size it’s not very difficult to convert it to men’s size. The biggest difference will be the length of sleeves and body. Start working on the women size that you think would fit across the chest. The additional length will be worked right before you cast off for the armhole/sleeve cap. If the pattern is worked top-down you can add the length right after the armhole or before the first decrease on sleeve.

Regarding additional yarn amount, this will depend on how much length you add, but it is better with a skein too many than too few.

All yarns will have excess fibres (from production) that might come off as lint or shedding. Brushed yarns (ie hairier yarns) have more of these loose, excess fibres, causing more shedding.

Shedding also depends on what is worn under or over the garment, and whether this pulls at the yarn fibres. It’s therefore not possible to guarantee that there will be no shedding

Below are some tips on how to get the best result when working with hairier yarns:

1. When the garment is finished (before you wash it) shake it vigorously so the looser hairs come off. NOTE: do NOT use a lint roller, brush or any method that pulls at the yarn.

2. Place the garment in a plastic bag and put it in your freezer - the temperature will cause the fibres to become less attached to each other, and excess fibres will come off easier.

3. Leave in the freezer for a few hours before taking it out and shaking it again.

4. Wash the garment according to the instructions on the yarn label.

Pilling is a natural process that happens to even the most exclusive of fibers. It's a natural sign of wear and tear that is hard to avoid, and that is most visible in high friction areas of your garment like a sweater's arms and cuffs.

You can make your garment look as new by removing the pilling, using a fabric comb or a pill/lint remover.

Still can't find the answer you need? Then scroll down and leave your question so one of our experts can try to help you. This will be done normally within 5 to 10 working days.
In the meantime, you can read the questions and answers that others have left to this pattern or join the DROPS Workshop on Facebook to get help from fellow knitters/crocheters!

Post a comment to pattern DROPS 137-22

We would love to hear what you have to say about this pattern!

If you want to leave a question, please make sure you select the correct category in the form below, to speed up the answering process. Required fields are marked *.

Comments / Questions (8)

country flag Åsa Lindgren wrote:

Hej ! Jag vill sticka hela koftan i Alpaca Boucle storlek medium. Hur mycket garn går det åt ? Tack på förhand Åsa

10.04.2023 - 10:49

DROPS Design answered:

Hej Åsa, da skal du nok bruge dobbelt så meget :)

11.04.2023 - 15:36

country flag Mariella wrote:

Semplice ma carinissimo

11.01.2012 - 15:10

country flag Lonnie wrote:

Rigtig sød og anvendelig

07.01.2012 - 10:57

country flag Isabella Bojanowska wrote:

Ren og vakker!!! Nydelige overganger og fin kvinnelig fasong

01.01.2012 - 20:16

country flag Kaja Nilsson wrote:

Jätte fin mönster, längtar när beskrivningen kommer ut

28.12.2011 - 16:43

country flag Joëlle wrote:

Simple et original, jolie couleur

12.12.2011 - 11:20

country flag Maria wrote:

Mooie basic met mogelijkheden tot aanpassing van patroon.

11.12.2011 - 23:15

country flag Helena wrote:

Kui eelistad natural look´i ja linast stiili.

08.12.2011 - 20:55