
Popular categories
Looking for a yarn?


|
|
Zipper Cuddles |
|
|
|
|
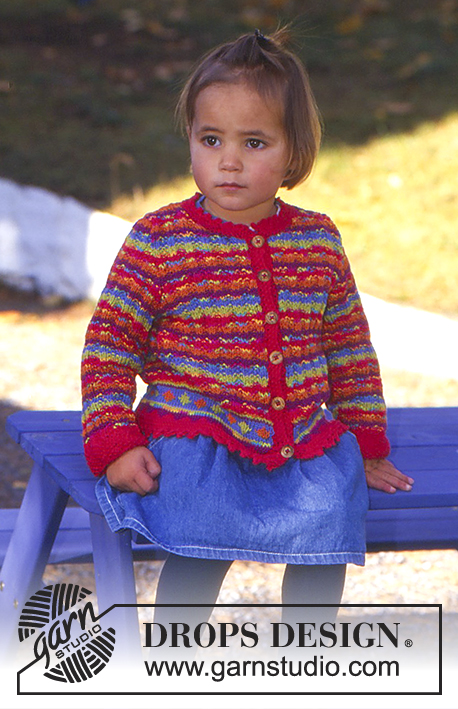
Jersey with Sleeves and Zip in Uld-Bouclé or Alpaca Bouclé
DROPS Children 9-4 |
|
|
Knitting gauge: 17 sts x 26 rows on needle size 4.5 mm / US 7 with Uld-Bouclè in stockinette sts = 4'' x 4'' (10 x 10 cm). Remember the needle sizes are guidelines only! Garter sts (back and forth): knit all rows. Rib: * K2, P2 *, repeat from *-*. Decreasing tips (apply to pocket): Dec as follows from RS: After 1 edge st: Slip 1 st as if to knit, K1, psso. Before 1 edge st: K2 tog. Dec as follows from WS: Before 1 edge st: P2 tog into back of st. After 1 edge st: P2 tog. Right front piece: Cast on 31-33-36 (38-41-43) sts (including 1 edge st mid front and 1 edge st at the side) on needle size 4 mm / US 6 with Uld-Bouclè. Knit 4 rows garter sts. Change to needle size 4.5 mm / US 7 and continue in stockinette sts with 1 edge st each side in garter sts. REMEMBER THE GAUGE! When piece measures 9-10-11 (12-12-12) cm inc 1 st at the side and repeat this inc when piece measures 18-20-22 (24-24-25) cm = 33-35-38 (40-43-45) sts. When piece measures 28-30-32 (35-36-37) cm bind off for armhole on every other row: 3 sts 1-1-1 (1-2-2) times, 2 sts 2-2-2 (3-2-3) times, 1 sts 3-2-3 (2-3-2) times = 23-26-28 (29-30-31) sts. When piece measures 37-41-44 (48-50-52) cm bind off 5-6-6 (7-7-8) sts mid front for neck and bind off to shape the neckline on every other row: 2 sts 2 times, 1 st 3 times = 11-13-15 (15-16-16) sts left on shoulder. Bind off when piece measures 41-45-48 (53-55-57) cm. Left front piece: Knit like right front piece, but mirrored. Back piece: Cast on 60-64-70 (74-80-84) sts (including 1 edge st each side) on needle size 4 mm / US 6 with Uld-Bouclè. Knit 4 rows garter sts. Change to needle size 4.5 mm / US 7, continue in stockinette sts with edge sts in garter sts throughout. Inc1 st each side when piece measures 9-10-11 (12-12-12) cm and repeat this inc when piece measures 18-20-22 (24-24-25) cm = 64-68-74 (78-84-88) sts. When piece measures 28-30-32 (35-36-37) cm bind off for armhole as for the front piece = 44-50-54 (56-58-60) sts. Continue until piece measures 39-43-46 (51-53-55) cm. Bind off the middle 20-22-22 (24-24-26) sts for neck and dec 1 st on neckline on next row = 11-13-15 (15-16-16) sts left on each shoulder. Bind off when the piece measures 41-45-48 (53-55-57) cm. Sleeve: Cast on 44-44-48 (48-52-52) sts on double pointed needle size 3 mm / US 2.5 with Karisma Superwash. Knit 4-4-4 (5-5-5) cm Rib. Change to double pointed needle size 4.5 mm / US 7 and Uld-Bouclè. Knit stockinette sts at the same time dec 10 sts evenly on the first round = 34-34-38 (38-42-42) sts. At the same time inc 2 sts mid under arm a total of 3-7-7 (10-10-11) times on every 7th -3.5rd – 4th (3 rd -3.5 rd.-3.5 rd) cm = 40-48-52 (58-62-64) sts. When piece measures 26-30-33 (37-40-43) cm bind off 4-6-6 (6-6-6) sts mid under arm and finish the sleeve back and forth on needle. Dec for sleeve cap each side on every other row: 2 sts 1-2-2 (3-3-2) times, 1 st 5-3-2 (2-3-6) times and then 2 sts each side until sleeve measures 33-37-40 (45-49-53) cm. Bind off. Pocket: Cast on 26-27-29 (31-32-34) sts on needles size 4 mm / US 6 with Uld-Bouclè. Knit 2 rows garter sts. Change to needle size 4.5 mm / US 7 and continue in stockinette sts with 1 edge st each side in garter sts. When piece measures 6-7-7 (8-8-9) cm bind off 1 st inside the edge st on the one side (= pocket opening – see Decreasing tips) a total of 10-9-9 (8-8-10) times on every row and thereafter 1 st 8-10-11 (13-14-13) times on every other row = 8-8-9 (10-10-11) sts left on needle. Bind off, the piece measures approx 16-18-19 (21-22-23) cm. Knit another pocket with decreases on the opposite side. Assembly: Sew the pockets on the cardigan above the edge in garter sts and mid front. Sew the shoulder seems. Pick up approx 92-108 sts (divisible by 4) round the neck on needle size 3 mm / US 2.5 with Karisma Superwash. Knit Rib with 1 garter st each side towards mid front until neck measures 5-5-6 (6-7-7) cm, bind off. Pick up sts up along the front band on needle size 3 mm / US 2.5 with Karisma Superwash - start from the bottom edge and continue up over the neck edge (pick up sts through both layers where the pocket is attached) = approx 100 -140 sts. Knit Rib with 1 garter st each side for 1 cm / 3/8'', bind off. Repeat along the left front band. Sew the side seams within 1 edge st, sew on the sleeves and the zip. If the zip is too long sew it in from the bottom edge and turn the extra length in towards the WS at the top. |
|

|
|
|
Have you made this or any other of our designs? Tag your pictures in social media with #dropsdesign so we can see them! Do you need help with this pattern?You'll find tutorial videos, a Comments/Questions area and more by visiting the pattern on garnstudio.com. © 1982-2024 DROPS Design A/S. We reserve all rights. This document, including all its sub-sections, has copyrights. Read more about what you can do with our patterns at the bottom of each pattern on our site. |


With over 40 years in knitting and crochet design, DROPS Design offers one of the most extensive collections of free patterns on the internet - translated to 17 languages. As of today we count 304 catalogs and 11422 patterns - 11417 of which are translated into English (US/in).
We work hard to bring you the best knitting and crochet have to offer, inspiration and advice as well as great quality yarns at incredible prices! Would you like to use our patterns for other than personal use? You can read what you are allowed to do in the Copyright text at the bottom of all our patterns. Happy crafting!
Comments / Questions (6)
Jag vill ha knappar istället för dragkedja. Är det något som jag behöver ändra i mönstret? Jag ska sticka till en ett-åring, hur många maskor behöver jag lägga upp, längd till ärmhålen. Längd armar. Tacksam för svar.
28.09.2019 - 18:34DROPS Design answered:
Hej Ullabritt, Vi kan tyvärr inte skriva om mönstret. Men här du du koftor till en 1-åring. koftor - baby - stickat Lycka till :)
01.10.2019 - 15:24Ich würde gerne dieser Modell in Gr. 110/116 in Big Merino stricken, wie wäre dann die Umrechnung? Danke für Ihr Antwort
17.02.2019 - 18:09DROPS Design answered:
Liebe Frau Rousseau-Dumarcet, diese Jacke wird mit Ull-Bouclé = Garn der Garngruppe C (wie Big Merino) gestrickt - Hier lesen Sie mehr über Garnalternativen - Hier wird wegen Strucktur Alpaca Bouclé empfohlen. Viel Spaß beim stricken!
18.02.2019 - 10:17Hej, jag är en ovan stickare och undrar om jag kan sticka hela koftan i Drops Karisma/mix? Och om jag isåfall kan använda samma maskantal eller måste lägga till eller dra ifrån i storlek 6 år. Och hur mycket garn behöver jag köpa? Tack för hjälp!
05.07.2018 - 11:15DROPS Design answered:
Hej Ninni, koftan vill bli för liten om du stickar hela i DROPS Karisma. Du kan sticka den i DROPS Alpaca Boucle eller en annan kvalitet i DROPS garngrupp C. Testa vår konverterare, skriv Ull Boucle 250g 1 tråd och se vilka aleternativ du får. Lycka till :)
06.07.2018 - 10:00Jeg kan ikke få opskriften på ærmet til at stemme. Kan det passe at man skal tag 10 m ind efter rib? Jeg synes ærmet bliver alt for smalt - og på fotoet ser det ud til at der skal tages ud efter rib. Håber I kan hjælpe mig.
24.11.2015 - 12:00DROPS Design answered:
Hej Anne, Jo men det er fordi at Uld-Boucle som man skifter til ifølge opskriften fylder meget mere end Karisma. Strikker du i en modsvarende kvalitet/strikkefasthed så skal du følge opskriften. God fornøjelse!
25.11.2015 - 12:07Tout à fait, merci Mariana, le modèle a été corrigé.
24.04.2010 - 15:35Mariana wrote:
Correction: Devant droit ...rabattre pour l'emmanchure tous les 2 rangs : 1-1-1 (1-2-2) fois 3 m,...
24.04.2010 - 00:22