DROPS Bomull-Lin uni colour 53% Cotton, 47% Linen |
4.80 CAD /50g |
Order |
Clicking the ORDER button will redirect you to Wool Warehouse Direct Ltd website
The yarn cost is calculated from the pattern’s smallest size and the yarn’s cheapest product type. Looking for an even better price? You might find it on the DROPS Deals!
-------------------------------------------------------
Alternative Yarn – See how to change yarns here
Yarn Groups A to F – Use the same pattern and change the yarn here
Yarn usage using an alternative yarn – Use our yarn converter here
-------------------------------------------------------
DROPS Bomull-Lin uni colour 53% Cotton, 47% Linen 4.80 CAD /50g Order |
Clicking the ORDER button will redirect you to Wool Warehouse Direct Ltd website
The yarn cost is calculated from the pattern’s smallest size and the yarn’s cheapest product type. Looking for an even better price? You might find it on the DROPS Deals!
Each of our patterns has specific tutorial videos to help you.
These step-by-step tutorials might also help you:
Why is the knitting/crochet tension so important?
Knitting tension is what determines the final measurements of your work, and is usually measured per 10 x 10 cm. It is provided like so: number of stitches in width x number of rows in height - eg: 19 stitches x 26 rows = 10 x 10 cm.
The knitting tension is very individual; some people knit/crochet loosely while others work tightly. You adjust the knitting tension with the needle size, which is why the suggested needle size only serve as a guide! You need to adjust this (up or down) to ensure that YOUR knitting tension matches the knitting tension provided in the pattern. If you work with a different knitting tension than provided you will have a different yarn consumption, and your work will have different measurements than what the pattern suggests.
The knitting tension also determines which yarns can replace each other. As long as you achieve the same knitting tension you can replace one yarn with another.
See DROPS lesson: How to measure your tension/gauge
See DROPS video: How to make a gauge tension swatch
How do I know how many balls of yarn I need?
The required amount of yarn is provided in grams, eg: 450 g. To calculate how many balls you’ll need you first need to know how many grams are in 1 ball (25g, 50g or 100g). This information is available if you click on the individual yarn quality on our pages. Divide the amount required with the amount of each ball. For example, if each ball is 50g (the most common amount), the calculation will be as follows: 450 / 50 = 9 balls.
Can I use a different yarn than what the pattern suggests?
The important thing when changing from one yarn to another is that the knitting/crochet tension remains the same. This is so that the measurements of the finished piece will be the same as on the sketch provided. It is easier to achieve the same knitting tension using yarns from the same yarn group. It is also possible to work with multiple strands of a thinner yarn to achieve the knitting tension of a thicker one. Please try our yarn converter. We recommend you to always work a test swatch.
Please NOTE: when changing yarn the garment might have a different look and feel to the garment in the photo, due to individual properties and qualities of each yarn.
See DROPS lesson: Can I use a different yarn than the one mentioned in the pattern?
What are the yarn groups?
All our yarns are categorised into yarn groups (from A to F) according to thickness and knitting tension – group A contains the thinnest yarns and group F the thickest. This makes it easier for you to find alternative yarns to our patterns, should you wish to switch yarn. All yarns within the same group have a similar knitting tension and can easily replace each other. However, different yarn qualities have different structures and properties which will give the finished work a unique look and feel.
How do I use the yarn converter?
At the top of all our patterns you’ll find a link to our yarn converter, which is a helpful tool should you wish to use a different yarn than suggested. By filling in the yarn quality you wish to replace, the amount (in your size) and number of strands, the converter will present good alternative yarns with the same knitting tension. Additionally it will tell you how much you’ll require in the new qualities and whether you’ll need to work with multiple strands. Most skeins are 50g (some are 25g or 100g).
If the pattern is worked with multiple colours, every colour will have to be converted separately. Similarly, if the pattern is worked with several strands of different yarns (for example 1 strand Alpaca and 1 strand Kid-Silk) you will have to find alternatives for each, individually.
Why do you show discontinued yarns in the patterns?
Since different yarns have different qualities and textures we have chosen to keep the original yarn in our patterns. However, you can easily find options among our available qualities by using our yarn converter, or simply pick a yarn from the same yarn group.
It is possible that some retailers still have discontinued yarns in stock, or that someone has a few skeins at home that they would like to find patterns for.
The yarn converter will provide both alternative yarn as well as required amount in the new quality.
What size should I knit?
If you think it's hard to decide what size to make, it can be a good idea to measure a garment you own already and like the size of. Then you can pick the size by comparing those measures with the ones available in the pattern's size chart.
You'll find the size chart at the bottom of the pattern.
See DROPS lesson: How to read size chart
Why do I get the wrong knitting tension with the suggested needle size?
The needle size provided in the pattern serves only as a guide, the important thing is to follow the knitting tension. And since knitting tension is very individual, you will have to adjust the needle size to ensure that YOUR tension is the same as in the pattern – maybe you’ll have to adjust 1, or even 2 needle sizes, up or down to achieve the correct tension. For this, we recommend that you work test swatches.
Should you work with a different knitting tension than the one provided, the measurements of the finished garment might deviate from the measurement sketch.
See DROPS lesson: How to measure your tension/gauge
See DROPS video: How to make a gauge tension swatch
Why is the pattern worked top-down?
Working a garment top-down provides more flexibility and room for personal adjustment. For example it is easier to try the garment on while working, as well as making adjustments to length of yoke and shoulder caps.
The instructions are carefully explaining every step, in the correct order. Diagrams are adjusted to the knitting direction and are worked as usual.
How do I work according to a knitting diagram?
The diagram depicts all rows/rounds, and every stitch seen from the right side. It is read from bottom to top, from right to left. 1 square = 1 stitch.
When working back and forth, every other row is worked from the right side and every other row is worked from the wrong side. When working from the wrong side, the diagram will have to be worked reversed: from left to right, knit stitches are purled, purl stitches are knit etc.
When working in the round every round is worked from the right side and the diagram are worked from right to left on all rounds.
See DROPS lesson: How to read knitting diagrams
How do I work according to a crochet diagram?
The diagram depicts all rows/rounds, and every stitch seen from the right side. It is worked from bottom to top, from right to left.
When working back and forth every other row is worked from the right side: from right to left and every other row is worked from the wrong side: from left to right.
When working in the round, every row in the diagram are worked from the right side, from right to left.
When working a circular diagram you start in the middle and work your way outwards, counter clockwise, row by row.
The rows usually start with a given number of chain stitches (equivalent to the height of the following stitch), this will either be depicted in the diagram or explained in the pattern.
See DROPS lesson: How to read crochet diagrams
How do I work several diagrams simultaneously on the same row/round?
Instructions for working several diagrams after each other on the same row/round, will often be written like so: “work A.1, A.2, A.3 a total of 0-0-2-3-4 times". This means you work A.1 once, then A.2 is worked once, and A.3 is repeated (in width) the number of times provided for your size – in this case like so: S = 0 times, M = 0 times, L=2 times, XL= 3 times and XXL = 4 times.
The diagrams are worked as usual: begin with the first row in A.1, then work the first row in A.2 etc.
See DROPS lesson: How to read knitting diagrams
See DROPS lesson: How to read crochet diagrams
Why are the sleeves shorter in larger sizes?
The total width of the garment (from wrist-to-wrist) will be larger in the larger sizes, despite the actual sleeves being shorter. The larger sizes have longer sleeve caps and wider shoulders, so there will be a good fit in all sizes.
Where on the garment is the length measured?
The measurement sketch/schematic drawing provides information regarding the full length of the garment. If it’s a jumper or a jacket the length is measured from the highest point on the shoulder (usually closest to the neckline), and straight down to the bottom of the garment. It is NOT measured from the tip of shoulder. Similarly, the length of yoke is measured from the highest point on the shoulder and down to where yoke is split into body and sleeves.
See DROPS lesson: How to read a schematic drawing
What is a repeat?
Diagrams are often repeated on the round or in height. 1 repeat is the diagram the way it appears in the pattern. If it says to work 5 repeats of A.1 in the round, then you work A.1 a total of 5 times after/next to each other in the round. If it says to work 2 repeats of A.1 vertically/in height you work the entire diagram once, then begin again at the start and work the entire diagram one more time.
Why does the piece start with more chain stitches than it’s worked with?
Chain stitches are slightly narrower than other stitches and to avoid working the cast-on edge too tight, we simply chain more stitches to begin with. The stitch count will be adjusted on the following row to fit the pattern and measurement sketch.
Why increase before the rib edge when the piece is worked top-down?
The rib edge is more elastic and will contract slightly compared to, for example, stocking stitch. By increasing before the rib edge, you avoid a visible difference in width between the rib edge and the rest of the body.
Why increase in the cast-off edge?
It’s very easy to cast off too tightly, and by making yarn overs while casting off (and simultaneously casting these off) you avoid a too tight cast off edge.
See DROPS video: How to bind off with yarn overs (yo)
How do I increase/decrease on every 3rd and 4th row/round alternately?
To achieve an even increase (or decrease) you can increase on, for example: every 3rd and 4th row alternately, like so: work 2 rows and increase on the 3rd row, work 3 rows and increase on the 4th. Repeat this until the increase is complete.
See DROPS lesson: Increase or decrease 1 st on every 3rd and 4th row alternately
How can I work a jacket in the round instead of back and forth?
Should you prefer to work in the round instead of back and forth, you may of course adjust the pattern. You’ll need to add steeks mid-front (usually 5 stitches), and follow the instructions. When you would normally turn and work from the wrong side, simply work across the steek and continue in the round. At the end you’ll cut the piece open, pick up stitches to work bands, and cover the cut edges.
See DROPS video: How to knit steeks and cut open
Can I work a jumper back and forth instead of in the round?
Should you prefer to work back and forth instead of in the round, you may of course adjust the pattern so you work the pieces separately and then assemble them at the end. Divide the stitches for the body in 2, add 1 edge stitch in each side (for sewing) and work the front and back pieces separately.
See DROPS lesson: Can I adapt a pattern for circular needles into straight needles?
Why is the pattern slightly different than what I see in the photo?
Pattern repeats can vary slightly in the different sizes, in order to get the correct proportions. If you’re not working the exact same size as the garment in the photo, yours might deviate slightly. This has been carefully developed and adjusted so that the complete impression of the garment is the same in all sizes.
Make sure to follow instructions and diagrams for your size!
How do I make a women’s size garment into a men’s size one?
If you have found a pattern you like which is available in women’s size it’s not very difficult to convert it to men’s size. The biggest difference will be the length of sleeves and body. Start working on the women size that you think would fit across the chest. The additional length will be worked right before you cast off for the armhole/sleeve cap. If the pattern is worked top-down you can add the length right after the armhole or before the first decrease on sleeve.
Regarding additional yarn amount, this will depend on how much length you add, but it is better with a skein too many than too few.
How do I prevent a hairy garment from shedding?
All yarns will have excess fibres (from production) that might come off as lint or shedding. Brushed yarns (ie hairier yarns) have more of these loose, excess fibres, causing more shedding.
Shedding also depends on what is worn under or over the garment, and whether this pulls at the yarn fibres. It’s therefore not possible to guarantee that there will be no shedding
Below are some tips on how to get the best result when working with hairier yarns:
1. When the garment is finished (before you wash it) shake it vigorously so the looser hairs come off. NOTE: do NOT use a lint roller, brush or any method that pulls at the yarn.
2. Place the garment in a plastic bag and put it in your freezer - the temperature will cause the fibres to become less attached to each other, and excess fibres will come off easier.
3. Leave in the freezer for a few hours before taking it out and shaking it again.
4. Wash the garment according to the instructions on the yarn label.
Why does my garment pill?
Pilling is a natural process that happens to even the most exclusive of fibers. It's a natural sign of wear and tear that is hard to avoid, and that is most visible in high friction areas of your garment like a sweater's arms and cuffs.
You can make your garment look as new by removing the pilling, using a fabric comb or a pill/lint remover.
Summer Love |
|
|
|
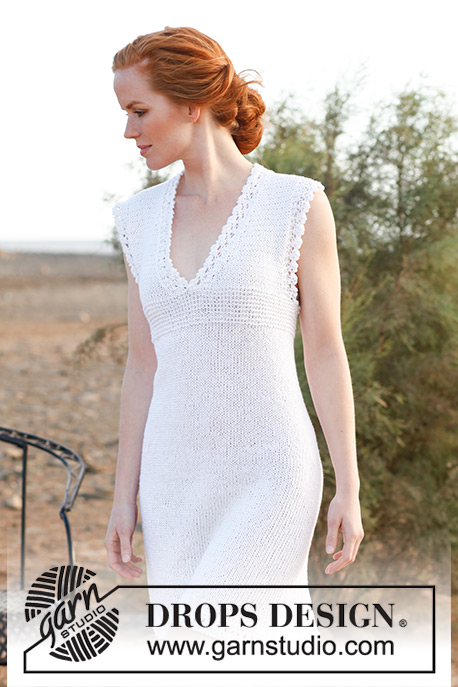
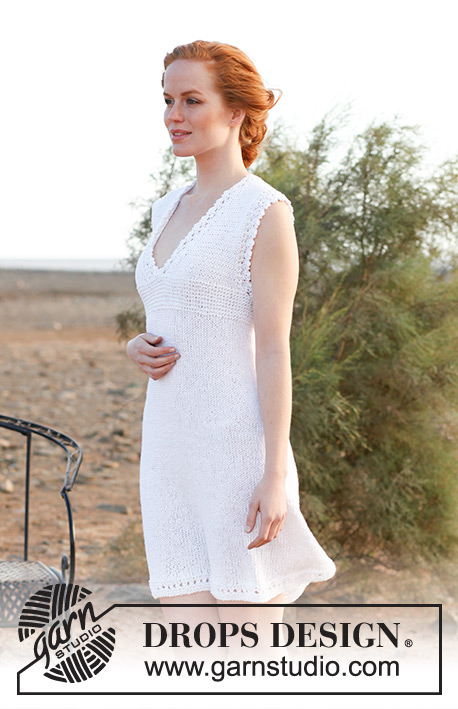
Knitted DROPS tunic with lace pattern in ”Bomull-Lin”. Size S-XXXL.
DROPS 137-8 |
|
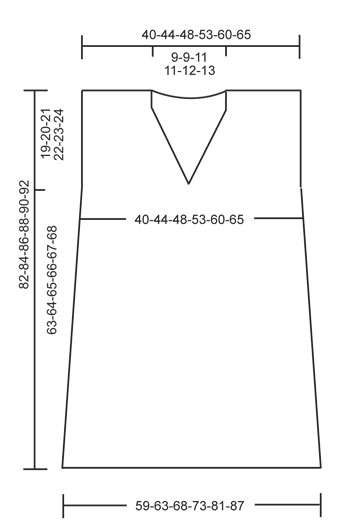
GARTER ST (in the round on circular needle): * K 1 round and P 1 round *, repeat from *-*. GARTER ST (back and forth on needle): K all rows. LACE PATTERN 1: Row 1 (from RS): K 3, 1 double YO, P 1, K 3 = 9 sts. Row 2 (from WS): K 5, K 1 twisted (i.e. back loop of st instead of front), K 3. Row 3: bind off 2 sts (= 1 st rem on right needle), K 2, P 1, 1 double YO, K 2 twisted tog, K 1 twisted = 8 sts. Row 4: K 2, K 1 in first YO, slip the other YO off the needle, K 4 = 7 sts. LACE PATTERN 2: Row 1 (from WS): K 3, 1 double YO, K 4 = 9 sts. Row 2 (from RS): K 3, P 1, K 1, K 1 twisted, K 3. Row 3: bind off 2 sts (= 1 st rem on right needle), K 3, 1 double YO, K 2 twisted tog, K 1 twisted = 8 sts. Row 4: K 2, K 1 in first YO, slip the other YO off the needle, P 1, K 3 = 7 sts. DECREASE TIP (applies to neck): All dec are done from RS. Dec as follows after band sts: Slip 1 st as if to K, K 1, psso. Dec as follows before band sts: K 2 tog. --------------------------------------------------------- BODY: Worked in the round on circular needle. Cast on 176-188-204-220-244-260 sts on circular needle size 6 mm / US 10 with Bomull-Lin. Work 4 rounds in GARTER ST - see explanation above. K 1 round. Work next round as follows: * 1 YO, K 2 tog *, repeat from *-* the entire round. Work 4 rounds in garter st. Then work in stockinette st. Insert 8 markers in the piece, approximately 22-23-25-27-30-32 sts apart. REMEMBER THE GAUGE! When piece measures 5 cm / 2", beg to dec 1 st alternately on the left and right side of markers, repeat dec every 8 cm / 3⅛" a total of 5 times (= 8 dec per round) = 136-148-164-180-204-220 sts. When piece measures 57-58-59-60-61-62 cm / 22½"-22¾"-23¼"-23⅝"-24"-24⅜", switch to circular needle size 5 mm / US 8 and continue in garter st. When piece measures 63-64-65-66-67-68 cm / 24¾"-25¼"-25½"-26"-26⅜"-26¾", divide for front and back piece and then work back and forth. Switch back to circular needle size 6 mm / US 10. BACK PIECE: = 68-74-82-90-102-110 sts. Work as follows – from RS: Lace pattern 1, stockinette st over the next 54-60-68-76-88-96 sts, finish with K 7, on next row work Lace pattern 2 over these 7 sts. Continue the pattern like this. NOTE! The no of sts will vary in the lace pattern therefore only count sts on 1st row in lace pattern. When piece measures 78-80-82-84-86-88 cm / 30¾"-31½"-32¼"-33"-33⅞"-34⅝", work in garter st over the middle 30-30-32-34-34-36 sts, the remaining sts are worked in stockinette st and lace pattern. When piece measures 80-82-84-86-88-90 cm / 31½"-32¼"-33"-33⅞"-34⅝"-35½", bind off the middle 14-14-16-18-18-20 sts for neck and finish each shoulder separately. On next row dec 1 st towards the neck = 26-29-32-35-41-44 sts remain on each shoulder. Continue with 7 sts in garter st towards the neck. Bind off when piece measures 82-84-86-88-90-92 cm / 32¼"-33"-33⅞"-34⅝"-35½"-36¼". RIGHT FRONT PIECE: Slip the first 32-35-39-43-49-53 sts (= left front piece) on a stitch holder = 36-39-43-47-53-57 sts. Work from RS and mid front as follows: Lace pattern 1, stockinette st over the next 22-25-29-33-39-43 sts, finish with K 7, on next row work Lace pattern 2 over these 7 sts. Continue the pattern like this. When piece measures 64-65-66-67-68-69 cm / 25¼"-25½"-26"-26⅜"-26¾"-27⅛", dec 1 st for neck towards mid front inside lace pattern - READ DECREASE TIP. Repeat dec every 1½ cm / ½" 9-9-10-11-11-12 more times = 26-29-32-35-41-44 sts remain on shoulder. Bind off when piece measures 82-84-86-88-90-92 cm / 32¼"-33"-33⅞"-34⅝"-35½"-36¼". LEFT FRONT PIECE: Slip sts on the stitch holder back on needle and pick up 4 new sts behind the lace edge on right front piece = 36-39-43-47-53-57 sts. Work as right front piece but reversed, i.e. 1st row is worked from WS and mid front as follows: Lace pattern 2, stockinette st over the next 22-25-29-33-39-43 sts, finish with P 7, on next row work Lace pattern 1 over these 7 sts. ASSEMBLY: Sew shoulder seams – the 7 sts in garter st along the neck on back piece is sewn to Lace pattern on front piece. |
|
Have you made this or any other of our designs? Tag your pictures in social media with #dropsdesign so we can see them! Do you need help with this pattern?You'll find tutorial videos, a Comments/Questions area and more by visiting the pattern on garnstudio.com. © 1982-2024 DROPS Design A/S. We reserve all rights. This document, including all its sub-sections, has copyrights. Read more about what you can do with our patterns at the bottom of each pattern on our site. |
With over 40 years in knitting and crochet design, DROPS Design offers one of the most extensive collections of free patterns on the internet - translated to 17 languages. As of today we count 304 catalogs and 11422 patterns - 11417 of which are translated into English (US/in).
We work hard to bring you the best knitting and crochet have to offer, inspiration and advice as well as great quality yarns at incredible prices! Would you like to use our patterns for other than personal use? You can read what you are allowed to do in the Copyright text at the bottom of all our patterns. Happy crafting!
Comments / Questions (42)
Marianne Billgren wrote:
Fråga 1: hur kan man få 23 maskor mellan markörerna när det är 188 maskor totalt? Fråga 3: vad menas med växelvis intag?
20.03.2023 - 12:29DROPS Design answered:
Hei Marianne. Svar 1) Du skal sett 8 merketråder med ca 23 masker i mellom, så for at det skal gå opp, må du telle 24 noen steder. F.eks: Tell 23 masker, sett 1. merke, tell 24 (47), sett 2. merke, tell 23 (70), sett 3. merke, tell 24 (94), sett 4. merke, tell 23 (117), sett 5. merke, tell 24 (141), sett 6. merke, tell 23 (164), sett 7. merke, tell 24 (188), sett 8. merke. Svar 2). Først fell på høyre side av merketråden, neste gang det skal felles, skal det felles på venstre side av merketråden, så neste gang det skal felles, skal det felles på høyre side av merketråden osv osv. mvh DROPS Design
20.03.2023 - 14:37Michaelle wrote:
Bonjour, J'aimerais savoir la robe comporte la dentelle ajourée au niveau de l'encolure dans le dos? Si non on a donc bien un coté du point ajouré des devants cousu avec du point jersey du dos... Merci
28.07.2022 - 19:45DROPS Design answered:
Bonjour Michelle, il n'y a pas la dentelle ajourée au niveau de l'encolure dans le dos. Bon tricot!
29.07.2022 - 08:46Michaelle wrote:
Bonjour, Malgré les explications données le 09/19, je ne comprends toujours pas les points ajourés Rang 1 (end) : rang 1 du point Ajouré1 , jersey, 7 m end Rang 2(env) : rang 1 du point Ajouré2 , jersey, rang 2 du point Ajouré1 Rang 3 (end) : rang 2 du point Ajouré2 , jersey, rang 3 Ajouré1 Rang 4 (env) : rang 3 du point Ajouré2 , jersey, rang 4 du point Ajouré 1 Rang 5 (end) : rang 4 du point Ajouré2 , jersey, rang 1 Ajouré1 etc... Merci
09.03.2022 - 09:22DROPS Design answered:
Bonjour Michaelle, au 1er rang, tricotez: le rang 1 du point ajouré 1, jersey jusqu'à la fin du rang; au 2ème rang: rang 1 du point ajouré-2, jersey et rang 2 du point ajouré -1, et continuez ainsi, avec un décalage des rangs du point ajouré-1 et -2 de sorte qu'ils soient tricotés comme indiqué sur l'endroit et/ou sur l'envers. Bon tricot!
09.03.2022 - 18:34Anna wrote:
Bonjour, que signifie dans la partie dos et devant :"diminuer 1 m alternativement à gauche et à droite des marqueurs "? Est ce que ça veut dire diminuer le 1er marqueur à gauche, le 2e à droite, le 3e à gauche. ..puis 8 cm plus haut, le 1er marqueur à gauche, le 2e à droite, le 3 e a gauche ....Merci pour votre aide ! Magnifique robe que je viens tout juste de commencer !
31.07.2020 - 19:10DROPS Design answered:
Bonjour Anna et merci. On diminue 8 mailles par tour, autrement dit, on va d'abord diminuer à gauche de chaque marqueur (= après les marqueurs) puis la fois suivante, on diminue à droite (= avant les marqueurs) et on continue ainsi, une fois après, une fois avant. Bon tricot!
03.08.2020 - 07:33Josée Dessureault wrote:
Bonjour, ne ne comprend pas les points ajourés au niveau de l’encolure. Fait-on le point ajouré 1 endroit sur le point ajouré envers 1 et le 2 envers sur le 2 endroit ou on doit alterner. Les points 1 sont-ils tous à droite et les points 2 à gauche? Merci!
28.09.2019 - 18:29DROPS Design answered:
Bonjour Mme Dessureault, le point ajouré-1 se tricote en début de rang sur l'endroit et en fin de rang sur l'envers pour le devant droit. Le point ajouré-2 se tricote en début de rang sur l'envers et en fin de rang sur l'endroit sur le devant gauche. Mettez un marqueur à 7 m du bord côté encolure et tricotez le point ajouré -1 ou -2 en fonction du devant droit ou gauche. Bon tricot!
30.09.2019 - 09:50Marina wrote:
Hallo. Ich habe ein Problem. Lese die Anleitung für Große L. Wenn ich 204 M anschlagen soll, dann mit 25 M. abstand 8 Markierungen einziehen soll (=200 M), sind 4 M übrig geblieben. Ich vermute, dass die die Seitenmashen von Rücken - und Vorderteil sind (1 M pro Seite?). Danke
08.08.2018 - 12:15DROPS Design answered:
Liebe Marina, danke für den Hinweis, unser Designteam wird die Anleitung mal schauen. Danke im voraus für Ihren Geduld. Viel Spaß beim stricken!
08.08.2018 - 13:25Petra De Vries wrote:
Hallo, ik heb problemen met het kantpatroon. Moet ik 1 en 2 aan het begin en het eind breien? Ik raak dan een naald kwijt (naald 2 van kantpatroon1) en ik kom uit dat naald 4 een beginnaald is. Moet ik dan een naald averecht of zo er tussen breien? Met vriendelijke groet Petra
14.06.2017 - 16:11DROPS Design answered:
Hoi Petra, Als je het achterpand voor je hebt liggen met de goede kant naar voren, begin je aan de rechterkant met naald 1 van kantpatroon 1, dan brei je trictotsteek en en de laatste 7 steken brei je recht. Keer het werk en begin met naald 1 van kantpatroon 2. Aan het eind van die naald (je bent dus nu aan de verkeerde kant van het werk) brei je naald 2 van kantpatroon 1. En zo ga je steeds verder. Hopelijk is het zo duidelijk. Anders vraag je maar weer. Veel breiplezier!
17.06.2017 - 21:06Liv Reidun Holstad wrote:
Hei, Får ikke mønsteret til å stemme i oppskriften på denne kjolen. Har delt til for og bakstykke og skal strikke blomstermønsteret, men slik jeg tolker oppskriften så får jeg riller bare på ene siden på bakstykket? Tolker jeg oppskriften galt eller er det feil i mønsteret? Jeg begynte med blomstermønster 1, 1 p., så blomstermønster 2 på 2.p, slik gikk jeg vekselvis på blomstermønster 1(retten) og 2(vrangen) Takknemlig for svar Mvh Liv Reidun
18.05.2015 - 14:47DROPS Design answered:
Hej, Du starter med bondemønster 1 i den ene side strikker glatstrik og afslutter med 7 m ret. Når du starter pinden i den anden side strikker du første p af blondemønster 2 over de første 7 m, så vrang til du har 9 m tilbage og så strikker du 2.p i blondemønster 1. osv. God fornøjelse!
20.05.2015 - 15:55Saskia wrote:
Ich glaube ihr habt einen Übersetzungsfehler in Reihe 3 vom Spitzenmuster 2, zumindest habe ich erst verstanden was gemeint ist, als ich mir die englische Anleitung durchgelesen habe.
11.07.2014 - 21:09DROPS Design answered:
Liebe Saskia, danke für den Hinweis, ja da ist etwas durcheinander geraten, das wird sofort behoben! Weiter gutes Gelingen!
14.07.2014 - 21:03Seyen wrote:
The Body Pattern - Work 4 rounds in GARTER ST - see explanation above. There are 2 explanation for Garter ST, which one should I follow? Please advice.Thanks
04.06.2014 - 21:18DROPS Design answered:
Dear Mrs Seyen, since you are working body in the round, you will work as follows: K1 round, P1 round, K1 round, P1 round (= 4 rounds in garter st = 2 ridges in garter st). Happy knitting!
05.06.2014 - 09:23