
Popular categories
Looking for a yarn?


|
|
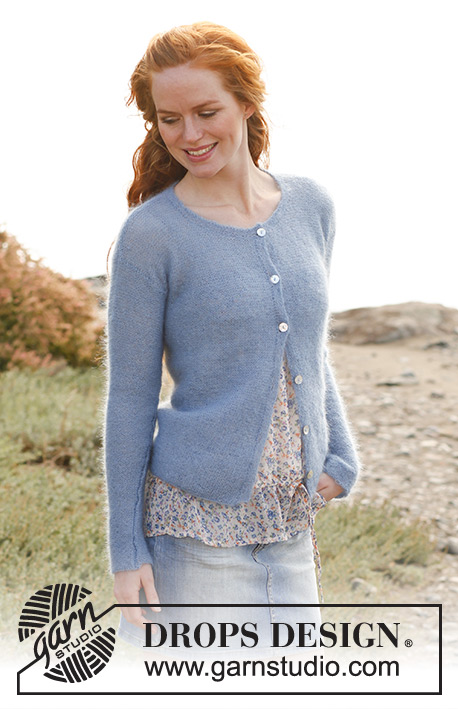
Morning Sky |
|
 |
 |
Knitted DROPS jacket in garter st in ”Kid-Silk”. Size S-XXXL.
DROPS 138-21 |
|
|
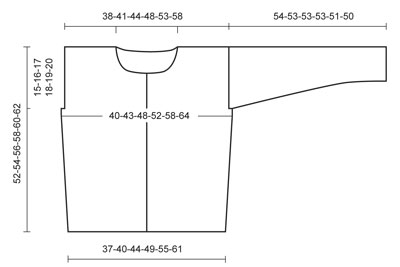
GARTER ST (back and forth on needle): K all rows. INCREASE TIP: Inc 1 st on each side of every marker as follows: Work until 1 st remains before marker, make 1 YO, K 2 (marker is between these sts), make 1 YO. On next row K YOs twisted (i.e. work in back loop of st instead of front) to avoid holes. -------------------------------------------------------- BODY: Worked in garter st - See explanation above - back and forth on circular needle from mid front. Cast on 168-184-204-224-252-280 sts on circular needle size 3 mm with 2 threads Kid-Silk (to avoid a tight cast on edge). Then work back and forth with 1 thread Kid-Silk (1st row = RS). REMEMBER THE KNITTING TENSION! When piece measures 6-6-6-6-7-7 cm, insert 2 markers in the piece; 42-46-51-56-63-70 sts in from each side (= 84-92-102-112-126-140 sts between markers on back piece). Move the markers upwards when working. On next row, inc 1 st on each side of each marker - Read INCREASE TIP above = 4 new sts. Repeat inc every 8-8-8-9-9-9 cm a total of 4 times = 184-200-220-240-268-296 sts. Continue to work until piece measures 37-38-39-40-41-42 cm. On next row cast off 2-3-4-5-6-7 sts for armholes on each side of every marker = 4-6-8-10-12-14 cast off sts in each side. Now divide the piece and finish each part separately. BACK PIECE: = 88-94-102-110-122-134 sts. Remove the markers in the sides and insert new markers at beg and end of row (where to knit up sleeves later). Continue in garter st until piece measures 50-52-54-56-58-60 cm. On next row from RS, cast off the middle 32-36-38-40-42-42 sts for neck and finish each shoulder separately. Continue to cast off 2 sts on next row from neck = 26-27-30-33-38-44 sts remain on the shoulder. Loosely cast off all sts when piece measures 52-54-56-58-60-62 cm. RIGHT FRONT PIECE: = 44-47-51-55-61-67 sts. Insert a marker at end of row (where to knit up sleeves later). Continue in garter st until piece measures 44-46-47-49-50-52 cm. Then cast off for neck at the beg of every row from RS (= every other row) as follows: Cast off 8-10-12-12-14-14 sts 1 time, 3 sts 1 time, and 2 sts 2 times. Then cast off 1 st every other row from RS (= every 4th row) 3-3-2-3-2-2 times = 26-27-30-33-38-44 sts remain on shoulder. Loosely cast off all sts when piece measures 52-54-56-58-60-62 cm. LEFT FRONT PIECE: Work as right front piece but reversed. ASSEMBLY: Sew the shoulder seams tog. SLEEVE: Worked back and forth on needle as follows: Knit up from RS approx. 70 to 100 sts between markers along one armhole (NOTE: Do not knit up sts over the cast off sts for armhole). On next row adjust no of sts to 68-74-78-82-86-92. Then work in garter st. When piece measures 3-3-3-3-4-4 cm, dec 1 st (by K 2 sts tog) in each side of piece. Repeat dec every 4-3½-3-3-2½-2 cm a total of 12-14-15-16-17-19 times = 44-46-48-50-52-54 sts. Continue in garter st until piece measures 54-53-53-53-51-50 cm (shorter measurements in the larger sizes because of broader shoulder width), loosely cast off all sts. Sew sleeve seam inside 1 edge st, NOTE: The top part of the sleeve should be sewn to the cast off edge on each side of back and front piece. Knit up another sleeve in the other side of piece. RIGHT BAND: Worked back and forth on needle as follows: Knit up from RS approx. 100 to 120 sts inside 1 edge st along mid front on right front piece. K 1 row from WS while AT THE SAME TIME adjusting no of sts to 104-109-109-118-118-118. On next row from RS, cast off for 5-5-5-6-6-6 button holes as follows: K 4, * K tog the next 2 sts, make 1 YO, K 18-19-19-17-17-17 *, repeat from *-* a total of 5-5-5-6-6-6 times. On next row K the YOs. Continue in garter st until band measures 2-2-2-3-3-3 cm, loosely cast off all sts. LEFT BAND: Work as right band but without button holes. NECK EDGE: Worked back and forth on needle as follows: Knit up from RS approx. 90 to 110 sts around the neck (also over bands). K 1 row from WS while AT THE SAME TIME adjusting no of sts to 92-96-100-104-108-112. On next row from RS, cast off for the last button hole as follows: K 3-3-3-4-4-4, K tog the next 2 sts, make 1 YO, K the rest of row. On next row K the YO. Continue in garter st until neck edge measures 2 cm, loosely cast off all sts. Sew the buttons on to the left band. |
|
|
|
|
Have you made this or any other of our designs? Tag your pictures in social media with #dropsdesign so we can see them! Do you need help with this pattern?You'll find tutorial videos, a Comments/Questions area and more by visiting the pattern on garnstudio.com. © 1982-2024 DROPS Design A/S. We reserve all rights. This document, including all its sub-sections, has copyrights. Read more about what you can do with our patterns at the bottom of each pattern on our site. |
|


With over 40 years in knitting and crochet design, DROPS Design offers one of the most extensive collections of free patterns on the internet - translated to 17 languages. As of today we count 304 catalogues and 11422 patterns - 11422 of which are translated into English (UK/cm).
We work hard to bring you the best knitting and crochet have to offer, inspiration and advice as well as great quality yarns at incredible prices! Would you like to use our patterns for other than personal use? You can read what you are allowed to do in the Copyright text at the bottom of all our patterns. Happy crafting!
Comments / Questions (86)
Hello I can\'t really think or see how to pick up for the sleeves .all I can see is there will be a big hole if not picking up over the hole lot
02.04.2019 - 05:37DROPS Design answered:
Dear Susan, the cast off stitches for armhole on front and back pieces will then be sewn along the first rows on sleeve - this video is showing how to sew a sleeve worked that way, and even if this pattern is worked a bit different, you can see how the seam will be done afterwards. Happy knitting!
02.04.2019 - 10:59Na 3 dagen nog geen reactie! Heb het ondertussen zelf uitgezocht door op de Engelse sit3 het patroon te lezen en kwam erachter dat niet 1x11 maar 1x14 steken afgekant moeten worden. Ergo: het verschil van 3 steken. Niet bedankt voor de hulp!
21.03.2019 - 14:51Betreft voorpand. Je begint met 67 steken en kant af 1x11 St. + 1x3 St. + 2x2 St. en 2x1 St. Totaal afgekant 20 steken. 67 - 20 = 47 steken over en geen 44. Klopt dit wel?
18.03.2019 - 11:58DROPS Design answered:
Dag Annie,
Bedankt voor de terugkoppeling in je andere bericht en ik heb het nu gecorrigeerd.
25.03.2019 - 09:50Oksana wrote:
The description says Knit up from RS ..... along one armhole and then - Do not knit up sts over the cast off sts for armhole... Can you please explain what the last line is to specify. thanks!
18.10.2018 - 18:21DROPS Design answered:
Dear Oksana, you will start picking up the sts for the sleeve from the marker added on back piece (right sleeve) / left front piece (left sleeve) to the marker added on right front piece (right sleeve)/ back piece (left sleeve) and work 3-4 cm (see size) then start to decrease for the sleeve. These 3-4 cm worked straight will then be sewn together to the sts bound off on body for the armholes. Happy knitting!
19.10.2018 - 08:36Merci beaucoup pour votre réponse. J'ai une autre question, pourquoi ne faut il pas relever de mailles au dessus des mailles rabattues pour l'emmanchure ? Dans ce cas on ne peut pas relever les mailles de marqueur à marqueur ? Merci d'avance pour votre aide !
16.10.2018 - 10:00DROPS Design answered:
Bonjour Mme Sabatier, on ne relève pas de mailles pour les manches le long des mailles rabattues pour les emmanchures, on va ensuite coudre les premiers rangs de la manche contre ces mailles rabattues - les mailles des manches sont relevées le long de l'emmanchure (dos + devant ou devant + dos) entre les marqueurs placés sur le dos/les devants. Bon tricot!
16.10.2018 - 15:29Bonjour, Je ne comprends pas comment réaliser les manches .Faut il commencer par coudre les épaules ? Comment relever 70 à 100 mailles entre les marqueurs car il n'y a pas beaucoup d'espace entre eux ? Serait-il possible d'avoir un petit shéma d'explication ? En vous remerciant par avance pour votre réponse Catherine Sabatier
15.10.2018 - 20:37DROPS Design answered:
Bonjour Mme Sabatier, faites la couture des épaules en premier, puis, en commençant à l'un des marqueurs (dos pour la manche droite par ex. = sur l'endroit), relevez les mailles de la manche jusqu'au marqueur du devant = environ 70-100 m. Au rang suivant, ajustez le nombre de mailles à celui indiqué pour votre taille. Bon tricot!
16.10.2018 - 09:09Ginny wrote:
Which yarn is more suitable for substituting kid-silk in this pattern, Lace or Alpaca ? Also, this pattern says the required needle is 3 when the instructions for this yarn (for the same gauge) suggest 3,5 .
01.04.2018 - 16:30DROPS Design answered:
Dear Ginny, if you look for a really light, almost featherweight sweater, I would suggest to try the Drops Lace yarn, which is more alike (in its length/ 50 grams), than the Alpaca, however neither will give you the lovely halo effect Kid Silk would. As for gauge, since everybody knits slightly differently, we always suggest you make a swatch, wash it, check its size and stitch count and adjust your needle size accordingly. Happy Knitting!
01.04.2018 - 18:52Würde denn aber die Gefahr bestehen, dass die Wolle dann nicht mehr so schön "fluffig" aussieht?
06.09.2017 - 10:23DROPS Design answered:
Liebe Sarah, das können Sie mit Ihrem Maschenprobe mal versuchen, so haben Sie eine Idee wie Sie am besten machen Sollen. Errinern Sie sich, daß Ihr DROPS Laden Ihnen gerne weiter helfen kann, auch per Mail or Telefon. Viel Spaß beim stricken!
06.09.2017 - 11:19Würde denn aber die Gefahr bestehen, dass die Wolle dann nicht mehr so schön "fluffig" aussieht?
05.09.2017 - 09:21Hallo, und vielen Dank für die Hilfe. Noch eine Frage: in der Anleitung steht nichts zum feuchten Spannen der Jacke. Empfiehlt sich das bei der Mohairwolle nicht? Vielen Dank schon einmal für die Antwort.
04.09.2017 - 19:15DROPS Design answered:
Liebe Frau Adler, dies hängt von jeder Strickerin ab, einige spannen jedes Strickstück und andere nicht. Gerne können Sie das mit Ihrem DROPS Laden besprechen. Viel Spaß beim stricken!
05.09.2017 - 08:25