
Popular categories
Looking for a yarn?


|
|
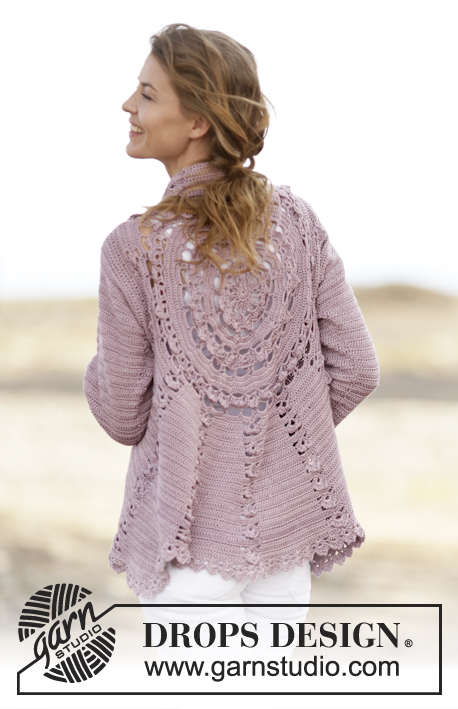
Summer Circle |
|
 |
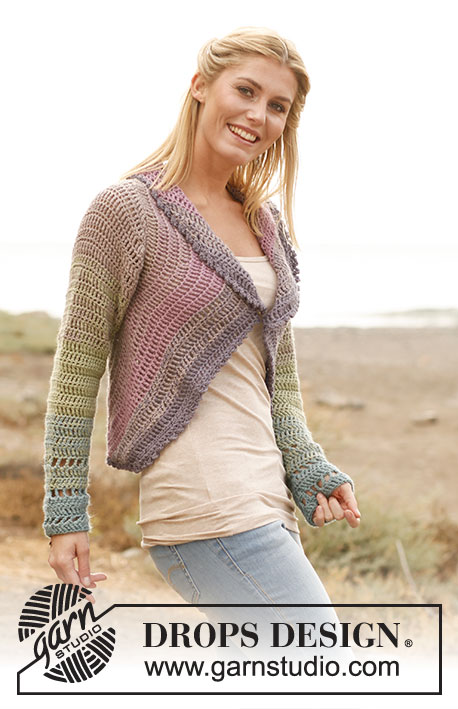 |
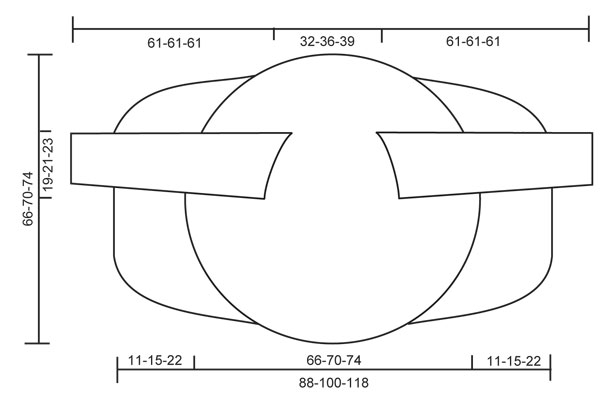
Crochet DROPS jacket worked in a circle in 2 strands ”BabyAlpaca Silk”. Size: S - XXXL.
DROPS 136-1 |
|
|
STRIPES: BODY: Beg with 2 strands light sea green. Then work 3-3-4 rounds with each of the following colors: Stripe 1: 2 strands light sea green, Stripe 2: 1 strand light sea green and 1 strand pistachio Stripe 3: 2 strands pistachio Stripe 4: 1 strand pistachio and 1 strand light gray purple Stripe 5: 2 strands light gray purple, Stripe 6: 1 strand light old pink and 1 strand light gray purple Stripe 7: 2 strands light old pink, Stripe 8: 1 strand light old pink and 1 strand gray purple Stripe 9 until finished measurements: 2 strands gray purple SLEEVE: Worked in stripes. Work sleeve cap as 5th-5th-4th stripe, then work 12 cm / 4¾" as stripe 4-4-3, 12 cm / 4¾" as stripe 3-3-2, 12 cm / 4¾" as stripe 2-2-1, and work as stripe 1 until finished measurements. CROCHET TIP: Replace first tr on every round/row with ch 4. DECREASE TIP 1 (applies to the body): Dec as follows: Work tr until 3 tr remain, * in the first of these work 1 dc, in the next 1 hdc and in the last 1 sc, turn with ch 1, skip sc, work 1 sl st in hdc and 1 sl st in dc, then 1 sc in first tr, 1 hdc in next tr and 1 dc in next tr, work tr until 3 tr remain at end of row *, repeat from *-* until a total of 6-8-12 rows have been worked. DECREASE TIP 2 (applies to sleeve): Dec at beg of row by working sl st over the no of tr to be dec. Dec at end of row by working until same no of tr to be dec remains, turn piece. -------------------------------------------------------- BODY: Worked in the round in a circle from mid back with 2 strands BabyAlpaca Silk and STRIPES – see explanation above. Ch 8 on hook size 5 mm / H/8 and form a ring with 1 sl st in first ch. ROUND 1: Work 12 sc in ch-ring, finish with 1 sl st in first sc. ROUND 2: 5 ch (= 1 dc + 2 ch), * 1 dc in next sc, 2 ch *, repeat from *-* the entire round and finish with 1 sl st in 3rd ch from beg of round = 12 dc with 2 ch between each. ROUND 3: READ CROCHET TIP! 1 tr, 2 tr in same dc, * 1 tr in ch-space, 3 tr in next dc *, finish with 1 tr in the last ch-space and 1 sl st in 4th ch from beg of round = 48 tr. ROUND 4: 1 tr, * 2 tr in next tr, 1 tr in next tr *, repeat from *-* and finish with 2 tr in next tr and 1 sl st in 4th ch from beg of round = 72 tr. ROUND 5: 1 tr, * 2 tr in next tr, 1 tr in each of the next 2 tr * repeat from *-* and finish with 2 tr in next tr, 1 tr in next tr and 1 sl st in 4th ch = 96 tr. ROUND 6: 5 ch (= 1 dc + 2 ch), * skip 1 tr, 1 dc in next tr, ch 2 *, repeat from *-* the entire round and finish with 1 sl st in 3rd ch from beg of round = 48 ch-spaces. ROUND 7: Work 1 tr in every dc and work 1 and 2 tr alternately in every ch-space the entire round = 120 tr. ROUND 8: Work 1 tr in every tr but work 2 tr in every 10th tr = 132 tr. ROUND 9: 5 ch (= 1 dc + 2 ch), * skip 1 tr, 1 dc in next tr, ch 2 *, repeat from *-* the entire round and finish with 1 sl st in 3rd ch from beg of round = 66 ch-spaces. ROUND 10: Work 1 tr in every dc and work 1 and 2 tr alternately in every ch-space the entire round = 165 tr. ROUND 11: Work 1 tr in every tr but work 2 tr in every 15th tr = 176 tr. ROUND 12: Work 1 tr in every tr but work 2 tr in every 16th tr = 187 tr. Piece measures approx. 20 cm / 8" from the middle and outwards. SIZE S/M: ROUND 13: ch 1, then work 1 sc in each of the first 45 tr (= up towards neck), ch 30 loosely, skip the next 27 tr (= armhole), then work 1 sc in each of the next 88 tr (= down towards back), ch 30 loosely, skip the next 27 tr (= armhole) and fasten with 1 sl st in first sc on round. ROUND 14: Work 1 tr in every sc - but inc 2 tr evenly over the first 45 sc (= 47 tr), then work 30 tr in ch-row over armhole, work 1 tr in every sc – but inc 3 tr evenly over the bottom 88 sc (= 91 tr), work 30 tr in ch-row over armhole and fasten with 1 sl st in 4th ch = 198 tr. ROUND 15 to 19: Continue with tr – while at the same time inc 6 tr evenly on every round. After 19th round there are 228 tr on the round and piece measures approx. 33 cm / 13" from the middle and outwards. Continue working only over 79 tr in each side – i.e. do not work over 35 tr at top by neck and 35 tr at bottom of back. Cut the yarn. Continue with explanation below for front piece. SIZE L/XL: ROUND 13: Work 1 tr in every tr but work 2 tr in every 17th tr = 198 tr. ROUND 14: 1 ch, then work 1 sc in each of the first 50 tr (= up towards neck), ch 32 loosely, skip the next 29 tr (= armhole), then work 1 sc in each of the next 90 tr (= down towards back), ch 32 loosely, skip the next 29 tr (= armhole) and fasten with 1 sl st in first sc on round. ROUND 15: Work 1 tr in every sc - but inc 3 tr evenly over the first 50 sc (= 53 tr), then work 32 tr in ch-row over armhole, work 1 tr in every sc – but inc 3 tr evenly over the bottom 90 sc (= 93 tr), work 32 tr in ch-row over armhole and fasten with 1 sl st in 4th ch = 210 tr. ROUND 16 to 20: Continue with tr – while at the same time inc 6 tr evenly on every round. After 20th round there are 240 tr on the round and piece measures approx. 35 cm / 13¾" from the middle and outwards. Continue working only over 81 tr in each side – i.e. do not work over 39 tr at top by neck and 39 tr at bottom of back. Cut the yarn. Continue with explanation below for front piece. SIZE XXL/XXXL: ROUND 13: Work 1 tr in every tr but work 2 tr in every 17th tr = 198 tr. ROUND 14: Work 1 tr in every tr but work 2 tr in every 18th tr = 209 tr. ROUND 15: 1 ch, then work 1 sc in each of the first 54 tr (= up towards neck), ch 36 loosely, skip the next 32 tr (= armhole), then work 1 sc in each of the next 91 tr (= down towards back), ch 36 loosely, skip the next 32 tr (= armhole) and fasten with 1 sl st in first sc on round. ROUND 16: Work 1 tr in every sc - but inc 2 tr evenly over the first 54 sc (= 56 tr), then work 36 tr in ch-row over armhole, work 1 tr in every sc – but inc 3 tr evenly over the bottom 91 sc (= 94 tr), and work 36 tr in ch-row over armhole = 222 tr. ROUND 17 to 22: Continue with tr – while at the same time inc 6 tr evenly on every round. After 22nd round there are 258 tr on the round and piece measures approx. 37 cm / 14½" from the middle and outwards. Continue working only over 89 tr in each side – i.e. do not work over 40 tr at top by neck and 40 tr at bottom of back. Continue with explanation below front piece. LEFT FRONT PIECE - ALL SIZES: = 79-81-89 tr. Insert a marker after 23-24-27 sts in from each side (= 33-33-35 sts between markers). Then work tr back and forth over these sts while at the same time inc 1 st at every marker on every row (i.e. inc 2 sts on row, inc alternately before and after marker) and dec 3 sts at end and beg of every row in each side – SEE DECREASE TIP 1 until a total of 6-8-12 rows back and forth have been worked = 55-49-41 tr. RIGHT FRONT PIECE: Work same way as on left piece over 79-81-89 tr in right side. SLEEVE: Worked back and forth from sleeve cap and down with 2 strands BabyAlpaca Silk and STRIPES – see explanation above. Ch 28-34-38 with stripe 5-5-4. Turn and work 1 tr in 5th ch from hook ( = 2 tr), then work 1 tr in every ch = 25-31-35 tr. ROW 2: Work ch 4, 3 tr in first tr, 1 tr in each of the next 23-29-33 tr, 4 tr in the last tr = 31-37-41 tr. Turn. ROW 3, 4 and 5: Work ch 4, 2 tr in first tr, 1 tr in every tr until 1 tr remains, 3 tr in the last tr = 43-49-53 tr. Turn. ROW 6: Work ch 4, 3 tr in first tr, 1 tr in each of the next 41-47-51 tr, 4 tr in the last tr = 49-55-59 tr. Turn. Switch to stripe 4-4-3 here. Then work tr on all rows until piece measures 17-15-15 cm / 6¾"-6"-6". Continue with tr while AT THE SAME TIME dec as follows in each side: SIZE S/M: * Work 1 row where dec 1 tr in each side - see Decrease tip. Work 1 row without dec. Work 1 row where dec 1 tr in each side. Work 2 rows without dec *, repeat from *-* a total of 3 times = 12 dec = 37 tr. SIZE L/XL + XXL/XXXL: * Work 1 row where dec 1 tr in each side - see Decrease tip. Work 1 row without dec *, repeat from *-* a total of 8 times = 16 dec = 39-43 tr. Continue to work as follows: ROW 1: 1 tr in every tr. ROW 2: 6 ch (= 1 tr + ch 2), skip 1 tr, 1 tr in next tr, * ch 2, skip 1 tr, 1 tr in next tr *, repeat from *-* the entire row = 18-19-21 ch-spaces. ROW 3: Work 1 tr in every tr and 1 tr in every ch-space = 37-39-43 tr. Repeat rows 1 to 3 a total of 3 times, sleeve measures approx. 61-61-61 cm / 24"-24"-24". Fasten off. ASSEMBLY: Sew sleeve seams tog edge to edge to avoid a chunky seam. Work 1 round around the entire body and at bottom of sleeves as follows with 2 strands gray purple: 1 sl st, * ch 5, 1 dc in first ch, skip 1 st, fasten with 1 sc in next st *, repeat from *-* the entire round and finish with 1 sl st in first ch. Sew in the sleeves. |
|
|
|
|
Have you made this or any other of our designs? Tag your pictures in social media with #dropsdesign so we can see them! Do you need help with this pattern?You'll find tutorial videos, a Comments/Questions area and more by visiting the pattern on garnstudio.com. © 1982-2024 DROPS Design A/S. We reserve all rights. This document, including all its sub-sections, has copyrights. Read more about what you can do with our patterns at the bottom of each pattern on our site. |
|


With over 40 years in knitting and crochet design, DROPS Design offers one of the most extensive collections of free patterns on the internet - translated to 17 languages. As of today we count 304 catalogs and 11422 patterns - 11417 of which are translated into English (US/in).
We work hard to bring you the best knitting and crochet have to offer, inspiration and advice as well as great quality yarns at incredible prices! Would you like to use our patterns for other than personal use? You can read what you are allowed to do in the Copyright text at the bottom of all our patterns. Happy crafting!
Comments / Questions (191)
Hej, Jag får inte det att stämma färgmässigt? På ärmarna säger mönstret en sak men bilden visar andra färger än vad mönstret säger?
10.07.2013 - 09:31DROPS Design answered:
Det finns en rättelse til färgerna på mönstret!
04.10.2013 - 10:18Je l'ai fait mais en version plus longue ,pour avoir plus chaud..
03.04.2013 - 12:41Après la couleur de la rayure 6 pour la manche,dans quel ordre fait-on les rayures ? merci.
20.03.2013 - 21:43DROPS Design answered:
Bonjour Madame Le Bren, après les 6 premiers rangs de la manche, on continue avec la rayure 4-4-3 (cf début du modèle). La correction a été faite, merci. Bon crochet !
25.03.2013 - 10:24Stricke gerade am "Summer circle" und komme bei der Anleitung linkes Vorderteil nich klar.Was bedeutet, bei der 3. Zeile das "abwechslungsweise", "(d.h.pro R. je + 2 M., abwechselungsweise vor und nach der Markierung aufnehmen)? heisst es bei der erster Markierung vor, bei der zweite nach? oder heisst es beim hinhäckeln vor der Marlierung, beim zurückhäckel, nach der Marlierung?. Sollen alle zugenommen Maschen aufeinander kommen oder eben nicht? Kann mich jemand helfen? Ich danke im voraus
24.01.2013 - 09:56DROPS Design answered:
Liebe Josianne, es gibt 2 Markierungen und in einer R wird je 1 M pro Markierung VOR der Markierung aufgenommen und in der nächsten R je 1 M NACH jeder der beiden Markierungen.
24.01.2013 - 11:36Bij mouw. Staat bij toer 6. Ga verder met streep 6-6-5. Dit is verwarrend want als je gewoon het streeppatroon dat bij de mouw staat aanhoudt komt het wel goed. Mijn advies; weghalen dit stukje!!!
02.12.2012 - 11:52DROPS Design answered:
Het is een fout in de Nederlandse vertaling. Het moet zijn: Ga verder met streep 4-4-3. Ik heb het aangepast. Bedankt voor de reactie.
05.12.2012 - 12:35Jag får inte maskantalet att stämma för vänster respektive framstycke om endast 6 varv ska virkas och minskning av antalet maskor påbörjas i slutet av varv nr 1 enligt avmasknkngstips 1. Det blir fler än 55 maskor efter varv 6 i stl s/m. Förtydligande ang detta, tack.
17.09.2012 - 21:28DROPS Design answered:
Jo du tager 2 m ud 6 gange og du tager (3x)= 18 m ind i hver side 2 gange = 79+(2x6)-(2x18) = 55 m
04.12.2012 - 14:33Op 27/3 is het patroon aangepast. Echter, ik kom nu niet uit met de hoeveelheid garen (de hoeveelheden zijn waarschijnlijk niet aangepast) en als ik de foto van het model goed bekijk, moet streep 8 toch echt 1 draad licht grijs/paars (1760) en 1 draad grijs/paars (4314) zijn. Zou u mij kunnen laten weten wat correct is?
04.06.2012 - 20:55DROPS Design answered:
Hoi Saskia. Het patroon klopt. De hoeveelheden zijn op 12 maart aangepast tot de aantallen, die nu in het patroon staat. De streep 8 moet ook oudroze met grijs/paars zijn.
05.06.2012 - 20:27Minua ihmetyttää etukappaleen lisäykset, miksi ne täytyy tehdä ennen ja jälkeen merkkilangan? Miksi lisäystä ei tehdä joka kierroksella samaan kohtaan, eli merkkilangan kohdalle?
17.05.2012 - 22:30DROPS Design answered:
Kun lisäykset tehdään vuorotellen merkkilangan vasemmalla ja oikealla puolella, työstä tulee siistimpi ja tasaisempi.
21.05.2012 - 14:13Loreto Sims wrote:
Tendrán el diagrama para crochet??
05.05.2012 - 22:10Loreto Sims wrote:
Quería preguntarles si tienen el diagrama (dibujo) que describe el trabajo a crochet para este chaleco, gracias y está precioso
05.05.2012 - 22:09DROPS Design answered:
Hola Loreto! Lo sentimos, este modelo no tiene el diagrama que pides.
06.05.2012 - 02:47