DROPS BabyAlpaca Silk
70% Alpaca, 30% Silk
Discontinued
find alternatives
DROPS SS24

Summer Circle

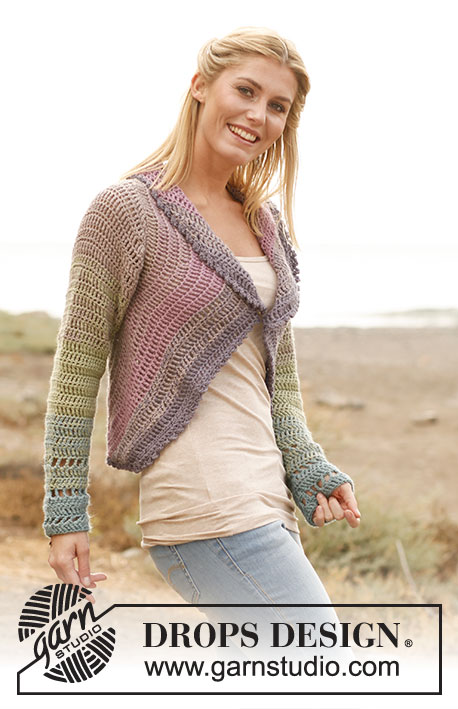
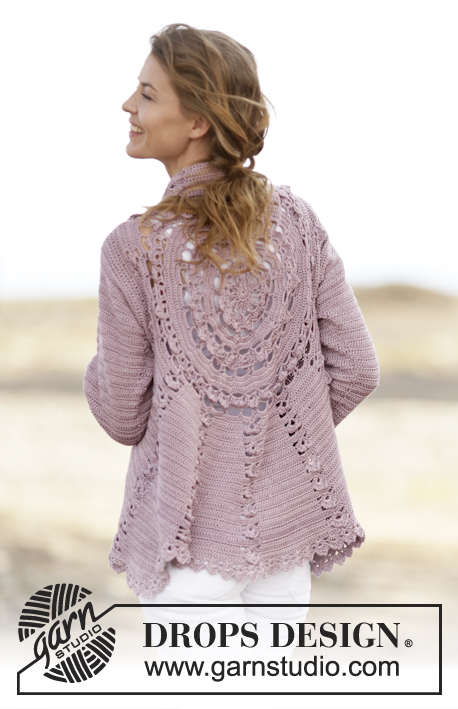
Crochet DROPS jacket worked in a circle in 2 threads ”BabyAlpaca Silk”. Size: S - XXXL.

DROPS 136-1
DROPS design: Pattern no BS-011
Yarn group A
--------------------------------------------------------
Size: S/M - L/XL - XXL/XXXL
To fit chest measurements: 80/88 – 92/100 – 110/118 cm

Materials: DROPS BABYALPACA SILK from Garnstudio
200-250-250 g colour no 7219, pistachio
150-200-200 g colour no 7402, light sea green
150-200-200 g colour no 1760, light grey purple
100-100-100 g colour no 3250, light old pink
100-100-100 g colour no 4314, grey purple

DROPS CROCHET HOOK SIZE 5 mm – or size needed to get 14 dtr x 5½ rows with dtr vertically with 2 threads = 10 x 10 cm.

-------------------------------------------------------

Alternative Yarn – See how to change yarns here
Yarn Groups A to F – Use the same pattern and change the yarn here
Yarn usage using an alternative yarn – Use our yarn converter here

-------------------------------------------------------

DROPS BabyAlpaca Silk
70% Alpaca, 30% Silk
Discontinued
find alternatives

Pattern instructions

NOTE: This pattern is written in British English. All measurements in charts are in cm. For conversion from cm to inches - click here. There are different terms for crocheting in British and American English. If this pattern includes crochet, click for "crochet terms" here. For this pattern in American English, please click here.
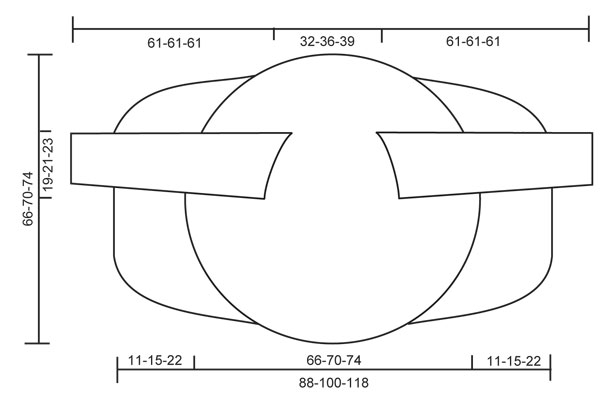
STRIPES:

BODY:
Beg with 2 threads light sea green.
Then work 3-3-4 rounds with each of the following colours:
Stripe 1: 2 threads light sea green,
Stripe 2: 1 thread light sea green and 1 thread pistachio
Stripe 3: 2 threads pistachio
Stripe 4: 1 thread pistachio and 1 thread light grey purple
Stripe 5: 2 threads light grey purple,
Stripe 6: 1 thread light old pink and 1 thread light grey purple
Stripe 7: 2 threads light old pink,
Stripe 8: 1 thread light old pink and 1 thread grey purple
Stripe 9 until finished measurements: 2 threads grey purple

SLEEVE:
Worked in stripes. Work sleeve cap as 5th-5th-4th stripe, then work 12 cm as stripe 4-4-3, 12 cm as stripe 3-3-2, 12 cm as stripe 2-2-1, and work as stripe 1 until finished measurements.

CROCHET TIP:
Replace first dtr on every round/row with 4 ch.

DECREASE TIP 1 (applies to the body):
Dec as follows: Work dtr until 3 dtr remain, * in the first of these work 1 tr, in the next 1 htr and in the last 1 dc, turn with 1 ch, skip dc, work 1 sl st in htr and 1 sl st in tr, then 1 dc in first dtr, 1 htr in next dtr and 1 tr in next dtr, work dtr until 3 dtr remain at end of row *, repeat from *-* until a total of 6-8-12 rows have been worked.

DECREASE TIP 2 (applies to sleeve):
Dec at beg of row by working sl st over the no of dtr to be dec. Dec at end of row by working until same no of dtr to be dec remains, turn piece.
--------------------------------------------------------
BODY:
Worked in the round in a circle from mid back with 2 threads BabyAlpaca Silk and STRIPES – see explanation above.
Crochet 8 ch on hook size 5 mm and form a ring with 1 sl st in first ch.
ROUND 1: Work 12 dc in ch-ring, finish with 1 sl st in first dc.
ROUND 2: 5 ch (= 1 tr + 2 ch), * 1 tr in next dc, 2 ch *, repeat from *-* the entire round and finish with 1 sl st in 3rd ch from beg of round = 12 tr with 2 ch between each.
ROUND 3: READ CROCHET TIP!
1 dtr, 2 dtr in same tr, * 1 dtr in ch-loop, 3 dtr in next tr *, finish with 1 dtr in the last ch-loop and 1 sl st in 4th ch from beg of round = 48 dtr.
ROUND 4: 1 dtr, * 2 dtr in next dtr, 1 dtr in next dtr *, repeat from *-* and finish with 2 dtr in next dtr and 1 sl st in 4th ch from beg of round = 72 dtr.
ROUND 5: 1 dtr, * 2 dtr in next dtr, 1 dtr in each of the next 2 dtr * repeat from *-* and finish with 2 dtr in next dtr, 1 dtr in next dtr and 1 sl st in 4th ch = 96 dtr.
ROUND 6:
5 ch (= 1 tr + 2 ch), * skip 1 dtr, 1 tr in next dtr, 2 ch *, repeat from *-* the entire round and finish with 1 sl st in 3rd ch from beg of round = 48 ch-loops.
ROUND 7:
Work 1 dtr in every tr and work 1 and 2 dtr alternately in every ch-loop the entire round = 120 dtr.
ROUND 8:
Work 1 dtr in every dtr but work 2 dtr in every 10th dtr = 132 dtr.
ROUND 9:
5 ch (= 1 tr + 2 ch), * skip 1 dtr, 1 tr in next dtr, 2 ch *, repeat from *-* the entire round and finish with 1 sl st in 3rd ch from beg of round = 66 ch-loops.
ROUND 10:
Work 1 dtr in every tr and work 1 and 2 dtr alternately in every ch-loop the entire round = 165 dtr.
ROUND 11:
Work 1 dtr in every dtr but work 2 dtr in every 15th dtr = 176 dtr.
ROUND 12:
Work 1 dtr in every dtr but work 2 dtr in every 16th dtr = 187 dtr.
Piece measures approx. 20 cm from centre and outwards.

SIZE S/M:
ROUND 13:
1 ch, then work 1 dc in each of the first 45 dtr (= up towards neck), work 30 loose ch, skip the next 27 dtr (= armhole), then work 1 dc in each of the next 88 dtr (= down towards back), work 30 loose ch, skip the next 27 dtr (= armhole) and fasten with 1 sl st in first dc on round.
ROUND 14:
Work 1 dtr in every dc - but inc 2 dtr evenly over the first 45 dc (= 47 dtr), then work 30 dtr in ch-row over armhole, work 1 dtr in every dc – but inc 3 dtr evenly over the bottom 88 dc (= 91 dtr), work 30 dtr in ch-row over armhole and fasten with 1 sl st in 4th ch = 198 dtr.
ROUND 15 to 19:
Continue with dtr – while at the same time inc 6 dtr evenly on every round. After 19th round there are 228 dtr on the round and piece measures approx. 33 cm from centre and outwards.
Continue working only over 79 dtr in each side – i.e. do not work over 35 dtr at top by neck and 35 dtr at bottom of back. Cut the thread.
Continue with explanation below front piece.

SIZE L/XL:
ROUND 13:
Work 1 dtr in every dtr but work 2 dtr in every 17th dtr = 198 dtr.
ROUND 14:
1 ch, then work 1 dc in each of the first 50 dtr (= up towards neck), work 32 loose ch, skip the next 29 dtr (= armhole), then work 1 dc in each of the next 90 dtr (= down towards back), work 32 loose ch, skip the next 29 dtr (= armhole) and fasten with 1 sl st in first dc on round.
ROUND 15:
Work 1 dtr in every dc - but inc 3 dtr evenly over the first 50 dc (= 53 dtr), then work 32 dtr in ch-row over armhole, work 1 dtr in every dc – but inc 3 dtr evenly over the bottom 90 dc (= 93 dtr), work 32 dtr in ch-row over armhole and fasten with 1 sl st in 4th ch = 210 dtr.
ROUND 16 to 20:
Continue with dtr – while at the same time inc 6 dtr evenly on every round. After 20th round there are 240 dtr on the round and piece measures approx. 35 cm from centre and outwards.
Continue working only over 81 dtr in each side – i.e. do not work over 39 dtr at top by neck and 39 dtr at bottom of back. Cut the thread.
Continue with explanation below front piece.

SIZE XXL/XXXL:
ROUND 13:
Work 1 dtr in every dtr but work 2 dtr in every 17th dtr = 198 dtr.
ROUND 14:
Work 1 dtr in every dtr but work 2 dtr in every 18th dtr = 209 dtr.
ROUND 15:
1 ch, then work 1 dc in each of the first 54 dtr (= up towards neck), work 36 loose ch, skip the next 32 dtr (= armhole), then work 1 dc in each of the next 91 dtr (= down towards back), work 36 loose ch, skip the next 32 dtr (= armhole) and fasten with 1 sl st in first dc on round.
ROUND 16:
Work 1 dtr in every dc - but inc 2 dtr evenly over the first 54 dc (= 56 dtr), then work 36 dtr in ch-row over armhole, work 1 dtr in every dc – but inc 3 dtr evenly over the bottom 91 dc (= 94 dtr), and work 36 dtr in ch-row over armhole = 222 dtr.
ROUND 17 to 22:
Continue with dtr – while at the same time inc 6 dtr evenly on every round. After 22nd round there are 258 dtr on the round and piece measures approx. 37 cm from centre and outwards.
Continue working only over 89 dtr in each side – i.e. do not work over 40 dtr at top by neck and 40 dtr at bottom of back.
Continue with explanation below front piece.

LEFT FRONT PIECE - ALL SIZES:
= 79-81-89 dtr. Insert a marker after 23-24-27 sts in from each side (= 33-33-35 sts between markers). Then work dtr back and forth over these sts while at the same time inc 1 st at every marker on every row (i.e. inc 2 sts on row, inc alternately before and after marker) and dec 3 sts at end and beg of every row in each side – SEE DECREASE TIP 1 until a total of 6-8-12 rows back and forth have been worked = 55-49-41 dtr.

RIGHT FRONT PIECE:
Work same way as on left piece over 79-81-89 dtr in right side.

SLEEVE:
Worked back and forth from sleeve cap and down with 2 threads BabyAlpaca Silk and STRIPES – see explanation above.
Work 28-34-38 ch with stripe 5-5-4. Turn and work 1 dtr in 5th ch from hook ( = 2 dtr), then work 1 dtr in every ch = 25-31-35 dtr.
ROW 2: Work 4 ch, 3 dtr in first dtr, 1 dtr in each of the next 23-29-33 dtr, 4 dtr in the last dtr = 31-37-41 dtr. Turn.
ROW 3, 4 and 5: Work 4 ch, 2 dtr in first dtr, 1 dtr in every dtr until 1 dtr remains, 3 dtr in the last dtr = 43-49-53 dtr. Turn.
ROW 6: Work 4 ch, 3 dtr in first dtr, 1 dtr in each of the next 41-47-51 dtr, 4 dtr in the last dtr = 49-55-59 dtr. Turn. Switch to stripe 4-4-3 here.

Then work dtr on all rows until piece measures 17-15-15 cm. Continue with dtr while AT THE SAME TIME dec as follows in each side:

SIZE S/M:
* Work 1 row where dec 1 dtr in each side - see Decrease tip. Work 1 row without dec. Work 1 row where dec 1 dtr in each side. Work 2 rows without dec *, repeat from *-* a total of 3 times = 12 dec = 37 dtr.
SIZE L/XL + XXL/XXXL:
* Work 1 row where dec 1 dtr in each side - see Decrease tip. Work 1 row without dec *, repeat from *-* a total of 8 times = 16 dec = 39-43 dtr.

Continue to work as follows:
ROW 1: 1 dtr in every dtr.
ROW 2: 6 ch (= 1 dtr + 2 ch), skip 1 dtr, 1 dtr in next dtr, * 2 ch, skip 1 dtr, 1 dtr in next dtr *, repeat from *-* the entire row = 18-19-21 ch-loops.
ROW 3: Work 1 dtr in every dtr and 1 dtr in every ch-loop = 37-39-43 dtr.
Repeat rows 1 to 3 a total of 3 times, sleeve measures approx. 61-61-61 cm. Cut and fasten the thread.

ASSEMBLY:
Sew sleeve seams tog edge to edge to avoid a chunky seam.
Work 1 round around the entire body and at bottom of sleeves as follows with 2 threads grey purple: 1 sl st, * 5 ch, 1 tr in first ch, skip 1 st, fasten with 1 dc in next st *, repeat from *-* the entire round and finish with 1 sl st in first ch. Sew in the sleeves.

This pattern has been corrected.

Updated online: 12.03.2012
Materials: DROPS BABYALPACA SILK from Garnstudio
200-250-250 g colour no 7219, pistachio
150-200-200 g colour no 7402, light sea green
150-200-200 g colour no 1760, light grey purple
100-100-100 g colour no 3250, light old pink
100-100-100 g colour no 4314, grey purple
Updated online: 27.03.2012
STRIPES:...
Stripe 8: 1 strand light old pink and 1 strand gray purple
Stripe 9 until finished measurements: 2 strands gray purple
ASSEMBLY:...
Work 1 round around the entire body and at bottom of sleeves as follows with 2 strands gray purple:

Diagram

diagram measurements
Do you have a question? See a list of frequently asked questions (FAQ)

Knitting tension is what determines the final measurements of your work, and is usually measured per 10 x 10 cm. It is provided like so: number of stitches in width x number of rows in height - eg: 19 stitches x 26 rows = 10 x 10 cm.

The knitting tension is very individual; some people knit/crochet loosely while others work tightly. You adjust the knitting tension with the needle size, which is why the suggested needle size is only meant as a guide! You need to adjust this (up or down) to ensure that YOUR knitting tension matches the knitting tension provided in the pattern. If you work with a different knitting tension than provided you will have a different yarn consumption, and your work will have different measurements than what the pattern suggests.

The knitting tension also determines which yarns can replace each other. As long as you achieve the same knitting tension you can replace one yarn with another.

See DROPS lesson: How to measure your tension/gauge

See DROPS video: How to make a gauge tension swatch

The required amount of yarn is provided in grams, eg: 450 g. To calculate how many balls you’ll need you first need to know how many grams are in 1 ball (25g, 50g or 100g). This information is available if you click on the individual yarn quality on our pages. Divide the amount required with the amount of each ball. For example, if each ball is 50g (the most common amount), the calculation will be as follows: 450 / 50 = 9 balls.

The important thing when changing from one yarn to another is that the knitting/crochet tension remains the same. This is so that the measurements of the finished piece will be the same as on the sketch provided. It is easier to achieve the same knitting tension using yarns from the same yarn group. It is also possible to work with multiple strands of a thinner yarn to achieve the knitting tension of a thicker one. Please try our yarn converter. We recommend you to always work a test swatch.

Please NOTE: when changing yarn the garment might have a different look and feel to the garment in the photo, due to individual properties and qualities of each yarn.

See DROPS lesson: Can I use a different yarn than the one mentioned in the pattern?

All our yarns are categorised into yarn groups (from A to F) according to thickness and knitting tension – group A contains the thinnest yarns and group F the thickest. This makes it easier for you to find alternative yarns to our patterns, should you wish to switch yarn. All yarns within the same group have a similar knitting tension and can easily replace each other. However, different yarn qualities have different structures and properties which will give the finished work a unique look and feel.

Click here for an overview of the yarns in each yarn group

At the top of all our patterns you’ll find a link to our yarn calculator, which is a helpful tool should you wish to use a different yarn than suggested. By filling in the yarn quality you wish to replace, the amount (in your size) and number of strands, the calculator will present good alternative yarns with the same knitting tension. Additionally it will tell you how much you’ll require in the new qualities and whether you’ll need to work with multiple strands. Most skeins are 50g (some are 25g or 100g).

If the pattern is worked with multiple colours, every colour will have to be calculated separately. Similarly, if the pattern is worked with several strands of different yarns (for example 1 strand Alpaca and 1 strand Kid-Silk) you will have to find alternatives for each, individually.

Click here to see our yarn calculator

Since different yarns have different qualities and textures we have chosen to keep the original yarn in our patterns. However, you can easily find options among our available qualities by using our yarn calculator, or simply pick a yarn from the same yarn group.

It is possible that some retailers still have discontinued yarns in stock, or that someone has a few skeins at home that they would like to find patterns for.

The yarn calculator will provide both alternative yarn as well as required amount in the new quality.

If you think it's hard to decide what size to make, it can be a good idea to measure a garment you own already and like the size of. Then you can pick the size by comparing those measures with the ones available in the pattern's size chart.

You'll find the size chart at the bottom of the pattern.

See DROPS lesson: How to read size chart

The needle size provided in the pattern serves only as a guide, the important thing is to follow the knitting tension. And since knitting tension is very individual, you will have to adjust the needle size to ensure that YOUR tension is the same as in the pattern – maybe you’ll have to adjust 1, or even 2 needle sizes, up or down to achieve the correct tension. For this, we recommend that you work test swatches.

Should you work with a different knitting tension than the one provided, the measurements of the finished garment might deviate from the measurement sketch.

See DROPS lesson: How to measure your tension/gauge

See DROPS video: How to make a tension/gauge swatch

Working a garment top-down provides more flexibility and room for personal adjustment. For example it is easier to try the garment on while working, as well as making adjustments to length of yoke and shoulder caps.

The instructions are carefully explaining every step, in the correct order. Diagrams are adjusted to the knitting direction and are worked as usual.

The diagram depicts all rows/rounds, and every stitch seen from the right side. It is read from bottom to top, from right to left. 1 square = 1 stitch.

When working back and forth, every other row is worked from the right side and every other row is worked from the wrong side. When working from the wrong side, the diagram will have to be worked reversed: from left to right, knit stitches are purled, purl stitches are knit etc.

When working in the round every round is worked from the right side and the diagram are worked from right to left on all rounds.

See DROPS lesson: How to read knitting diagrams

The diagram depicts all rows/rounds, and every stitch seen from the right side. It is worked from bottom to top, from right to left.

When working back and forth every other row is worked from the right side: from right to left and every other row is worked from the wrong side: from left to right.

When working in the round, every row in the diagram are worked from the right side, from right to left.

When working a circular diagram you start in the middle and work your way outwards, counter clockwise, row by row.

The rows usually start with a given number of chain stitches (equivalent to the height of the following stitch), this will either be depicted in the diagram or explained in the pattern.

See DROPS lesson: How to read crochet diagrams

Instructions for working several diagrams after each other on the same row/round, will often be written like so: “work A.1, A.2, A.3 a total of 0-0-2-3-4 times". This means you work A.1 once, then A.2 is worked once, and A.3 is repeated (in width) the number of times provided for your size – in this case like so: S = 0 times, M = 0 times, L=2 times, XL= 3 times and XXL = 4 times.

The diagrams are worked as usual: begin with the first row in A.1, then work the first row in A.2 etc.

See DROPS lesson: How to read knitting diagrams

See DROPS lesson: How to read crochet diagrams

The total width of the garment (from wrist-to-wrist) will be larger in the larger sizes, despite the actual sleeves being shorter. The larger sizes have longer sleeve caps and wider shoulders, so there will be a good fit in all sizes.

The measurement sketch/schematic drawing provides information regarding the full length of the garment. If it’s a jumper or a jacket the length is measured from the highest point on the shoulder closest to the neckline, and straight down to the bottom of the garment. It is NOT measured from the tip of shoulder. Similarly, the length of yoke is measured from the highest point on the shoulder and down to where yoke is split into body and sleeves.

On a jacket measures are never taken along bands, unless specifically stated. Always measure inside band stitches when measuring the length.

See DROPS lesson: How to read a schematic drawing

Diagrams are often repeated on the round or in height. 1 repeat is the diagram the way it appears in the pattern. If it says to work 5 repeats of A.1 in the round, then you work A.1 a total of 5 times after/next to each other in the round. If it says to work 2 repeats of A.1 vertically/in height you work the entire diagram once, then begin again at the start and work the entire diagram one more time.

Chain stitches are slightly narrower than other stitches and to avoid working the cast-on edge too tight, we simply chain more stitches to begin with. The stitch count will be adjusted on the following row to fit the pattern and measurement sketch.

The rib edge is more elastic and will contract slightly compared to, for example, stocking stitch. By increasing before the rib edge, you avoid a visible difference in width between the rib edge and the rest of the body.

It’s very easy to cast off too tightly, and by making yarn overs while casting off (and simultaneously casting these off) you avoid a too tight cast off edge.

See DROPS video: How to bind off with yarn overs (yo)

To achieve an even increase (or decrease) you can increase on, for example: every 3rd and 4th row alternately, like so: work 2 rows and increase on the 3rd row, work 3 rows and increase on the 4th. Repeat this until the increase is complete.

See DROPS lesson: Increase or decrease 1 st on every 3rd and 4th row alternately

Should you prefer to work in the round instead of back and forth, you may of course adjust the pattern. You’ll need to add steeks mid-front (usually 5 stitches), and follow the instructions. When you would normally turn and work from the wrong side, simply work across the steek and continue in the round. At the end you’ll cut the piece open, pick up stitches to work bands, and cover the cut edges.

See DROPS video: How to knit steeks and cut open

Should you prefer to work back and forth instead of in the round, you may of course adjust the pattern so you work the pieces separately and then assemble them at the end. Divide the stitches for the body in 2, add 1 edge stitch in each side (for sewing) and work the front and back pieces separately.

See DROPS lesson: Can I adapt a pattern for circular needles into straight needles?

Pattern repeats can vary slightly in the different sizes, in order to get the correct proportions. If you’re not working the exact same size as the garment in the photo, yours might deviate slightly. This has been carefully developed and adjusted so that the complete impression of the garment is the same in all sizes.

Make sure to follow instructions and diagrams for your size!

If you have found a pattern you like which is available in women’s size it’s not very difficult to convert it to men’s size. The biggest difference will be the length of sleeves and body. Start working on the women size that you think would fit across the chest. The additional length will be worked right before you cast off for the armhole/sleeve cap. If the pattern is worked top-down you can add the length right after the armhole or before the first decrease on sleeve.

Regarding additional yarn amount, this will depend on how much length you add, but it is better with a skein too many than too few.

All yarns will have excess fibres (from production) that might come off as lint or shedding. Brushed yarns (ie hairier yarns) have more of these loose, excess fibres, causing more shedding.

Shedding also depends on what is worn under or over the garment, and whether this pulls at the yarn fibres. It’s therefore not possible to guarantee that there will be no shedding

Below are some tips on how to get the best result when working with hairier yarns:

1. When the garment is finished (before you wash it) shake it vigorously so the looser hairs come off. NOTE: do NOT use a lint roller, brush or any method that pulls at the yarn.

2. Place the garment in a plastic bag and put it in your freezer - the temperature will cause the fibres to become less attached to each other, and excess fibres will come off easier.

3. Leave in the freezer for a few hours before taking it out and shaking it again.

4. Wash the garment according to the instructions on the yarn label.

Pilling is a natural process that happens to even the most exclusive of fibers. It's a natural sign of wear and tear that is hard to avoid, and that is most visible in high friction areas of your garment like a sweater's arms and cuffs.

You can make your garment look as new by removing the pilling, using a fabric comb or a pill/lint remover.

Still can't find the answer you need? Then scroll down and leave your question so one of our experts can try to help you. This will be done normally within 5 to 10 working days.
In the meantime, you can read the questions and answers that others have left to this pattern or join the DROPS Workshop on Facebook to get help from fellow knitters/crocheters!

You might also like...

Frühlingsgefühle

Strickmieze21, Germany

Summer Circle Jacket

Valentina, Italy

Post a comment to pattern DROPS 136-1

We would love to hear what you have to say about this pattern!

If you want to leave a question, please make sure you select the correct category in the form below, to speed up the answering process. Required fields are marked *.

Comments / Questions (191)

country flag Sigurborg wrote:

Sommerfugl

09.01.2012 - 18:04

country flag Claudia wrote:

Fantastico

09.01.2012 - 02:02

country flag Jurima wrote:

Fantastisch: leichte Romantik

08.01.2012 - 17:15

country flag Marleen wrote:

Ben het met Annasoer eens, de kleuren zij erg mooi, maar de mouwenzitten wat raar.

07.01.2012 - 19:06

country flag Annasoer wrote:

Volgens mij te strak van voren en te flubberig van achter. Mouwinzet ook niet zo mooi, de kleuren wel.

07.01.2012 - 12:51

country flag Agat wrote:

Soo kuules Tail!

07.01.2012 - 12:49

country flag Evelyne wrote:

Très joli modèle pour le printemps! J'aime beaucoup le crochet.

06.01.2012 - 17:21

country flag Belinda wrote:

Het blijft leuk zo'n cirkel vest, mooie kleuren heeft deze!

05.01.2012 - 19:34

country flag Lichterfeld wrote:

Supi!!!

04.01.2012 - 18:02

country flag Tineke wrote:

Deze is leuk!!!!!

04.01.2012 - 14:47