
Popular categories
Looking for a yarn?


|
|
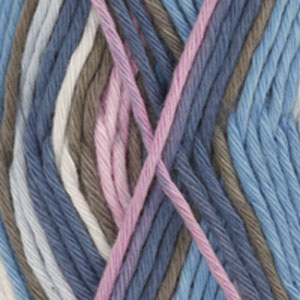
Tripoli |
|
 |
 |
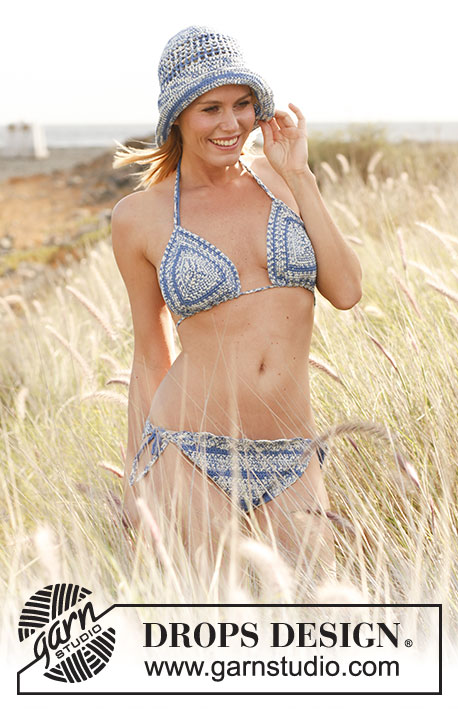
Crochet DROPS bikini in Muskat Soft or Muskat. Size XS - XXL/XXXL. Size XS - XXL/XXXL.
DROPS 136-18 |
|
|
CROCHET TIP SC-ROW: Start every row with 1 ch before continuing with sc in every st. DECREASE TIP: Dec 1 sc in each side on a row as follows: Work 1 sc, * insert hook in next st, get yarn *, repeat from *-*, make a YO and pull yarn through all 3 sts on hook. Then work 1 sc in every st until 3 sts remain on row, repeat dec in the next 2 sts, work 1 sc in last st. INCREASE TIP: Inc 1 st in each side on a row by working 2 sts in first and last st on row (work 1 sc in each of the other sc). FAN PATTERN: ROW 1: ch 1, 1 sc in first st on row, * skip 2 sts, 5 dc in next st, skip 2 sts, 1 sc in next st *, repeat from *-* the entire row. Finish with 1 sc in last st, turn piece. ROW 2: ch 3, 2 dc in first sc on row, * 1 sc in the middle dc of the 5 dc from previous row, 5 dc in next sc *, repeat from *-* the entire row. Finish with 1 sc in the middle dc of the 5 dc from previous row, 3 dc in last sc on row, turn piece. ROW 3: ch 1, 1 sc in first dc on row, * 5 dc in next sc, 1 sc in the middle dc of the 5 dc from previous row *, repeat from *-* the entire row. Finish with 1 sc in 3rd ch from beg of previous row. -------------------------------------------------------- BIKINI BOTTOMS: Start at top of front piece and work in one until top of back piece. Ch 45-45-51-51-51-57 on hook size 4 mm / G/6 with Muskat Soft. Work first row as follows: 1 sc in 3rd ch from hook, 1 sc in every ch on row = 43-43-49-49-49-55 sc (no of sts can be divided by 6 + 1), turn piece - READ CROCHET TIP SC-ROW. Work sc-rows back and forth with 1 sc in every sc. AT THE SAME TIME dec 1 sc in each side on every row a total of 0-0-6-6-6-12 times and then on every other row a total of 15-15-12-12-12-9 times - READ DECREASE TIP = 13 sc in all sizes (piece measures approx. 15 cm / 6"). REMEMBER THE CROCHET GAUGE! Continue to work sc-rows with 1 sc in every sc. When piece measures 19-20-21-22-23-24 cm / 7½"-8"-8¼"-8¾"-9"-9½", beg back piece and now measure piece from here. Now inc 1 sc in each side - READ INCREASE TIP. Repeat inc in each side on every other row a total of 3 times in all sizes, on every row a total of 8-8-10-10-10-10 times and finally on every other row again a total of 13-13-14-14-14-17 times = 61-61-67-67-67-73 sc (no of sts can be divided by 6 + 1). Continue sc-row over all sc until back piece measures 23-24-25-26-27-28 cm / 9"-9½"-9¾"-10¼"-10⅝"-11", do not cut the yarn. FAN EDGE AND TIES: Work row 1-3 in FAN PATTERN – see explanation above, do not cut the yarn. Then crochet ties as follows: ch 2, work 1 sc in first ch worked, * ch 1, work 1 sc in previous sc *, repeat from *-* until tie measures approx. 30-40 cm / 11¾"-15¾", fasten off. Work another tie the same way and fasten it on the other side of fan edge. Work the fan edge and two ties the same way on front piece. BIKINI TOP: Worked in 2 parts. Ch 3 on hook size 4 mm / G/6 with Muskat Soft and form a ring with 1 sl st in first ch. ROUND 1: ch 1, 1 sc in first ch in ch-ring, 2 sc in each of the next 2 ch in ch-ring (= 6 sc), insert a marker and move it upwards. Then work in the round to avoid making the beg of round visible. ROUND 2: * 2 sc in each of the first 2 sc, 1 ch *, repeat from *-* a total of 3 times (= 4 sc with 1 ch between). ROUND 3: * 1 sc in each of the first 4 sc, in next ch work 1 sc + 1 ch (= 1 corner) + 1 sc *, repeat from *-* a total of 3 times (there are now 3 corners with 6 sc between each corner). ROUND 4: 1 sc in every sc, in ch in every corner work 1 sc + 1 ch + 1 sc (there are now 8 sc between each corner). ROUND 5: 1 sc in every sc, in ch in every corner work 1 sc + 1 ch + 1 sc (there are now 10 sc between each corner). Continue inc like this until piece measures approx. 8-8½-9-9½-10-10½ cm / 3⅛"-3¼"-3½"-3¾"-4"-4¼" from the middle and outwards (or to desired size). Work last round as follows: Work as before with sc and inc along 2 of the sides (incl all 3 corners), then work as follows along the last side: 1 hdc in first st, * ch 1, skip 1 sc, 1 hdc in next st *, repeat from *-* until corner and finish with 1 sl st in 1st ch from beg of round (= eyelet holes). Fasten off. Work another part the same way. TIES: Ch 2, work 1 sc in first ch worked, * ch 1, work 1 sc in previous sc *, repeat from *-* until tie measures approx. 110-120-140-150-160-180 cm / 43½"-47"-55"-59"-63"-71", fasten off. Thread the tie up and down through the eyelet holes on the two bikini parts. Work another tie the same way of approx. 180-185-190-195-200-210 cm / 71"-73"-75"-77"-80"-83". Thread the end in from WS, through corner at the top of one bikini part and then in from RS through the corner at the top of the other bikini part (this "loop" should be in the back of neck when the bikini top is worn). Tie the ends mid back of neck. |
|
|
Have you made this or any other of our designs? Tag your pictures in social media with #dropsdesign so we can see them! Do you need help with this pattern?You'll find tutorial videos, a Comments/Questions area and more by visiting the pattern on garnstudio.com. © 1982-2024 DROPS Design A/S. We reserve all rights. This document, including all its sub-sections, has copyrights. Read more about what you can do with our patterns at the bottom of each pattern on our site. |
|


With over 40 years in knitting and crochet design, DROPS Design offers one of the most extensive collections of free patterns on the internet - translated to 17 languages. As of today we count 304 catalogs and 11422 patterns - 11417 of which are translated into English (US/in).
We work hard to bring you the best knitting and crochet have to offer, inspiration and advice as well as great quality yarns at incredible prices! Would you like to use our patterns for other than personal use? You can read what you are allowed to do in the Copyright text at the bottom of all our patterns. Happy crafting!
Comments / Questions (17)
Hola ! Muchas gracias por estos bellos patrones. Tengo problemas interpretando cómo realizar la parte de abajo. Primero realizo la parte de abajo y después, una vez terminada , comiendo a hacer el punto abanico ?
20.08.2021 - 07:33DROPS Design answered:
Hola Yasmin, correcto, primero se trabaja la parte de abajo y después se trabaja el punto abanico y los cordones.
20.08.2021 - 21:23Buonasera, non capisco come infilare il cordoncino per la parte sopra dei bikini.:-(
16.07.2019 - 19:01DROPS Design answered:
Buongiorno Bettina. Per il cordino intorno al collo, deve infilare un’estremità nell’angolo in alto di una delle coppe, tira il cordino, poi infila la stessa estremità nell’angolo in alto dell’altra coppa e tira ancora il cordino. Lega le due estremità del cordino tra loro. Mette il cordino (che risulta doppio), dietro il collo come mostrato in fotografia. Buon lavoro!
16.07.2019 - 21:17Are the ties going to look like they are little fans? If not I think I'm doing something wrong. Love the pattern so far.
29.05.2019 - 20:05DROPS Design answered:
Dear Christina, you first work the rows 1 to 3 from fan pattern, then after last row do not cut the yarn, continue for the ties as described, ie ch 2, work 1 sc in first ch worked, * ch 1, work 1 sc in previous sc *, repeat from *-* until tie measures approx. 11 3/4"-15 3/4". Happy crocheting!
31.05.2019 - 08:54On the crochet bottom is it saying that in all sizes after the crochet tip there needs to have just 13 sc sts and that it should measure the correct gauge?
25.04.2019 - 14:59DROPS Design answered:
Dear Mrs Shepard, depending on the size you will crochet a different number of rows, but when all decreases are done, piece will measures approx. 15 cm and there are 13 sc remaining in all size. Remember to keep same gauge as for your swatch to keep correct measurements. Happy crocheting!
25.04.2019 - 16:04Bonjour ,je ne comprends pas le tour 1 . Si 1 ms + 2ms dans les 2 ms suivantes cela fait 5ms et pas 6 ?
24.04.2018 - 21:22DROPS Design answered:
Bonjour Mme Bodson, la ml du début du tour compte pour la 1ère ms = on a ainsi 6 ms. Bon crochet!
25.04.2018 - 09:08Nice! This I will try! :0) Thank u for all your nice patterns.
13.05.2013 - 10:16Denne likte jeg ikke!
20.01.2012 - 13:08Bellissimo! Quando avevo 15 anni non c'era ragazza in comitiva che non avesse un bikini fatto all'uncinetto. Che bello avere dei modelli da realizzare di nuovo!
19.01.2012 - 12:51Debra Malik wrote:
This is a very lovely swimsuit!! I love your patterns.
09.01.2012 - 22:18All our patterns are made by our own Drops design team.
09.01.2012 - 03:15