DROPS Cotton Viscose
54% Cotton, 46% Viscose
Discontinued
find alternatives
DROPS SS24

DROPS 76-16

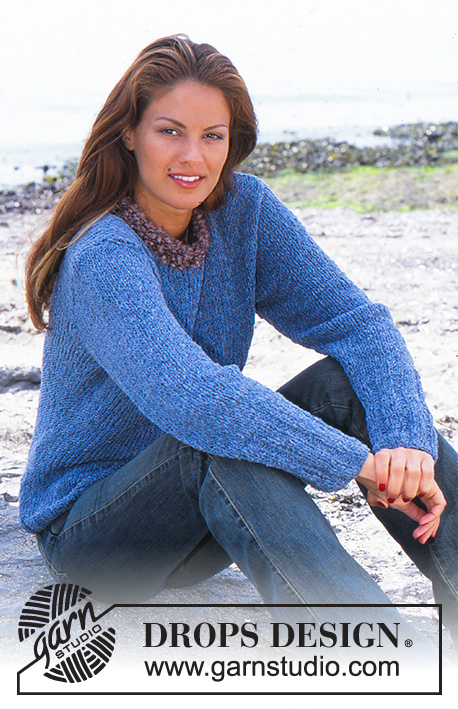
Knitted DROPS Jumper with rib and puffed sleeves in Camelia and with crochet ruffled edges in Cotton Viscose. DROPS Scarf in Ull-Flamé and Cotton Viscose

DROPS 76-16
DROPS design: Pattern no Z-153
--------------------------------------------------------

Sizes: S – M - L - XL
The measurements in the pattern are with the jumper stretched. The body will be narrower because of the pattern.
Materials: DROPS Camelia
400-450-500-550 g colour no 08, off white
and use: DROPS Cotton Viscose from Garnstudio
50-50-50-50 g colour no 02, off white

DROPS Circular needle and double pointed needles size 3 mm
DROPS Crochet hook size 3 mm
--------------------------------------------------------

-------------------------------------------------------

Alternative Yarn – See how to change yarns here
Yarn Groups A to F – Use the same pattern and change the yarn here
Yarn usage using an alternative yarn – Use our yarn converter here

-------------------------------------------------------

DROPS Cotton Viscose
54% Cotton, 46% Viscose
Discontinued
find alternatives

Pattern instructions

NOTE: This pattern is written in British English. All measurements in charts are in cm. For conversion from cm to inches - click here. There are different terms for crocheting in British and American English. If this pattern includes crochet, click for "crochet terms" here. For this pattern in American English, please click here.
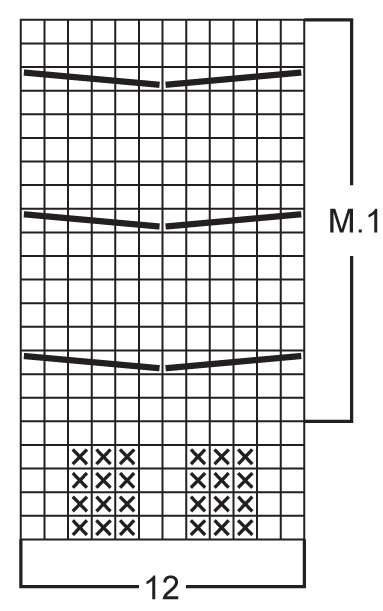
Knitting tension: 24 stitches x 32 rows = 10 x 10 cm with needle size 3 mm and stocking stitch. Remember needle size is only a guide!

Rib-1: * K2, P3 *, repeat from *-*.
Rib-2: * K2, P5 *, repeat from *-*.

Pattern: See diagram M.1.

Decrease tip (decreases for armholes):
All decreases are worked from the right side! Decrease for armholes inside 4 stitches which are worked as follows from the edge: 2 edge stitches and 2 stitches stocking stitch.
Decrease as follows after the 4 stitches: P2 together.
Decrease as follows before the 4 stitches: P2 twisted together.

Crochet ruffled edges:
Round 1: 1 double crochet, * 5 chain stitches, skip 2 stitches/rows, 1 double crochet in next stitch *, repeat from *-*.
Round 2: 1 double crochet in first chain-space, * 3 chain stitches, 1 double crochet in same chain-space, 4 chain stitches, 1 double crochet in next chain-space *, repeat from *-*.
---------------------------------------------------

Body: Cast on 240-260-280-300 stitches with circular needle size 3 mm and Camelia and work rib-1. NOTE: There should be 2 knitted stitches mid front, mid back and in each side - insert 1 marker thread in each side. Remember the knitting tension! When piece measures 24 cm work M.1 over 12 stitches mid front, the other stitches are continued in rib-1. When piece measures 36-37-38-39 cm, cast off 14 stitches in each side for armholes (i.e. 7 stitches on each side of marker threads). Each part is finished separately.

Front piece: = 106-116-126-136 stitches. Continue the pattern - at the same time, decrease for armholes in each side every 2nd row - see Decrease tip: 1 stitch 5-10-15-20 times = 96 stitches. When piece measures 50-52-54-56 cm place the middle 28 stitches on 1 thread for neck. Then decrease towards neck every 2nd row: 2 stitches 1 time and 1 stitch 6 times = 26 stitches left on each shoulder. Cast off when piece measures 56-58-60-62 cm.

Back piece: = 106-116-126-136 stitches. Continue to decrease for armholes as for front piece = 96 stitches. When piece measures 54-56-58-60 cm, cast off the middle 40 stitches for neck. Then decrease towards neck every 2nd row: 1 stitch 2 times. Cast off the remaining stitches 26 stitches on each shoulder when piece measures 56-58-60-62 cm.

Sleeve: Cast on 84-84-91-91 stitches with double pointed needles size 3 mm and Camelia. Work rib-2. When piece measures 5 cm decrease all P5 to P4 = 72-72-78-78 m. When piece measures 10 cm decrease all P4 to P3 = 60-60-65-65 stitches. Continue the rib - at the same time, when piece measures 12 cm increase mid under sleeve (on each side of 2 knitted stitches): 1 stitch 20 times every 4th round = 100-100-105-105 stitches - the increased stitches are worked into the rib as you go. When sleeve measures 38 cm work stocking stitch over all stitches to finished length - at the same time, increase 9-9-10-10 stitches evenly spaced over 45-45-50-50 stitches mid top of sleeve = 109-109-115-115 stitches. When sleeve measures 48-47-46-45 cm cast off 10 stitches mid under sleeve and finish working back and forth on needle. Continue by decreasing to sleeve cap in each side every 2nd row: 3 stitches 1 time, 2 stitches 2 times, then 1 stitch in each side until sleeve measures 58-59-60-61 cm, then 2 stitches in each side until sleeve measures 60-61-62-63 cm. Cast off the remaining stitches.

Assembly: Sew shoulder seams. Knit up approx. 120 to 140 stitches (divisible by 5, incl. stitches on thread mid front) around neck with double pointed needles size 3 mm and Camelia. Work rib-1 but M.1 continues mid front - make sure that knit and purl stitches match above each other mid front and mid back. When neck measures 10 cm cast off with knit over knit and purl over purl.

Crochet edges: Work with Cotton Viscose around the neck, cable mid front (= band) and around bottom of sleeves. Work according to the description above. Start to work mid back of neck from wrong side; work as far as cable mid front, down the cable (i.e. in first knitted stitch at side of cable), continue along bottom edge of cable, up the other side and to mid back of neck. Work in the same way (from wrong side) around bottom of sleeves.

Sew in sleeves - NOTE: There should be a small "puff" on top of sleeve, pull the extra breadth of sleeve to the top and spread it evenly over the top 6-8 cm as you sew in the sleeve.


DROPS Scarf:
Length: Approx. 130 cm
Width: Approx. 15 cm
Materials: DROPS Ull-Flamé from Garnstudio
100 g colour no 01, off white
and use: DROPS Cotton Viscose from Garnstudio
50 g colour no 02, off white.

DROPS Needle size 10 mm
-----------------------------------------------------------

Knitting tension: 10 stitches in width with1 strand Ull-Flamé and 1 strand Cotton Viscose and needle size 10 mm and garter stitch = 10 cm. Remember needle size is only a guide!

Ridge/Garter stitch (back and forth on needle):
1 ridge = Knit 2 rows
------------------------------------------------------------

Scarf: Cast on 15 stitches with needle size 10 mm and 1 strand Ull-Flamé and 1 strand Cotton Viscose. Work garter stitch until scarf measures 130 cm or to desired length. Loosely cast off.

Diagram

symbols = knit from right side, purl from wrong side
symbols = purl from right side, knit from wrong side.
symbols = place 3 stitches on cable needle behind piece, K3, K3 from cable needle.
symbols = place 3 stitches on cable needle in front of piece, K3, K3 from cable needle
diagram
diagram

Each of our patterns has specific tutorial videos to help you.

Do you have a question? See a list of frequently asked questions (FAQ)

Knitting tension is what determines the final measurements of your work, and is usually measured per 10 x 10 cm. It is provided like so: number of stitches in width x number of rows in height - eg: 19 stitches x 26 rows = 10 x 10 cm.

The knitting tension is very individual; some people knit/crochet loosely while others work tightly. You adjust the knitting tension with the needle size, which is why the suggested needle size is only meant as a guide! You need to adjust this (up or down) to ensure that YOUR knitting tension matches the knitting tension provided in the pattern. If you work with a different knitting tension than provided you will have a different yarn consumption, and your work will have different measurements than what the pattern suggests.

The knitting tension also determines which yarns can replace each other. As long as you achieve the same knitting tension you can replace one yarn with another.

See DROPS lesson: How to measure your tension/gauge

See DROPS video: How to make a gauge tension swatch

The required amount of yarn is provided in grams, eg: 450 g. To calculate how many balls you’ll need you first need to know how many grams are in 1 ball (25g, 50g or 100g). This information is available if you click on the individual yarn quality on our pages. Divide the amount required with the amount of each ball. For example, if each ball is 50g (the most common amount), the calculation will be as follows: 450 / 50 = 9 balls.

The important thing when changing from one yarn to another is that the knitting/crochet tension remains the same. This is so that the measurements of the finished piece will be the same as on the sketch provided. It is easier to achieve the same knitting tension using yarns from the same yarn group. It is also possible to work with multiple strands of a thinner yarn to achieve the knitting tension of a thicker one. Please try our yarn converter. We recommend you to always work a test swatch.

Please NOTE: when changing yarn the garment might have a different look and feel to the garment in the photo, due to individual properties and qualities of each yarn.

See DROPS lesson: Can I use a different yarn than the one mentioned in the pattern?

All our yarns are categorised into yarn groups (from A to F) according to thickness and knitting tension – group A contains the thinnest yarns and group F the thickest. This makes it easier for you to find alternative yarns to our patterns, should you wish to switch yarn. All yarns within the same group have a similar knitting tension and can easily replace each other. However, different yarn qualities have different structures and properties which will give the finished work a unique look and feel.

Click here for an overview of the yarns in each yarn group

At the top of all our patterns you’ll find a link to our yarn calculator, which is a helpful tool should you wish to use a different yarn than suggested. By filling in the yarn quality you wish to replace, the amount (in your size) and number of strands, the calculator will present good alternative yarns with the same knitting tension. Additionally it will tell you how much you’ll require in the new qualities and whether you’ll need to work with multiple strands. Most skeins are 50g (some are 25g or 100g).

If the pattern is worked with multiple colours, every colour will have to be calculated separately. Similarly, if the pattern is worked with several strands of different yarns (for example 1 strand Alpaca and 1 strand Kid-Silk) you will have to find alternatives for each, individually.

Click here to see our yarn calculator

Since different yarns have different qualities and textures we have chosen to keep the original yarn in our patterns. However, you can easily find options among our available qualities by using our yarn calculator, or simply pick a yarn from the same yarn group.

It is possible that some retailers still have discontinued yarns in stock, or that someone has a few skeins at home that they would like to find patterns for.

The yarn calculator will provide both alternative yarn as well as required amount in the new quality.

If you think it's hard to decide what size to make, it can be a good idea to measure a garment you own already and like the size of. Then you can pick the size by comparing those measures with the ones available in the pattern's size chart.

You'll find the size chart at the bottom of the pattern.

See DROPS lesson: How to read size chart

The needle size provided in the pattern serves only as a guide, the important thing is to follow the knitting tension. And since knitting tension is very individual, you will have to adjust the needle size to ensure that YOUR tension is the same as in the pattern – maybe you’ll have to adjust 1, or even 2 needle sizes, up or down to achieve the correct tension. For this, we recommend that you work test swatches.

Should you work with a different knitting tension than the one provided, the measurements of the finished garment might deviate from the measurement sketch.

See DROPS lesson: How to measure your tension/gauge

See DROPS video: How to make a tension/gauge swatch

Working a garment top-down provides more flexibility and room for personal adjustment. For example it is easier to try the garment on while working, as well as making adjustments to length of yoke and shoulder caps.

The instructions are carefully explaining every step, in the correct order. Diagrams are adjusted to the knitting direction and are worked as usual.

The diagram depicts all rows/rounds, and every stitch seen from the right side. It is read from bottom to top, from right to left. 1 square = 1 stitch.

When working back and forth, every other row is worked from the right side and every other row is worked from the wrong side. When working from the wrong side, the diagram will have to be worked reversed: from left to right, knit stitches are purled, purl stitches are knit etc.

When working in the round every round is worked from the right side and the diagram are worked from right to left on all rounds.

See DROPS lesson: How to read knitting diagrams

The diagram depicts all rows/rounds, and every stitch seen from the right side. It is worked from bottom to top, from right to left.

When working back and forth every other row is worked from the right side: from right to left and every other row is worked from the wrong side: from left to right.

When working in the round, every row in the diagram are worked from the right side, from right to left.

When working a circular diagram you start in the middle and work your way outwards, counter clockwise, row by row.

The rows usually start with a given number of chain stitches (equivalent to the height of the following stitch), this will either be depicted in the diagram or explained in the pattern.

See DROPS lesson: How to read crochet diagrams

Instructions for working several diagrams after each other on the same row/round, will often be written like so: “work A.1, A.2, A.3 a total of 0-0-2-3-4 times". This means you work A.1 once, then A.2 is worked once, and A.3 is repeated (in width) the number of times provided for your size – in this case like so: S = 0 times, M = 0 times, L=2 times, XL= 3 times and XXL = 4 times.

The diagrams are worked as usual: begin with the first row in A.1, then work the first row in A.2 etc.

See DROPS lesson: How to read knitting diagrams

See DROPS lesson: How to read crochet diagrams

The total width of the garment (from wrist-to-wrist) will be larger in the larger sizes, despite the actual sleeves being shorter. The larger sizes have longer sleeve caps and wider shoulders, so there will be a good fit in all sizes.

The measurement sketch/schematic drawing provides information regarding the full length of the garment. If it’s a jumper or a jacket the length is measured from the highest point on the shoulder closest to the neckline, and straight down to the bottom of the garment. It is NOT measured from the tip of shoulder. Similarly, the length of yoke is measured from the highest point on the shoulder and down to where yoke is split into body and sleeves.

On a jacket measures are never taken along bands, unless specifically stated. Always measure inside band stitches when measuring the length.

See DROPS lesson: How to read a schematic drawing

Diagrams are often repeated on the round or in height. 1 repeat is the diagram the way it appears in the pattern. If it says to work 5 repeats of A.1 in the round, then you work A.1 a total of 5 times after/next to each other in the round. If it says to work 2 repeats of A.1 vertically/in height you work the entire diagram once, then begin again at the start and work the entire diagram one more time.

Chain stitches are slightly narrower than other stitches and to avoid working the cast-on edge too tight, we simply chain more stitches to begin with. The stitch count will be adjusted on the following row to fit the pattern and measurement sketch.

The rib edge is more elastic and will contract slightly compared to, for example, stocking stitch. By increasing before the rib edge, you avoid a visible difference in width between the rib edge and the rest of the body.

It’s very easy to cast off too tightly, and by making yarn overs while casting off (and simultaneously casting these off) you avoid a too tight cast off edge.

See DROPS video: How to bind off with yarn overs (yo)

To achieve an even increase (or decrease) you can increase on, for example: every 3rd and 4th row alternately, like so: work 2 rows and increase on the 3rd row, work 3 rows and increase on the 4th. Repeat this until the increase is complete.

See DROPS lesson: Increase or decrease 1 st on every 3rd and 4th row alternately

Should you prefer to work in the round instead of back and forth, you may of course adjust the pattern. You’ll need to add steeks mid-front (usually 5 stitches), and follow the instructions. When you would normally turn and work from the wrong side, simply work across the steek and continue in the round. At the end you’ll cut the piece open, pick up stitches to work bands, and cover the cut edges.

See DROPS video: How to knit steeks and cut open

Should you prefer to work back and forth instead of in the round, you may of course adjust the pattern so you work the pieces separately and then assemble them at the end. Divide the stitches for the body in 2, add 1 edge stitch in each side (for sewing) and work the front and back pieces separately.

See DROPS lesson: Can I adapt a pattern for circular needles into straight needles?

Pattern repeats can vary slightly in the different sizes, in order to get the correct proportions. If you’re not working the exact same size as the garment in the photo, yours might deviate slightly. This has been carefully developed and adjusted so that the complete impression of the garment is the same in all sizes.

Make sure to follow instructions and diagrams for your size!

If you have found a pattern you like which is available in women’s size it’s not very difficult to convert it to men’s size. The biggest difference will be the length of sleeves and body. Start working on the women size that you think would fit across the chest. The additional length will be worked right before you cast off for the armhole/sleeve cap. If the pattern is worked top-down you can add the length right after the armhole or before the first decrease on sleeve.

Regarding additional yarn amount, this will depend on how much length you add, but it is better with a skein too many than too few.

All yarns will have excess fibres (from production) that might come off as lint or shedding. Brushed yarns (ie hairier yarns) have more of these loose, excess fibres, causing more shedding.

Shedding also depends on what is worn under or over the garment, and whether this pulls at the yarn fibres. It’s therefore not possible to guarantee that there will be no shedding

Below are some tips on how to get the best result when working with hairier yarns:

1. When the garment is finished (before you wash it) shake it vigorously so the looser hairs come off. NOTE: do NOT use a lint roller, brush or any method that pulls at the yarn.

2. Place the garment in a plastic bag and put it in your freezer - the temperature will cause the fibres to become less attached to each other, and excess fibres will come off easier.

3. Leave in the freezer for a few hours before taking it out and shaking it again.

4. Wash the garment according to the instructions on the yarn label.

Pilling is a natural process that happens to even the most exclusive of fibers. It's a natural sign of wear and tear that is hard to avoid, and that is most visible in high friction areas of your garment like a sweater's arms and cuffs.

You can make your garment look as new by removing the pilling, using a fabric comb or a pill/lint remover.

Still can't find the answer you need? Then scroll down and leave your question so one of our experts can try to help you. This will be done normally within 5 to 10 working days.
In the meantime, you can read the questions and answers that others have left to this pattern or join the DROPS Workshop on Facebook to get help from fellow knitters/crocheters!

You might also like...

Post a comment to pattern DROPS 76-16

We would love to hear what you have to say about this pattern!

If you want to leave a question, please make sure you select the correct category in the form below, to speed up the answering process. Required fields are marked *.

Comments / Questions (4)

country flag Susana Rodríguez-Vida wrote:

Hay otro error en la versión española. Los puntos del delantero que deben dejarse en un gancho auxiliar (para el cuello) son 28, no 26.

09.12.2021 - 19:14

country flag Susana Rodríguez-Vida wrote:

Hay un pequeño error en las explicaciones en español. En la Terminación, donde dice "Tejer resorte 1, siguiendo el resorte desde abajo del Patrón 1 en el delantero central y centro de la espalda" debería decir "Tejer resorte 1, pero continuar con el Patrón 1 en el delantero central".

07.12.2021 - 23:57

country flag JetteEtly Binder wrote:

Hej Kan man lave den uden snoningen foran?

17.11.2020 - 19:43

DROPS Design answered:

Hej Jette, Ja selvfølgelig, vi kan dog ikke hjælpe med at skrive opskriften om :)

18.11.2020 - 12:23

country flag Tineke Tromp wrote:

Trui nr. 76-16 Bij het kabel patroon M1 zijn er 5 toeren recht breien tussen de kabels behalve aan het einde van de M1 waar er 2 toeren zijn + 2 toeren aan het begin van de herhaling (in totaal 4 toeren). Dat betekent dat er om de drie kabels, een korte kabel (in de hoogte) moet worden gemaakt. Is dit bewust zo gedaan of is het een fout?

04.02.2013 - 12:54

DROPS Design answered:

Dit is bewust en niet verkeerd. Bij het breien van M.1 begin je met 3 nld voor de eerste kabel, daarna zijn er altijd 5 nld tussen elke kabel (na laatste kabel 2 nld + 3 nld voor de eerste kabel).

04.02.2013 - 14:10