DROPS Safran
DROPS Safran
100% Cotton
from 2.05 $ /50g
Get the yarn to make this pattern from 6.15$.

The yarn cost is calculated from the pattern’s smallest size and the yarn’s cheapest product type. Looking for an even better price? You might find it on the DROPS Deals!

DROPS SS24

Simply Summer

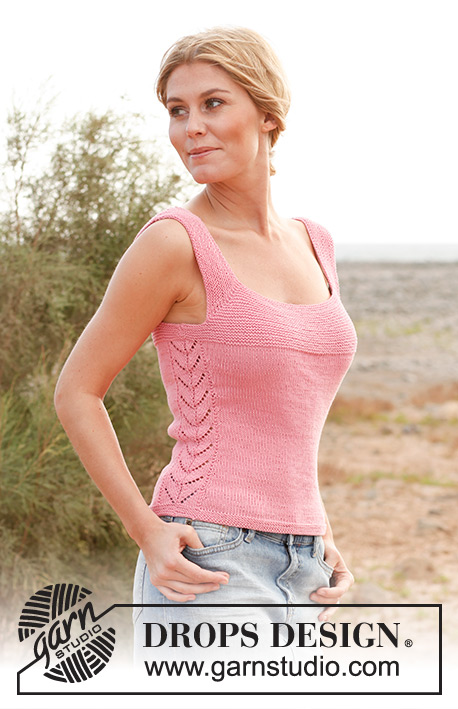
Knitted DROPS top in garter st and with lace pattern, worked top down in ”Safran”. Size: S - XXXL

DROPS 137-2
DROPS design: Pattern no E-179
Yarn group A
--------------------------------------------------------
Size: S - M - L - XL - XXL - XXXL
Finished measurements:
Bust: 76-84-92-100-110-120 cm / 30"-33"-36¼"-39⅜"-43⅜"-47¼"
Full length: 52-54-56-58-60-62 cm / 20½"-21¼"-22"-22¾"-23⅝"-24⅜"
Measurements might appear small but the garment will be very elastic so knit it in the size you normally use.

Materials: DROPS SAFRAN from Garnstudio
150-200-200-200-250-250 g color no 02, medium pink.

DROPS CIRCULAR NEEDLE (80 cm / 32") SIZE 3 mm /US 2or3- or size needed to get 24 sts x 32 rows in stockinette st = 10 x 10 cm / 4" x 4".
DROPS CIRCULAR NEEDLE (80 cm / 32") size 2.5 mm /US 1or2 – or size needed to get 24 sts x 48 rows in garter st = 10 x 10 cm / 4" x 4".

-------------------------------------------------------

Alternative Yarn – See how to change yarns here
Yarn Groups A to F – Use the same pattern and change the yarn here
Yarn usage using an alternative yarn – Use our yarn converter here

-------------------------------------------------------

DROPS Safran
DROPS Safran
100% Cotton
from 2.05 $ /50g
Get the yarn to make this pattern from 6.15$.

The yarn cost is calculated from the pattern’s smallest size and the yarn’s cheapest product type. Looking for an even better price? You might find it on the DROPS Deals!

Pattern instructions

NOTE: This pattern is written in American English. All measurements in charts are in cm. For conversion from inches to cm - click here. There are different terms for crocheting in American and British English. If this pattern includes crochet, click for "crochet terms" here. For this pattern in British English, please click here.
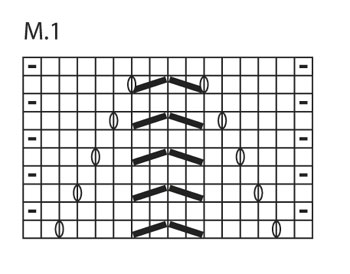
GARTER ST (back and forth on needle):
K all rows. 1 ridge = K 2 rows.

GARTER ST (in the round on circular needle):
* K 1 round and P 1 round *, repeat from *-*.

PATTERN:
See diagram M.1 – the diagram shows 1 repetition of the pattern.

DECREASE TIP (applies to side dec):
Dec as follows when 2 sts remain BEFORE diagram M.1: K 2 tog.
Dec as follows AFTER diagram M.1: Slip 1 st as if to K, K 1, psso.

INCREASE TIP (applies to side inc):
Work until 1 st in stockinette st remains before diagram M.1, make 1 YO, 1 st in stockinette st, work diagram M.1 and 1 st in stockinette st, make 1 YO. On next round K YOs twisted (i.e. work in back loop of st instead of front) to avoid holes.
--------------------------------------------------------

TOP:
Worked top down.
Front and back piece are worked separately, then put tog and worked in the round.

FRONT PIECE:
Worked back and forth on circular needle.
Cast on 100-100-108-108-115-121 sts on circular needle size 3 mm / US 2or3 with Safran. Switch to circular needle size 2.5 mm / US 1or2. Insert a marker in the 27th-27th-30th-30th-32nd-35th st in from each side (= 46-46-48-48-51-51 sts between sts with markers). K 1 row from WS. Continue with K on all rows (= garter st). AT THE SAME TIME on next row, inc 1 st on each side of the 2 sts with markers – inc by making 1 YO, on next row K YOs twisted (i.e. work in back loop of st instead of front) to avoid holes. Repeat inc every other row a total of 14-17-17-19-19-22 times = 156-168-176-184-191-209 sts. K 1 row from WS after last inc. REMEMBER THE GAUGE!
Now piece measures approx. 6-7-7-8-8-9 cm / 2⅜"-2¾"-2¾"-3⅛"-3⅛"-3½". Work next row as follows (from RS): Loosely bind off the first 40-43-46-48-50-56 sts (= strap), K the next 76-82-84-88-91-97 sts (the first of these sts is already on right needle), and loosely bind off the last 40-43-46-48-50-56 sts (= strap), cut the yarn. Work next row from WS as follows: Cast on 7-9-13-16-20-24 new sts at beg of row, work the 76-82-84-88-91-97 sts from needle and cast on 7-9-13-16-20-24 new sts at the end of row = 90-100-110-120-131-145 sts. Work in garter st back and forth for 3-3-3-4-4-4 cm / 1⅛"-1⅛"-1⅛"-1½"-1½"-1½" – AT THE SAME TIME after 2-2-2-3-3-3 cm / ¾"-¾"-¾"-1⅛"-1⅛"-1⅛", dec 1 st in each side by K tog the 2 second outermost sts from RS = 88-98-108-118-129-143 sts. Put piece aside.

BACK PIECE:
Cast on and work as front piece.

BODY:
Slip front and back piece on to same circular needle size 3 mm / US 2or3 = 176-196-216-236-258-286 sts. NOW MEASURE PIECE FROM HERE! Then work diagram M.1 over 16 sts in each side (i.e. 8 sts from back piece and 8 sts from front piece = mid under sleeve). Work the other sts in stockinette st. AT THE SAME TIME when piece measures 2 cm / ¾", dec 1 st on each side of diagram M.1 in each side - SEE DECREASE TIP! Repeat dec every 2½ cm / ⅞" a total of 6-6-6-6-5-5 times = 152-172-192-212-238-266 sts. When piece measures 18 cm / 7", inc 1 st on each side of diagram M.1 - SEE INCREASE TIP! Repeat inc every 2 cm / ¾" a total of 6 times = 176-196-216-236-262-290 sts. When piece measures approx. 30-31-32-32-33-33 cm / 11¾"-12¼"-12½"-12½"-13"-13" (50-52-54-56-58-60 cm / 19¾"-20½"-21¼"-22"-22¾"-23⅝" in total) - stop after 1 full repetition of diagram M.1, switch to circular needle size 2.5 mm / US 1or2. Work in GARTER ST in the round over all sts for 2 cm / ¾" - see explanation above! Then loosely bind off with K – use circular needle size 3 mm / US 2or3 when casting/binding off (it is very important that the bind off edge is not too tight).
The top measures approx. 52-54-56-58-60-62 cm / 20½"-21¼"-22"-22¾"-23⅝"-24⅜" vertically.

ASSEMBLY:
Sew shoulder seams and side seams edge to edge in front loop of outermost st to avoid chunky and visible seams.

This pattern has been corrected.

Updated online: 29.09.2023
BODY: ... Repeat inc every 2 cm = 3/4" a total of 6 times = 176-196-216-236-262-290 sts

Diagram

All measurements in charts are in cm.

symbols = K
symbols = P
symbols = 1 YO between 2 sts
symbols = K 2 tog
symbols = slip 1 st as if to K, K 1, psso
diagram
diagram
Do you have a question? See a list of frequently asked questions (FAQ)

Knitting tension is what determines the final measurements of your work, and is usually measured per 10 x 10 cm. It is provided like so: number of stitches in width x number of rows in height - eg: 19 stitches x 26 rows = 10 x 10 cm.

The knitting tension is very individual; some people knit/crochet loosely while others work tightly. You adjust the knitting tension with the needle size, which is why the suggested needle size only serve as a guide! You need to adjust this (up or down) to ensure that YOUR knitting tension matches the knitting tension provided in the pattern. If you work with a different knitting tension than provided you will have a different yarn consumption, and your work will have different measurements than what the pattern suggests.

The knitting tension also determines which yarns can replace each other. As long as you achieve the same knitting tension you can replace one yarn with another.

See DROPS lesson: How to measure your tension/gauge

See DROPS video: How to make a gauge tension swatch

The required amount of yarn is provided in grams, eg: 450 g. To calculate how many balls you’ll need you first need to know how many grams are in 1 ball (25g, 50g or 100g). This information is available if you click on the individual yarn quality on our pages. Divide the amount required with the amount of each ball. For example, if each ball is 50g (the most common amount), the calculation will be as follows: 450 / 50 = 9 balls.

The important thing when changing from one yarn to another is that the knitting/crochet tension remains the same. This is so that the measurements of the finished piece will be the same as on the sketch provided. It is easier to achieve the same knitting tension using yarns from the same yarn group. It is also possible to work with multiple strands of a thinner yarn to achieve the knitting tension of a thicker one. Please try our yarn converter. We recommend you to always work a test swatch.

Please NOTE: when changing yarn the garment might have a different look and feel to the garment in the photo, due to individual properties and qualities of each yarn.

See DROPS lesson: Can I use a different yarn than the one mentioned in the pattern?

All our yarns are categorised into yarn groups (from A to F) according to thickness and knitting tension – group A contains the thinnest yarns and group F the thickest. This makes it easier for you to find alternative yarns to our patterns, should you wish to switch yarn. All yarns within the same group have a similar knitting tension and can easily replace each other. However, different yarn qualities have different structures and properties which will give the finished work a unique look and feel.

Click here for an overview of the yarns in each yarn group

At the top of all our patterns you’ll find a link to our yarn converter, which is a helpful tool should you wish to use a different yarn than suggested. By filling in the yarn quality you wish to replace, the amount (in your size) and number of strands, the converter will present good alternative yarns with the same knitting tension. Additionally it will tell you how much you’ll require in the new qualities and whether you’ll need to work with multiple strands. Most skeins are 50g (some are 25g or 100g).

If the pattern is worked with multiple colours, every colour will have to be converted separately. Similarly, if the pattern is worked with several strands of different yarns (for example 1 strand Alpaca and 1 strand Kid-Silk) you will have to find alternatives for each, individually.

Click here to see our yarn converter

Since different yarns have different qualities and textures we have chosen to keep the original yarn in our patterns. However, you can easily find options among our available qualities by using our yarn converter, or simply pick a yarn from the same yarn group.

It is possible that some retailers still have discontinued yarns in stock, or that someone has a few skeins at home that they would like to find patterns for.

The yarn converter will provide both alternative yarn as well as required amount in the new quality.

If you think it's hard to decide what size to make, it can be a good idea to measure a garment you own already and like the size of. Then you can pick the size by comparing those measures with the ones available in the pattern's size chart.

You'll find the size chart at the bottom of the pattern.

See DROPS lesson: How to read size chart

The needle size provided in the pattern serves only as a guide, the important thing is to follow the knitting tension. And since knitting tension is very individual, you will have to adjust the needle size to ensure that YOUR tension is the same as in the pattern – maybe you’ll have to adjust 1, or even 2 needle sizes, up or down to achieve the correct tension. For this, we recommend that you work test swatches.

Should you work with a different knitting tension than the one provided, the measurements of the finished garment might deviate from the measurement sketch.

See DROPS lesson: How to measure your tension/gauge

See DROPS video: How to make a gauge tension swatch

Working a garment top-down provides more flexibility and room for personal adjustment. For example it is easier to try the garment on while working, as well as making adjustments to length of yoke and shoulder caps.

The instructions are carefully explaining every step, in the correct order. Diagrams are adjusted to the knitting direction and are worked as usual.

The diagram depicts all rows/rounds, and every stitch seen from the right side. It is read from bottom to top, from right to left. 1 square = 1 stitch.

When working back and forth, every other row is worked from the right side and every other row is worked from the wrong side. When working from the wrong side, the diagram will have to be worked reversed: from left to right, knit stitches are purled, purl stitches are knit etc.

When working in the round every round is worked from the right side and the diagram are worked from right to left on all rounds.

See DROPS lesson: How to read knitting diagrams

The diagram depicts all rows/rounds, and every stitch seen from the right side. It is worked from bottom to top, from right to left.

When working back and forth every other row is worked from the right side: from right to left and every other row is worked from the wrong side: from left to right.

When working in the round, every row in the diagram are worked from the right side, from right to left.

When working a circular diagram you start in the middle and work your way outwards, counter clockwise, row by row.

The rows usually start with a given number of chain stitches (equivalent to the height of the following stitch), this will either be depicted in the diagram or explained in the pattern.

See DROPS lesson: How to read crochet diagrams

Instructions for working several diagrams after each other on the same row/round, will often be written like so: “work A.1, A.2, A.3 a total of 0-0-2-3-4 times". This means you work A.1 once, then A.2 is worked once, and A.3 is repeated (in width) the number of times provided for your size – in this case like so: S = 0 times, M = 0 times, L=2 times, XL= 3 times and XXL = 4 times.

The diagrams are worked as usual: begin with the first row in A.1, then work the first row in A.2 etc.

See DROPS lesson: How to read knitting diagrams

See DROPS lesson: How to read crochet diagrams

The total width of the garment (from wrist-to-wrist) will be larger in the larger sizes, despite the actual sleeves being shorter. The larger sizes have longer sleeve caps and wider shoulders, so there will be a good fit in all sizes.

The measurement sketch/schematic drawing provides information regarding the full length of the garment. If it’s a jumper or a jacket the length is measured from the highest point on the shoulder (usually closest to the neckline), and straight down to the bottom of the garment. It is NOT measured from the tip of shoulder. Similarly, the length of yoke is measured from the highest point on the shoulder and down to where yoke is split into body and sleeves.

See DROPS lesson: How to read a schematic drawing

Diagrams are often repeated on the round or in height. 1 repeat is the diagram the way it appears in the pattern. If it says to work 5 repeats of A.1 in the round, then you work A.1 a total of 5 times after/next to each other in the round. If it says to work 2 repeats of A.1 vertically/in height you work the entire diagram once, then begin again at the start and work the entire diagram one more time.

Chain stitches are slightly narrower than other stitches and to avoid working the cast-on edge too tight, we simply chain more stitches to begin with. The stitch count will be adjusted on the following row to fit the pattern and measurement sketch.

The rib edge is more elastic and will contract slightly compared to, for example, stocking stitch. By increasing before the rib edge, you avoid a visible difference in width between the rib edge and the rest of the body.

It’s very easy to cast off too tightly, and by making yarn overs while casting off (and simultaneously casting these off) you avoid a too tight cast off edge.

See DROPS video: How to bind off with yarn overs (yo)

To achieve an even increase (or decrease) you can increase on, for example: every 3rd and 4th row alternately, like so: work 2 rows and increase on the 3rd row, work 3 rows and increase on the 4th. Repeat this until the increase is complete.

See DROPS lesson: Increase or decrease 1 st on every 3rd and 4th row alternately

Should you prefer to work in the round instead of back and forth, you may of course adjust the pattern. You’ll need to add steeks mid-front (usually 5 stitches), and follow the instructions. When you would normally turn and work from the wrong side, simply work across the steek and continue in the round. At the end you’ll cut the piece open, pick up stitches to work bands, and cover the cut edges.

See DROPS video: How to knit steeks and cut open

Should you prefer to work back and forth instead of in the round, you may of course adjust the pattern so you work the pieces separately and then assemble them at the end. Divide the stitches for the body in 2, add 1 edge stitch in each side (for sewing) and work the front and back pieces separately.

See DROPS lesson: Can I adapt a pattern for circular needles into straight needles?

Pattern repeats can vary slightly in the different sizes, in order to get the correct proportions. If you’re not working the exact same size as the garment in the photo, yours might deviate slightly. This has been carefully developed and adjusted so that the complete impression of the garment is the same in all sizes.

Make sure to follow instructions and diagrams for your size!

If you have found a pattern you like which is available in women’s size it’s not very difficult to convert it to men’s size. The biggest difference will be the length of sleeves and body. Start working on the women size that you think would fit across the chest. The additional length will be worked right before you cast off for the armhole/sleeve cap. If the pattern is worked top-down you can add the length right after the armhole or before the first decrease on sleeve.

Regarding additional yarn amount, this will depend on how much length you add, but it is better with a skein too many than too few.

All yarns will have excess fibres (from production) that might come off as lint or shedding. Brushed yarns (ie hairier yarns) have more of these loose, excess fibres, causing more shedding.

Shedding also depends on what is worn under or over the garment, and whether this pulls at the yarn fibres. It’s therefore not possible to guarantee that there will be no shedding

Below are some tips on how to get the best result when working with hairier yarns:

1. When the garment is finished (before you wash it) shake it vigorously so the looser hairs come off. NOTE: do NOT use a lint roller, brush or any method that pulls at the yarn.

2. Place the garment in a plastic bag and put it in your freezer - the temperature will cause the fibres to become less attached to each other, and excess fibres will come off easier.

3. Leave in the freezer for a few hours before taking it out and shaking it again.

4. Wash the garment according to the instructions on the yarn label.

Pilling is a natural process that happens to even the most exclusive of fibers. It's a natural sign of wear and tear that is hard to avoid, and that is most visible in high friction areas of your garment like a sweater's arms and cuffs.

You can make your garment look as new by removing the pilling, using a fabric comb or a pill/lint remover.

Still can't find the answer you need? Then scroll down and leave your question so one of our experts can try to help you. This will be done normally within 5 to 10 working days.
In the meantime, you can read the questions and answers that others have left to this pattern or join the DROPS Workshop on Facebook to get help from fellow knitters/crocheters!

Simply Summer

J_e_z_i_o_r_k_a, Poland

Simply Summer

La Gata Con Guantes, Italy

Simply Summer

Heike, Germany

Simply Blue Summer

Amy, United States

137-2 Simply Summer

Angela, Italy

SunFlower Top

ynory, Germany

Magenta Cotton Tank

Elizabeth, United States

Post a comment to pattern DROPS 137-2

We would love to hear what you have to say about this pattern!

If you want to leave a question, please make sure you select the correct category in the form below, to speed up the answering process. Required fields are marked *.

Comments / Questions (97)

country flag Veronica wrote:

Scusate, mi sono bloccata! Una volta messe tutte le maglie del dietro e del davanti sul ferro circolare, dovrei iniziare a lavorare il diagramma M1. Trovandomi al centro sotto le maniche, devo partire da metà diagramma per lavorare le prime otto maglie, terminando il giro con le restanti 8 maglie del diagramma?

08.03.2019 - 00:31

DROPS Design answered:

Buongiorno Veronica. Una volta messe insieme le maglie del dietro e del davanti, se inizia il giro dal lato, dovrà lavorare metà diagramma sulle prime 8 maglie e l'altra metà sulle ultime 8 maglie. Se preferisce può spostare l'inizio del giro al centro sul dietro, oppure subito dopo il diagramma lavorato sul lato. Buon lavoro!

08.03.2019 - 09:04

country flag Veronica wrote:

Buonasera, aumentare 1 maglia da ciascun lato delle due maglie con i segni, vuol dire fare una gettata tra la penultima e l'ultima maglia prima del segno e poi fra la prima e la seconda maglia dopo il secondo segno?

25.02.2019 - 23:07

DROPS Design answered:

Buongiorno Veronica. Deve lavorare fino alla maglia con il segno, fa una maglia gettata, lavora la m con il segno, 1 maglia gettata. Ripete in corrispondenza del secondo segno. Ad ogni riga con aumenti, vengono aumentate 4 maglie. Buon lavoro!

26.02.2019 - 00:12

country flag Fiorella Carrera wrote:

Scusatemi ma non trovo dove si creano le spalline forse non capisco le istruzioni

30.09.2018 - 14:10

DROPS Design answered:

Buongiorno Fiorella. Il top viene lavorato dall’alto verso il basso. Le spalline vengono lavorate subito all’inizio, quando lavora a legaccio la parte superiore del top. Le maglie delle spalline corrispondono alle prime e alle ultime m sul ferro (quelle prima del primo segno e quello dopo il secondo segno). Proseguendo con il lavoro come indicato, le spalline prendono forma. Buon lavoro!

01.10.2018 - 09:35

country flag Catharina wrote:

Ik wil met dit model gaan beginnen. Na het opzetten wordt gezegd: brei 1 naald recht aan de verkeerde kant. Brei daarna alle naalden recht. Wat is er bijzonder aan deze ene naald, dat deze apart wordt genoemd? Moet ik na het opzetten van de steken de draad afknippen en aan de andere kant van het werk beginnen?

10.04.2018 - 16:02

DROPS Design answered:

Hallo Catharina, Nee, je hoeft de draad niet af te knippen. Je kunt na het opzetten gewoon beginnen met 1 naald recht. Dit zorgt voor een mooiere onderrand.

12.04.2018 - 07:17

country flag Sylvie Chevalley wrote:

Merci, je vais essayer de faire cela. Est-ce qu'un bord au crochet tout le long des bretelles suffirait également à les bloquer ?

29.08.2017 - 12:49

DROPS Design answered:

Bonjour Mme Chevalley, en fonction du résultat souhaité vous pouvez essayer l'un ou l'autre ou les 2. Bonnes finitions!

29.08.2017 - 16:21

country flag Sylvie wrote:

Bonjour, ayant terminé le top, je commence à faire les finitions. Je vois qu'il est très échancré sous les bras, et les bretelles ont tendance à se distendre. Que pourrais-je faire pour 'bloquer' les bretelles et pour compenser le trop échancré ? un grand merci.

20.08.2017 - 15:54

DROPS Design answered:

Bonjour Sylvie, si les emmanchures sont trop échancrées, vous pouvez réaliser une petite bordure au crochet qui va les resserrer aux dimensions que vous souhaitez.

28.08.2017 - 12:20

country flag Thorandt wrote:

Danke für die schnelle Antwort alles OK. bitte nochmal zum besseren Verständnis: Die Aufnahmereie zählt ja nicht?? Dann eine Reihe rechts (1.R.)mit Markierung setzen!! ist das die Rückseite?? Nächste Reihe (2.Reihe) "Vorderseite" mit Umschlag beginnen??? Danke im voraus für die "schnelle" Antwort

31.07.2017 - 10:47

DROPS Design answered:

Liebe Frau Thorandt, Zuerst schlagen Sie alle Maschen an, dann, ohne die Maschen zu stricken (= von der Vorderseite) die Markierer einsetzen. Dann 1 Rückreihe rechts stricken, und dann bei der nächsten Hinreihe die Aufnahme anfangen, und bei jeder Hinreihe zunehmen. Viel Spaß beim stricken!

31.07.2017 - 11:22

country flag Thorandt wrote:

Guten Tag brauch bitte mal schon am Anfang Hilfe Vorderteil 1. Reihe rechts von der Rückseite stricken danach mit Krausrippen weiterstricken GLEICHZEITIG bei der nächsten R.(Reihe 2?) Von der Vorderseite auf beiden Seiten der Markierung je 1 Umschlag machen Kommt der Umschlag vor bzw. nach der Markierung (bei mir 30 M=31M je Seite?) Bleiben die Maschen der Zwischenmarkierung unverändert Bin etwas ratlos bitte danke im voraus für die Info

27.07.2017 - 22:13

DROPS Design answered:

Liebe Frau Thorandt, die Zunahmen werden von der 1. Reihe von der Vorderseite und dann in jede 2. R (= jede Hinreihe) gestrikt. Die Markierungen sollen in den selben Maschen bleiben, dann vor/nach den Markierer zunehmen. Die Maschenanzahl vor/nach den Markierern und zwischen beiden Markierer werden dann zunehmen. Viel Spaß beim stricken!

28.07.2017 - 08:30

country flag Kogler wrote:

Bonjour Je voudrais savoir si au moment de rassembler le dos et le devant sur la même aiguille circulaire on tricote en rond ou en allers retours.Si on tricote en rond comment travaille t-on sur le motif.D'après ce que je comprends lorsqu'on tricote en rond le point mousse se fait avec un rg endroit et un rg envers et pour le point jersey on tricote ts les rgs à l'endroit .Je n'ai jamais tricoter en rond sur aiguilles circulaires .Je vous remercie pour votre réponse

17.07.2017 - 23:27

DROPS Design answered:

Bonjour Mme Kogler, on tricote le devant et le dos séparément (= en allers et retours) jusqu'à la partie point mousse (on fera ensuite une couture sur les côtés). On reprend ensuite toutes les mailles ensemble sur l'aiguille circulaire et on tricote A.1 de chaque côté - dans A.1, lisez le diagramme en commençant en bas à droite vers la gauche et ceci, tous les tours. Tricotez les mailles comme indiqué dans la légende. Bon tricot!

18.07.2017 - 08:54

country flag Andrea wrote:

Dobrý den, popisy jsou napsány s krajovými oky, nebo musím 2 krajová oka přidat (popis začíná na 100 ok nebo na 102 ok)? Děkuji

17.06.2017 - 13:57

DROPS Design answered:

Dobrý den, Andreo, v návodech uvádíme celkový počet ok v řadě, tj. včetně krrajových ok. Žádná oka navíc tedy přičítat nemusíte. Hodně zdaru! Hana

18.06.2017 - 12:12