DROPS Snow
DROPS Snow
100% Wool
from 2.00 £ /50g
DROPS Vienna
DROPS Vienna
91% Mohair, 9% Polyester
Discontinued
find alternatives
DROPS SS24

Sandy Waves

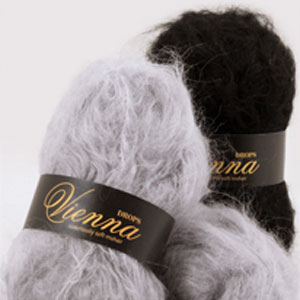
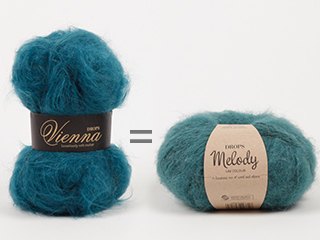
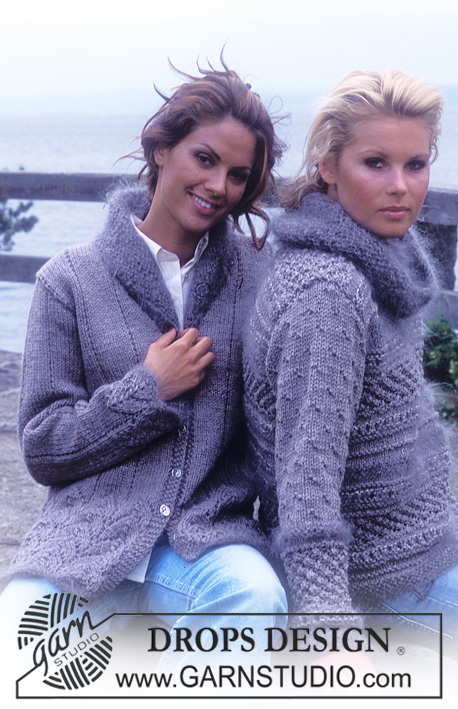
Pullover in DROPS Snow and DROPS Vienna or DROPS Snow and DROPS Melody. Gloves in DROPS Karisma Superwash. Scarf in DROPS Vivaldi or DROPS Brushed Alpaca Silk.

DROPS 76-13
DROPS 76-13
Pullover:

Sizes: S - M/L - L/XL - XXL
Finished measurements: 102-114-126-136 cm

Materials: DROPS SNOW from Garnstudio
650-750-800-900 gr nr 01, natural white.

and use: DROPS VIENNA from Garnstudio
50-50-50-50 gr nr 21, natural white
or: DROPS MELODY from Garnstudio
50-50-50-50 gr nr 01, off white

DROPS 10 mm needles, or size needed to obtain correct gauge.

-------------------------------------------------------

Alternative Yarn – See how to change yarns here
Yarn Groups A to F – Use the same pattern and change the yarn here
Yarn usage using an alternative yarn – Use our yarn converter here

-------------------------------------------------------

DROPS Snow
DROPS Snow
100% Wool
from 2.00 £ /50g
DROPS Vienna
DROPS Vienna
91% Mohair, 9% Polyester
Discontinued
find alternatives

Pattern instructions

NOTE: This pattern is written in British English. All measurements in charts are in cm. For conversion from cm to inches - click here. There are different terms for crocheting in British and American English. If this pattern includes crochet, click for "crochet terms" here. For this pattern in American English, please click here.
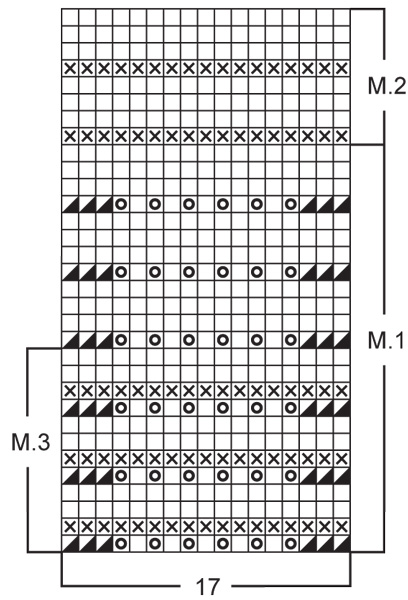
PULLOVER:

Gauge: 10 sts x 14 rows = 10 x 10 cm in pattern.

Measuring-tips: Measure the garment when held up due to the pattern.

Pattern: See chart. The pattern is seen from the right side. The chart is placed sideways on the page with the bottom of the chart toward the outside edge of the page. Note: Pattern 3 (M.3) is incorrectly marked on the chart. Pattern 3 is the first 12 rows of the chart.

Rib: * P 2, K 2 *, repeat from * - *.

Front: Loosely cast on 53-59-65-70 sts on smaller needles with 2 strands Vienna or Melody. Change to 1 strand Snow and knit as follows (row 1 = right side): K 1 (edge st knit in garter st), 0-3-6-0 sts stockinette st, Pattern 1 over 51-51-51-68 sts, 0-3-6-0 sts stockinette st, K 1 (edge st knit in garter st). Continue the pattern as established – note: for sizes M/L and L/XL on the rows where you K all sts from the wrong side, you need to continue to K across the sts in stockinette st at each side so that the ridge will continue all the way across the row.
When the piece measures 52-53-54-55 cm - see Measuring-tips - bind off 1 edge st at each side to mark armholes = 51-57-63-68 sts, continue the pattern. When the piece measures approx. 64-66-68-70 cm - adjust to end after 2 rows stockinette st - knit Pattern 2 to finished measurements. At the same time after row 2 of Pattern 2 put the center 9-9-9-10 sts on a st holder for the neck. Then bind off at each neck edge every other row: 2 sts 1 time and 1 st 1 time = 18-21-24-26 sts remain on shoulder. Bind off when the piece measures 72-74-76-78 cm.

Back: Cast on and knit the same as the front. Bind off for armhole as on front. When the piece measures approx. 64-66-68-70 cm (match front) continue with Pattern 2 to finished measurements. When the piece measures 70-72-74-76 cm bind off the center 15-15-15-16 sts for the neck = 18-21-24-26 sts remain on each shoulder. Bind off when the piece measures 72-74-76-78 cm.

Sleeve: Loosely cast on 29-29-31-31 sts with 2 strands Vienna or Melody. Change to 1 strand Snow and knit as follows (row 1 = right side): K 1 (edge st knit in garter st), 5-5-6-6 sts stockinette st, Pattern 1 over 17 sts, 5-5-6-6 sts stockinette st, K 1 (edge st knit in garter st). Continue in pattern as established – note that on the rows where you K all sts from the wrong side, you need to continue to K across the sts in stockinette st at each side so that the ridge will continue across the row.
When the piece measures 8 cm inc 1 st at each side every 8-6-5.5-4.5 cm a total of 6-7-7-8 times = 41-43-45-47 sts. When sleeve measures 50-48-46-44 cm, bind off all sts.

Assembly: Sew right shoulder.
Collar: Pick up approx. 38 to 46 sts incl. sts on st holder (divisible by 4 + 2) around the neck with 2 strands Vienna or Melody. If you pick up more than 46 sts you must dec evenly distributed on the 1st row so the collar will not be stretched out. Knit rib keeping 1 edge st at each side in garter st for approx. 12 cm - or as long as desired, bind off in rib. Sew left shoulder and up collar. Sew in sleeves. Sew sleeve and side seams using edge sts as a seam allowance.


GLOVES:

Sizes: S/M - M/L

Materials: DROPS KARISMA SUPERWASH from Garnstudio
150-150 gr nr 01, natural.

DROPS 3 mm and 3.5 mm double-pointed needles, or sizes needed to obtain correct gauge.

Gauge: 22 sts x 30 rows on larger needles in stockinette st = 10 x 10 cm.

Rib: * K 2, P 2 *, repeat from * - *.

Garter st, when knitting flat: Knit all sts, all rows.
Garter st, when knitting in the round: *Rnd 1, knit. Rnd 2, purl.* Repeat from * - *.

Gloves: Cast on 52-56 sts on smaller double-pointed needles; join and knit 4 rows garter st. Change to rib and knit until the piece measures 15 cm, decreasing 8 sts evenly distributed on the last row = 44 (48) sts. Measure the piece from here.
Change to larger double pointed needles and knit the next row in stockinette st as follows: 22-24 sts (upper hand), 1-1 st for the thumb (put a marker in this st), 21-23 sts (inside hand). Continue in stockinette st over all sts. When the piece measures 1-2 cm inc 1 st each side of thumb st every 4-3 rows a total of 5-6 times = 54-60 sts - knit the increased sts in stockinette st. Put the 11-13 thumb sts on a st holder. Cast on 1 new st in back of these sts on the next row= 44-48 sts. Continue until the piece measures 9-10 cm. Put the 22-24 upper hand sts on a st holder (st holder-1) and the 22-24 inside hand sts (incl. st in back of thumb) on a second st holder (st holder-2).Now knit fingers as follows:

Little finger: Pick up 4-5 sts from st holder-1 and 5-5 sts from st holder-2 and cast on 2 new sts toward ring finger = 11-12 sts. Join and knit stockinette st until finger measures 5-6 cm. Now K 2 tog across row, 1 strand through the remaining sts and fasten neatly. Put all sts from st holders back on needles and knit 3 rows stockinette st. Put back on st holders 1 and 2.

Ring finger: Pick up 6-6 sts from st holder-1 and 5-6 sts from st holder-2 and cast on 1 st between fingers at each side = 13-14 sts. Join and knit stockinette st until finger measures 7-8 cm. Now K 2 tog across row, then pull 1 strand through the remaining sts and fasten neatly.

Middle finger: Pick up 6-7 sts from st holder-1 and 6 6 sts from st holder-2 and cast on 1 st between fingers at each side = 14-15 sts. Join and knit stockinette st until finger measures 8-9 cm. Now K 2 tog across row, then pull 1 strand through the remaining sts and fasten neatly.

Index finger: Pick up the remaining 6-6 sts from st holder-1 and 6-7 sts from st holder-2 and cast on 2 new sts toward middle finger = 14-15 sts. Join and knit stockinette st until finger measures 6-7 cm. Now K 2 tog across row, then pull 1 strand through the remaining sts and fasten neatly.

Thumb: Put the 11-13 thumb sts onto needles, pick up 3-3 sts in back of thumb = 14-16 sts. Join and knit stockinette st until thumb measures 5-6 cm. Now K 2 tog across row, pull 1 strand through the remaining sts and fasten neatly.

Assembly: Fold hem to wrong side and stitch in place. Sew a small st between fingers so that there will not be a hole in the transitions. Knit a second glove, reversing shaping.


SCARF:

Length: approx. 150 cm
Width: approx. 40 cm

Materials: DROPS VIVALDI from Garnstudio
100 gr nr 06, natural
Or use: DROPS BRUSHED ALPACA SILK from Garnstudio
100 gr nr 01, off white

DROPS 5 mm needles, or size needed to obtain correct gauge.

Gauge: 18 sts in Pattern 3 = 10 cm.

Garter st, when knitting flat: Knit all sts, all rows.

Pattern: See chart. The scarf uses only Pattern 3 (M.3) and the pattern is seen from the right side. The chart is placed sideways on the page with the bottom of the chart towards the outer edge of the page. Note: Pattern 3 (M.3) is incorrectly marked on the chart. Pattern 3 is the first 12 rows of the chart.

Scarf: Cast on 74 sts with 2 strands of Vivaldi or Brushed Alpaca Silk. Take away 1 strand and knit 4 rows garter st. Continue with Pattern 3, keeping 3 sts in garter st at each side edge. When the piece measures approx. 148 cm knit 4 rows garter st over all sts then bind off with 2 strands of yarn.

Diagram

symbols = K from RS, P from WS
symbols = P from RS, K from WS
symbols = K 2 tog (on right side row)
symbols = yo
diagram
diagram

Each of our patterns has specific tutorial videos to help you.

Do you have a question? See a list of frequently asked questions (FAQ)

Knitting tension is what determines the final measurements of your work, and is usually measured per 10 x 10 cm. It is provided like so: number of stitches in width x number of rows in height - eg: 19 stitches x 26 rows = 10 x 10 cm.

The knitting tension is very individual; some people knit/crochet loosely while others work tightly. You adjust the knitting tension with the needle size, which is why the suggested needle size is only meant as a guide! You need to adjust this (up or down) to ensure that YOUR knitting tension matches the knitting tension provided in the pattern. If you work with a different knitting tension than provided you will have a different yarn consumption, and your work will have different measurements than what the pattern suggests.

The knitting tension also determines which yarns can replace each other. As long as you achieve the same knitting tension you can replace one yarn with another.

See DROPS lesson: How to measure your tension/gauge

See DROPS video: How to make a gauge tension swatch

The required amount of yarn is provided in grams, eg: 450 g. To calculate how many balls you’ll need you first need to know how many grams are in 1 ball (25g, 50g or 100g). This information is available if you click on the individual yarn quality on our pages. Divide the amount required with the amount of each ball. For example, if each ball is 50g (the most common amount), the calculation will be as follows: 450 / 50 = 9 balls.

The important thing when changing from one yarn to another is that the knitting/crochet tension remains the same. This is so that the measurements of the finished piece will be the same as on the sketch provided. It is easier to achieve the same knitting tension using yarns from the same yarn group. It is also possible to work with multiple strands of a thinner yarn to achieve the knitting tension of a thicker one. Please try our yarn converter. We recommend you to always work a test swatch.

Please NOTE: when changing yarn the garment might have a different look and feel to the garment in the photo, due to individual properties and qualities of each yarn.

See DROPS lesson: Can I use a different yarn than the one mentioned in the pattern?

All our yarns are categorised into yarn groups (from A to F) according to thickness and knitting tension – group A contains the thinnest yarns and group F the thickest. This makes it easier for you to find alternative yarns to our patterns, should you wish to switch yarn. All yarns within the same group have a similar knitting tension and can easily replace each other. However, different yarn qualities have different structures and properties which will give the finished work a unique look and feel.

Click here for an overview of the yarns in each yarn group

At the top of all our patterns you’ll find a link to our yarn calculator, which is a helpful tool should you wish to use a different yarn than suggested. By filling in the yarn quality you wish to replace, the amount (in your size) and number of strands, the calculator will present good alternative yarns with the same knitting tension. Additionally it will tell you how much you’ll require in the new qualities and whether you’ll need to work with multiple strands. Most skeins are 50g (some are 25g or 100g).

If the pattern is worked with multiple colours, every colour will have to be calculated separately. Similarly, if the pattern is worked with several strands of different yarns (for example 1 strand Alpaca and 1 strand Kid-Silk) you will have to find alternatives for each, individually.

Click here to see our yarn calculator

Since different yarns have different qualities and textures we have chosen to keep the original yarn in our patterns. However, you can easily find options among our available qualities by using our yarn calculator, or simply pick a yarn from the same yarn group.

It is possible that some retailers still have discontinued yarns in stock, or that someone has a few skeins at home that they would like to find patterns for.

The yarn calculator will provide both alternative yarn as well as required amount in the new quality.

If you think it's hard to decide what size to make, it can be a good idea to measure a garment you own already and like the size of. Then you can pick the size by comparing those measures with the ones available in the pattern's size chart.

You'll find the size chart at the bottom of the pattern.

See DROPS lesson: How to read size chart

The needle size provided in the pattern serves only as a guide, the important thing is to follow the knitting tension. And since knitting tension is very individual, you will have to adjust the needle size to ensure that YOUR tension is the same as in the pattern – maybe you’ll have to adjust 1, or even 2 needle sizes, up or down to achieve the correct tension. For this, we recommend that you work test swatches.

Should you work with a different knitting tension than the one provided, the measurements of the finished garment might deviate from the measurement sketch.

See DROPS lesson: How to measure your tension/gauge

See DROPS video: How to make a tension/gauge swatch

Working a garment top-down provides more flexibility and room for personal adjustment. For example it is easier to try the garment on while working, as well as making adjustments to length of yoke and shoulder caps.

The instructions are carefully explaining every step, in the correct order. Diagrams are adjusted to the knitting direction and are worked as usual.

The diagram depicts all rows/rounds, and every stitch seen from the right side. It is read from bottom to top, from right to left. 1 square = 1 stitch.

When working back and forth, every other row is worked from the right side and every other row is worked from the wrong side. When working from the wrong side, the diagram will have to be worked reversed: from left to right, knit stitches are purled, purl stitches are knit etc.

When working in the round every round is worked from the right side and the diagram are worked from right to left on all rounds.

See DROPS lesson: How to read knitting diagrams

The diagram depicts all rows/rounds, and every stitch seen from the right side. It is worked from bottom to top, from right to left.

When working back and forth every other row is worked from the right side: from right to left and every other row is worked from the wrong side: from left to right.

When working in the round, every row in the diagram are worked from the right side, from right to left.

When working a circular diagram you start in the middle and work your way outwards, counter clockwise, row by row.

The rows usually start with a given number of chain stitches (equivalent to the height of the following stitch), this will either be depicted in the diagram or explained in the pattern.

See DROPS lesson: How to read crochet diagrams

Instructions for working several diagrams after each other on the same row/round, will often be written like so: “work A.1, A.2, A.3 a total of 0-0-2-3-4 times". This means you work A.1 once, then A.2 is worked once, and A.3 is repeated (in width) the number of times provided for your size – in this case like so: S = 0 times, M = 0 times, L=2 times, XL= 3 times and XXL = 4 times.

The diagrams are worked as usual: begin with the first row in A.1, then work the first row in A.2 etc.

See DROPS lesson: How to read knitting diagrams

See DROPS lesson: How to read crochet diagrams

The total width of the garment (from wrist-to-wrist) will be larger in the larger sizes, despite the actual sleeves being shorter. The larger sizes have longer sleeve caps and wider shoulders, so there will be a good fit in all sizes.

The measurement sketch/schematic drawing provides information regarding the full length of the garment. If it’s a jumper or a jacket the length is measured from the highest point on the shoulder closest to the neckline, and straight down to the bottom of the garment. It is NOT measured from the tip of shoulder. Similarly, the length of yoke is measured from the highest point on the shoulder and down to where yoke is split into body and sleeves.

On a jacket measures are never taken along bands, unless specifically stated. Always measure inside band stitches when measuring the length.

See DROPS lesson: How to read a schematic drawing

Diagrams are often repeated on the round or in height. 1 repeat is the diagram the way it appears in the pattern. If it says to work 5 repeats of A.1 in the round, then you work A.1 a total of 5 times after/next to each other in the round. If it says to work 2 repeats of A.1 vertically/in height you work the entire diagram once, then begin again at the start and work the entire diagram one more time.

Chain stitches are slightly narrower than other stitches and to avoid working the cast-on edge too tight, we simply chain more stitches to begin with. The stitch count will be adjusted on the following row to fit the pattern and measurement sketch.

The rib edge is more elastic and will contract slightly compared to, for example, stocking stitch. By increasing before the rib edge, you avoid a visible difference in width between the rib edge and the rest of the body.

It’s very easy to cast off too tightly, and by making yarn overs while casting off (and simultaneously casting these off) you avoid a too tight cast off edge.

See DROPS video: How to bind off with yarn overs (yo)

To achieve an even increase (or decrease) you can increase on, for example: every 3rd and 4th row alternately, like so: work 2 rows and increase on the 3rd row, work 3 rows and increase on the 4th. Repeat this until the increase is complete.

See DROPS lesson: Increase or decrease 1 st on every 3rd and 4th row alternately

Should you prefer to work in the round instead of back and forth, you may of course adjust the pattern. You’ll need to add steeks mid-front (usually 5 stitches), and follow the instructions. When you would normally turn and work from the wrong side, simply work across the steek and continue in the round. At the end you’ll cut the piece open, pick up stitches to work bands, and cover the cut edges.

See DROPS video: How to knit steeks and cut open

Should you prefer to work back and forth instead of in the round, you may of course adjust the pattern so you work the pieces separately and then assemble them at the end. Divide the stitches for the body in 2, add 1 edge stitch in each side (for sewing) and work the front and back pieces separately.

See DROPS lesson: Can I adapt a pattern for circular needles into straight needles?

Pattern repeats can vary slightly in the different sizes, in order to get the correct proportions. If you’re not working the exact same size as the garment in the photo, yours might deviate slightly. This has been carefully developed and adjusted so that the complete impression of the garment is the same in all sizes.

Make sure to follow instructions and diagrams for your size!

If you have found a pattern you like which is available in women’s size it’s not very difficult to convert it to men’s size. The biggest difference will be the length of sleeves and body. Start working on the women size that you think would fit across the chest. The additional length will be worked right before you cast off for the armhole/sleeve cap. If the pattern is worked top-down you can add the length right after the armhole or before the first decrease on sleeve.

Regarding additional yarn amount, this will depend on how much length you add, but it is better with a skein too many than too few.

All yarns will have excess fibres (from production) that might come off as lint or shedding. Brushed yarns (ie hairier yarns) have more of these loose, excess fibres, causing more shedding.

Shedding also depends on what is worn under or over the garment, and whether this pulls at the yarn fibres. It’s therefore not possible to guarantee that there will be no shedding

Below are some tips on how to get the best result when working with hairier yarns:

1. When the garment is finished (before you wash it) shake it vigorously so the looser hairs come off. NOTE: do NOT use a lint roller, brush or any method that pulls at the yarn.

2. Place the garment in a plastic bag and put it in your freezer - the temperature will cause the fibres to become less attached to each other, and excess fibres will come off easier.

3. Leave in the freezer for a few hours before taking it out and shaking it again.

4. Wash the garment according to the instructions on the yarn label.

Pilling is a natural process that happens to even the most exclusive of fibers. It's a natural sign of wear and tear that is hard to avoid, and that is most visible in high friction areas of your garment like a sweater's arms and cuffs.

You can make your garment look as new by removing the pilling, using a fabric comb or a pill/lint remover.

Still can't find the answer you need? Then scroll down and leave your question so one of our experts can try to help you. This will be done normally within 5 to 10 working days.
In the meantime, you can read the questions and answers that others have left to this pattern or join the DROPS Workshop on Facebook to get help from fellow knitters/crocheters!

You might also like...

Post a comment to pattern DROPS 76-13

We would love to hear what you have to say about this pattern!

If you want to leave a question, please make sure you select the correct category in the form below, to speed up the answering process. Required fields are marked *.

Comments / Questions (7)

country flag Elena wrote:

Dear Garnstudio-Team, can this pullover be knitted in the round bottom-up until armholes? Thank you!

22.03.2021 - 22:05

DROPS Design answered:

Dear Elene, yes, it can be pretty easily done. Add up the stitches of teh front and the back to cast on, but omit the edge stitches (4 stitch on theround all together), and knit straight up with the pattern until the armhole should begin. Divide the stitches to the front and back and continue according to the instructions. Happy Knitting!

22.03.2021 - 23:40

country flag Wenche Olsen wrote:

Hei. Jeg finner ikke ut om det skal strikkes vrangbord på bol og ermer, og hvor mange omganger det skal være?

18.01.2019 - 14:03

DROPS Design answered:

Hei Wenche. Det strikkes kun vrangbord rundt halsen. Rundt ermene og nederst på bolen strikkes det mønster med en gang. God fornøyelse

23.01.2019 - 15:29

Amy wrote:

What does 'adjust to end after 2 rows stockinette st ' mean?

28.05.2018 - 10:30

DROPS Design answered:

Dear Amy, you start working M.2 after 64-70 cm (see size) and at least after 2 rows stocking stitch in M.1. Happy knitting!

28.05.2018 - 11:33

country flag Miriam wrote:

Hei. I diagram m1, hvor befinner kastene seg?

01.09.2017 - 23:31

DROPS Design answered:

Hei Miriam. Forklaringen til diagram ikonene finner du over målskissen og diagrammet. I denne oppskriften har kastet en sort sirkel. God Fornøyelse!

04.09.2017 - 11:34

country flag RODRIGUEZ wrote:

Effectivement le sigle "2m ens à l'end "n'est pas le même sur le diagramme. Est ce une erreur d'imprimerie? Merci

25.03.2013 - 13:33

DROPS Design answered:

Bonjour Madame Rodriguez, le 3ème symbole est inversé dans la légende effectivement, mais il s'agit bien de 2 m à tricoter ens à l'end. Bon tricot !

25.03.2013 - 13:49

country flag SUSINI wrote:

Je pense qu'il y un problème par rapport au diagramme qui ne correspond pas aux signes. En effet, le signe signifiant "Sur l'endroit : 2 m ens à l'end" est inversé sur le diagramme, est ce que cela veut dire que les 2 m doivent être prises ensemble à l'envers ?

22.11.2012 - 13:21

DROPS Design answered:

Bonjour Madame Susini, ce symbole dans le diagramme de ce modèle signifie bien de tricoter 2 m ens à l'end sur l'endroit. N'hésitez pas à vous référer à la vidéo dont le lien figure en bas de page si nécessaire. Bon tricot !

22.11.2012 - 14:11

country flag Hanna Marie wrote:

Nydelig genser, strikket den i burgunder.

06.04.2012 - 22:29