DROPS Karisma
DROPS Karisma
100% Wool
from 3.00 $ /50g
Get the yarn to make this pattern from 42.00$.

The yarn cost is calculated from the pattern’s smallest size and the yarn’s cheapest product type. Looking for an even better price? You might find it on the DROPS Deals!

DROPS SS24

Nordic Midnight

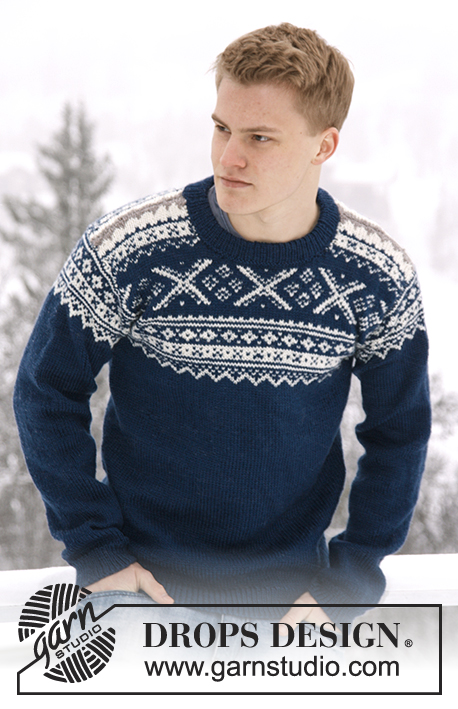
Knitted sweater for men with Norwegian pattern, in DROPS Karisma. Size: S - XXXL.

DROPS Extra 0-809
DROPS design: Pattern no U-650
Yarn group B
--------------------------------------------------------

Size: S - M - L - XL - XXL - XXXL
Finished measurements:
Bust: 86-94-102-112-124-134 cm / 34"-37"-40"-44"-49"-54"
Full length: 66-68-70-72-74-76 cm / 26"-26¾"-27½"-28⅜"-29⅛"-30"

Materials:
DROPS KARISMA from Garnstudio
Color no 37, dark gray blue:
550-600-650-700-750-850 g
Color no 01, off white:
100-100-150-150-150-150 g
Color no 55, light beige brown:
50-50-50-50-50-50 g

DROPS DOUBLE POINTED NEEDLES AND CIRCULAR NEEDLE (40 and 80 cm / 16" and 32") SIZE 4 mm / US 6 - or size needed to get 21 sts x 28 rows in stockinette st = 10 x 10 cm / 4" x 4".
DROPS DOUBLE POINTED NEEDLES and CIRCULAR NEEDLE (80 and 40 cm / 32" and 16") SIZE 3 mm / US 2or3 - for rib.

-------------------------------------------------------

Alternative Yarn – See how to change yarns here
Yarn Groups A to F – Use the same pattern and change the yarn here
Yarn usage using an alternative yarn – Use our yarn converter here

-------------------------------------------------------

DROPS Karisma
DROPS Karisma
100% Wool
from 3.00 $ /50g
Get the yarn to make this pattern from 42.00$.

The yarn cost is calculated from the pattern’s smallest size and the yarn’s cheapest product type. Looking for an even better price? You might find it on the DROPS Deals!

Pattern instructions

NOTE: This pattern is written in American English. All measurements in charts are in cm. For conversion from inches to cm - click here. There are different terms for crocheting in American and British English. If this pattern includes crochet, click for "crochet terms" here. For this pattern in British English, please click here.
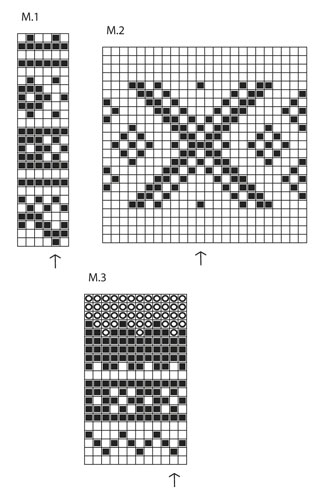
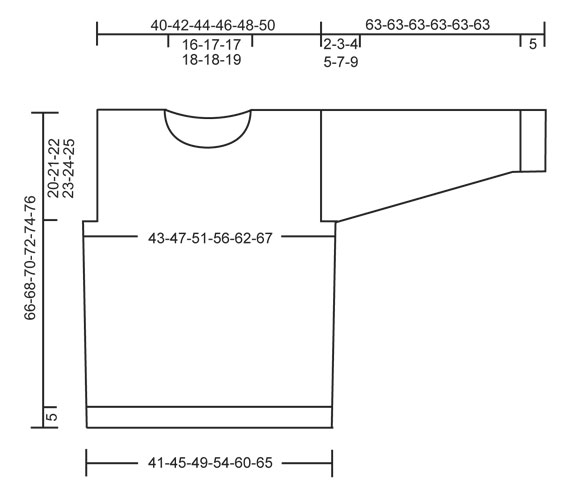
PATTERN:
See diagrams M.1 to M.3 – diagrams are worked in stockinette st and show 1 repetition of pattern.
--------------------------------------------------------

BODY:
Worked in the round on circular needle.
Cast on 210-228-246-270-306-330 sts on circular needle size 3 mm / US 2or3 with dark gray blue Karisma.
Work rib = K 1/P 1 for 5 cm / 2".
Switch to circular needle size 4 mm / US 6 and K 1 round while AT THE SAME TIME dec 36-38-40-44-52-56 sts evenly = 174-190-206-226-254-274 sts.
Insert a marker at beg of round and a marker after 87-95-103-113-127-137 sts (these marks the sides). Continue in stockinette st.
REMEMBER THE GAUGE!
When piece measures 15 cm / 6", inc 1 st on each side of both markers. Repeat inc when piece measures 30 cm / 11¾" = 182-198-214-234-262-282 sts.
When piece measures 41-43-45-46-48-50 cm / 16"-17"-17¾"-18"-19"-19¾", insert 2 markers in the piece; 1 in the middle st at the front and 1 in the middle st at the back.
Then work diagram M.1 – st marked with arrow in diagram should be sts with marker mid front/back - count out towards the side. Count out again when at the marker in the side so that pattern is the same on the front and on the back. AT THE SAME TIME when piece measures 46-47-48-49-50-51 cm / 18"-18½"-19"-19¼"-19¾"-20", bind off 6-10-14-20-30-36 sts for armholes in each side (i.e. 3-5-7-10-15-18 sts on each side of both markers in the sides). Finish front and back piece separately, back and forth on needle.

FRONT PIECE:
= 85-89-93-97-101-105 sts. Finish diagram M.1, then work diagram M.2 and finally M.3 before continuing with light beige brown until finished measurements (st with arrow in diagram should be st with marker mid front/back – count out towards the side).
When piece measures 58-60-62-64-66-68 cm / 22¾"-23⅝"-24⅜"-25¼"-26"-26¾", slip the middle 15-17-17-19-19-21 sts on a stitch holder for neck and finish each shoulder separately.
AT THE SAME TIME bind off at beg of every row from neck: 2 sts 3 times and 1 st 3 times = 26-27-29-30-32-33 sts remain on shoulder.
Bind off when piece measures 66-68-70-72-74-76 cm / 26"-26¾"-27½"-28⅜"-29⅛"-30".

BACK PIECE:
= 85-89-93-97-101-105 sts. Work as on front piece but do not bind off for neck until piece measures 64-66-68-70-72-74 cm / 25¼"-26"-26¾"-27½"-28⅜"-29⅛". Now bind off the middle 29-31-31-33-33-35 sts for neck and finish each shoulder separately - AT THE SAME TIME bind off 2 sts on next row from neck = 26-27-29-30-32-33 sts remain on each shoulder. Bind off when piece measures approx. 66-68-70-72-74-76 cm / 26"-26¾"-27½"-28⅜"-29⅛"-30" / 26"-26¾"-27½"-28⅜"-29⅛"-30" – bind off on same row in pattern as on front piece.

SLEEVE:
Worked in the round on double pointed needles, switch to circular needle when needed.
Cast on 62-64-66-66-68-68 sts on double pointed needles size 3 mm / US 2or3 with dark gray blue. Work rib = K 1/P 1 for 5 cm / 2".
Switch to double pointed needles size 4 mm / US 6 and K 1 round while AT THE SAME TIME dec 11 sts evenly = 51-53-55-55-57-57 sts.
Insert a marker at beg of round (= mid under sleeve) and continue in stockinette st. When piece measures 6 cm / 2⅜", inc 1 st on each side of marker. Repeat inc a total of 17-18-19-21-22-24 times in
Size S: On every 9th round,
Size M: Alternately on every 8th and 9th round,
Size L: Every 8th round,
Size XL: On every 7th round,
Size XXL: Alternately on every 6th and 7th round
Size XXXL: Alternately on every 5th and 6th round
= 85-89-93-97-101-105 sts.
AT THE SAME TIME when piece measures 53 cm / 21" in all sizes, work diagram M.1 (st with arrow in diagram = mid on top of sleeve – count out towards the side).
After diagram M.1, continue with dark gray blue until finished measurements. AT THE SAME TIME when piece measures 61-60-59-58-56-54 cm / 24"-23½"-23¼"-22¾"-22"-21¼" (shorter measurements in the larger sizes because of longer sleeve cap and broader shoulder width), finish the piece back and forth on needle from mid under sleeve.
Cast on 1 new st in each side (= edge st for assembly) and work until sleeve measures 63 cm / 24¾" in all sizes, bind off.

ASSEMBLY:
Sew shoulder seams and sew in sleeves (section worked back and forth at the top of sleeve should fit the bind off for armhole).

NECK:
Pick up from RS approx. 82 to 98 sts around the neck (including sts on stitch holder at the front) on a short circular needle size 3 mm / US 2or3 with dark gray blue.
P 1 round, then K 1 round while AT THE SAME TIME inc evenly to 102-108-110-116-118-122 sts.
Then work rib = K 1/P 1 for approx. 7 cm / 2¾", bind off with K over K and P over P.
Fold the rib double towards WS and fasten it to the back of neck edge with neat little loose stitches.


Diagram

All measurements in charts are in cm.

symbols = dark gray blue
symbols = off white
symbols = light beige brown
diagram
diagram

Each of our patterns has specific tutorial videos to help you.

Do you have a question? See a list of frequently asked questions (FAQ)

Knitting tension is what determines the final measurements of your work, and is usually measured per 10 x 10 cm. It is provided like so: number of stitches in width x number of rows in height - eg: 19 stitches x 26 rows = 10 x 10 cm.

The knitting tension is very individual; some people knit/crochet loosely while others work tightly. You adjust the knitting tension with the needle size, which is why the suggested needle size only serve as a guide! You need to adjust this (up or down) to ensure that YOUR knitting tension matches the knitting tension provided in the pattern. If you work with a different knitting tension than provided you will have a different yarn consumption, and your work will have different measurements than what the pattern suggests.

The knitting tension also determines which yarns can replace each other. As long as you achieve the same knitting tension you can replace one yarn with another.

See DROPS lesson: How to measure your tension/gauge

See DROPS video: How to make a gauge tension swatch

The required amount of yarn is provided in grams, eg: 450 g. To calculate how many balls you’ll need you first need to know how many grams are in 1 ball (25g, 50g or 100g). This information is available if you click on the individual yarn quality on our pages. Divide the amount required with the amount of each ball. For example, if each ball is 50g (the most common amount), the calculation will be as follows: 450 / 50 = 9 balls.

The important thing when changing from one yarn to another is that the knitting/crochet tension remains the same. This is so that the measurements of the finished piece will be the same as on the sketch provided. It is easier to achieve the same knitting tension using yarns from the same yarn group. It is also possible to work with multiple strands of a thinner yarn to achieve the knitting tension of a thicker one. Please try our yarn converter. We recommend you to always work a test swatch.

Please NOTE: when changing yarn the garment might have a different look and feel to the garment in the photo, due to individual properties and qualities of each yarn.

See DROPS lesson: Can I use a different yarn than the one mentioned in the pattern?

All our yarns are categorised into yarn groups (from A to F) according to thickness and knitting tension – group A contains the thinnest yarns and group F the thickest. This makes it easier for you to find alternative yarns to our patterns, should you wish to switch yarn. All yarns within the same group have a similar knitting tension and can easily replace each other. However, different yarn qualities have different structures and properties which will give the finished work a unique look and feel.

Click here for an overview of the yarns in each yarn group

At the top of all our patterns you’ll find a link to our yarn converter, which is a helpful tool should you wish to use a different yarn than suggested. By filling in the yarn quality you wish to replace, the amount (in your size) and number of strands, the converter will present good alternative yarns with the same knitting tension. Additionally it will tell you how much you’ll require in the new qualities and whether you’ll need to work with multiple strands. Most skeins are 50g (some are 25g or 100g).

If the pattern is worked with multiple colours, every colour will have to be converted separately. Similarly, if the pattern is worked with several strands of different yarns (for example 1 strand Alpaca and 1 strand Kid-Silk) you will have to find alternatives for each, individually.

Click here to see our yarn converter

Since different yarns have different qualities and textures we have chosen to keep the original yarn in our patterns. However, you can easily find options among our available qualities by using our yarn converter, or simply pick a yarn from the same yarn group.

It is possible that some retailers still have discontinued yarns in stock, or that someone has a few skeins at home that they would like to find patterns for.

The yarn converter will provide both alternative yarn as well as required amount in the new quality.

If you think it's hard to decide what size to make, it can be a good idea to measure a garment you own already and like the size of. Then you can pick the size by comparing those measures with the ones available in the pattern's size chart.

You'll find the size chart at the bottom of the pattern.

See DROPS lesson: How to read size chart

The needle size provided in the pattern serves only as a guide, the important thing is to follow the knitting tension. And since knitting tension is very individual, you will have to adjust the needle size to ensure that YOUR tension is the same as in the pattern – maybe you’ll have to adjust 1, or even 2 needle sizes, up or down to achieve the correct tension. For this, we recommend that you work test swatches.

Should you work with a different knitting tension than the one provided, the measurements of the finished garment might deviate from the measurement sketch.

See DROPS lesson: How to measure your tension/gauge

See DROPS video: How to make a gauge tension swatch

Working a garment top-down provides more flexibility and room for personal adjustment. For example it is easier to try the garment on while working, as well as making adjustments to length of yoke and shoulder caps.

The instructions are carefully explaining every step, in the correct order. Diagrams are adjusted to the knitting direction and are worked as usual.

The diagram depicts all rows/rounds, and every stitch seen from the right side. It is read from bottom to top, from right to left. 1 square = 1 stitch.

When working back and forth, every other row is worked from the right side and every other row is worked from the wrong side. When working from the wrong side, the diagram will have to be worked reversed: from left to right, knit stitches are purled, purl stitches are knit etc.

When working in the round every round is worked from the right side and the diagram are worked from right to left on all rounds.

See DROPS lesson: How to read knitting diagrams

The diagram depicts all rows/rounds, and every stitch seen from the right side. It is worked from bottom to top, from right to left.

When working back and forth every other row is worked from the right side: from right to left and every other row is worked from the wrong side: from left to right.

When working in the round, every row in the diagram are worked from the right side, from right to left.

When working a circular diagram you start in the middle and work your way outwards, counter clockwise, row by row.

The rows usually start with a given number of chain stitches (equivalent to the height of the following stitch), this will either be depicted in the diagram or explained in the pattern.

See DROPS lesson: How to read crochet diagrams

Instructions for working several diagrams after each other on the same row/round, will often be written like so: “work A.1, A.2, A.3 a total of 0-0-2-3-4 times". This means you work A.1 once, then A.2 is worked once, and A.3 is repeated (in width) the number of times provided for your size – in this case like so: S = 0 times, M = 0 times, L=2 times, XL= 3 times and XXL = 4 times.

The diagrams are worked as usual: begin with the first row in A.1, then work the first row in A.2 etc.

See DROPS lesson: How to read knitting diagrams

See DROPS lesson: How to read crochet diagrams

The total width of the garment (from wrist-to-wrist) will be larger in the larger sizes, despite the actual sleeves being shorter. The larger sizes have longer sleeve caps and wider shoulders, so there will be a good fit in all sizes.

The measurement sketch/schematic drawing provides information regarding the full length of the garment. If it’s a jumper or a jacket the length is measured from the highest point on the shoulder (usually closest to the neckline), and straight down to the bottom of the garment. It is NOT measured from the tip of shoulder. Similarly, the length of yoke is measured from the highest point on the shoulder and down to where yoke is split into body and sleeves.

See DROPS lesson: How to read a schematic drawing

Diagrams are often repeated on the round or in height. 1 repeat is the diagram the way it appears in the pattern. If it says to work 5 repeats of A.1 in the round, then you work A.1 a total of 5 times after/next to each other in the round. If it says to work 2 repeats of A.1 vertically/in height you work the entire diagram once, then begin again at the start and work the entire diagram one more time.

Chain stitches are slightly narrower than other stitches and to avoid working the cast-on edge too tight, we simply chain more stitches to begin with. The stitch count will be adjusted on the following row to fit the pattern and measurement sketch.

The rib edge is more elastic and will contract slightly compared to, for example, stocking stitch. By increasing before the rib edge, you avoid a visible difference in width between the rib edge and the rest of the body.

It’s very easy to cast off too tightly, and by making yarn overs while casting off (and simultaneously casting these off) you avoid a too tight cast off edge.

See DROPS video: How to bind off with yarn overs (yo)

To achieve an even increase (or decrease) you can increase on, for example: every 3rd and 4th row alternately, like so: work 2 rows and increase on the 3rd row, work 3 rows and increase on the 4th. Repeat this until the increase is complete.

See DROPS lesson: Increase or decrease 1 st on every 3rd and 4th row alternately

Should you prefer to work in the round instead of back and forth, you may of course adjust the pattern. You’ll need to add steeks mid-front (usually 5 stitches), and follow the instructions. When you would normally turn and work from the wrong side, simply work across the steek and continue in the round. At the end you’ll cut the piece open, pick up stitches to work bands, and cover the cut edges.

See DROPS video: How to knit steeks and cut open

Should you prefer to work back and forth instead of in the round, you may of course adjust the pattern so you work the pieces separately and then assemble them at the end. Divide the stitches for the body in 2, add 1 edge stitch in each side (for sewing) and work the front and back pieces separately.

See DROPS lesson: Can I adapt a pattern for circular needles into straight needles?

Pattern repeats can vary slightly in the different sizes, in order to get the correct proportions. If you’re not working the exact same size as the garment in the photo, yours might deviate slightly. This has been carefully developed and adjusted so that the complete impression of the garment is the same in all sizes.

Make sure to follow instructions and diagrams for your size!

If you have found a pattern you like which is available in women’s size it’s not very difficult to convert it to men’s size. The biggest difference will be the length of sleeves and body. Start working on the women size that you think would fit across the chest. The additional length will be worked right before you cast off for the armhole/sleeve cap. If the pattern is worked top-down you can add the length right after the armhole or before the first decrease on sleeve.

Regarding additional yarn amount, this will depend on how much length you add, but it is better with a skein too many than too few.

All yarns will have excess fibres (from production) that might come off as lint or shedding. Brushed yarns (ie hairier yarns) have more of these loose, excess fibres, causing more shedding.

Shedding also depends on what is worn under or over the garment, and whether this pulls at the yarn fibres. It’s therefore not possible to guarantee that there will be no shedding

Below are some tips on how to get the best result when working with hairier yarns:

1. When the garment is finished (before you wash it) shake it vigorously so the looser hairs come off. NOTE: do NOT use a lint roller, brush or any method that pulls at the yarn.

2. Place the garment in a plastic bag and put it in your freezer - the temperature will cause the fibres to become less attached to each other, and excess fibres will come off easier.

3. Leave in the freezer for a few hours before taking it out and shaking it again.

4. Wash the garment according to the instructions on the yarn label.

Pilling is a natural process that happens to even the most exclusive of fibers. It's a natural sign of wear and tear that is hard to avoid, and that is most visible in high friction areas of your garment like a sweater's arms and cuffs.

You can make your garment look as new by removing the pilling, using a fabric comb or a pill/lint remover.

Still can't find the answer you need? Then scroll down and leave your question so one of our experts can try to help you. This will be done normally within 5 to 10 working days.
In the meantime, you can read the questions and answers that others have left to this pattern or join the DROPS Workshop on Facebook to get help from fellow knitters/crocheters!

Nordic Midnight

Ainara, Denmark

Nordic Midnight

Sarah, Germany

Post a comment to pattern DROPS Extra 0-809

We would love to hear what you have to say about this pattern!

If you want to leave a question, please make sure you select the correct category in the form below, to speed up the answering process. Required fields are marked *.

Comments / Questions (114)

country flag Kari Frogner wrote:

Hei! Jeg strikker denne genseren i xxl, og har begynt på ermene. Her står det "når arbeidet måler 6cm skal en øke med en maske på hver side av merket". Er det hele arbeidet som skal måle 6cm eller skal det måles 6cm fra etter vrangborden? Når jeg begynner å øke masker etter 6 cm målt fra starten av vrangborden blir ermet veldig bredt veldig fort, er det meningen? Mvh Kari

09.01.2020 - 20:42

DROPS Design answered:

Hei Kari. Ja, det stemmer at det skal økes når arbeidet måler 6cm. Det økes med mindre antall omganger mellom økningene på de større størrelsene på grunn av at ermene er korterer enn ermene i de mindre størrelsene, dette fører til at ermet blir bredere fortere. Ermet økes slik på grunn av at det er bredere skuldervidde og lengre ermetopp på ermene i str. XXL-XXXL. Lykke til!

10.01.2020 - 11:08

country flag Luana Minasso wrote:

Quindi quale ferri mi servono in tutto? Devo comprarli tutti e vorrei sapere quali con esattezza

05.01.2020 - 18:24

DROPS Design answered:

Buonasera Luana, per il lavoro le servono i necessari ad ottenere il campione indicato. Prima di procedere con l'acquisto ha verificato che il suo campione corrisponde a quello indicato? Buon lavoro!

09.01.2020 - 17:27

country flag Luana Minasso wrote:

Non ho compreso bene quali ferri usare. mi servono i circolari n.3 ( sia da 40 che da 80 cm?) e i n.4 (sia da 40 che da 80?).?? Nella spiegazione non c'è scritto quando passare da quelli lunghi 40 a quelli 80, c'è solo scritto circolari 3 e circolari 4. Quindi non ho capito se in totale mi servono 6 o 4 coppie di ferri, grazio

05.01.2020 - 16:10

DROPS Design answered:

Buonasera Luana, la lunghezza dei ferri dipende dalla parte del maglione che sta lavorando: durante la lavorazione del corpo userà i ferri da 80 cm, mentre per il collo quelli da 40 cm e per le maniche i ferri a doppia punta. Se non ha quelli corti da 40 cm può usare il cavo lungo e la tecnica del magic loop. Buon lavoro!

05.01.2020 - 18:20

country flag Valentina wrote:

Hi, I'm on the sleeves' part (M) I've finished working M1 (60cm) but I don't understand the last part. I should work back and forth in blue for 3cm, but looking at the pictures I can see no blue over the shoulders, so I guess I don't have to work the entire row. How many sts should I work back and forth then?

18.12.2019 - 00:27

DROPS Design answered:

Dear Valentina, when piece measures 60 cm you continue working back and forth inc 1 st on each side for seam allowances (= 91 sts in total on needle) then cast off when piece measures 63 cm. If M.1 is finished before these measurements, continue working with blue - but make sure that M.1 has been worked to the end (check tension in height). Happy knitting!

18.12.2019 - 07:49

country flag Loredana Speriani wrote:

Volevo sapere se i vostri capi sono in vendita grazie

18.11.2019 - 21:23

DROPS Design answered:

Buongiorno Loredana. Purtroppo i nostri capi non sono in vendita. Può contattare il suo rivenditore Drops di fiducia e chiedere se ha il nominativo di una magliaia che possa realizzare il capo per lei.

18.11.2019 - 21:58

country flag Janneke wrote:

Ik heb de boord gebreid van de hals maat s maar die is heel ruim klopt dat?

09.11.2019 - 22:45

DROPS Design answered:

Dag Janneke,

Als je een proeflapje hebt gemaakt en de stekenverhouding klopt, dan zou de opening voor het hoofd ongeveer zo breed moeten zijn als onderaan de tekening aangegeven is, dus afhankelijk van je maat 16- tot 19 cm.

10.11.2019 - 21:18

country flag Lenka Kuricová wrote:

Už chápem ďakujem veľmi pekne za vysvetlenie

23.10.2019 - 11:13

country flag Lenka Kuricová wrote:

Dobrý deň, pekne poprosím o radu, už som veľa krásnych návodov od Dropsu použila no pri tomto akosi nechápem postup a to najprv sa spraví tela a nechápam zo stredu hore ??? a predný a zadný diel dokončím samostatne......no proste nechápem.

21.10.2019 - 10:13

DROPS Design answered:

Dobrý den, Lenko, tento pulovr se plete zdola nahoru - od pasu k průkrčníku. Takže nejdřív pletete tělo v kruhových řadách (tj. dohromady přední i zadní díl) až k průramkům, jakmile uzavřete oka pro průramky dokončíte přední a zadní díl zvlášť, v řadách (líc a rub). Hodně zdaru! Hana

23.10.2019 - 09:25

country flag Lina wrote:

Hej. Hur gör jag om ett mönster från herr till dam?

18.10.2019 - 17:34

DROPS Design answered:

Hei Lina. Om du ønsker å strikke Nordic Midnight genseren til dame, kan du ta en titt på genseren Victoria i DROPS Extra / 0-816. Samme genser som Nordic Midnight, men dameversjonen. God Fornøyelse!

21.10.2019 - 10:41

country flag Jennifer wrote:

Hallo, ich verstehe den Teil mit dem Halsausschnitt nicht. Die mittleren Maschen sollen auf eine Hilfnadel, aber wo werden die Maschen abgekettet? Reihe für Reihe bei dem Muster 3 und vor der hilfsnadel? Lege ich während des 3. Musters erst einmal die andere Seite still?

07.10.2019 - 21:35

DROPS Design answered:

Liebe Jennifer, nachdem Sie die mittleren Maschen für den Halsausschnitt stillgelegt haben, stricken Sie jede Schulter separat, und am Anfang jeder Reihe (die vom Halsausschnitt beginng) ketten Sie Maschen ab (= Hinreihe für die rechte Schulter, wenn man den Pull trägt). Wenn 1. Schulter fertig ist, stricken Sie die 2. Schulter (es wird am Anfang der Rückreihe abgekettet wenn man die linke Schulter strickt). Viel Spaß beim stricken!

08.10.2019 - 10:00