Popular categories
Looking for a yarn?

100% Wool
from 2.30 £ /50g
Order DROPS Needles & Hooks
Clicking the ORDER button will redirect you to Wool Warehouse Direct Ltd website
The yarn cost is calculated from the pattern’s smallest size and the yarn’s cheapest product type. Looking for an even better price? You might find it on the DROPS Deals!
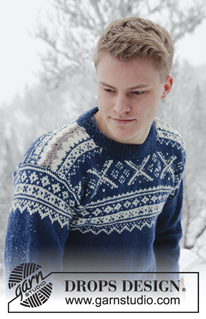
Nordic Midnight
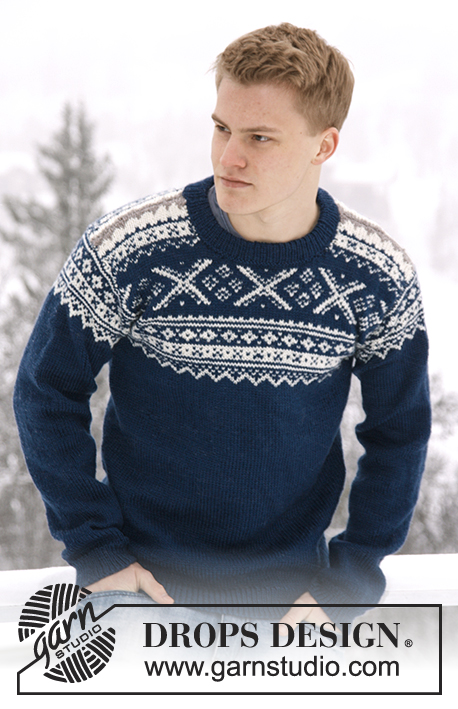
Knitted jumper for men with Norwegian pattern, in DROPS Karisma. Size: S - XXXL.
DROPS design: Pattern no U-650
Yarn group B
--------------------------------------------------------
Size: S - M - L - XL - XXL - XXXL
Materials:
DROPS KARISMA from Garnstudio
Colour no 37, dark grey blue:
550-600-650-700-750-850 g
Colour no 01, off white:
100-100-150-150-150-150 g
Colour no 55, light beige brown:
50-50-50-50-50-50 g
DROPS DOUBLE POINTED NEEDLES AND CIRCULAR NEEDLE (40 and 80 cm) SIZE 4 mm - or size needed to get 21 sts x 28 rows in stocking st = 10 x 10 cm.
DROPS DOUBLE POINTED NEEDLES and CIRCULAR NEEDLE (80 and 40 cm) SIZE 3 mm - for rib.
-------------------------------------------------------
Alternative Yarn – See how to change yarns here
Yarn Groups A to F – Use the same pattern and change the yarn here
Yarn usage using an alternative yarn – Use our yarn converter here
-------------------------------------------------------
Men Men's Jumpers Nordic Jumpersbottom up colourwork nordic round neck sewn in sleeves

100% Wool
from 2.30 £ /50g
Order DROPS Needles & Hooks
Clicking the ORDER button will redirect you to Wool Warehouse Direct Ltd website
The yarn cost is calculated from the pattern’s smallest size and the yarn’s cheapest product type. Looking for an even better price? You might find it on the DROPS Deals!
- English (UK/cm)
- Česky
- Dansk
- Deutsch
- Eesti keel
- English (US/in)
- Español
- Français
- Íslenska
- Italiano
- Magyar
- Nederlands
- Norsk
- Polski - not translated
- Português
- Suomi
- Svenska
- English (UK/cm), Bulgaria
- English (UK/cm), Croatia
- English (UK/cm), Greece
- English (UK/cm), Latvia
- English (UK/cm), Lithuania
- English (UK/cm), Romania
- English (UK/cm), Slovenia
- Česky, Slovakia
Pattern instructions
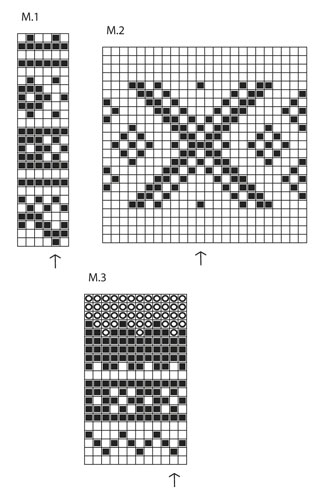
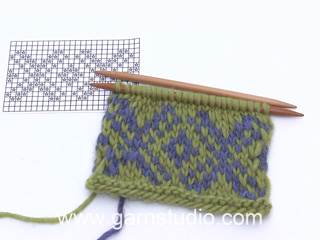
See diagrams M.1 to M.3 – diagrams are worked in stocking st and show 1 repetition of pattern.
--------------------------------------------------------
BODY:
Worked in the round on circular needle.
Cast on 210-228-246-270-306-330 sts on circular needle size 3 mm with dark grey blue Karisma. Work rib = K 1/P 1 for 5 cm. Switch to circular needle size 4 mm and K 1 round while AT THE SAME TIME dec 36-38-40-44-52-56 sts evenly = 174-190-206-226-254-274 sts. Insert a marker at beg of round and a marker after 87-95-103-113-127-137 sts (these marks the sides). Continue in stocking st.
REMEMBER THE KNITTING TENSION!
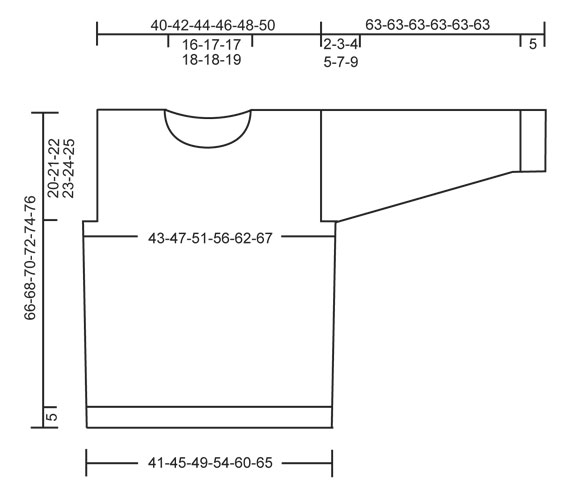
When piece measures 15 cm, inc 1 st on each side of both markers. Repeat inc when piece measures 30 cm = 182-198-214-234-262-282 sts. When piece measures 41-43-45-46-48-50 cm, insert 2 markers in the piece; 1 in the middle st at the front and 1 in the middle st at the back. Then work diagram M.1 – st marked with arrow in diagram should be sts with marker mid front/back - count out towards the side. Count out again when at the marker in the side so that pattern is the same on the front and on the back. AT THE SAME TIME when piece measures 46-47-48-49-50-51 cm, cast off 6-10-14-20-30-36 sts for armholes in each side (i.e. 3-5-7-10-15-18 sts on each side of both markers in the sides). Finish front and back piece separately, back and forth on needle.
FRONT PIECE:
= 85-89-93-97-101-105 sts. Finish diagram M.1, then work diagram M.2 and finally M.3 before continuing with light beige brown until finished measurements (st with arrow in diagram should be st with marker mid front/back – count out towards the side). When piece measures 58-60-62-64-66-68 cm, slip the middle 15-17-17-19-19-21 sts on a stitch holder for neck and finish each shoulder separately. AT THE SAME TIME cast off at beg of every row from neck: 2 sts 3 times and 1 st 3 times = 26-27-29-30-32-33 sts remain on shoulder. Cast off when piece measures 66-68-70-72-74-76 cm.
BACK PIECE:
= 85-89-93-97-101-105 sts. Work as on front piece but do not cast off for neck until piece measures 64-66-68-70-72-74 cm. Now cast off the middle 29-31-31-33-33-35 sts for neck and finish each shoulder separately - AT THE SAME TIME cast off 2 sts on next row from neck = 26-27-29-30-32-33 sts remain on each shoulder. Cast off when piece measures approx. 66-68-70-72-74-76 cm – cast off on same row in pattern as on front piece.
SLEEVE:
Worked in the round on double pointed needles, switch to circular needle when needed.
Cast on 62-64-66-66-68-68 sts on double pointed needles size 3 mm with dark grey blue. Work rib = K 1/P 1 for 5 cm. Switch to double pointed needles size 4 mm and K 1 round while AT THE SAME TIME dec 11 sts evenly = 51-53-55-55-57-57 sts. Insert a marker at beg of round (= mid under sleeve) and continue in stocking st. When piece measures 6 cm, inc 1 st on each side of marker. Repeat inc a total of 17-18-19-21-22-24 times in Size S: On every 9th round, Size M: Alternately on every 8th and 9th round, Size L: Every 8th round, Size XL: On every 7th round, Size XXL: Alternately on every 6th and 7th round and Size XXXL: Alternately on every 5th and 6th round = 85-89-93-97-101-105 sts. AT THE SAME TIME when piece measures 53 cm in all sizes, work diagram M.1 (st with arrow in diagram = mid on top of sleeve – count out towards the side). After diagram M.1, continue with dark grey blue until finished measurements. AT THE SAME TIME when piece measures 61-60-59-58-56-54 cm (shorter measurements in the larger sizes because of longer sleeve cap and broader shoulder width), finish the piece back and forth on needle from mid under sleeve. Cast on 1 new st in each side (= edge st for assembly) and work until sleeve measures 63 cm in all sizes, cast off.
ASSEMBLY:
Sew shoulder seams and sew in sleeves (section worked back and forth at the top of sleeve should fit the cast off for armhole).
NECK:
Knit up from RS approx. 82 to 98 sts around the neck (incl sts on stitch holder at the front) on a short circular needle size 3 mm with dark grey blue. P 1 round, then K 1 round while AT THE SAME TIME inc evenly to 102-108-110-116-118-122 sts. Then work rib = K 1/P 1 for approx. 7 cm, cast off with K over K and P over P. Fold the rib double towards WS and fasten it to the back of neck edge with neat little loose stitches.
Diagram

|
= dark grey blue |

|
= off white |

|
= light beige brown |
What can you do with our patterns? You can share DROPS patterns online, using the pattern original picture, materials, name and number. But you are NOT ALLOWED to reproduce the complete pattern digitally in any way. Yarn stores are welcome to use the DROPS pattern database to promote the sale of our assortment. You can print out our patterns, make as many copies as you’d like. The only thing we ask is that you don't make any changes / additions to the original printed document. And that the patterns according to the DROPS philosophy are given out to the consumers for free. Editorials that wish to publish our patterns in printed books or magazines can contact us for more information. The sale of garments based on DROPS patterns is permitted as long as they are sold as single items or per order. Further commercial use of the patterns is not permitted. It has to be clearly stated that the garment is made based on a design from DROPS DESIGN. The use of clothing labels of which DROPS DESIGN forms part is conditioned by the inclusion of the following text: “A DROPS DESIGN made by …..”. The use of DROPS photos for marketing purposes/sales is only permitted in connection with the use/sale of DROPS products. The photos may not be cut or edited and the logo should be clearly visible.
We reserve the right to withdraw the permission for use of our patterns at any time, notwithstanding the reason.
Each of our patterns has specific tutorial videos to help you.
These step-by-step tutorials might also help you:
Why is the knitting/crochet tension so important?
Knitting tension is what determines the final measurements of your work, and is usually measured per 10 x 10 cm. It is provided like so: number of stitches in width x number of rows in height - eg: 19 stitches x 26 rows = 10 x 10 cm.
The knitting tension is very individual; some people knit/crochet loosely while others work tightly. You adjust the knitting tension with the needle size, which is why the suggested needle size is only meant as a guide! You need to adjust this (up or down) to ensure that YOUR knitting tension matches the knitting tension provided in the pattern. If you work with a different knitting tension than provided you will have a different yarn consumption, and your work will have different measurements than what the pattern suggests.
The knitting tension also determines which yarns can replace each other. As long as you achieve the same knitting tension you can replace one yarn with another.
See DROPS lesson: How to measure your tension/gauge
See DROPS video: How to make a gauge tension swatch
How do I know how many balls of yarn I need?
The required amount of yarn is provided in grams, eg: 450 g. To calculate how many balls you’ll need you first need to know how many grams are in 1 ball (25g, 50g or 100g). This information is available if you click on the individual yarn quality on our pages. Divide the amount required with the amount of each ball. For example, if each ball is 50g (the most common amount), the calculation will be as follows: 450 / 50 = 9 balls.
Can I use a different yarn than what the pattern suggests?
The important thing when changing from one yarn to another is that the knitting/crochet tension remains the same. This is so that the measurements of the finished piece will be the same as on the sketch provided. It is easier to achieve the same knitting tension using yarns from the same yarn group. It is also possible to work with multiple strands of a thinner yarn to achieve the knitting tension of a thicker one. Please try our yarn converter. We recommend you to always work a test swatch.
Please NOTE: when changing yarn the garment might have a different look and feel to the garment in the photo, due to individual properties and qualities of each yarn.
See DROPS lesson: Can I use a different yarn than the one mentioned in the pattern?
What are the yarn groups?
All our yarns are categorised into yarn groups (from A to F) according to thickness and knitting tension – group A contains the thinnest yarns and group F the thickest. This makes it easier for you to find alternative yarns to our patterns, should you wish to switch yarn. All yarns within the same group have a similar knitting tension and can easily replace each other. However, different yarn qualities have different structures and properties which will give the finished work a unique look and feel.
How do I use the yarn calculator?
At the top of all our patterns you’ll find a link to our yarn calculator, which is a helpful tool should you wish to use a different yarn than suggested. By filling in the yarn quality you wish to replace, the amount (in your size) and number of strands, the calculator will present good alternative yarns with the same knitting tension. Additionally it will tell you how much you’ll require in the new qualities and whether you’ll need to work with multiple strands. Most skeins are 50g (some are 25g or 100g).
If the pattern is worked with multiple colours, every colour will have to be calculated separately. Similarly, if the pattern is worked with several strands of different yarns (for example 1 strand Alpaca and 1 strand Kid-Silk) you will have to find alternatives for each, individually.
Why do you show discontinued yarns in the patterns?
Since different yarns have different qualities and textures we have chosen to keep the original yarn in our patterns. However, you can easily find options among our available qualities by using our yarn calculator, or simply pick a yarn from the same yarn group.
It is possible that some retailers still have discontinued yarns in stock, or that someone has a few skeins at home that they would like to find patterns for.
The yarn calculator will provide both alternative yarn as well as required amount in the new quality.
What size should I knit?
If you think it's hard to decide what size to make, it can be a good idea to measure a garment you own already and like the size of. Then you can pick the size by comparing those measures with the ones available in the pattern's size chart.
You'll find the size chart at the bottom of the pattern.
See DROPS lesson: How to read size chart
Why do I get the wrong knitting tension with the suggested needle size?
The needle size provided in the pattern serves only as a guide, the important thing is to follow the knitting tension. And since knitting tension is very individual, you will have to adjust the needle size to ensure that YOUR tension is the same as in the pattern – maybe you’ll have to adjust 1, or even 2 needle sizes, up or down to achieve the correct tension. For this, we recommend that you work test swatches.
Should you work with a different knitting tension than the one provided, the measurements of the finished garment might deviate from the measurement sketch.
See DROPS lesson: How to measure your tension/gauge
See DROPS video: How to make a tension/gauge swatch
Why is the pattern worked top-down?
Working a garment top-down provides more flexibility and room for personal adjustment. For example it is easier to try the garment on while working, as well as making adjustments to length of yoke and shoulder caps.
The instructions are carefully explaining every step, in the correct order. Diagrams are adjusted to the knitting direction and are worked as usual.
How do I work according to a knitting diagram?
The diagram depicts all rows/rounds, and every stitch seen from the right side. It is read from bottom to top, from right to left. 1 square = 1 stitch.
When working back and forth, every other row is worked from the right side and every other row is worked from the wrong side. When working from the wrong side, the diagram will have to be worked reversed: from left to right, knit stitches are purled, purl stitches are knit etc.
When working in the round every round is worked from the right side and the diagram are worked from right to left on all rounds.
See DROPS lesson: How to read knitting diagrams
How do I work according to a crochet diagram?
The diagram depicts all rows/rounds, and every stitch seen from the right side. It is worked from bottom to top, from right to left.
When working back and forth every other row is worked from the right side: from right to left and every other row is worked from the wrong side: from left to right.
When working in the round, every row in the diagram are worked from the right side, from right to left.
When working a circular diagram you start in the middle and work your way outwards, counter clockwise, row by row.
The rows usually start with a given number of chain stitches (equivalent to the height of the following stitch), this will either be depicted in the diagram or explained in the pattern.
See DROPS lesson: How to read crochet diagrams
How do I work several diagrams simultaneously on the same row/round?
Instructions for working several diagrams after each other on the same row/round, will often be written like so: “work A.1, A.2, A.3 a total of 0-0-2-3-4 times". This means you work A.1 once, then A.2 is worked once, and A.3 is repeated (in width) the number of times provided for your size – in this case like so: S = 0 times, M = 0 times, L=2 times, XL= 3 times and XXL = 4 times.
The diagrams are worked as usual: begin with the first row in A.1, then work the first row in A.2 etc.
See DROPS lesson: How to read knitting diagrams
See DROPS lesson: How to read crochet diagrams
Why are the sleeves shorter in larger sizes?
The total width of the garment (from wrist-to-wrist) will be larger in the larger sizes, despite the actual sleeves being shorter. The larger sizes have longer sleeve caps and wider shoulders, so there will be a good fit in all sizes.
Where on the garment is the length measured?
The measurement sketch/schematic drawing provides information regarding the full length of the garment. If it’s a jumper or a jacket the length is measured from the highest point on the shoulder closest to the neckline, and straight down to the bottom of the garment. It is NOT measured from the tip of shoulder. Similarly, the length of yoke is measured from the highest point on the shoulder and down to where yoke is split into body and sleeves.
On a jacket measures are never taken along bands, unless specifically stated. Always measure inside band stitches when measuring the length.
See DROPS lesson: How to read a schematic drawing
What is a repeat?
Diagrams are often repeated on the round or in height. 1 repeat is the diagram the way it appears in the pattern. If it says to work 5 repeats of A.1 in the round, then you work A.1 a total of 5 times after/next to each other in the round. If it says to work 2 repeats of A.1 vertically/in height you work the entire diagram once, then begin again at the start and work the entire diagram one more time.
Why does the piece start with more chain stitches than it’s worked with?
Chain stitches are slightly narrower than other stitches and to avoid working the cast-on edge too tight, we simply chain more stitches to begin with. The stitch count will be adjusted on the following row to fit the pattern and measurement sketch.
Why increase before the rib edge when the piece is worked top-down?
The rib edge is more elastic and will contract slightly compared to, for example, stocking stitch. By increasing before the rib edge, you avoid a visible difference in width between the rib edge and the rest of the body.
Why increase in the cast-off edge?
It’s very easy to cast off too tightly, and by making yarn overs while casting off (and simultaneously casting these off) you avoid a too tight cast off edge.
See DROPS video: How to bind off with yarn overs (yo)
How do I increase/decrease on every 3rd and 4th row/round alternately?
To achieve an even increase (or decrease) you can increase on, for example: every 3rd and 4th row alternately, like so: work 2 rows and increase on the 3rd row, work 3 rows and increase on the 4th. Repeat this until the increase is complete.
See DROPS lesson: Increase or decrease 1 st on every 3rd and 4th row alternately
How can I work a jacket in the round instead of back and forth?
Should you prefer to work in the round instead of back and forth, you may of course adjust the pattern. You’ll need to add steeks mid-front (usually 5 stitches), and follow the instructions. When you would normally turn and work from the wrong side, simply work across the steek and continue in the round. At the end you’ll cut the piece open, pick up stitches to work bands, and cover the cut edges.
See DROPS video: How to knit steeks and cut open
Can I work a jumper back and forth instead of in the round?
Should you prefer to work back and forth instead of in the round, you may of course adjust the pattern so you work the pieces separately and then assemble them at the end. Divide the stitches for the body in 2, add 1 edge stitch in each side (for sewing) and work the front and back pieces separately.
See DROPS lesson: Can I adapt a pattern for circular needles into straight needles?
Why is the pattern slightly different than what I see in the photo?
Pattern repeats can vary slightly in the different sizes, in order to get the correct proportions. If you’re not working the exact same size as the garment in the photo, yours might deviate slightly. This has been carefully developed and adjusted so that the complete impression of the garment is the same in all sizes.
Make sure to follow instructions and diagrams for your size!
How do I make a women’s size garment into a men’s size one?
If you have found a pattern you like which is available in women’s size it’s not very difficult to convert it to men’s size. The biggest difference will be the length of sleeves and body. Start working on the women size that you think would fit across the chest. The additional length will be worked right before you cast off for the armhole/sleeve cap. If the pattern is worked top-down you can add the length right after the armhole or before the first decrease on sleeve.
Regarding additional yarn amount, this will depend on how much length you add, but it is better with a skein too many than too few.
How do I prevent a hairy garment from shedding?
All yarns will have excess fibres (from production) that might come off as lint or shedding. Brushed yarns (ie hairier yarns) have more of these loose, excess fibres, causing more shedding.
Shedding also depends on what is worn under or over the garment, and whether this pulls at the yarn fibres. It’s therefore not possible to guarantee that there will be no shedding
Below are some tips on how to get the best result when working with hairier yarns:
1. When the garment is finished (before you wash it) shake it vigorously so the looser hairs come off. NOTE: do NOT use a lint roller, brush or any method that pulls at the yarn.
2. Place the garment in a plastic bag and put it in your freezer - the temperature will cause the fibres to become less attached to each other, and excess fibres will come off easier.
3. Leave in the freezer for a few hours before taking it out and shaking it again.
4. Wash the garment according to the instructions on the yarn label.
Why does my garment pill?
Pilling is a natural process that happens to even the most exclusive of fibers. It's a natural sign of wear and tear that is hard to avoid, and that is most visible in high friction areas of your garment like a sweater's arms and cuffs.
You can make your garment look as new by removing the pilling, using a fabric comb or a pill/lint remover.
In the meantime, you can read the questions and answers that others have left to this pattern or join the DROPS Workshop on Facebook to get help from fellow knitters/crocheters!
Nordic Midnight |
||||||||||
 |
 |
|||||||||
Knitted jumper for men with Norwegian pattern, in DROPS Karisma. Size: S - XXXL.
DROPS Extra 0-809 |
||||||||||
|
PATTERN: See diagrams M.1 to M.3 – diagrams are worked in stocking st and show 1 repetition of pattern. -------------------------------------------------------- BODY: Worked in the round on circular needle. Cast on 210-228-246-270-306-330 sts on circular needle size 3 mm with dark grey blue Karisma. Work rib = K 1/P 1 for 5 cm. Switch to circular needle size 4 mm and K 1 round while AT THE SAME TIME dec 36-38-40-44-52-56 sts evenly = 174-190-206-226-254-274 sts. Insert a marker at beg of round and a marker after 87-95-103-113-127-137 sts (these marks the sides). Continue in stocking st. REMEMBER THE KNITTING TENSION! When piece measures 15 cm, inc 1 st on each side of both markers. Repeat inc when piece measures 30 cm = 182-198-214-234-262-282 sts. When piece measures 41-43-45-46-48-50 cm, insert 2 markers in the piece; 1 in the middle st at the front and 1 in the middle st at the back. Then work diagram M.1 – st marked with arrow in diagram should be sts with marker mid front/back - count out towards the side. Count out again when at the marker in the side so that pattern is the same on the front and on the back. AT THE SAME TIME when piece measures 46-47-48-49-50-51 cm, cast off 6-10-14-20-30-36 sts for armholes in each side (i.e. 3-5-7-10-15-18 sts on each side of both markers in the sides). Finish front and back piece separately, back and forth on needle. FRONT PIECE: = 85-89-93-97-101-105 sts. Finish diagram M.1, then work diagram M.2 and finally M.3 before continuing with light beige brown until finished measurements (st with arrow in diagram should be st with marker mid front/back – count out towards the side). When piece measures 58-60-62-64-66-68 cm, slip the middle 15-17-17-19-19-21 sts on a stitch holder for neck and finish each shoulder separately. AT THE SAME TIME cast off at beg of every row from neck: 2 sts 3 times and 1 st 3 times = 26-27-29-30-32-33 sts remain on shoulder. Cast off when piece measures 66-68-70-72-74-76 cm. BACK PIECE: = 85-89-93-97-101-105 sts. Work as on front piece but do not cast off for neck until piece measures 64-66-68-70-72-74 cm. Now cast off the middle 29-31-31-33-33-35 sts for neck and finish each shoulder separately - AT THE SAME TIME cast off 2 sts on next row from neck = 26-27-29-30-32-33 sts remain on each shoulder. Cast off when piece measures approx. 66-68-70-72-74-76 cm – cast off on same row in pattern as on front piece. SLEEVE: Worked in the round on double pointed needles, switch to circular needle when needed. Cast on 62-64-66-66-68-68 sts on double pointed needles size 3 mm with dark grey blue. Work rib = K 1/P 1 for 5 cm. Switch to double pointed needles size 4 mm and K 1 round while AT THE SAME TIME dec 11 sts evenly = 51-53-55-55-57-57 sts. Insert a marker at beg of round (= mid under sleeve) and continue in stocking st. When piece measures 6 cm, inc 1 st on each side of marker. Repeat inc a total of 17-18-19-21-22-24 times in Size S: On every 9th round, Size M: Alternately on every 8th and 9th round, Size L: Every 8th round, Size XL: On every 7th round, Size XXL: Alternately on every 6th and 7th round and Size XXXL: Alternately on every 5th and 6th round = 85-89-93-97-101-105 sts. AT THE SAME TIME when piece measures 53 cm in all sizes, work diagram M.1 (st with arrow in diagram = mid on top of sleeve – count out towards the side). After diagram M.1, continue with dark grey blue until finished measurements. AT THE SAME TIME when piece measures 61-60-59-58-56-54 cm (shorter measurements in the larger sizes because of longer sleeve cap and broader shoulder width), finish the piece back and forth on needle from mid under sleeve. Cast on 1 new st in each side (= edge st for assembly) and work until sleeve measures 63 cm in all sizes, cast off. ASSEMBLY: Sew shoulder seams and sew in sleeves (section worked back and forth at the top of sleeve should fit the cast off for armhole). NECK: Knit up from RS approx. 82 to 98 sts around the neck (incl sts on stitch holder at the front) on a short circular needle size 3 mm with dark grey blue. P 1 round, then K 1 round while AT THE SAME TIME inc evenly to 102-108-110-116-118-122 sts. Then work rib = K 1/P 1 for approx. 7 cm, cast off with K over K and P over P. Fold the rib double towards WS and fasten it to the back of neck edge with neat little loose stitches. |
||||||||||
Diagram explanations |
||||||||||
|
||||||||||

|
||||||||||

|
||||||||||
|
Have you made this or any other of our designs? Tag your pictures in social media with #dropsdesign so we can see them! Do you need help with this pattern?You'll find tutorial videos, a Comments/Questions area and more by visiting the pattern on garnstudio.com. © 1982-2024 DROPS Design A/S. We reserve all rights. This document, including all its sub-sections, has copyrights. Read more about what you can do with our patterns at the bottom of each pattern on our site. |
||||||||||
With over 40 years in knitting and crochet design, DROPS Design offers one of the most extensive collections of free patterns on the internet - translated to 17 languages. As of today we count 304 catalogues and 11422 patterns - 11422 of which are translated into English (UK/cm).
We work hard to bring you the best knitting and crochet have to offer, inspiration and advice as well as great quality yarns at incredible prices! Would you like to use our patterns for other than personal use? You can read what you are allowed to do in the Copyright text at the bottom of all our patterns. Happy crafting!













Comments / Questions (114)
Stort problem: min strikkefasthed passer ellers - men her er noget galt. Mønsterdelen på for og bagstykke angiver i til 25 cm, men på min bliver den 32 cm, hvilket giver en ret dyb udskæring foran - og en meget mærkelig dyb udskæring bag på. Hvad gør jeg galt? Hvis jeg stoppe midt i mønsteret, vil det ser mærkeligt ud tror jeg - og jeg vil ikke nå den grå farve. Samtidig bliver ærmegabet 27 og ikke 22 ( str. L) . Årgh... jeg troede jeg skulle sy sammen nu :-(
10.12.2015 - 09:05DROPS Design answered:
Hej Lise, M.1, M.2 og M.3 går over totalt 68 pinde. 68/28 (28p måler 10cm) = 24 cm. Det betyder at hvis du har 28p på 10 cm så stemmer målene også som der står i opskriften. Kan du ikke hoppe over det sidste mønster på skulderen og så bare lukke af ifølge opskriften? Hvis ikke så er du desværre nødt til at strikke bærestykket med mindre pinde (lav en strikkeprøve først, den skal også stemme i højden). God fornøjelse!
10.12.2015 - 15:26Strikker i str xxl. Har problemer med at få mønster m1 til at gå op i masker. Mønstret er på 6 masker. Opskriften siger 262 masker.
04.12.2015 - 08:01DROPS Design answered:
Hej Gitte, Jo men du starter ved pilen, strikker de sidste 5m i diagrammet (fra højre mod venstre), så M.1x42=252m, og sidste de første 5 m i diag = i alt 262 m. God fornøjelse!
04.12.2015 - 08:09Buonasera, vorrei realizzare questo maglione ma, confrontandolo con uno già esistente che prenderei come campione, le maniche anche nelle taglie più grandi sono troppo corte, dato che il ragazzo che lo deve portare è molto alto. Io avrei bisogno che la manica a partire dalla cucitura della spalla fosse circa 10 cm più lunga: come posso risolvere il problema? Posso distanziare di più gli aumenti sino all'arrotondamento della spalla? Grazie mille
29.10.2015 - 00:17DROPS Design answered:
Buongiorno Stella. Sì, può distanziare di più gli aumenti oppure aumentare come indicato e portare la manica alla lunghezza desiderata fino allo scalfo. Buon lavoro!
29.10.2015 - 13:38Ok! Ora mi è più chiaro! Quindi il motivo va realizzato sempre sul dritto del lavoro? O il motivo di una stessa riga va ripetuto sia sul dritto che sul rovescio? Grazie mille!
08.09.2015 - 13:10DROPS Design answered:
Buongiorno Michi. Nel diagramma, ogni riga rappresenta un ferro. Quindi, quando lavora avanti e indietro, sul diritto lavorerà una riga del diagramma leggendola da destra verso sinistra, al ferro successivo, sul rovescio, lavorerà la riga successiva del diagramma leggendola da sinistra verso destra. Ci riscriva se ancora in difficoltà. Buon lavoro!
08.09.2015 - 14:21Ciao! Sto realizzando il mio primo maglione con i ferri circolari: Sono arrivata a 48 cm di lavorazione del davanti/dietro e ora dovrei iniziare a lavorare separatamente le due parti, ma non mi è molto chiaro come: continuo il lavoro sui ferri circolari, ma come faccio? Utilizzo sempre lo stesso gomitolo sia per il davanti che per il dietro? In questo modo, però, non mi rimane sempre il filo sospeso nel punto in cui dovrò poi montare le maniche?
08.09.2015 - 12:13DROPS Design answered:
Buongiorno Michi. Deve proseguire lavorando prima solo sulle m del davanti e poi solo sulle m del dietro. Usa i ferri circolari come fossero ferri dritti, lavorando avanti e indietro e non in tondo. Buon lavoro!
08.09.2015 - 12:57Hallo, mir ist nicht ganz klar wie die Ärmel am Ende gestrickt werden. "Gleichzeitig nach 61...cm die Arbeit von der Markierung her hin und zurück stricken und auf beiden Seiten je 1 neue Masche anschlagen (=Randm.)". Heißt das, dass am Schluss nicht mehr in Runden gestrickt wird oder was bedeutet "hin und zurück stricken"?
04.09.2015 - 23:21DROPS Design answered:
Genau, das soll bedeuten, dass Sie nicht mehr in Runden, sondern in Hin- und Rück-R weiterstricken, also jeweils wenden. So erhalten Sie einen Schlitz. Das ist nötig, damit sich die Passform unter dem Arm ergibt und Sie den Ärmel in den Armausschnitt einnähen können.
08.09.2015 - 14:19Bonjour, Après la manche, j'arrive au devant et dos. Est-ce que mon calcul est bon pour centrer le motif M1 ? Sur 182 m, la 91ème maille tricotée = 2ème de M1 je commence par les 4 dernières mailles ? + 14 fois le diagramme (84m) + 6 centrées + 84 + 4 premières mailles ? Si je rabats ensuite 3 mailles de chaque côté je vais obtenir 170 mailles à répartir en 2*85 mailles. Est-ce que je suis ensuite les conseils que vous m'aviez donnés avec les calculs de la manche ? Merci beaucoup
21.05.2015 - 17:11DROPS Design answered:
Bonjour Mme Rech, sur 91 m (dos & devant), la 46ème m (= m centrale) doit être la 2ème m de M1, soit: *depuis le marqueur côté: 2 dernières m de M1, 7 fois M.1, 1 fois M.1 (la 2ème m = m centrale avec le marqueur), 6 fois M.1, 5 premières m de M.1* - pour les emmanchures rabattez ensuite 3 m de chaque côté du marqueur soit 6 m au total de chaque côté et continuez le motif comme avant avec les mailles en moins (=rabattues) sur les côtés. Bon tricot!
22.05.2015 - 09:32Eerder schreef ik: In het patroon staat: Brei tegelijkertijd vanaf een hoogte van 54 cm het werk verder heen en weer op de nld vanaf midden onder de mouw. Moet je dan niet eerst een paar steken afkanten? Hoe bedoelt U heen en weer op de naald? Bedankt voor uw antwoord, echter de vraag gaat over de mouw zelf. Het voor -en achterpand heb ik reeds klaar.
10.04.2015 - 17:14DROPS Design answered:
Hoi Marco. Je breit eerst de mouw in de rondte. Bij 54 cm brei je heen en weer vanaf het begin van de nld (middenonder de mouw), dus als j de nld hebt gebreid, keer je het werk en breit av terug tot aan het begin van de nld, keer, brei r enzovoort. Je gaat dus niet meer verder in de rondte. De mouwkop is recht voor deze model, je hoeft hier geen st af te kanten.
13.04.2015 - 14:42Hallo, erg leuk patroon. Ik ben momenteel met de mouwen bezig. Ik begrijp alleen niet goed hoe ik verder moet, na telpatroon M1? Ik brei het in het rond op de rondbreinaald. In het patroon staat: Brei tegelijkertijd vanaf een hoogte van 54 cm het werk verder heen en weer op de nld vanaf midden onder de mouw. Moet je dan niet eerst een paar steken afkanten? Hoe bedoelt U heen en weer op de naald? (eerste keer dat ik een trui brei). ;) groeten.
10.04.2015 - 13:50DROPS Design answered:
Hoi Marco, je begint al met afkanten voor de armsgaten als M.1 nog niet klaar is, dat staat hier: Kant TEGELIJKERTIJD bij een hoogte van 46-47-48-49-50-51 cm, 6-10-14-20-30-36 st af voor de armsgaten aan iedere kant... Als je dit gedaan hebt, heb je dus twee sets steken op de naald (voor- en achterpand) met openingen ertussen - het begin van de armsgaten. Als je het werk verdeeld hebt in twee panden, brei je die heen en weer. Hierna staat hoe en ook hoe je verder moet breien na M.1, bijvoorbeeld voor het voorpand: VOORPAND: = 85-89-93-97-101-105 st. Brei telpatroon M.1, brei dan telpatroon M.2 en brei tot slot M.3, ga hierna verder... Succes!
10.04.2015 - 16:04Bonjour. A 53 cm de haut, j'ai fait toutes mes augmentations, j'ai donc 85 m. Si je fais coïncider le début du tour avec la flèche, le début du tour est aussi pour moi la flèche du diagramme. Dois-je faire 1 m de couleur 5 m de blanc et de nouveau 1m couleur 5m blancs ? Si je fais cela, il me reste une maille. Je ne comprends pas votre phrase "comptez pour savoir à quel niveau commencer le diagramme. Désolée, pouvez-vous essayer de m'expliquer autrement svp ? Merci de votre patience !
24.03.2015 - 14:30DROPS Design answered:
Bonjour Mme Rech, avec 28 rangs pour 10 cm, les augmentations ne devraient pas être terminées à 53 cm. Il faut centrer le motif M1 de sorte que la 2ème m du diagramme soit celle au milieu de la manche et revenir en arrière ensuite en comptant les mailles pour savoir à quel niveau commencer. Sur 85 m, la 43ème tricotée = 2ème de M1, commencez par le tour par les 2 dernières m + 6 x le diag + le motif centré (de la 42e à la 47e m), puis 6 x le diag + les 5 premières m du diag). Bon tricot!
24.03.2015 - 15:30