DROPS Karisma
DROPS Karisma
100% Wool
from 3.00 $ /50g
Get the yarn to make this pattern from 42.00$.

The yarn cost is calculated from the pattern’s smallest size and the yarn’s cheapest product type. Looking for an even better price? You might find it on the DROPS Deals!

DROPS SS24

Nordic Midnight

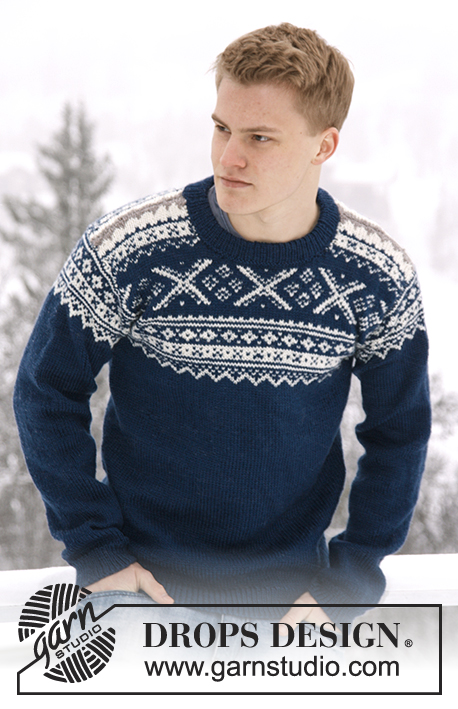
Knitted sweater for men with Norwegian pattern, in DROPS Karisma. Size: S - XXXL.

DROPS Extra 0-809
DROPS design: Pattern no U-650
Yarn group B
--------------------------------------------------------

Size: S - M - L - XL - XXL - XXXL
Finished measurements:
Bust: 86-94-102-112-124-134 cm / 34"-37"-40"-44"-49"-54"
Full length: 66-68-70-72-74-76 cm / 26"-26¾"-27½"-28⅜"-29⅛"-30"

Materials:
DROPS KARISMA from Garnstudio
Color no 37, dark gray blue:
550-600-650-700-750-850 g
Color no 01, off white:
100-100-150-150-150-150 g
Color no 55, light beige brown:
50-50-50-50-50-50 g

DROPS DOUBLE POINTED NEEDLES AND CIRCULAR NEEDLE (40 and 80 cm / 16" and 32") SIZE 4 mm / US 6 - or size needed to get 21 sts x 28 rows in stockinette st = 10 x 10 cm / 4" x 4".
DROPS DOUBLE POINTED NEEDLES and CIRCULAR NEEDLE (80 and 40 cm / 32" and 16") SIZE 3 mm / US 2or3 - for rib.

-------------------------------------------------------

Alternative Yarn – See how to change yarns here
Yarn Groups A to F – Use the same pattern and change the yarn here
Yarn usage using an alternative yarn – Use our yarn converter here

-------------------------------------------------------

DROPS Karisma
DROPS Karisma
100% Wool
from 3.00 $ /50g
Get the yarn to make this pattern from 42.00$.

The yarn cost is calculated from the pattern’s smallest size and the yarn’s cheapest product type. Looking for an even better price? You might find it on the DROPS Deals!

Pattern instructions

NOTE: This pattern is written in American English. All measurements in charts are in cm. For conversion from inches to cm - click here. There are different terms for crocheting in American and British English. If this pattern includes crochet, click for "crochet terms" here. For this pattern in British English, please click here.
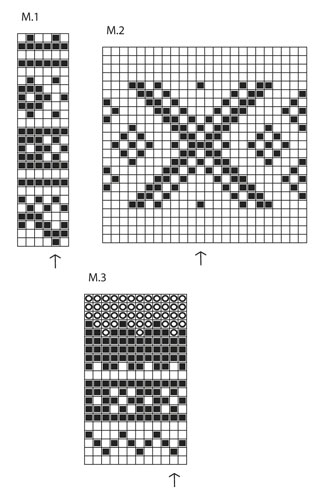
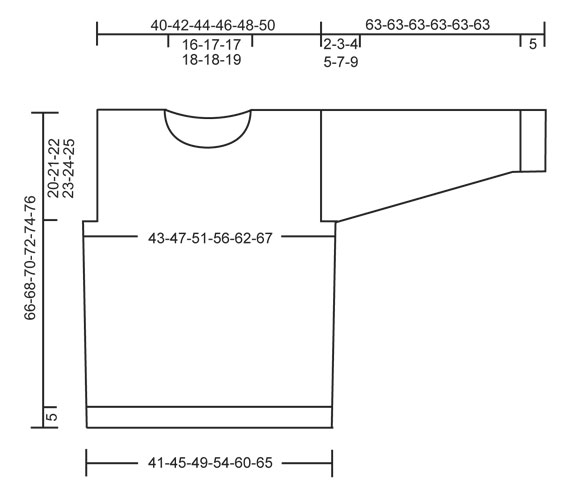
PATTERN:
See diagrams M.1 to M.3 – diagrams are worked in stockinette st and show 1 repetition of pattern.
--------------------------------------------------------

BODY:
Worked in the round on circular needle.
Cast on 210-228-246-270-306-330 sts on circular needle size 3 mm / US 2or3 with dark gray blue Karisma.
Work rib = K 1/P 1 for 5 cm / 2".
Switch to circular needle size 4 mm / US 6 and K 1 round while AT THE SAME TIME dec 36-38-40-44-52-56 sts evenly = 174-190-206-226-254-274 sts.
Insert a marker at beg of round and a marker after 87-95-103-113-127-137 sts (these marks the sides). Continue in stockinette st.
REMEMBER THE GAUGE!
When piece measures 15 cm / 6", inc 1 st on each side of both markers. Repeat inc when piece measures 30 cm / 11¾" = 182-198-214-234-262-282 sts.
When piece measures 41-43-45-46-48-50 cm / 16"-17"-17¾"-18"-19"-19¾", insert 2 markers in the piece; 1 in the middle st at the front and 1 in the middle st at the back.
Then work diagram M.1 – st marked with arrow in diagram should be sts with marker mid front/back - count out towards the side. Count out again when at the marker in the side so that pattern is the same on the front and on the back. AT THE SAME TIME when piece measures 46-47-48-49-50-51 cm / 18"-18½"-19"-19¼"-19¾"-20", bind off 6-10-14-20-30-36 sts for armholes in each side (i.e. 3-5-7-10-15-18 sts on each side of both markers in the sides). Finish front and back piece separately, back and forth on needle.

FRONT PIECE:
= 85-89-93-97-101-105 sts. Finish diagram M.1, then work diagram M.2 and finally M.3 before continuing with light beige brown until finished measurements (st with arrow in diagram should be st with marker mid front/back – count out towards the side).
When piece measures 58-60-62-64-66-68 cm / 22¾"-23⅝"-24⅜"-25¼"-26"-26¾", slip the middle 15-17-17-19-19-21 sts on a stitch holder for neck and finish each shoulder separately.
AT THE SAME TIME bind off at beg of every row from neck: 2 sts 3 times and 1 st 3 times = 26-27-29-30-32-33 sts remain on shoulder.
Bind off when piece measures 66-68-70-72-74-76 cm / 26"-26¾"-27½"-28⅜"-29⅛"-30".

BACK PIECE:
= 85-89-93-97-101-105 sts. Work as on front piece but do not bind off for neck until piece measures 64-66-68-70-72-74 cm / 25¼"-26"-26¾"-27½"-28⅜"-29⅛". Now bind off the middle 29-31-31-33-33-35 sts for neck and finish each shoulder separately - AT THE SAME TIME bind off 2 sts on next row from neck = 26-27-29-30-32-33 sts remain on each shoulder. Bind off when piece measures approx. 66-68-70-72-74-76 cm / 26"-26¾"-27½"-28⅜"-29⅛"-30" / 26"-26¾"-27½"-28⅜"-29⅛"-30" – bind off on same row in pattern as on front piece.

SLEEVE:
Worked in the round on double pointed needles, switch to circular needle when needed.
Cast on 62-64-66-66-68-68 sts on double pointed needles size 3 mm / US 2or3 with dark gray blue. Work rib = K 1/P 1 for 5 cm / 2".
Switch to double pointed needles size 4 mm / US 6 and K 1 round while AT THE SAME TIME dec 11 sts evenly = 51-53-55-55-57-57 sts.
Insert a marker at beg of round (= mid under sleeve) and continue in stockinette st. When piece measures 6 cm / 2⅜", inc 1 st on each side of marker. Repeat inc a total of 17-18-19-21-22-24 times in
Size S: On every 9th round,
Size M: Alternately on every 8th and 9th round,
Size L: Every 8th round,
Size XL: On every 7th round,
Size XXL: Alternately on every 6th and 7th round
Size XXXL: Alternately on every 5th and 6th round
= 85-89-93-97-101-105 sts.
AT THE SAME TIME when piece measures 53 cm / 21" in all sizes, work diagram M.1 (st with arrow in diagram = mid on top of sleeve – count out towards the side).
After diagram M.1, continue with dark gray blue until finished measurements. AT THE SAME TIME when piece measures 61-60-59-58-56-54 cm / 24"-23½"-23¼"-22¾"-22"-21¼" (shorter measurements in the larger sizes because of longer sleeve cap and broader shoulder width), finish the piece back and forth on needle from mid under sleeve.
Cast on 1 new st in each side (= edge st for assembly) and work until sleeve measures 63 cm / 24¾" in all sizes, bind off.

ASSEMBLY:
Sew shoulder seams and sew in sleeves (section worked back and forth at the top of sleeve should fit the bind off for armhole).

NECK:
Pick up from RS approx. 82 to 98 sts around the neck (including sts on stitch holder at the front) on a short circular needle size 3 mm / US 2or3 with dark gray blue.
P 1 round, then K 1 round while AT THE SAME TIME inc evenly to 102-108-110-116-118-122 sts.
Then work rib = K 1/P 1 for approx. 7 cm / 2¾", bind off with K over K and P over P.
Fold the rib double towards WS and fasten it to the back of neck edge with neat little loose stitches.


Diagram

All measurements in charts are in cm.

symbols = dark gray blue
symbols = off white
symbols = light beige brown
diagram
diagram

Each of our patterns has specific tutorial videos to help you.

Do you have a question? See a list of frequently asked questions (FAQ)

Knitting tension is what determines the final measurements of your work, and is usually measured per 10 x 10 cm. It is provided like so: number of stitches in width x number of rows in height - eg: 19 stitches x 26 rows = 10 x 10 cm.

The knitting tension is very individual; some people knit/crochet loosely while others work tightly. You adjust the knitting tension with the needle size, which is why the suggested needle size only serve as a guide! You need to adjust this (up or down) to ensure that YOUR knitting tension matches the knitting tension provided in the pattern. If you work with a different knitting tension than provided you will have a different yarn consumption, and your work will have different measurements than what the pattern suggests.

The knitting tension also determines which yarns can replace each other. As long as you achieve the same knitting tension you can replace one yarn with another.

See DROPS lesson: How to measure your tension/gauge

See DROPS video: How to make a gauge tension swatch

The required amount of yarn is provided in grams, eg: 450 g. To calculate how many balls you’ll need you first need to know how many grams are in 1 ball (25g, 50g or 100g). This information is available if you click on the individual yarn quality on our pages. Divide the amount required with the amount of each ball. For example, if each ball is 50g (the most common amount), the calculation will be as follows: 450 / 50 = 9 balls.

The important thing when changing from one yarn to another is that the knitting/crochet tension remains the same. This is so that the measurements of the finished piece will be the same as on the sketch provided. It is easier to achieve the same knitting tension using yarns from the same yarn group. It is also possible to work with multiple strands of a thinner yarn to achieve the knitting tension of a thicker one. Please try our yarn converter. We recommend you to always work a test swatch.

Please NOTE: when changing yarn the garment might have a different look and feel to the garment in the photo, due to individual properties and qualities of each yarn.

See DROPS lesson: Can I use a different yarn than the one mentioned in the pattern?

All our yarns are categorised into yarn groups (from A to F) according to thickness and knitting tension – group A contains the thinnest yarns and group F the thickest. This makes it easier for you to find alternative yarns to our patterns, should you wish to switch yarn. All yarns within the same group have a similar knitting tension and can easily replace each other. However, different yarn qualities have different structures and properties which will give the finished work a unique look and feel.

Click here for an overview of the yarns in each yarn group

At the top of all our patterns you’ll find a link to our yarn converter, which is a helpful tool should you wish to use a different yarn than suggested. By filling in the yarn quality you wish to replace, the amount (in your size) and number of strands, the converter will present good alternative yarns with the same knitting tension. Additionally it will tell you how much you’ll require in the new qualities and whether you’ll need to work with multiple strands. Most skeins are 50g (some are 25g or 100g).

If the pattern is worked with multiple colours, every colour will have to be converted separately. Similarly, if the pattern is worked with several strands of different yarns (for example 1 strand Alpaca and 1 strand Kid-Silk) you will have to find alternatives for each, individually.

Click here to see our yarn converter

Since different yarns have different qualities and textures we have chosen to keep the original yarn in our patterns. However, you can easily find options among our available qualities by using our yarn converter, or simply pick a yarn from the same yarn group.

It is possible that some retailers still have discontinued yarns in stock, or that someone has a few skeins at home that they would like to find patterns for.

The yarn converter will provide both alternative yarn as well as required amount in the new quality.

If you think it's hard to decide what size to make, it can be a good idea to measure a garment you own already and like the size of. Then you can pick the size by comparing those measures with the ones available in the pattern's size chart.

You'll find the size chart at the bottom of the pattern.

See DROPS lesson: How to read size chart

The needle size provided in the pattern serves only as a guide, the important thing is to follow the knitting tension. And since knitting tension is very individual, you will have to adjust the needle size to ensure that YOUR tension is the same as in the pattern – maybe you’ll have to adjust 1, or even 2 needle sizes, up or down to achieve the correct tension. For this, we recommend that you work test swatches.

Should you work with a different knitting tension than the one provided, the measurements of the finished garment might deviate from the measurement sketch.

See DROPS lesson: How to measure your tension/gauge

See DROPS video: How to make a gauge tension swatch

Working a garment top-down provides more flexibility and room for personal adjustment. For example it is easier to try the garment on while working, as well as making adjustments to length of yoke and shoulder caps.

The instructions are carefully explaining every step, in the correct order. Diagrams are adjusted to the knitting direction and are worked as usual.

The diagram depicts all rows/rounds, and every stitch seen from the right side. It is read from bottom to top, from right to left. 1 square = 1 stitch.

When working back and forth, every other row is worked from the right side and every other row is worked from the wrong side. When working from the wrong side, the diagram will have to be worked reversed: from left to right, knit stitches are purled, purl stitches are knit etc.

When working in the round every round is worked from the right side and the diagram are worked from right to left on all rounds.

See DROPS lesson: How to read knitting diagrams

The diagram depicts all rows/rounds, and every stitch seen from the right side. It is worked from bottom to top, from right to left.

When working back and forth every other row is worked from the right side: from right to left and every other row is worked from the wrong side: from left to right.

When working in the round, every row in the diagram are worked from the right side, from right to left.

When working a circular diagram you start in the middle and work your way outwards, counter clockwise, row by row.

The rows usually start with a given number of chain stitches (equivalent to the height of the following stitch), this will either be depicted in the diagram or explained in the pattern.

See DROPS lesson: How to read crochet diagrams

Instructions for working several diagrams after each other on the same row/round, will often be written like so: “work A.1, A.2, A.3 a total of 0-0-2-3-4 times". This means you work A.1 once, then A.2 is worked once, and A.3 is repeated (in width) the number of times provided for your size – in this case like so: S = 0 times, M = 0 times, L=2 times, XL= 3 times and XXL = 4 times.

The diagrams are worked as usual: begin with the first row in A.1, then work the first row in A.2 etc.

See DROPS lesson: How to read knitting diagrams

See DROPS lesson: How to read crochet diagrams

The total width of the garment (from wrist-to-wrist) will be larger in the larger sizes, despite the actual sleeves being shorter. The larger sizes have longer sleeve caps and wider shoulders, so there will be a good fit in all sizes.

The measurement sketch/schematic drawing provides information regarding the full length of the garment. If it’s a jumper or a jacket the length is measured from the highest point on the shoulder (usually closest to the neckline), and straight down to the bottom of the garment. It is NOT measured from the tip of shoulder. Similarly, the length of yoke is measured from the highest point on the shoulder and down to where yoke is split into body and sleeves.

See DROPS lesson: How to read a schematic drawing

Diagrams are often repeated on the round or in height. 1 repeat is the diagram the way it appears in the pattern. If it says to work 5 repeats of A.1 in the round, then you work A.1 a total of 5 times after/next to each other in the round. If it says to work 2 repeats of A.1 vertically/in height you work the entire diagram once, then begin again at the start and work the entire diagram one more time.

Chain stitches are slightly narrower than other stitches and to avoid working the cast-on edge too tight, we simply chain more stitches to begin with. The stitch count will be adjusted on the following row to fit the pattern and measurement sketch.

The rib edge is more elastic and will contract slightly compared to, for example, stocking stitch. By increasing before the rib edge, you avoid a visible difference in width between the rib edge and the rest of the body.

It’s very easy to cast off too tightly, and by making yarn overs while casting off (and simultaneously casting these off) you avoid a too tight cast off edge.

See DROPS video: How to bind off with yarn overs (yo)

To achieve an even increase (or decrease) you can increase on, for example: every 3rd and 4th row alternately, like so: work 2 rows and increase on the 3rd row, work 3 rows and increase on the 4th. Repeat this until the increase is complete.

See DROPS lesson: Increase or decrease 1 st on every 3rd and 4th row alternately

Should you prefer to work in the round instead of back and forth, you may of course adjust the pattern. You’ll need to add steeks mid-front (usually 5 stitches), and follow the instructions. When you would normally turn and work from the wrong side, simply work across the steek and continue in the round. At the end you’ll cut the piece open, pick up stitches to work bands, and cover the cut edges.

See DROPS video: How to knit steeks and cut open

Should you prefer to work back and forth instead of in the round, you may of course adjust the pattern so you work the pieces separately and then assemble them at the end. Divide the stitches for the body in 2, add 1 edge stitch in each side (for sewing) and work the front and back pieces separately.

See DROPS lesson: Can I adapt a pattern for circular needles into straight needles?

Pattern repeats can vary slightly in the different sizes, in order to get the correct proportions. If you’re not working the exact same size as the garment in the photo, yours might deviate slightly. This has been carefully developed and adjusted so that the complete impression of the garment is the same in all sizes.

Make sure to follow instructions and diagrams for your size!

If you have found a pattern you like which is available in women’s size it’s not very difficult to convert it to men’s size. The biggest difference will be the length of sleeves and body. Start working on the women size that you think would fit across the chest. The additional length will be worked right before you cast off for the armhole/sleeve cap. If the pattern is worked top-down you can add the length right after the armhole or before the first decrease on sleeve.

Regarding additional yarn amount, this will depend on how much length you add, but it is better with a skein too many than too few.

All yarns will have excess fibres (from production) that might come off as lint or shedding. Brushed yarns (ie hairier yarns) have more of these loose, excess fibres, causing more shedding.

Shedding also depends on what is worn under or over the garment, and whether this pulls at the yarn fibres. It’s therefore not possible to guarantee that there will be no shedding

Below are some tips on how to get the best result when working with hairier yarns:

1. When the garment is finished (before you wash it) shake it vigorously so the looser hairs come off. NOTE: do NOT use a lint roller, brush or any method that pulls at the yarn.

2. Place the garment in a plastic bag and put it in your freezer - the temperature will cause the fibres to become less attached to each other, and excess fibres will come off easier.

3. Leave in the freezer for a few hours before taking it out and shaking it again.

4. Wash the garment according to the instructions on the yarn label.

Pilling is a natural process that happens to even the most exclusive of fibers. It's a natural sign of wear and tear that is hard to avoid, and that is most visible in high friction areas of your garment like a sweater's arms and cuffs.

You can make your garment look as new by removing the pilling, using a fabric comb or a pill/lint remover.

Still can't find the answer you need? Then scroll down and leave your question so one of our experts can try to help you. This will be done normally within 5 to 10 working days.
In the meantime, you can read the questions and answers that others have left to this pattern or join the DROPS Workshop on Facebook to get help from fellow knitters/crocheters!

Nordic Midnight

Ainara, Denmark

Nordic Midnight

Sarah, Germany

Post a comment to pattern DROPS Extra 0-809

We would love to hear what you have to say about this pattern!

If you want to leave a question, please make sure you select the correct category in the form below, to speed up the answering process. Required fields are marked *.

Comments / Questions (114)

country flag Liv Berit Simonsen wrote:

Jeg holder på å strikke ermet til denne genseren, leser i oppskriften at etter 53 cm skal det strikkes M 1. Men på bildet ser det ut for at det er mønster 3 også?

13.03.2017 - 13:48

DROPS Design answered:

Hei Liv. Der strikkes kun M.3 paa skulderen - ikke överst paa ermet.

13.03.2017 - 14:25

country flag Maire wrote:

Hei, Aloittaessani kuviota M1, huomasin että kuviossa silmukat eivät mene tasan. Teen kokoa L, jolloin silmukkamäärä on 214. Ohjeessa keskisilmukan molemmilla puolilla olisi 53 s etu- ja takakappaleessa. Pitääkö siis ohjeessa lisätä vielä kaksi silmukkaa (yhteensä 216 silmukkaa työssä), jotta kuvio täsmäisi? Kuviohan on jaollinen 6:lla.

07.03.2017 - 11:39

DROPS Design answered:

Hei! Kuvioon on nuolella merkitty etu- ja takakappaleen keskikohta ja kuvion alku lasketaan tästä. Tämä tarkoittaa, että kuvion silmukkaluku ei välttämättä mene kaikissa koissa tasan.

07.03.2017 - 16:13

country flag Yvonne Skogli wrote:

Hei ! Eg lurer på om det stemmer at en skal strikke vrangborden, for så å felle når en begynner på bolen ? Str S skal en legge opp 228 masker og så felle 38 masker og fortsette med glattstrikk. Det er første gang eg gjør det med en genseroppskrift, så er usikker om det virkelig stemmer ? Som regel så øker man antallet masker når en begynner på bolen. Mvh Yvonne :)

02.03.2017 - 09:28

DROPS Design answered:

Hej Yvonne. Ja, det er korrekt. Vrangbord traekker sig mere sammen en ren glatstrik, derfor tager du ind, saa din glatstrik del bliver lige saa bred som vrangborden. Tager du ikke ind (eller tog ud), ville den del blive meget bredere = mere poset.

02.03.2017 - 15:45

Alex wrote:

I have just got to the part where I will begin the colourwork and am making size Large. I can't help noticing that 214 sts doesn't go equally into the number of stitches required for the colour pattern repeats (6sts, 24sts and 12sts), meaning that the pattern will not have a neat join. To solve it I will have to increase an extra 2sts to 216, so the pattern comes out even. Is this intentional or is this a mistake in the pattern?

14.01.2017 - 10:44

DROPS Design answered:

Dear Alex, in size L you are working over 214 sts, center diagram (see here) so that the st with an arrow in diagram is the st with a marker on mid back and on mid front, ie pattern will not match on the sides, start from one marker, work across to the 2nd marker, and repeat to the end of round. Happy knitting!

16.01.2017 - 09:12

country flag Ike Pots wrote:

Ik ben begonnen met M1 over 214 st. Maar kom niet uit. Kom op het laatst 2 steken te kort. Wat doe ik fout?

20.11.2016 - 13:02

DROPS Design answered:

Hoi Ike. Je hebt in totaal 214 st = 107 st voor elk pand. Middelste st voor/achter is dan de 54e st (je hebt dan 53 st aan elke zijkant van de middelste st). Dit is de steken gemarkeerd met een pijltje. Je hebt 6 st per herhaling van M.1, steken met pijltje is 2e st. Steek 53 is eerste st van de herhaling, dan 8 hele herhalingen: 48 st, 5 st over, dus je begint met 2e st van het telpatroon. Lees ook hier hoe je een telpatroon in met midden plaatst

21.11.2016 - 13:24

country flag Kristine wrote:

Stemmer det virkelig at det skal felles 30m til erme på hver side av bolen? For- og bakstykket er jo ca 126 omg (høyde på begge til sammen) på xxl og med de 30 til ermehull, blir ikke dette alt for stort for å passe inn et erme på 101m? Og hvordan blir dette under armen, folder det seg ikke mot brystkassen når det er et såpass stort "flatt" parti?

14.11.2016 - 11:40

DROPS Design answered:

Hei Kristine. Det burde vaere korrekt ja. Vi har ikke modtaget yderligere kommentarer paa at dette skulle vaere forkert og der er f.eks. paa Ravelry mange fine resultater paa denne genser.

14.11.2016 - 12:13

Dror wrote:

This is not a seamless sweater. please correct your tags :)

05.10.2016 - 12:59

DROPS Design answered:

Dear Mrs Dror, we do not have "seamless" as a tag on this pattern, can you tell us more? Thank you!

05.10.2016 - 14:32

country flag Lisbet Holze Jespersen wrote:

Denne trøje skulle bestå af 3 farver jf. forsiden af opskriften. Under diagram forklaring er der nu en 4. farve lys grågrøn. Bundfarven strikkes i mørk blågrøn. Hvis jeg har forstået det korrekt, hvor mange garnnøgler af farven lys grågrøn skal jeg bruge. Venlig hilsen Lisbet

04.07.2016 - 16:25

DROPS Design answered:

Hej Lizbet. Du skal bruge mørk blågrøn. Det er vist en lille fejl i oversaettelsen paa diagrammet.

04.07.2016 - 16:31

country flag Mieke Baras wrote:

Ik brei de grootste maat en heb voor-en achterpand klaar. Bij de mouw ben ik heen en weer aan t breien, maar ik zie echt niet hoe ik deze mouwkop moet innaaien als op het VP en RP armsgaten zijn gemaakt terwijl je die niet hebt moeten maken bij de mouwen. Waar juist komt de split vd mouw aan het lijf? Ik zie het niet ...

09.03.2016 - 13:59

DROPS Design answered:

Hoi Mieke. Brei je heen en weer, dan sluit je de naad onder de mouw tot aan het eind = opening mouw = mouwkop. Deze naai je in de armsgaten op de panden.

10.03.2016 - 13:54

country flag Laura Binda wrote:

Buonasera, sto lavorando il modello rappresentato,ma non riesco a capire ciò che riguarda le maniche. 1): le 66 maglie di avvio si riferiscono ad entrambe le maniche o ad una sola? 2) posso lavorare le maniche con i ferri circolari e non con quelli a doppia punta che mii risultano difficili? 3) le maniche si lavorano una per volta? In attesa di vostra risposta, vi auguro buona serata. Cordiali saluti Laura

18.02.2016 - 21:36

DROPS Design answered:

Buonasera Laura. Per le maniche: il numero delle m da avviare fa riferimento ad una manica sola. Può lavorare le maniche sui ferri circolari al posto dei ferri a doppia punta. Generalmente si lavora una manica alla volta. Ci riscriva se ancora in difficoltà. Buon lavoro!

18.02.2016 - 21:54