DROPS Baby Merino
DROPS Baby Merino
100% Wool
from 4.55 $ /50g
Get the yarn to make this pattern from 13.65$.

The yarn cost is calculated from the pattern’s smallest size and the yarn’s cheapest product type. Looking for an even better price? You might find it on the DROPS Deals!

DROPS SS24

McDreamy

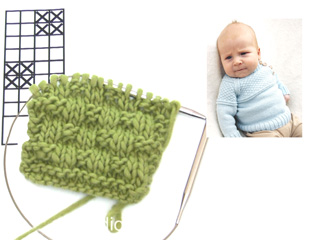
Knitted sweater with textured pattern and raglan sleeve for baby and children in DROPS BabyMerino

DROPS Baby 21-15
DROPS design: Pattern no BM-025-by
Yarn group A
--------------------------------------------------------
Size: 1/3 - 6/9 - 12/18 months (2 - 3/4) years
Finished measurements:
Bust: 50-56-64 (70-74) cm / 19¾"-22"-25¼" (27½"-29⅛")
Full length: 25-27-31 (35-39) cm / 9¾"-10⅝"-12¼" (13¾"-15¼")

Materials: DROPS BABY MERINO from Garnstudio
150-150-150 (150-200) g color no 11, ice blue

DROPS DOUBLE POINTED NEEDLES AND CIRCULAR NEEDLE (60 cm / 24") size 3 mm/US 2 or 3 - or size needed to get 24 sts x 32 rows in stockinette st = 10 x 10 cm / 4" x 4".
DROPS DOUBLE POINTED NEEDLES AND CIRCULAR NEEDLE (40 cm / 16") size 2.5 mm/US 1 – for rib.

DROPS WOODEN BUTTON LIGHT, no 503: 4 pcs.

-------------------------------------------------------

Alternative Yarn – See how to change yarns here
Yarn Groups A to F – Use the same pattern and change the yarn here
Yarn usage using an alternative yarn – Use our yarn converter here

-------------------------------------------------------

DROPS Baby Merino
DROPS Baby Merino
100% Wool
from 4.55 $ /50g
Get the yarn to make this pattern from 13.65$.

The yarn cost is calculated from the pattern’s smallest size and the yarn’s cheapest product type. Looking for an even better price? You might find it on the DROPS Deals!

Pattern instructions

NOTE: This pattern is written in American English. All measurements in charts are in cm. For conversion from inches to cm - click here. There are different terms for crocheting in American and British English. If this pattern includes crochet, click for "crochet terms" here. For this pattern in British English, please click here.
PATTERN: See diagrams M.1 to M.3. Diagrams show the pattern from RS.

DECREASING TIP (applies to raglan):
FROM RS:
At beg of row: 1 edge st, slip 1 st as if to K, K1, psso.
At the end of row, beg when 3 sts remain: K2 tog, 1 edge st.
By the other 3 markers dec as follows in each transition between sleeve and body piece, beg 3 sts before marker: K2 tog, K2 (marker sits between these 2 sts), slip 1 st as if to K, K1, psso.
FROM WS:
At beg of row: 1 edge st, P2 tog.
At the end of row, beg when 3 sts remain: P2 tog into back of loop, 1 edge st.
By the other 3 markers dec as follows in each transition between sleeve and body piece, beg 3 sts before marker: P2 tog into back of loop, P2 (marker sits between these 2 sts), P2 tog.

GARTER ST (back and forth on needle): K all rows.
--------------------------------------------------------
--------------------------------------------------------

BODY PIECE:
Worked in the round on circular needle.
Cast on 148-168-184 (204-216) sts on circular needle size 2.5 mm / US 1 with Baby Merino. K 1 round and continue in rib, K2/P2. When rib measures 4 cm / 1½" K 1 round, AT THE SAME TIME dec 28-32-32 (36-40) sts evenly = 120-136-152 (168-176) sts. Insert 1 marker at beg of round and 1 marker after 60-68-76 (84-88) sts (= the sides). Change to circular needle size 3 mm / US 2or3 and continue in stockinette st. REMEMBER THE GAUGE! When piece measures 14-15-18 (20-23) cm / 5½"-6"-7" (8"-9") work chart M.1 on all sts. After M.1 continue in chart M.2 on all sts. AT THE SAME TIME when piece measures 17-18-21 (24-27) cm / 6¾"-7"-8¼" (9½"-10⅝") work next round as follows: bind off 4 sts for armhole, work 52-60-68 (76-80) sts (= front piece), bind off 8 sts for armhole, work 52-60-68 (76-80) sts (= back piece) and bind off the last 4 sts for armhole.
Cut the thread and put piece aside. Knit the sleeves.

SLEEVE:
Worked in the round on double pointed needles.
Cast on 44-48-52 (56-60) sts on double pointed needles size 2.5 mm / US 1 with Baby Merino. K 1 round and continue in rib, K2/P2. When rib measures 4 cm / 1½" K 1 round, AT THE SAME TIME dec 10-12-14 (16-16) sts evenly = 34-36-38 (40-44) sts. Insert a marker at beg of round = mid under sleeve. Change to double pointed needles size 3 mm / US 2or3 and continue in stockinette st. When piece measures 6 cm / 2⅜" inc 1 st on each side of marker.
SIZE 1/3 months + 6/9 months: Repeat the inc on every 4th round a total of 7-8 times.
SIZE 12/18 months + 2 years: Repeat the inc on every 4th and 5th round alternately a total of 9 (12) times.
SIZE 3/4 years: Repeat the inc on every 6th round a total of (12) times.
= 48-52-56 (64-68) sts.
AT THE SAME TIME when piece measures 13-14-17 (20-24) cm / 5⅛"-5½"-6¾" (8"-9½") work M.1.
After M.1 continue in M.2. When piece measures approx 16-17-20 (24-28) cm / 6¼"-6¾"-8" (9½"-11") – make sure to be on the same row in M.2 as on body piece – bind off 8 sts mid under sleeve (= 4 sts each side of marker) = 40-44-48 (56-60) sts left on needle. Put piece aside and knit the other sleeve.

YOKE:
Slip sleeves on the same circular needle as body piece where bind off for armhole = 184-208-232 (264-280) sts. Insert a marker in all transitions between sleeves and body piece and insert a marker mid front (= 26-30-34 (38-40) sts each side).
READ ALL OF THE FOLLOWING SECTION BEFORE CONTINUING!
Continue back and forth on needle from the raglan on right front piece (when garment lies flat in front of you). Beg by casting/binding off 3 sts on each side of this raglan opening. Continue in M.2 with 1 edge st each side (make sure pattern continues from body piece and sleeves). After 6-6.5-7 (8-8.5) cm / 2⅜"-2½"-2¾" (3⅛"-3¼") of M.2 work M.3 and then complete piece in M.2.
AT THE SAME TIME on first row from RS dec 1 st for raglan on each side of all markers – SEE DECREASING TIP!
Repeat the dec on every other row a total of 13-15-16 (15-16) times and then on every row: 0-0-1 (6-7) times.
AT THE SAME TIME when piece measures 24-26-30 (34-38) cm / 9½"-10¼"-11¾" (13⅜"-15") slip the middle 14-18-22 (22-22) sts on front piece (i.e. 7-9-11 (11-11) sts on each side of marker mid front) on a stitch holder for neck and complete each side separately. Bind off to shape the neckline at the beg of every row from mid front: 2 sts 1 time and 1 st 1 time. After all dec for raglan and neck are complete there are approx 54-58-62 (62-62) sts left on needle and piece measures approx 28-30-34 (38-42) cm / 11"-11¾"-13⅜" (15"-16½") up to shoulder. Slip sts on a stitch holder and work the raglan edges before the neckline.

RAGLAN EDGE:
Pick up approx 24 to 36 sts (divisible by 4) inside 1 edge st along the raglan opening on sleeve on needle size 2.5 mm / US 1 with Baby Merino. Work rib K2/P2 with 1 garter st and K2 each side (as seen from RS). When edge measures 2 cm / ¾" bind off with K over K and P over P.
Repeat along raglan opening on front piece, but after 2 rows make 3 buttonholes evenly (the last buttonholes is made on neck).
1 buttonhole = bind off 2 sts and cast on 2 new sts on return row.

NECK:
Slip sts from stitch holder mid front and on yoke back on circular needle size 2.5 mm / US 1, pick up approx 20 to 28 sts on each neckline at front and pick up 6 sts on each raglan edge with Baby Merino = approx 100 to 128 sts (divisible by 4). Work rib back and forth on needle from raglan opening as follows (as seen from RS): 1 garter st, * K2/P2 *, repeat from *-* and finish with K2 and 1 garter st. AT THE SAME TIME after 2 rows make 1 buttonhole in line with the others on raglan edge and when neck measures 4.5 cm / 1¾" make 1 buttonhole over the first one. Work another 2 rows and bind off with K over K and P over P.

ASSEMBLY:
Fold neck double towards WS and fasten with neat sts. Sew raglan edges to bottom of raglan openings.
Sew openings under sleeves.
Sew on buttons.

Diagram

All measurements in charts are in cm.

symbols = K from RS, P from WS
symbols = P from RS, K from WS
diagram

Each of our patterns has specific tutorial videos to help you.

Do you have a question? See a list of frequently asked questions (FAQ)

Knitting tension is what determines the final measurements of your work, and is usually measured per 10 x 10 cm. It is provided like so: number of stitches in width x number of rows in height - eg: 19 stitches x 26 rows = 10 x 10 cm.

The knitting tension is very individual; some people knit/crochet loosely while others work tightly. You adjust the knitting tension with the needle size, which is why the suggested needle size only serve as a guide! You need to adjust this (up or down) to ensure that YOUR knitting tension matches the knitting tension provided in the pattern. If you work with a different knitting tension than provided you will have a different yarn consumption, and your work will have different measurements than what the pattern suggests.

The knitting tension also determines which yarns can replace each other. As long as you achieve the same knitting tension you can replace one yarn with another.

See DROPS lesson: How to measure your tension/gauge

See DROPS video: How to make a gauge tension swatch

The required amount of yarn is provided in grams, eg: 450 g. To calculate how many balls you’ll need you first need to know how many grams are in 1 ball (25g, 50g or 100g). This information is available if you click on the individual yarn quality on our pages. Divide the amount required with the amount of each ball. For example, if each ball is 50g (the most common amount), the calculation will be as follows: 450 / 50 = 9 balls.

The important thing when changing from one yarn to another is that the knitting/crochet tension remains the same. This is so that the measurements of the finished piece will be the same as on the sketch provided. It is easier to achieve the same knitting tension using yarns from the same yarn group. It is also possible to work with multiple strands of a thinner yarn to achieve the knitting tension of a thicker one. Please try our yarn converter. We recommend you to always work a test swatch.

Please NOTE: when changing yarn the garment might have a different look and feel to the garment in the photo, due to individual properties and qualities of each yarn.

See DROPS lesson: Can I use a different yarn than the one mentioned in the pattern?

All our yarns are categorised into yarn groups (from A to F) according to thickness and knitting tension – group A contains the thinnest yarns and group F the thickest. This makes it easier for you to find alternative yarns to our patterns, should you wish to switch yarn. All yarns within the same group have a similar knitting tension and can easily replace each other. However, different yarn qualities have different structures and properties which will give the finished work a unique look and feel.

Click here for an overview of the yarns in each yarn group

At the top of all our patterns you’ll find a link to our yarn converter, which is a helpful tool should you wish to use a different yarn than suggested. By filling in the yarn quality you wish to replace, the amount (in your size) and number of strands, the converter will present good alternative yarns with the same knitting tension. Additionally it will tell you how much you’ll require in the new qualities and whether you’ll need to work with multiple strands. Most skeins are 50g (some are 25g or 100g).

If the pattern is worked with multiple colours, every colour will have to be converted separately. Similarly, if the pattern is worked with several strands of different yarns (for example 1 strand Alpaca and 1 strand Kid-Silk) you will have to find alternatives for each, individually.

Click here to see our yarn converter

Since different yarns have different qualities and textures we have chosen to keep the original yarn in our patterns. However, you can easily find options among our available qualities by using our yarn converter, or simply pick a yarn from the same yarn group.

It is possible that some retailers still have discontinued yarns in stock, or that someone has a few skeins at home that they would like to find patterns for.

The yarn converter will provide both alternative yarn as well as required amount in the new quality.

If you think it's hard to decide what size to make, it can be a good idea to measure a garment you own already and like the size of. Then you can pick the size by comparing those measures with the ones available in the pattern's size chart.

You'll find the size chart at the bottom of the pattern.

See DROPS lesson: How to read size chart

The needle size provided in the pattern serves only as a guide, the important thing is to follow the knitting tension. And since knitting tension is very individual, you will have to adjust the needle size to ensure that YOUR tension is the same as in the pattern – maybe you’ll have to adjust 1, or even 2 needle sizes, up or down to achieve the correct tension. For this, we recommend that you work test swatches.

Should you work with a different knitting tension than the one provided, the measurements of the finished garment might deviate from the measurement sketch.

See DROPS lesson: How to measure your tension/gauge

See DROPS video: How to make a gauge tension swatch

Working a garment top-down provides more flexibility and room for personal adjustment. For example it is easier to try the garment on while working, as well as making adjustments to length of yoke and shoulder caps.

The instructions are carefully explaining every step, in the correct order. Diagrams are adjusted to the knitting direction and are worked as usual.

The diagram depicts all rows/rounds, and every stitch seen from the right side. It is read from bottom to top, from right to left. 1 square = 1 stitch.

When working back and forth, every other row is worked from the right side and every other row is worked from the wrong side. When working from the wrong side, the diagram will have to be worked reversed: from left to right, knit stitches are purled, purl stitches are knit etc.

When working in the round every round is worked from the right side and the diagram are worked from right to left on all rounds.

See DROPS lesson: How to read knitting diagrams

The diagram depicts all rows/rounds, and every stitch seen from the right side. It is worked from bottom to top, from right to left.

When working back and forth every other row is worked from the right side: from right to left and every other row is worked from the wrong side: from left to right.

When working in the round, every row in the diagram are worked from the right side, from right to left.

When working a circular diagram you start in the middle and work your way outwards, counter clockwise, row by row.

The rows usually start with a given number of chain stitches (equivalent to the height of the following stitch), this will either be depicted in the diagram or explained in the pattern.

See DROPS lesson: How to read crochet diagrams

Instructions for working several diagrams after each other on the same row/round, will often be written like so: “work A.1, A.2, A.3 a total of 0-0-2-3-4 times". This means you work A.1 once, then A.2 is worked once, and A.3 is repeated (in width) the number of times provided for your size – in this case like so: S = 0 times, M = 0 times, L=2 times, XL= 3 times and XXL = 4 times.

The diagrams are worked as usual: begin with the first row in A.1, then work the first row in A.2 etc.

See DROPS lesson: How to read knitting diagrams

See DROPS lesson: How to read crochet diagrams

The total width of the garment (from wrist-to-wrist) will be larger in the larger sizes, despite the actual sleeves being shorter. The larger sizes have longer sleeve caps and wider shoulders, so there will be a good fit in all sizes.

The measurement sketch/schematic drawing provides information regarding the full length of the garment. If it’s a jumper or a jacket the length is measured from the highest point on the shoulder (usually closest to the neckline), and straight down to the bottom of the garment. It is NOT measured from the tip of shoulder. Similarly, the length of yoke is measured from the highest point on the shoulder and down to where yoke is split into body and sleeves.

See DROPS lesson: How to read a schematic drawing

Diagrams are often repeated on the round or in height. 1 repeat is the diagram the way it appears in the pattern. If it says to work 5 repeats of A.1 in the round, then you work A.1 a total of 5 times after/next to each other in the round. If it says to work 2 repeats of A.1 vertically/in height you work the entire diagram once, then begin again at the start and work the entire diagram one more time.

Chain stitches are slightly narrower than other stitches and to avoid working the cast-on edge too tight, we simply chain more stitches to begin with. The stitch count will be adjusted on the following row to fit the pattern and measurement sketch.

The rib edge is more elastic and will contract slightly compared to, for example, stocking stitch. By increasing before the rib edge, you avoid a visible difference in width between the rib edge and the rest of the body.

It’s very easy to cast off too tightly, and by making yarn overs while casting off (and simultaneously casting these off) you avoid a too tight cast off edge.

See DROPS video: How to bind off with yarn overs (yo)

To achieve an even increase (or decrease) you can increase on, for example: every 3rd and 4th row alternately, like so: work 2 rows and increase on the 3rd row, work 3 rows and increase on the 4th. Repeat this until the increase is complete.

See DROPS lesson: Increase or decrease 1 st on every 3rd and 4th row alternately

Should you prefer to work in the round instead of back and forth, you may of course adjust the pattern. You’ll need to add steeks mid-front (usually 5 stitches), and follow the instructions. When you would normally turn and work from the wrong side, simply work across the steek and continue in the round. At the end you’ll cut the piece open, pick up stitches to work bands, and cover the cut edges.

See DROPS video: How to knit steeks and cut open

Should you prefer to work back and forth instead of in the round, you may of course adjust the pattern so you work the pieces separately and then assemble them at the end. Divide the stitches for the body in 2, add 1 edge stitch in each side (for sewing) and work the front and back pieces separately.

See DROPS lesson: Can I adapt a pattern for circular needles into straight needles?

Pattern repeats can vary slightly in the different sizes, in order to get the correct proportions. If you’re not working the exact same size as the garment in the photo, yours might deviate slightly. This has been carefully developed and adjusted so that the complete impression of the garment is the same in all sizes.

Make sure to follow instructions and diagrams for your size!

If you have found a pattern you like which is available in women’s size it’s not very difficult to convert it to men’s size. The biggest difference will be the length of sleeves and body. Start working on the women size that you think would fit across the chest. The additional length will be worked right before you cast off for the armhole/sleeve cap. If the pattern is worked top-down you can add the length right after the armhole or before the first decrease on sleeve.

Regarding additional yarn amount, this will depend on how much length you add, but it is better with a skein too many than too few.

All yarns will have excess fibres (from production) that might come off as lint or shedding. Brushed yarns (ie hairier yarns) have more of these loose, excess fibres, causing more shedding.

Shedding also depends on what is worn under or over the garment, and whether this pulls at the yarn fibres. It’s therefore not possible to guarantee that there will be no shedding

Below are some tips on how to get the best result when working with hairier yarns:

1. When the garment is finished (before you wash it) shake it vigorously so the looser hairs come off. NOTE: do NOT use a lint roller, brush or any method that pulls at the yarn.

2. Place the garment in a plastic bag and put it in your freezer - the temperature will cause the fibres to become less attached to each other, and excess fibres will come off easier.

3. Leave in the freezer for a few hours before taking it out and shaking it again.

4. Wash the garment according to the instructions on the yarn label.

Pilling is a natural process that happens to even the most exclusive of fibers. It's a natural sign of wear and tear that is hard to avoid, and that is most visible in high friction areas of your garment like a sweater's arms and cuffs.

You can make your garment look as new by removing the pilling, using a fabric comb or a pill/lint remover.

Still can't find the answer you need? Then scroll down and leave your question so one of our experts can try to help you. This will be done normally within 5 to 10 working days.
In the meantime, you can read the questions and answers that others have left to this pattern or join the DROPS Workshop on Facebook to get help from fellow knitters/crocheters!

You might also like...

McDreamy

Katja, Finland

McDreamy

Cecilia Maria Sala, Italy

McDreamy and Little Miss Ribbons

Stephanie, Switzerland

McDreamy

@sifpetrea, Denmark

McDreamy

Anna, Russian Federation

McDreamy in Baby Merino

Joanna, Poland

McDreamy Jumper

oliverabb, France

McDreamy

Carmen, Spain

Post a comment to pattern DROPS Baby 21-15

We would love to hear what you have to say about this pattern!

If you want to leave a question, please make sure you select the correct category in the form below, to speed up the answering process. Required fields are marked *.

Comments / Questions (492)

country flag Ulla wrote:

(Str. 6/9 mdr.)Efter at have sat de midterste m midt for på en hjælpepind er jeg fortsat med: lukke af 2 m 1 gang og 1 m 1 gang i begyndelsen af hver næste pind. Jeg skulle nu fortsætte med raglanindtagninger men!!! ifølge opskriften skulle der til slut være ca. 58 m tilbage på pinden. Jeg har kun 52 hvis jeg tæller m på hjælpepinden med??? Og jeg er ikke færdig med indtagningerne.

21.03.2013 - 14:43

DROPS Design answered:

Kaere Ulla. Det lyder som om du har lukket for mange m af til raglan? Du begyndte med 208 m. Du lukker först 3 m af på hver side af mærketråden (= 6). Du har 8 indtagninger pr p og dem gentager du for den mindste str totalt 15 gange i hver 2e p (= 120 m mindre naar den er afsluttet). Da har du 82 m paa pinden og her tager du 18 m fra til hals og har da 64 m tilbage til at lukke af for hals: 2 m 1 gang og 1 m 1 gang (4 + 2). Da ender du paa 58.

28.03.2013 - 14:22

country flag Nathalie wrote:

Joli modèle, mais explications un peu confuses au niveau de l'encolure...

19.03.2013 - 16:04

country flag Britt wrote:

Hej hej! På oket står det "När M.2är stickat i 6-6½-7 (8-8½) cm stickas M.3 innan det stickas vidare med M.2 till färdigt mått. SAMTIDIGT, på förstavarvet från rätsidan, minskas 1 m på var sidaav alla raglanmarkörer (= 8 minskningar per v)" Är det första varvet på M3 man börjar minskningarna eller när man börjar om på M2? Tack på förhand!

18.03.2013 - 00:25

DROPS Design answered:

Du börjar minskningarna till raglan redan på førsta varvet när du har satt ärmarna in på samma rundst som fram- och bakst.

18.03.2013 - 13:04

country flag Astrid wrote:

Hei. Stemmer maskeantallet til ermene? 56 masker til står 2 år virker veldig stort. Nå når jeg har strikket noen omganger ser det ut til at erme passer meg..

01.03.2013 - 10:53

DROPS Design answered:

Vrangborden traekker sig noget sammen. Om du har den rette strikkefasthed skulle den vaere ret. Efter borden tager du ind til 40 m = ca 17 cm bred.

21.03.2013 - 10:08

country flag Helle wrote:

Strikker i str. 12-18 mrd. Har samme problem som en anden lidt længere oppe. Stykket fra indtag til raglan (16 indtag x 8 m på hver anden pind + 1 fra vrangsiden) giver mig kun 27 cm i den samlede højde på arbejdet. Er i tvivl om hvordan jeg får mere højde på så,der er plads til halsafslutning. Kan selvfølgelig pille op og strikke ekstra stykke ind under ærmer, men det virker ikke som en god løsning.

25.01.2013 - 21:42

DROPS Design answered:

Hvis du strikker lidt stramt i forhold til anbefalet strikkefasthed, så vil raglanindtagningen bliver for kort. Da må du strikke en ekstra pind ind imellem raglanindtagningerne. Hvor mange cm mangler du? Du har ca 3 pinde på 1 cm.

29.01.2013 - 09:44

country flag Tina wrote:

Nu har jeg læst alting igennem 100 gange, og kan stadig ikke få toppen til at gå op. Efter at have sat det forreste 18 m (6/9) på tråd, har jeg strikket resterende op sammen, og lukket de overskydende 4 i den ene side af, og 3 ind mod den modsatte raglankant, er det forkert? Skal jeg så strikke de 18 masker op til samme højde, og skal jeg også lukke 3m i hver side af her? Jeg kan ikke se, hvordan åbningerne mellem de to dele skal lukkes bagefter.

18.01.2013 - 20:26

DROPS Design answered:

Du sætter alle m fra ærmerne og ryg og forstykke ind på samme pind. Det er kun den side hvor du skal have en åbning med knapper at du skal lukke 3x2 m af. Over de andre overgange strikker du ifølge forklaringen til raglan. Jeg tror at du er nødt til at spørge i butikken hvor du har købt garnet, det lyder til at det bliver for svært at svare på pr mail.

23.01.2013 - 11:34

country flag Anna wrote:

Neulon pienintä puseroa, ja olen päässyt vaiheeseen, jossa 14 s on kerätty apulangalle kaulan kohdalta. Pitääkö paikkansa että pääntien reunuksen toiselle puolelle jää vain 3 s? Ohjeessa lukee että päätä pääntien reunasta joka 2. kierros... Tarkoittaako tämä, että vain toisesta reunasta päätetään silmukoita vai kummastakin. Jos kummastakin reunasta päätetään niin tehdäänkö se symmetrisesti vai toiselta puolelta 1X2 ja toiselta 1X1?

23.11.2012 - 14:26

country flag Donatella wrote:

Buongiorno sto realizzando questo modello nella taglia 1/3 mesi ,sono arrivata al collo e qui sorge il problema non mi trovo con il numero di maglie ed inoltre non so come proseguire sulla divisione delle maglie per lavorare la scollatura con relative diminuzioni

11.11.2012 - 08:55

DROPS Design answered:

Buongiorno, abbiamo modificato leggermento il testo del COLLO. Intrecciare per modellare la scollatura all’inizio di ogni ferro sul centro davanti: 2 maglie 1 volta e 1 maglia 1 volta.

11.11.2012 - 15:24

country flag Mette wrote:

Jeg har sat ærmer og ryg og forstykke sammen, og skal i gang med bærestykket. Jeg forstår ikke helt - skal jeg "både" lukke 8*3 masker og lukke til raglan på første pind??? og hvordan skal jeg lukke de 8*3 masker???

19.10.2012 - 20:52

DROPS Design answered:

Ved den ene raglansøm foran, der hvor du kan se knapperne, starter du med at lukke 2x3m af. Når du har gjort det følger du forklaringen til raglanindtagning.

16.11.2012 - 10:02

country flag Lisa wrote:

Jeg sliter med halsen. Strikker str 1-3mnd og har kommet til det stedet i mønsteret hvor man setter de midterste maskene (7+7m)på en tråd og strikker hver for seg. Jeg har da 3m igjen på høyre side før halsen.Fellingene som nevnes i dette punktet forstår jeg ikke. Skal jeg felle alle 3m før halsmaskene som er adskilt? Jeg har 68m på p. og arb. måler ca24,5 cm midt foran. Skal de fellingene som nevnes gjøres i tillegg til reglanfellingen?

18.10.2012 - 20:33

DROPS Design answered:

Ja, du skal felle paa hver side af halsen i tillegg til raglanfellingen. Du strikker da frem og tilbage og hver del for sig. Saa paa hver side ved de 7+7 m skal du felle de ekstra 3 m

25.11.2012 - 16:15