
Popular categories
Looking for a yarn?


|
|||||||||||||
Blueberry |
|||||||||||||
 |
 |
||||||||||||
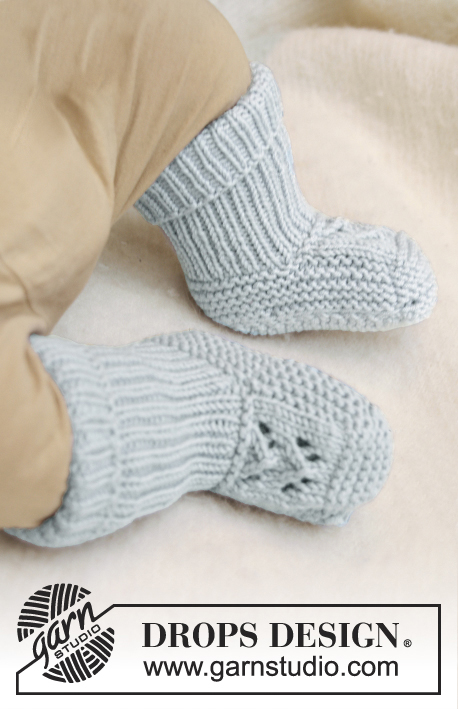
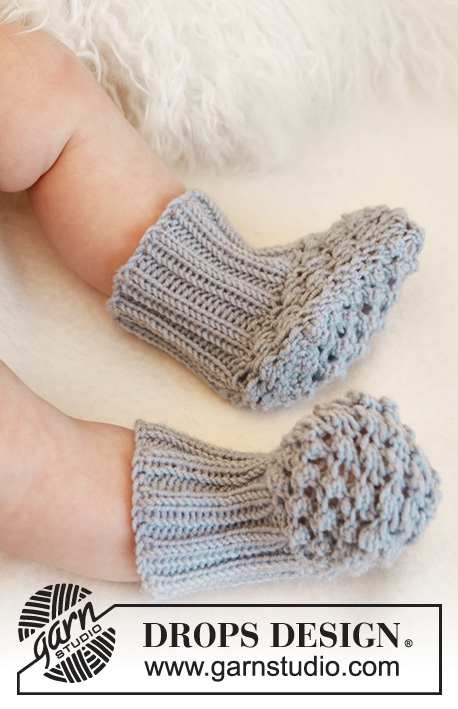
Set of knitted socks, pants and jacket with round yoke and blackberry pattern for baby and children in DROPS Alpaca
DROPS Baby 21-24 |
|||||||||||||
|
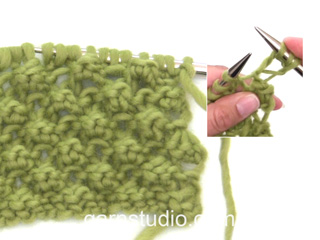
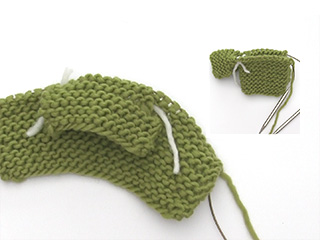
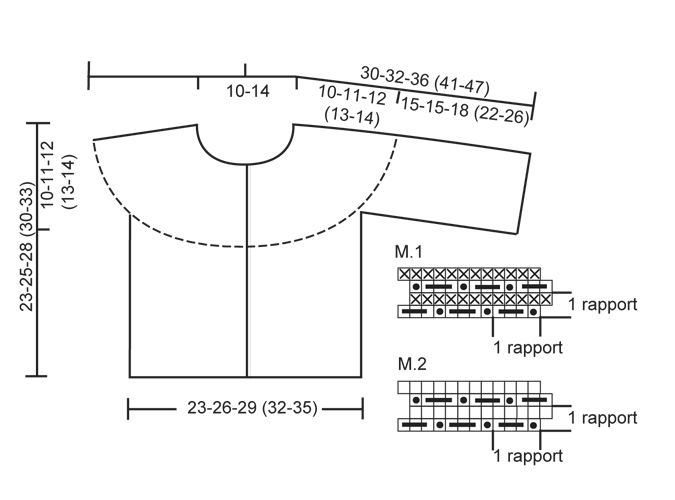
GARTER ST (back and forth on needle): K all rows. GARTER ST (in the round on double pointed needles/circular needle): * K 1 round and P 1 round *, repeat from *-*. PATTERN: See diagram M.1. The diagram shows the pattern from RS. 1st row = RS: DECREASE TIP: Dec as follows 3 sts before marker: K 2 tog, K 1. Dec as follows after marker: K 1, slip 1 st as if to K, K 1, psso. BUTTON HOLES: Cast off for button holes on right band. 1 button hole = cast off 3rd and 4th st from edge and cast on 2 new sts on next row over these sts. Cast off for button holes when piece measures: Size 1/3 months: 5, 10, 14, 19 and 23 cm Size 6/9 months: 5, 10, 15, 20 and 25 cm Size 12/18 months: 6, 12, 17, 23 and 28 cm Size 2 years: 6, 12, 18, 24 and 30 cm Size 3/4 years: 6, 13, 20, 27 and 33 cm NOTE: Cast off for last button hole when 2 rows in garter st on band remain before neck edge. ------------------------------------------------------- JACKET: BODY: Worked back and forth on circular needle from mid front. Cast on 120-134-150 (164-178) sts (incl 5 band sts in each side towards mid front) on circular needle size 3 mm with Alpaca. Work 4 rows in GARTER ST - see explanation above (1st row = RS). AT THE SAME TIME on last row, inc 18-20-24 (26-28) sts evenly = 138-154-174 (190-206) sts. Then work diagram M.1 with 5 band sts in garter st in each side. Remember BUTTON HOLES on right band - see explanation above. REMEMBER THE KNITTING TENSION! When piece measures approx. 13-14-16 (17-19) cm - adjust after 3rd row in diagram M.1 - work next row as follows from WS: Work 33-37-42 (46-50) sts (= left front piece), cast off 8 sts for armhole, work 56-64-74 (82-90) sts (= back piece), cast off 8 sts for armhole and work 33-37-42 (46-50) sts (= right front piece). Put piece aside and work the sleeves. SLEEVE: Worked back and forth on circular needle. Cast on 38-38-40 (42-45) sts (includes 1 edge st in each side) on needle size 3 mm with Alpaca. Work 8 rows in garter st (1st row = RS). AT THE SAME TIME on last row, inc 8-8-10 (8-9) sts evenly = 46-46-50 (50-54) sts. Then work diagram M.1 with 1 edge st in garter st in each side. AT THE SAME TIME when piece measures 4-4-5 (6-6) cm, inc 1 st in each side. Repeat inc every 3-2-1½ (1½-2) cm a total of 4-6-8 (10-10) times = 54-58-66 (70-74) sts – work the inc sts gradually in diagram M.1, work the sts that do not fit in pattern in garter st. When piece measures approx. 15-15-18 (22-26) cm - adjust after 3rd row in diagram M.1 - cast off 5 sts in each side (cast off at beg and end of row) = 44-48-56 (60-64) sts remain on needle. Put piece aside and knit another sleeve. YOKE: Slip sleeves on to same circular needle as body where armholes were cast off = 210-234-270 (294-318) sts. K 1 row from RS while AT THE SAME TIME dec 34-37-43 (46-49) sts evenly (do not dec over bands) = 176-197-227 (248-269) sts. K 1 row from WS. Then work in garter st back and forth over all sts while AT THE SAME TIME on 1st row dec 11-11-12 (12-13) sts evenly (do not dec over bands). Repeat dec every 6th row (from RS) a total of 8-9-10 (11-11) times = 88-98-107 (116-126) sts remain on needle. When piece measures approx. 23-25-28 (30-33) cm - adjust so that next row is worked from WS - dec 20-22-23 (24-34) sts evenly = 68-76-84 (92-92) sts remain on needle. NECK EDGE: Work as follows seen from from RS: 5 sts in garter st, * K 2, P 2 *, repeat from *-* and finish with K 2 and 5 sts in garter st. When neck edge measures 3-3-4 (4-4) cm, cast off with K over K and P over P. ASSEMBLY: Sew the sleeve seams inside 1 edge st. Sew the openings under the sleeves. Sew on buttons. ------------------------------------------------------------------- PANTS: LEG: Worked in the round on double pointed needles. LOOSELY cast on 56-60-64 (68-72) sts on double pointed needles size 2.5 mm with Alpaca. Insert a marker at beg of round = inside of leg. K 1 round, then work rib = K 2/P 2. When piece measures 8-8-9 (9-10) cm, switch to double pointed needles size 3 mm. K 1 round while AT THE SAME TIME dec 8-8-10 (12-12) sts evenly = 48-52-54 (56-60) sts. Then work in GARTER ST - see explanation above. When piece measures 9-9-10 (10-11) cm, inc 1 st on each side of marker. Repeat inc every 4th-6th-7th (10th-13th) round a total of 9 times = 66-70-72 (74-78) sts. Continue in garter st. When piece measures approx. 16-19-22 (27-33) cm (make sure all inc are finished), divide at inside of leg and finish the piece back and forth on needle (to make it easier to slip the legs on the same circular needle). Cast on 1 new st in each side for seam = 68-72-74 (76-80) sts. When piece measures 18-21-24 (29-35) cm, cast off 3 sts in each side = 62-66-68 (70-74) sts. Put piece aside and knit another leg the same way. PANTS: Slip both legs on the same circular needle size 3 mm = 124-132-136 (140-148) sts. Insert a marker mid front. Work in garter st in the round on needle – AT THE SAME TIME dec 1 st on each side of marker mid front – READ DECREASE TIP. Repeat dec on every other round a total of 6-6-6 (4-4) times = 112-120-124 (132-140) sts. When piece measures 29-35-38 (43-50) cm, K 1 round while AT THE SAME TIME inc 24-24-24 (28-28) sts evenly = 136-144-148 (160-168) sts. Switch to circular needle size 2.5 mm and work rib = K 2/P 2 for 7-7-8 (9-9) cm. LOOSELY cast off with K over K and P over P. Pants measures approx. 36-42-46 (52-59) cm. ASSEMBLY: Sew tog the opening between the legs. ------------------------------------------------------------------- SOCKS: PATTERN: See diagrams M.1 and M.2. The diagrams show the pattern from RS. SOCK: Worked in the round on double pointed needles. Cast on 40-44-44 (48-48) sts on double pointed needles size 3 mm with Alpaca. K 1 round, then work rib = K 2/P 2 for 6-7-7 (8-8) cm. K 1 round while AT THE SAME TIME dec 4 sts evenly = 36-40-40 (44-44) sts. Keep the middle 12 sts at the front of sock (= upper piece) on needle, slip the remaining 24-28-28 (32-32) sts on a stitch holder. Work diagram M.1 back and forth over the 12 sts on upper piece for approx. 3-3½-4 (5-6) cm – adjust after one whole repetition of diagram M.1 vertically. Cut the thread. Keep the 12 sts on needle, knit up 8-10-10 (12-16) sts along one side of upper piece, slip the 24-28-28 (32-32) sts from stitch holder back on needle and knit up 8-10-10 (12-16) sts along the other side over upper piece = 52-60-60 (68-76) sts – NOTE: This is done without working the sts. Start round mid back and work diagram M.2 in the round over all sts for approx. 1½-2-2½ (3-3½) cm – finish either after 1st or 3rd row in diagram M.2. P 1 round and then cast off all sts except the 12 sts on upper piece. Work diagram M.1 back and forth for sole over these sts for approx. 9-10-11 (13-15) cm – adjust after one whole repetition. Cast off and sew sole to sock - sew edge to edge to avoid a chunky seam. |
|||||||||||||
Diagram explanations |
|||||||||||||
|
|||||||||||||
|
|||||||||||||

|
|||||||||||||
|
Have you made this or any other of our designs? Tag your pictures in social media with #dropsdesign so we can see them! Do you need help with this pattern?You'll find tutorial videos, a Comments/Questions area and more by visiting the pattern on garnstudio.com. © 1982-2024 DROPS Design A/S. We reserve all rights. This document, including all its sub-sections, has copyrights. Read more about what you can do with our patterns at the bottom of each pattern on our site. |
|||||||||||||


With over 40 years in knitting and crochet design, DROPS Design offers one of the most extensive collections of free patterns on the internet - translated to 17 languages. As of today we count 304 catalogues and 11422 patterns - 11422 of which are translated into English (UK/cm).
We work hard to bring you the best knitting and crochet have to offer, inspiration and advice as well as great quality yarns at incredible prices! Would you like to use our patterns for other than personal use? You can read what you are allowed to do in the Copyright text at the bottom of all our patterns. Happy crafting!
Comments / Questions (68)
Hvor mye garn trenger jeg av hver sort til denne oppskriften? 12/18 mnd :)
19.09.2017 - 18:39I want to knit this for a 9-12 month baby. His would you advise I adapt the pattern? Thank you.
01.09.2017 - 11:11DROPS Design answered:
Dear Ellie, this pattern is given in size 6/9 months and 12/18 months, you can find all measurements for each size in the chart at the bottom of the pattern. For any further personnal assistance, you are welcome to contact your DROPS Store, even per mail or telephone. Happy knitting!
01.09.2017 - 15:23Hej! Det står att man aldrig ska minska på framkanterna, innebär detta framstyckena eller endast de fem framkantsmaskorna?
23.07.2017 - 11:29DROPS Design answered:
Hej! Det gäller endast de 5 maskorna på framkanten.
24.07.2017 - 13:47Hej! Jag undrar hur andra raden i M.1 ska tolkas? Det står "rät maska från avigsidan", innebär det att jag stickar räta maskor på det varvet som blir på avigsidan av koftan?
10.07.2017 - 15:09DROPS Design answered:
Jo, detta varv stickas räta från avigsidan.
10.07.2017 - 17:20Dobrý den. Průramky na kabátku se mají dělat ve vÍšce 13-14-16 cm Nemělo by to být správně 23-24-26cm? Děkuji za odpověď 😊
12.06.2017 - 11:34DROPS Design answered:
Dobrý den, Lenko, údaje jsou správné - malé děti mají trup celkem krátký a navíc dalších 10-11-12 (13-14) cm bude vysoké sedlo, míry by tedy měly odpovídat uvedeným konfekčním velikostem. Hodně zdaru! Hana
12.06.2017 - 15:53På bærestykket er jeg i tvivl om hvornår jeg første gang skal tage ind som følger: 'Strik 1 p ret fra vrangen. Fortsæt med retstrik frem og tilbage over alle m Samtidig med at der på 1.p tages 11-11-12 (12-13) m ind jævnt'. Er det på 3. pind af bære stykket eller hvornår? Vh. Lise
12.04.2017 - 13:32DROPS Design answered:
Hej Lise, Det er på første retstrikspind du tager 11-11-x-x-x-x m ind jævnt fordelt. God fornøjelse!
26.04.2017 - 15:24Hallo! Die Anleitung für das Brombeermuster in M1 ist nicht identisch mit der Anleitung in dem Tutorial Video (1 Umschlag vs 1 re wenn aus einer Masche 3 gestrickt werden sollen und 3 M li zusammen vs 3 M. li. stricken, die erste M. über die 2 letzten M. ziehen, danach die 2. M. über die erste M. ziehen = 1 M. übrig). Wie muss man dieses Muster denn jetzt stricken?
19.06.2016 - 14:34DROPS Design answered:
Hallo Frauke, stricken Sie wie in der Anleitung beschrieben, die Videos zeigen nur das Grundprinzip, das von Anleitung zu Anleitung variieren kann.
20.06.2016 - 20:27Hej, jeg er igang med det første ærme, og jeg er meget i tvivl om hvornår man strikke udtagningerne ind i mønsteret? Håber I kan hjælpe da det er et puslespil jeg ikke kan få til at gå op. /Anne
18.04.2016 - 19:09DROPS Design answered:
Hej Anne. En rapport af "brombær" er 4 masker (Strik 3 m vr, løft den første m over de 2 sidste, løft den anden m over den sidste m = 1 m tilbage OG Strik 3 m i 1 m således: 1 vr, slå om, 1 vr), saa jeg vil vente til du har 4 nye masker paa hver side, saa kan du strikke één hel rapport af mönstret. Indtil da kan du strikke disse masker i ret/vrang.
19.04.2016 - 15:55Bonjour, Je ne comprends toujours pas la diagramme. Est-ce qu'on commence à partir du coin droit en bas? Et le terme "rapport", est-ce que cela veut dire, on fait les deux lignes 1-2, puis on répète ces deux linges une fois, ensuite on continue la ligne 3-4? Merci d'avance pour votre réponse !
09.01.2016 - 20:38DROPS Design answered:
Bonjour Mme Le Dang, dans M1 on va ainsi commencer par *1 point noir = tricoter 3 fois la même m, puis 1 tiret = 3 m env, passez les 2 premières m l'une après l'autre par-dessus la 3ème* répétez de *-* = 1 rapport = le motif se tricote sur 3 m et 2 rangs. Bon tricot!
11.01.2016 - 11:35Bonjour, Merci de votre réponse. Pourriez-vous me dire comment prendre en compte le décalage d'une maille entre le 1er et 2ème rang (3ème et 4ème rang), svp ? (Si on garde 5 points mousse à chaque extrémité) Merci, joyeux Noël !
23.12.2015 - 11:23DROPS Design answered:
Bonjour Manoa, le "décalage" va s'effectuer automatiquement, on va avoir alternativement 3 m tricotée ens au-dessus de l'augmentation 2 rangs plus bas (= on tricote d'abord 1 augm (=3 m dans 1), 3 m ens, puis 2 rangs après: 3 m ens, 1 augm), comme dans la vidéo ci-dessous (légère différence avec la façon de faire le point mais le principe reste le même). Bon tricot!
02.01.2016 - 12:52