DROPS Baby Merino
DROPS Baby Merino
100% Wool
from 4.55 $ /50g
Get the yarn to make this pattern from 9.10$.

The yarn cost is calculated from the pattern’s smallest size and the yarn’s cheapest product type. Looking for an even better price? You might find it on the DROPS Deals!

DROPS SS24

Junior

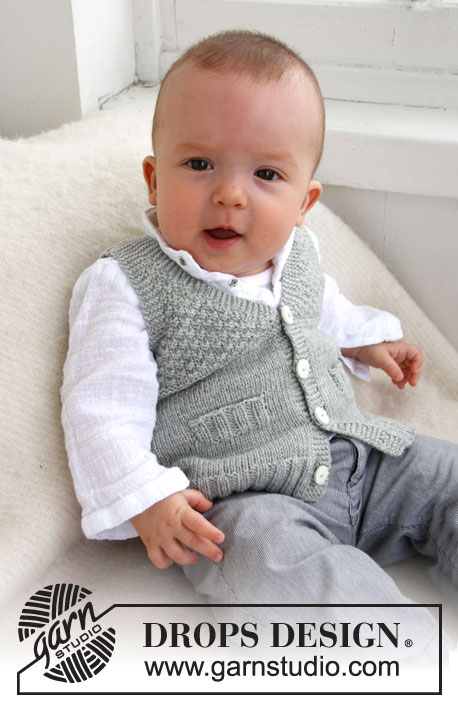
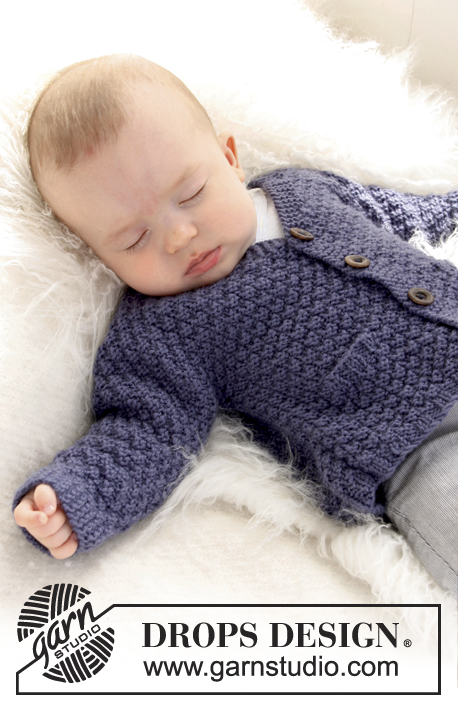
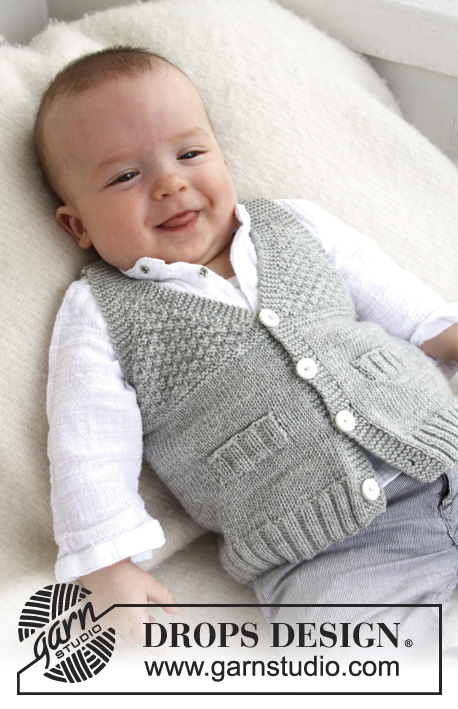
Knitted vest with V-neck and textured pattern for baby and children in DROPS BabyMerino or DROPS BabyAlpaca Silk

DROPS Baby 21-8
DROPS design: Pattern no BM-036-by
Yarn group A
--------------------------------------------------------
Size: 1/3 - 6/9 - 12/18 months (2 - 3/4) years
Finished measurements:
Bust: 44-50-56 (62-68) cm / 17 1/4"-19 3/4"-22" (24½"-26 3/4")
Full length: 26-28-31 (33-36) cm / 10 1/4"-11"-12 1/4" (13"-14 1/4")

Materials: DROPS BABY MERINO from Garnstudio
100-100-100 (100-150) color no 19, gray
Or use:
DROPS BABYALPACA SILK from Garnstudio
100-100-100 (150-150) colour no 8465, medium grey

DROPS CIRCULAR NEEDLE size 3 mm / US 2or3 (60 or 80 cm / 24'' or 32'') - or size needed to get 24 sts x 32 rows in stockinette st = 10 x 10 cm / 4'' x 4''.
DROPS CIRCULAR NEEDLE size 2.5 mm / US 1or2 (60 or 80 cm / 24'' or 32'') - for rib.

DROPS MOTHER-OF-PEARL BUTTONS NO 521: 4 pieces

-------------------------------------------------------

Alternative Yarn – See how to change yarns here
Yarn Groups A to F – Use the same pattern and change the yarn here
Yarn usage using an alternative yarn – Use our yarn converter here

-------------------------------------------------------

DROPS Baby Merino
DROPS Baby Merino
100% Wool
from 4.55 $ /50g
Get the yarn to make this pattern from 9.10$.

The yarn cost is calculated from the pattern’s smallest size and the yarn’s cheapest product type. Looking for an even better price? You might find it on the DROPS Deals!

Pattern instructions

NOTE: This pattern is written in American English. All measurements in charts are in cm. For conversion from inches to cm - click here. There are different terms for crocheting in American and British English. If this pattern includes crochet, click for "crochet terms" here. For this pattern in British English, please click here.
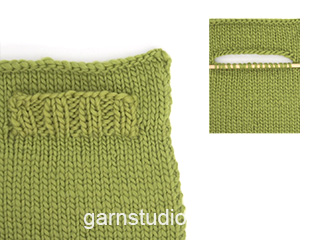
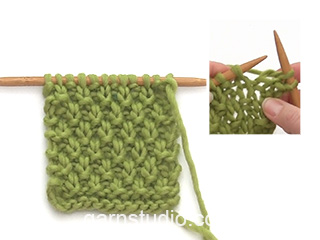
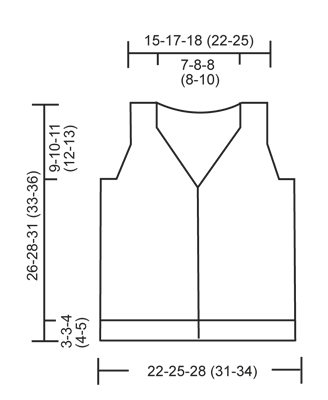
GARTER ST (back and forth on needle): K all rows.

DOUBLE SEED ST:
Row 1: * K 2, P 2 *, repeat from *-*.
Row 2: K over K and P over P.
Row 3: P over K and K over P.
Row 4: As row 2.
Repeat row 1 to 4.

BUTTON HOLES:
Bind off for button holes on right band. 1 button hole = K tog 2nd and 3rd st from edge and make 1 YO. Bind off for button holes when piece measures:
SIZE 1/3 MONTHS: 2, 6, 10 and 14 cm / 3/4", 2 3/8", 4" and 5½''.
SIZE 6/9 MONTHS: 2, 7, 11 and 16 cm / 3/4", 2 3/4", 4 3/8" and 6 1/4".
SIZE 12/18 MONTHS: 2, 7, 12 and 17 cm / 3/4", 2 3/4", 4 3/4" and 6 3/4".
SIZE 2 YEARS: 2, 8, 13 and 19 cm / 3/4", 3 1/8", 5 1/8" and 7½".
SIZE 3/4 YEARS: 2, 8, 14 and 20 cm / 3/4", 3 1/8", 5½" and 8".

DEC FOR V-NECK AND ARMHOLES IN DOUBLE SEED ST:
All dec are done from RS!
DEC AS FOLLOWS BEFORE BAND/SLEEVE EDGE:
When last st should be K: K 2 tog.
When last st should be P: P 2 tog.
DEC AS FOLLOWS AFTER BAND/SLEEVE EDGE:
When first st should be K: Slip 1 st as if to K, K 1, psso.
When first st should be P: P 2 twisted tog (i.e. work in back loop of st instead of front).
--------------------------------------------------------
--------------------------------------------------------

BODY:
Worked back and forth on circular needle from mid front.
Cast on 148-168-184 (204-224) sts on circular needle size 2.5 mm / US 1 with Baby Merino. Work first row as follows from RS: 5 sts in GARTER ST (= band) - see explanation above, * K 2, P 2 *, repeat from *-* until 7 sts remain, finish with K 2 and 5 sts in GARTER ST (= band). Continue rib like this with 5 sts in garter st in each side until piece measures 3-3-4 (4-5) cm / 1 1/8"-1 1/8"-1½" (1½"-2") - REMEMBER BUTTON HOLES on band - see explanation above. Switch to circular needle size 3 mm / US 2or3 and work in stockinette st but continue bands in garter st as before. AT THE SAME TIME on first row after rib, dec 32-36-40 (44-52) sts evenly (do not dec over bands) = 116-132-144 (160-172) sts. Insert a marker 31-35-39 (43-45) sts in from each side (= 54-62-66 (74-82) sts between markers on back piece). REMEMBER THE GAUGE! When piece measures 7-7½-8 (9-10) cm / 2 3/4"-2 7/8"-3 1/8" (3½"-4"), work next row as follows from RS: 5 sts in garter st, 21-21-27 (27-31) sts in stockinette st, slip the last 16-16-20 (20-24) sts that were worked on a stitch holder for pocket slit, work until 10-10-12 (12-12) sts remain on needle, slip the last 16-16-20 (20-24) sts that were worked on a stitch holder for pocket slit, work 5-5-7 (7-7) sts in stockinette st and finish with 5 sts in garter st. On next row cast on 16-16-20 (20-24) new sts over each of the 2 stitch holders with sts = 116-132-144 (160-172) sts. Continue in stockinette st and in garter st until piece measures 13-14-16 (16-18) cm / 5 1/8"-5½"-6 1/4" (6 1/4"-7"). Now K 4 rows over all sts (= 2 ridges). Then work DOUBLE SEED ST - see explanation above (continue bands in garter st as before). READ ALL OF THE FOLLOWING SECTION BEFORE CONTINUING! When piece measures 15-17-18 (20-21) cm / 6"-6 3/4"-7" (8"-8 1/4"), work 2 rows in garter st over the first 5 sts on needle (do not work the other sts on needle), then work 1 row over all sts before working 2 rows in garter st over the first 5 sts on needle in the other side of piece (this is done so that the V-neck looks nice). Then dec for V-neck - see explanation above: Dec 1 st every other row (i.e. every row from RS) a total of 12-13-16 (16-16) times. AT THE SAME TIME when piece measures 16-17-19 (20-22) cm / 6¼''-6¾''-7½'' (8''-8¾''), work 4 rows in garter st over the middle 18-20-20 (20-20) sts in each side (i.e. over 9-10-10 (10-10) sts on each side of both markers) – work the other sts as before. On next row, bind off the middle 8-10-10 (10-10) sts in each side for armhole and finish front and back piece separately.

BACK PIECE:
= 46-52-56 (64-72) sts. Work double seed st with 5 sts in garter st in each side (= sleeve edges). AT THE SAME TIME dec for armholes - see explanation above: Dec 1 st every other row (i.e. on every row from RS) a total of 5-6-6 (6-6) times = 36-40-44 (52-60) sts. Continue in double seed st and in garter st until piece measures 24-26-29 (31-34) cm / 9½"-10 1/4"-11 3/8" (12 1/4"-13 3/8"). Now work in garter st over all sts until finished measurements. AT THE SAME TIME when piece measures 25-27-30 (32-35) cm / 9 3/4"-10 5/8"-11 3/4" (12½"-13 3/4"), bind off the middle 16-18-20 (20-24) sts for neck = 10-11-12 (16-18) sts remain on each shoulder. Now finish each shoulder separately. Continue with garter st until piece measures 26-28-31 (33-36) cm / 10 1/4"-11"-12 1/4" (13"-14 1/4"), bind off.

LEFT FRONT PIECE:
Continue with double seed st and in garter st while AT THE SAME TIME dec for armhole in the side as on back piece and continue dec for V-neck as before. After last dec, 10-11-12 (16-18) sts remain on needle. Work garter st over all sts until piece measures 26-28-31 (33-36) cm / 10 1/4"-11"-12 1/4" (13"-14 1/4") and bind off.

RIGHT FRONT PIECE:
Work as left front piece but reversed.

POCKET FLAP:
Slip the 16-16-20 (20-24) sts from stitch holder on one front piece back on needle size 2.5 mm / US 1or2. Work rib K2/P2 with 1 st in garter st and K 2 in each side (seen from RS).
When pocket flap measures 2½-2½-3 (3-3) cm / 7/8"-7/8"-1 1/8" (1 1/8"-1 1/8"), loosely bind off with K over K and P over P.
Sew pocket flap to front piece with duplicate sts in each side. Sew pocket opening to bottom of pocket flap (where sts were put on a stitch holder) on the back of piece. Work another pocket flap the same way on the other front piece.

ASSEMBLY:
Sew the shoulder seams. Sew on buttons.

Diagram

All measurements in charts are in cm.

diagram measurements
Do you have a question? See a list of frequently asked questions (FAQ)

Knitting tension is what determines the final measurements of your work, and is usually measured per 10 x 10 cm. It is provided like so: number of stitches in width x number of rows in height - eg: 19 stitches x 26 rows = 10 x 10 cm.

The knitting tension is very individual; some people knit/crochet loosely while others work tightly. You adjust the knitting tension with the needle size, which is why the suggested needle size only serve as a guide! You need to adjust this (up or down) to ensure that YOUR knitting tension matches the knitting tension provided in the pattern. If you work with a different knitting tension than provided you will have a different yarn consumption, and your work will have different measurements than what the pattern suggests.

The knitting tension also determines which yarns can replace each other. As long as you achieve the same knitting tension you can replace one yarn with another.

See DROPS lesson: How to measure your tension/gauge

See DROPS video: How to make a gauge tension swatch

The required amount of yarn is provided in grams, eg: 450 g. To calculate how many balls you’ll need you first need to know how many grams are in 1 ball (25g, 50g or 100g). This information is available if you click on the individual yarn quality on our pages. Divide the amount required with the amount of each ball. For example, if each ball is 50g (the most common amount), the calculation will be as follows: 450 / 50 = 9 balls.

The important thing when changing from one yarn to another is that the knitting/crochet tension remains the same. This is so that the measurements of the finished piece will be the same as on the sketch provided. It is easier to achieve the same knitting tension using yarns from the same yarn group. It is also possible to work with multiple strands of a thinner yarn to achieve the knitting tension of a thicker one. Please try our yarn converter. We recommend you to always work a test swatch.

Please NOTE: when changing yarn the garment might have a different look and feel to the garment in the photo, due to individual properties and qualities of each yarn.

See DROPS lesson: Can I use a different yarn than the one mentioned in the pattern?

All our yarns are categorised into yarn groups (from A to F) according to thickness and knitting tension – group A contains the thinnest yarns and group F the thickest. This makes it easier for you to find alternative yarns to our patterns, should you wish to switch yarn. All yarns within the same group have a similar knitting tension and can easily replace each other. However, different yarn qualities have different structures and properties which will give the finished work a unique look and feel.

Click here for an overview of the yarns in each yarn group

At the top of all our patterns you’ll find a link to our yarn converter, which is a helpful tool should you wish to use a different yarn than suggested. By filling in the yarn quality you wish to replace, the amount (in your size) and number of strands, the converter will present good alternative yarns with the same knitting tension. Additionally it will tell you how much you’ll require in the new qualities and whether you’ll need to work with multiple strands. Most skeins are 50g (some are 25g or 100g).

If the pattern is worked with multiple colours, every colour will have to be converted separately. Similarly, if the pattern is worked with several strands of different yarns (for example 1 strand Alpaca and 1 strand Kid-Silk) you will have to find alternatives for each, individually.

Click here to see our yarn converter

Since different yarns have different qualities and textures we have chosen to keep the original yarn in our patterns. However, you can easily find options among our available qualities by using our yarn converter, or simply pick a yarn from the same yarn group.

It is possible that some retailers still have discontinued yarns in stock, or that someone has a few skeins at home that they would like to find patterns for.

The yarn converter will provide both alternative yarn as well as required amount in the new quality.

If you think it's hard to decide what size to make, it can be a good idea to measure a garment you own already and like the size of. Then you can pick the size by comparing those measures with the ones available in the pattern's size chart.

You'll find the size chart at the bottom of the pattern.

See DROPS lesson: How to read size chart

The needle size provided in the pattern serves only as a guide, the important thing is to follow the knitting tension. And since knitting tension is very individual, you will have to adjust the needle size to ensure that YOUR tension is the same as in the pattern – maybe you’ll have to adjust 1, or even 2 needle sizes, up or down to achieve the correct tension. For this, we recommend that you work test swatches.

Should you work with a different knitting tension than the one provided, the measurements of the finished garment might deviate from the measurement sketch.

See DROPS lesson: How to measure your tension/gauge

See DROPS video: How to make a gauge tension swatch

Working a garment top-down provides more flexibility and room for personal adjustment. For example it is easier to try the garment on while working, as well as making adjustments to length of yoke and shoulder caps.

The instructions are carefully explaining every step, in the correct order. Diagrams are adjusted to the knitting direction and are worked as usual.

The diagram depicts all rows/rounds, and every stitch seen from the right side. It is read from bottom to top, from right to left. 1 square = 1 stitch.

When working back and forth, every other row is worked from the right side and every other row is worked from the wrong side. When working from the wrong side, the diagram will have to be worked reversed: from left to right, knit stitches are purled, purl stitches are knit etc.

When working in the round every round is worked from the right side and the diagram are worked from right to left on all rounds.

See DROPS lesson: How to read knitting diagrams

The diagram depicts all rows/rounds, and every stitch seen from the right side. It is worked from bottom to top, from right to left.

When working back and forth every other row is worked from the right side: from right to left and every other row is worked from the wrong side: from left to right.

When working in the round, every row in the diagram are worked from the right side, from right to left.

When working a circular diagram you start in the middle and work your way outwards, counter clockwise, row by row.

The rows usually start with a given number of chain stitches (equivalent to the height of the following stitch), this will either be depicted in the diagram or explained in the pattern.

See DROPS lesson: How to read crochet diagrams

Instructions for working several diagrams after each other on the same row/round, will often be written like so: “work A.1, A.2, A.3 a total of 0-0-2-3-4 times". This means you work A.1 once, then A.2 is worked once, and A.3 is repeated (in width) the number of times provided for your size – in this case like so: S = 0 times, M = 0 times, L=2 times, XL= 3 times and XXL = 4 times.

The diagrams are worked as usual: begin with the first row in A.1, then work the first row in A.2 etc.

See DROPS lesson: How to read knitting diagrams

See DROPS lesson: How to read crochet diagrams

The total width of the garment (from wrist-to-wrist) will be larger in the larger sizes, despite the actual sleeves being shorter. The larger sizes have longer sleeve caps and wider shoulders, so there will be a good fit in all sizes.

The measurement sketch/schematic drawing provides information regarding the full length of the garment. If it’s a jumper or a jacket the length is measured from the highest point on the shoulder (usually closest to the neckline), and straight down to the bottom of the garment. It is NOT measured from the tip of shoulder. Similarly, the length of yoke is measured from the highest point on the shoulder and down to where yoke is split into body and sleeves.

See DROPS lesson: How to read a schematic drawing

Diagrams are often repeated on the round or in height. 1 repeat is the diagram the way it appears in the pattern. If it says to work 5 repeats of A.1 in the round, then you work A.1 a total of 5 times after/next to each other in the round. If it says to work 2 repeats of A.1 vertically/in height you work the entire diagram once, then begin again at the start and work the entire diagram one more time.

Chain stitches are slightly narrower than other stitches and to avoid working the cast-on edge too tight, we simply chain more stitches to begin with. The stitch count will be adjusted on the following row to fit the pattern and measurement sketch.

The rib edge is more elastic and will contract slightly compared to, for example, stocking stitch. By increasing before the rib edge, you avoid a visible difference in width between the rib edge and the rest of the body.

It’s very easy to cast off too tightly, and by making yarn overs while casting off (and simultaneously casting these off) you avoid a too tight cast off edge.

See DROPS video: How to bind off with yarn overs (yo)

To achieve an even increase (or decrease) you can increase on, for example: every 3rd and 4th row alternately, like so: work 2 rows and increase on the 3rd row, work 3 rows and increase on the 4th. Repeat this until the increase is complete.

See DROPS lesson: Increase or decrease 1 st on every 3rd and 4th row alternately

Should you prefer to work in the round instead of back and forth, you may of course adjust the pattern. You’ll need to add steeks mid-front (usually 5 stitches), and follow the instructions. When you would normally turn and work from the wrong side, simply work across the steek and continue in the round. At the end you’ll cut the piece open, pick up stitches to work bands, and cover the cut edges.

See DROPS video: How to knit steeks and cut open

Should you prefer to work back and forth instead of in the round, you may of course adjust the pattern so you work the pieces separately and then assemble them at the end. Divide the stitches for the body in 2, add 1 edge stitch in each side (for sewing) and work the front and back pieces separately.

See DROPS lesson: Can I adapt a pattern for circular needles into straight needles?

Pattern repeats can vary slightly in the different sizes, in order to get the correct proportions. If you’re not working the exact same size as the garment in the photo, yours might deviate slightly. This has been carefully developed and adjusted so that the complete impression of the garment is the same in all sizes.

Make sure to follow instructions and diagrams for your size!

If you have found a pattern you like which is available in women’s size it’s not very difficult to convert it to men’s size. The biggest difference will be the length of sleeves and body. Start working on the women size that you think would fit across the chest. The additional length will be worked right before you cast off for the armhole/sleeve cap. If the pattern is worked top-down you can add the length right after the armhole or before the first decrease on sleeve.

Regarding additional yarn amount, this will depend on how much length you add, but it is better with a skein too many than too few.

All yarns will have excess fibres (from production) that might come off as lint or shedding. Brushed yarns (ie hairier yarns) have more of these loose, excess fibres, causing more shedding.

Shedding also depends on what is worn under or over the garment, and whether this pulls at the yarn fibres. It’s therefore not possible to guarantee that there will be no shedding

Below are some tips on how to get the best result when working with hairier yarns:

1. When the garment is finished (before you wash it) shake it vigorously so the looser hairs come off. NOTE: do NOT use a lint roller, brush or any method that pulls at the yarn.

2. Place the garment in a plastic bag and put it in your freezer - the temperature will cause the fibres to become less attached to each other, and excess fibres will come off easier.

3. Leave in the freezer for a few hours before taking it out and shaking it again.

4. Wash the garment according to the instructions on the yarn label.

Pilling is a natural process that happens to even the most exclusive of fibers. It's a natural sign of wear and tear that is hard to avoid, and that is most visible in high friction areas of your garment like a sweater's arms and cuffs.

You can make your garment look as new by removing the pilling, using a fabric comb or a pill/lint remover.

Still can't find the answer you need? Then scroll down and leave your question so one of our experts can try to help you. This will be done normally within 5 to 10 working days.
In the meantime, you can read the questions and answers that others have left to this pattern or join the DROPS Workshop on Facebook to get help from fellow knitters/crocheters!

You might also like...

Junior

Isidor Knits, Germany

Little gentleman

Isidor Knits, Germany

Post a comment to pattern DROPS Baby 21-8

We would love to hear what you have to say about this pattern!

If you want to leave a question, please make sure you select the correct category in the form below, to speed up the answering process. Required fields are marked *.

Comments / Questions (208)

Willa A wrote:

I have enjoyed working on this pattern and after a few wrong turns have now finished - except for the pockets! I am a bit confused by the following direction: “Work rib K2/P2 with 1 st in garter st and K 2 in each side (seen from RS).” What does “with 1 stitch in garter stitch and K2 in each side” mean? Does it mean K2 on each end of the row? But what 1 stitch in garter stitch mean? Thank you!

15.06.2018 - 10:54

DROPS Design answered:

Dear Mrs Willa, work the sts for pocket as follows, seen from RS: 1 st in garter st (seam allowance), then repeat (K2/P2) until 3 sts remain, finish row with K2, and 1 st in garter st (seam allowance). From WS, work: K1, P2, and repeat (K2/P2) to the last st, finish with K1. Happy knitting!

15.06.2018 - 11:35

country flag Ali wrote:

Hello, What does it mean when it says \"work as left front piece but reversed"? I'm not sure how to reverse this: \r\nContinue with double moss st and in garter st while AT THE SAME TIME dec for armhole in the side as on back piece and continue dec for V-neck as before. After last dec, 10-11-12 (16-18) sts remain on needle. Work garter st over all sts until piece measures 26-28-31 (33-36) cm and cast off. Thank you!

22.05.2018 - 01:17

DROPS Design answered:

Dear Ali, on right front piece you will also bind off fro armhole towards back piece (= decrease at the end of row from RS instead of at the beg of row from RS for left front piece) and decrease for neck at the beg of row from RS (instead of at the end of row from RS). Happy knitting!

22.05.2018 - 10:37

Susan wrote:

Does the knitted Drops vest with V-line come with instructions to fit a 5-6 year old?

29.04.2018 - 03:08

DROPS Design answered:

Dear Susan, this pattern goes to size 3/4 years only. For a vest in a larger size, please look at our patterns for vest, children. Happy knitting!

30.04.2018 - 10:43

Sheryl White wrote:

Is the total decrease for each armpit is only 10 stitches or 20 stitches

29.04.2018 - 01:19

DROPS Design answered:

See answer below :)

30.04.2018 - 10:41

Sheryl White wrote:

Hi I have only ended up with 42 sts for back piece I have recounted and recounted sure I did it right I don't know where I went wrong

29.04.2018 - 01:10

DROPS Design answered:

Dear Mrs White, you bind off for armhole 10 sts on each side, ie 5 sts on each side of each marker, so that only 10 sts will be cast off for back piece (= 5 sts at the beg of back piece, after marker and 5 sts at the end of back piece, before 2nd marker) = 52 sts remain in 2nd size. Happy knitting!

30.04.2018 - 10:41

country flag Garson wrote:

Bonjour comment faire la taille 6 mois exacte j'ai fait le 3 mois et c'est très beau je pense qu'il faut réduire des mailles par rapport aux poches etc.... merci de votre réponse car je voudrais le faire assez vite le modèle

23.04.2018 - 11:04

DROPS Design answered:

Bonjour Mme Garson, ce modèle est disponible en taille 1/3 mois et 6/9 mois. Pour ajuster différemment, vous pourrez vous aider des explications et du schéma des mesures en bas de page. Pour toute assistance complémentaire, n'hésitez pas à contacter le magasin où vous avez acheté votre laine. Bon tricot!

23.04.2018 - 11:24

country flag Isa wrote:

Bonjour, \r\nj\'aimerai faire ce gilet mais je ne sais pas comment trouver les explications en français. Pouvez-vous m\'aider ? merci

15.04.2018 - 09:56

DROPS Design answered:

Bonjour Isa, changez simplement la langue du modèle en sélectionnant français sous la photo - le modèle français est ici. Bon tricot!

16.04.2018 - 10:19

country flag Laury Macauley wrote:

When I get to start BACK PIECE alone,it says that I should have 52sts for 6/9 mos size. But in the previous section,all decreases are from the sides so the Back should have 62sts still. Not sure where I went wrong!. ????

09.03.2018 - 05:27

DROPS Design answered:

Dear Mrs Macauley, you inserted markers for the sides 35 sts from each side = 62 sts for back piece between markers. On last row on body you bind off 5 sts on each side of these both markers = 62-10 = 52 sts remain for back piece. Happy knitting!

09.03.2018 - 09:25

country flag Anna wrote:

Buon giorno Jeanette, Volendo fare il gilet misura 6/9 mesi in cotone, quanto cotone vi vorrà? Grazie e complimenti

23.02.2018 - 15:10

DROPS Design answered:

Buongiorno Anna. Nella pagina delle spiegazioni trova un link al convertitore di filato. Deve inserire la qualità da sostituire (BabyMerino), la quantità indicata nel modello per la sua taglia e le verranno presentate le quantità necessarie per i filati dello stesso gruppo di filati. Nel suo caso avrà bisogno di 110 gr di Safran. Buon lavoro!

23.02.2018 - 19:53

country flag Maggie wrote:

After I finish doing the row with the 2rows of garter on the band I don't understand the decrease - It says to decrease 1 st but the directions on how are ambiguous... do I decrease before or after the band/sleeve edge and if so, which band/sleeve edge.... Also, it says I have to work 4 rows in garter stitch over the middle 20 stitches on each side..... this piece is all one - how do i determine sides and which are front and back pieces.

05.02.2018 - 05:16

DROPS Design answered:

Dear Maggie, decrease for neck on front pieces as explained under DEC FOR V-NECK AND ARMHOLES IN DOUBLE MOSS ST, ie from RS, dec 1 st after band sts (at the beg of row = right front piece) and dec 1 st before band sts (= at the end of row = left front piece). At the same time, work in garter st over the 9-10 sts (see size) on each side of the markers on the sides = 18-20 sts in garter st on each side for armholes. Happy knitting!

05.02.2018 - 10:11