DROPS Muskat uni colour 100% Cotton |
3.90 CAD /50g |
Order |
Clicking the ORDER button will redirect you to Wool Warehouse Direct Ltd website
The yarn cost is calculated from the pattern’s smallest size and the yarn’s cheapest product type. Looking for an even better price? You might find it on the DROPS Deals!
-------------------------------------------------------
Alternative Yarn – See how to change yarns here
Yarn Groups A to F – Use the same pattern and change the yarn here
Yarn usage using an alternative yarn – Use our yarn converter here
-------------------------------------------------------
DROPS Muskat uni colour 100% Cotton 3.90 CAD /50g Order |
Clicking the ORDER button will redirect you to Wool Warehouse Direct Ltd website
The yarn cost is calculated from the pattern’s smallest size and the yarn’s cheapest product type. Looking for an even better price? You might find it on the DROPS Deals!
This pattern has been corrected. Click here to see the correction/s.
= K from RS, P from WS | |
= K from WS | |
= 1 YO between 2 sts | |
= K 2 tog |
Each of our patterns has specific tutorial videos to help you.
These step-by-step tutorials might also help you:
Why is the knitting/crochet tension so important?
Knitting tension is what determines the final measurements of your work, and is usually measured per 10 x 10 cm. It is provided like so: number of stitches in width x number of rows in height - eg: 19 stitches x 26 rows = 10 x 10 cm.
The knitting tension is very individual; some people knit/crochet loosely while others work tightly. You adjust the knitting tension with the needle size, which is why the suggested needle size only serve as a guide! You need to adjust this (up or down) to ensure that YOUR knitting tension matches the knitting tension provided in the pattern. If you work with a different knitting tension than provided you will have a different yarn consumption, and your work will have different measurements than what the pattern suggests.
The knitting tension also determines which yarns can replace each other. As long as you achieve the same knitting tension you can replace one yarn with another.
See DROPS lesson: How to measure your tension/gauge
See DROPS video: How to make a gauge tension swatch
How do I know how many balls of yarn I need?
The required amount of yarn is provided in grams, eg: 450 g. To calculate how many balls you’ll need you first need to know how many grams are in 1 ball (25g, 50g or 100g). This information is available if you click on the individual yarn quality on our pages. Divide the amount required with the amount of each ball. For example, if each ball is 50g (the most common amount), the calculation will be as follows: 450 / 50 = 9 balls.
Can I use a different yarn than what the pattern suggests?
The important thing when changing from one yarn to another is that the knitting/crochet tension remains the same. This is so that the measurements of the finished piece will be the same as on the sketch provided. It is easier to achieve the same knitting tension using yarns from the same yarn group. It is also possible to work with multiple strands of a thinner yarn to achieve the knitting tension of a thicker one. Please try our yarn converter. We recommend you to always work a test swatch.
Please NOTE: when changing yarn the garment might have a different look and feel to the garment in the photo, due to individual properties and qualities of each yarn.
See DROPS lesson: Can I use a different yarn than the one mentioned in the pattern?
What are the yarn groups?
All our yarns are categorised into yarn groups (from A to F) according to thickness and knitting tension – group A contains the thinnest yarns and group F the thickest. This makes it easier for you to find alternative yarns to our patterns, should you wish to switch yarn. All yarns within the same group have a similar knitting tension and can easily replace each other. However, different yarn qualities have different structures and properties which will give the finished work a unique look and feel.
How do I use the yarn converter?
At the top of all our patterns you’ll find a link to our yarn converter, which is a helpful tool should you wish to use a different yarn than suggested. By filling in the yarn quality you wish to replace, the amount (in your size) and number of strands, the converter will present good alternative yarns with the same knitting tension. Additionally it will tell you how much you’ll require in the new qualities and whether you’ll need to work with multiple strands. Most skeins are 50g (some are 25g or 100g).
If the pattern is worked with multiple colours, every colour will have to be converted separately. Similarly, if the pattern is worked with several strands of different yarns (for example 1 strand Alpaca and 1 strand Kid-Silk) you will have to find alternatives for each, individually.
Why do you show discontinued yarns in the patterns?
Since different yarns have different qualities and textures we have chosen to keep the original yarn in our patterns. However, you can easily find options among our available qualities by using our yarn converter, or simply pick a yarn from the same yarn group.
It is possible that some retailers still have discontinued yarns in stock, or that someone has a few skeins at home that they would like to find patterns for.
The yarn converter will provide both alternative yarn as well as required amount in the new quality.
What size should I knit?
If you think it's hard to decide what size to make, it can be a good idea to measure a garment you own already and like the size of. Then you can pick the size by comparing those measures with the ones available in the pattern's size chart.
You'll find the size chart at the bottom of the pattern.
See DROPS lesson: How to read size chart
Why do I get the wrong knitting tension with the suggested needle size?
The needle size provided in the pattern serves only as a guide, the important thing is to follow the knitting tension. And since knitting tension is very individual, you will have to adjust the needle size to ensure that YOUR tension is the same as in the pattern – maybe you’ll have to adjust 1, or even 2 needle sizes, up or down to achieve the correct tension. For this, we recommend that you work test swatches.
Should you work with a different knitting tension than the one provided, the measurements of the finished garment might deviate from the measurement sketch.
See DROPS lesson: How to measure your tension/gauge
See DROPS video: How to make a gauge tension swatch
Why is the pattern worked top-down?
Working a garment top-down provides more flexibility and room for personal adjustment. For example it is easier to try the garment on while working, as well as making adjustments to length of yoke and shoulder caps.
The instructions are carefully explaining every step, in the correct order. Diagrams are adjusted to the knitting direction and are worked as usual.
How do I work according to a knitting diagram?
The diagram depicts all rows/rounds, and every stitch seen from the right side. It is read from bottom to top, from right to left. 1 square = 1 stitch.
When working back and forth, every other row is worked from the right side and every other row is worked from the wrong side. When working from the wrong side, the diagram will have to be worked reversed: from left to right, knit stitches are purled, purl stitches are knit etc.
When working in the round every round is worked from the right side and the diagram are worked from right to left on all rounds.
See DROPS lesson: How to read knitting diagrams
How do I work according to a crochet diagram?
The diagram depicts all rows/rounds, and every stitch seen from the right side. It is worked from bottom to top, from right to left.
When working back and forth every other row is worked from the right side: from right to left and every other row is worked from the wrong side: from left to right.
When working in the round, every row in the diagram are worked from the right side, from right to left.
When working a circular diagram you start in the middle and work your way outwards, counter clockwise, row by row.
The rows usually start with a given number of chain stitches (equivalent to the height of the following stitch), this will either be depicted in the diagram or explained in the pattern.
See DROPS lesson: How to read crochet diagrams
How do I work several diagrams simultaneously on the same row/round?
Instructions for working several diagrams after each other on the same row/round, will often be written like so: “work A.1, A.2, A.3 a total of 0-0-2-3-4 times". This means you work A.1 once, then A.2 is worked once, and A.3 is repeated (in width) the number of times provided for your size – in this case like so: S = 0 times, M = 0 times, L=2 times, XL= 3 times and XXL = 4 times.
The diagrams are worked as usual: begin with the first row in A.1, then work the first row in A.2 etc.
See DROPS lesson: How to read knitting diagrams
See DROPS lesson: How to read crochet diagrams
Why are the sleeves shorter in larger sizes?
The total width of the garment (from wrist-to-wrist) will be larger in the larger sizes, despite the actual sleeves being shorter. The larger sizes have longer sleeve caps and wider shoulders, so there will be a good fit in all sizes.
Where on the garment is the length measured?
The measurement sketch/schematic drawing provides information regarding the full length of the garment. If it’s a jumper or a jacket the length is measured from the highest point on the shoulder (usually closest to the neckline), and straight down to the bottom of the garment. It is NOT measured from the tip of shoulder. Similarly, the length of yoke is measured from the highest point on the shoulder and down to where yoke is split into body and sleeves.
See DROPS lesson: How to read a schematic drawing
What is a repeat?
Diagrams are often repeated on the round or in height. 1 repeat is the diagram the way it appears in the pattern. If it says to work 5 repeats of A.1 in the round, then you work A.1 a total of 5 times after/next to each other in the round. If it says to work 2 repeats of A.1 vertically/in height you work the entire diagram once, then begin again at the start and work the entire diagram one more time.
Why does the piece start with more chain stitches than it’s worked with?
Chain stitches are slightly narrower than other stitches and to avoid working the cast-on edge too tight, we simply chain more stitches to begin with. The stitch count will be adjusted on the following row to fit the pattern and measurement sketch.
Why increase before the rib edge when the piece is worked top-down?
The rib edge is more elastic and will contract slightly compared to, for example, stocking stitch. By increasing before the rib edge, you avoid a visible difference in width between the rib edge and the rest of the body.
Why increase in the cast-off edge?
It’s very easy to cast off too tightly, and by making yarn overs while casting off (and simultaneously casting these off) you avoid a too tight cast off edge.
See DROPS video: How to bind off with yarn overs (yo)
How do I increase/decrease on every 3rd and 4th row/round alternately?
To achieve an even increase (or decrease) you can increase on, for example: every 3rd and 4th row alternately, like so: work 2 rows and increase on the 3rd row, work 3 rows and increase on the 4th. Repeat this until the increase is complete.
See DROPS lesson: Increase or decrease 1 st on every 3rd and 4th row alternately
How can I work a jacket in the round instead of back and forth?
Should you prefer to work in the round instead of back and forth, you may of course adjust the pattern. You’ll need to add steeks mid-front (usually 5 stitches), and follow the instructions. When you would normally turn and work from the wrong side, simply work across the steek and continue in the round. At the end you’ll cut the piece open, pick up stitches to work bands, and cover the cut edges.
See DROPS video: How to knit steeks and cut open
Can I work a jumper back and forth instead of in the round?
Should you prefer to work back and forth instead of in the round, you may of course adjust the pattern so you work the pieces separately and then assemble them at the end. Divide the stitches for the body in 2, add 1 edge stitch in each side (for sewing) and work the front and back pieces separately.
See DROPS lesson: Can I adapt a pattern for circular needles into straight needles?
Why is the pattern slightly different than what I see in the photo?
Pattern repeats can vary slightly in the different sizes, in order to get the correct proportions. If you’re not working the exact same size as the garment in the photo, yours might deviate slightly. This has been carefully developed and adjusted so that the complete impression of the garment is the same in all sizes.
Make sure to follow instructions and diagrams for your size!
How do I make a women’s size garment into a men’s size one?
If you have found a pattern you like which is available in women’s size it’s not very difficult to convert it to men’s size. The biggest difference will be the length of sleeves and body. Start working on the women size that you think would fit across the chest. The additional length will be worked right before you cast off for the armhole/sleeve cap. If the pattern is worked top-down you can add the length right after the armhole or before the first decrease on sleeve.
Regarding additional yarn amount, this will depend on how much length you add, but it is better with a skein too many than too few.
How do I prevent a hairy garment from shedding?
All yarns will have excess fibres (from production) that might come off as lint or shedding. Brushed yarns (ie hairier yarns) have more of these loose, excess fibres, causing more shedding.
Shedding also depends on what is worn under or over the garment, and whether this pulls at the yarn fibres. It’s therefore not possible to guarantee that there will be no shedding
Below are some tips on how to get the best result when working with hairier yarns:
1. When the garment is finished (before you wash it) shake it vigorously so the looser hairs come off. NOTE: do NOT use a lint roller, brush or any method that pulls at the yarn.
2. Place the garment in a plastic bag and put it in your freezer - the temperature will cause the fibres to become less attached to each other, and excess fibres will come off easier.
3. Leave in the freezer for a few hours before taking it out and shaking it again.
4. Wash the garment according to the instructions on the yarn label.
Why does my garment pill?
Pilling is a natural process that happens to even the most exclusive of fibers. It's a natural sign of wear and tear that is hard to avoid, and that is most visible in high friction areas of your garment like a sweater's arms and cuffs.
You can make your garment look as new by removing the pilling, using a fabric comb or a pill/lint remover.
Wonder Wave |
|||||||||||||
|
|||||||||||||
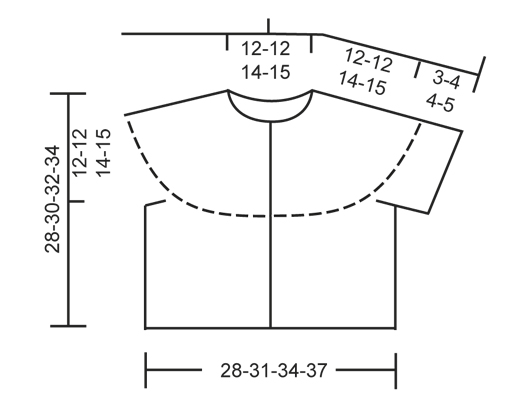
Knitted DROPS jacket with short sleeves, wavy pattern and round yoke in ”Muskat”. Size 3 - 12 years
DROPS Children 22-22 |
|||||||||||||
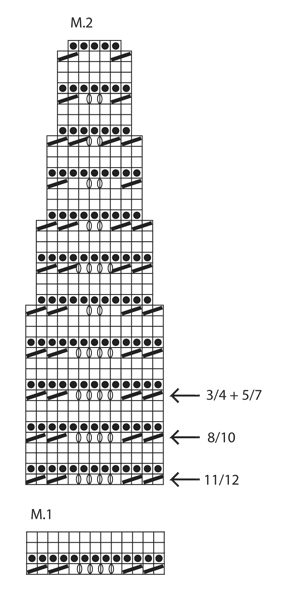
WAVY PATTERN: See diagrams M.1 and M.2. The diagrams show all rows in pattern seen from RS. GARTER ST (in the round on double pointed needles/circular needle): * K 1 round and P 1 round *, repeat from *-*. BUTTON HOLES: Bind off for button holes on right band from RS. 1 button hole = bind off 3rd band st from edge, on next row cast on 1 new st over the bound off st. Bind off for button holes when piece measures: SIZE 3/4 years: 18, 23 and 27 cm / 7", 8¾" and 10½" SIZE 5/7 years: 20, 25 and 29 cm / 8",9¾" and 11½" SIZE 8/10 years: 21, 27 and 31 cm / 8¼",10¼" and 12¼" SIZE 10/12 years: 23, 29 and 33 cm / 9", 11½" and 13" NOTE: Last button hole is bound off on row after diagram M.2 has been worked. --------------------------------------------------------- BODY: Worked back and forth on circular needle from mid front. Loosely cast on 152-166-180-194 sts (includes 5 band sts in each side) on circular needle size 4 mm / US 6 with Muskat. Work first row as follows from RS: * K 10, K 2 tog *, repeat from *-* until 8-10-12-14 sts remain, K these sts = 140-153-166-179 sts. Then K 3 rows back and forth. Continue with diagram M.1 with 5 band sts in each side in garter st until finished measurements. REMEMBER THE GAUGE! When piece measures approx. 16-18-18-19 cm / 6¼"-7"-7"-7½" (adjust so that 1 row remains of diagram M.1), work next row as follows (= WS): Work 34-37-41-44 sts, loosely bind off 7-7-6-6 sts for armhole, work 58-65-72-79 sts, loosely bind off 7-7-6-6 sts for armhole and work the rest of row (= 34-37-41-44 sts). Put piece aside and knit the sleeves. RIGHT SLEEVE: Worked in the round on double pointed needles. Cast on 59-59-74-74 sts on double pointed needles size 4 mm / US 6 with Muskat. Work first round as follows: * K 6, K 2 tog *, repeat from *-* until 3-3-2-2 sts remain, K these sts = 52-52-65-65 sts. Then P 1 round, K 1 round and P 1 round. Insert a marker at the beg of the round. Continue with diagram M.1 - beg in the 11th-1st-4th-7th sts in diagram, count from the right (in size 3/4 and 8/10 years, K first st, and at the end of round K this st tog with the last st on round). Continue working like this until piece measures approx. 3-4-4-5 cm / 1⅛"-1½"-1½"-2" (adjust so that 1 round of diagram M.1 remains). On next round bind off the FIRST 6-6-7-7 sts, work the rest of round = 46-46-58-58 sts. LEFT SLEEVE: Cast on and work as right sleeve but when piece measures 3-4-4-5 cm / 1⅛"-1½"-1½"-2", bind off like this: Size 3/4 and 8/10: bind off the FIRST 6-7 sts on round Size 5/7 and 11/12: bind off the LAST 6-7 sts on round (this is important to make the pattern correct on yoke). YOKE: Slip sleeves on to same circular needle as body where armholes were bind off = 218-231-270-283 sts. NOTE: It is very important that the right sleeve is inserted in the right side and the left sleeve is inserted in the left side so that the pattern fits onwards. Continue with diagram M.2 – start at the arrow for the correct size - with 5 band sts in garter st in each side (= 16-17-20-21 repetitions on the round). AT THE SAME TIME when piece measures 18-20-21-23 cm / 7"-8"-8¼"-9", bind off for BUTTON HOLES - see explanation above. When diagram M.2 has been worked vertically, 90-95-110-115 sts remain on needle. Work next row as follows from RS: K 5 (while at the same time casting/binding off for the last button hole), * K 2 tog, K 1 *, repeat from *-* until 7-6-6-5 sts remain, K these sts = 64-67-77-80 sts. K 3-3-5-5 rows back and forth, then bind off with K from RS. ASSEMBLY: Sew tog the openings under the sleeves and sew on buttons. |
|||||||||||||
Diagram explanations |
|||||||||||||
|
|||||||||||||
Have you made this or any other of our designs? Tag your pictures in social media with #dropsdesign so we can see them! Do you need help with this pattern?You'll find tutorial videos, a Comments/Questions area and more by visiting the pattern on garnstudio.com. © 1982-2024 DROPS Design A/S. We reserve all rights. This document, including all its sub-sections, has copyrights. Read more about what you can do with our patterns at the bottom of each pattern on our site. |
With over 40 years in knitting and crochet design, DROPS Design offers one of the most extensive collections of free patterns on the internet - translated to 17 languages. As of today we count 304 catalogs and 11422 patterns - 11417 of which are translated into English (US/in).
We work hard to bring you the best knitting and crochet have to offer, inspiration and advice as well as great quality yarns at incredible prices! Would you like to use our patterns for other than personal use? You can read what you are allowed to do in the Copyright text at the bottom of all our patterns. Happy crafting!
Comments / Questions (179)
Maria wrote:
Nel frattempo ho rifatto da capo la manica e ho capito come funziona il 1° giro del diagramma M1 e sono quindi riuscita a farlo. Grazie lo stesso.
25.03.2018 - 18:28Maria wrote:
Grazie per la risposta. Sto ora facendo la taglia 8/10 anni e nelle maniche non riesco a capire il 1° giro del diagramma M1, dove si dice di cominciare dalla 4^ m del diagramma lavorando a diritto la prima maglia e poi di lavorarla alla fine del giro a diritto insieme all'ultima. Così facendo non mi viene il motivo giusto: mi risultano solo 3 volte 2 m ins, a diritto anziché 4 volte. dove sbaglio? Grazie per l'aiuto.
25.03.2018 - 15:18Maria wrote:
Avrei bisogno di aiuto per quanto riguarda le maniche. Lavorando il diagramma M1 in tondo sui ferri a doppia punta, come devo lavorare tutti i giri: al diritto? Grazie mille per il vostro aiuto. maria
20.03.2018 - 17:34DROPS Design answered:
Buongiorno Maria. Lavorando M1 in tondo, la seconda riga deve lavorarla a rovescio, la terza e la quarta a diritto. Buon lavoro!
21.03.2018 - 09:54Verner Gisele wrote:
Un gros merci a votre équipe...et de l’aide donné pour réaliser ce modele a la perfection... sans votre aide et vos explications je n’y serait pas arrivé..
10.01.2018 - 12:00Gisele Verner wrote:
Pour les manches (5/7) on tricote en rond et non aller retour... on fait quoi avec le diagramme M1 qui dit 1 maille endroit sur l’envers...en rond on est toujours sur l’endroit...c’est ma premiere fois avec un diagramme...merci
14.12.2017 - 21:00DROPS Design answered:
Bonjour Mme Verner, quand on tricote M.1 en rond, le 2ème rang va se tricoter à l'envers, ainsi, on aura le même résultat que si on avait tricoté ces mailles à l'endroit sur l'envers. Les rangs 3 et 4 vont se tricoter à l'endroit (= jersey endroit). Bon tricot!
15.12.2017 - 08:32Gisele Verner wrote:
Donc si je comprends bien si je fais la taille 5/7 quand je fais les manches je continue le diagramme M1 pour les 52 mailles comme d’habitude tout simplement... je n’ai pas a changer le diagramme...merci infiniment
11.12.2017 - 15:32DROPS Design answered:
Bonjour Mme Verner, tout à fait, vous tricotez simplement M.1 sur vos 52 m (soit 4 fois le diagramme en largeur), la différence des 2 manches se fera au moment de rabattre les mailles. Bon tricot!
11.12.2017 - 16:41Gisele Verner wrote:
Ce n’était pas ma question: On dit continuer en M1 en commençant par la 11ieme maille... alors je tricote la 11ieme maille puis les 2 suivantes ensemble et la je retourne au debut de M1 et je tricote 2 ensemble puis 2 ensemble etc... jusqu’a Ce que 13 mailles soit tricotées et je recommence M1 en commençant par la premiere maille...est ce bien ca
11.12.2017 - 11:20DROPS Design answered:
Bonjour Mme Verner, En taille 3/4 ans, on commence effectivement par la 11ème maille du diagramme, on va tricoter la 1ère maille à l'endroit, et, à la fin du tour, la tricoter ensemble à l'endroit avec la dernière maille du tour. Tricotez ensuite les 2 dernières m de M.1 = 2 m ens à l'end. Reprenez ensuite M.1 au début (de droite à gauche), et terminez par tricoter ensemble à l'endroit la dernière m du tour avec la 1ère m du tour. Mais, c'est en taille 3/4 ans, or vous parliez de taille 5/7 ans dans votre précédente question, dans cette taille, on commence le diagramme par la 1ère maille. Bon tricot!
11.12.2017 - 13:35Gisele Verner wrote:
Je fais la grandeur 5/7... J’ai essaye de comprendre comment procéder pour les manches mais sans succès... pourquoi ne pas tout simplement nous donner le diagramme a suivre pour chaque grandeur (pour les manches) il suffirait de nous faire un diagramme M1 mais avec les modifications correspondant a la grandeur... Je veux dire par exemple M1 pour la grandeur 5/7 en commençant un nouveau diagramme par la 11ieme maille...comme ca ce serait plus facile et on se tromperait pas...merci
09.12.2017 - 19:15DROPS Design answered:
Bonjour Mme Verner, en taille 5/7 ans, on commence la manche droite par la 1ère maille du diagramme (= 2ème taille) et on rabat les 6 dernières mailles du tour. Pour la manche gauche, on commence par la 1ère maille également mais on rabat les 6 dernières mailles. Bon tricot!
11.12.2017 - 10:49Maria Wihlborg wrote:
Hej. Får inte till så att mönstret följer på varandra rätt. Efter uppläggningen. Ska man inte räkna kantmaskorna när man gör varvet *10 rm, 2 rm ihop*? Alltså först sticka 5 kantmaskor och sedan räkna 10 m innan mönstret börjar? Blir 4:e ggn jag repar upp😖
06.08.2017 - 11:58DROPS Design answered:
Hej! Du ska sticka precis som det står i beskrivningen så blir det rätt. Det minskas då inga maskor över kantmaskorna.
08.08.2017 - 13:39Susan Gungl wrote:
Die Blende wird erfahrungsgemäss noch ein bisschen schöner und gleichmässiger, wenn man die 5 kraus-rechten Blenden-Maschen rechts verschränkt abstrickt. Das mache ich oft bei kraus-rechten Abschlüssen und Kanten, sie wirken dann gleichmässiger und sind etwas stabiler als mit rechten Maschen.
02.08.2017 - 09:08