
Popular categories
Looking for a yarn?


|
|||||||||||||
Rubin |
|||||||||||||
 |
 |
||||||||||||
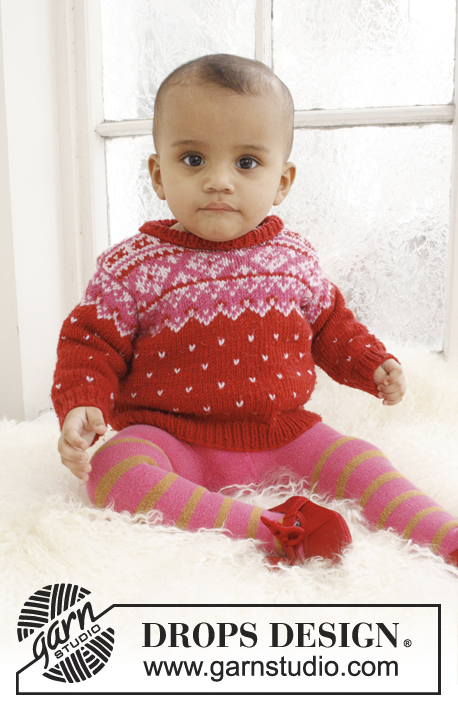
Knitted jumper with Nordic pattern for baby and children in DROPS Merino Extra Fine
DROPS Baby 21-18 |
|||||||||||||
|
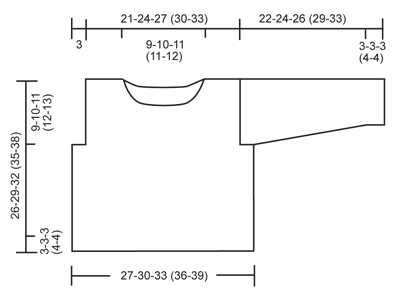
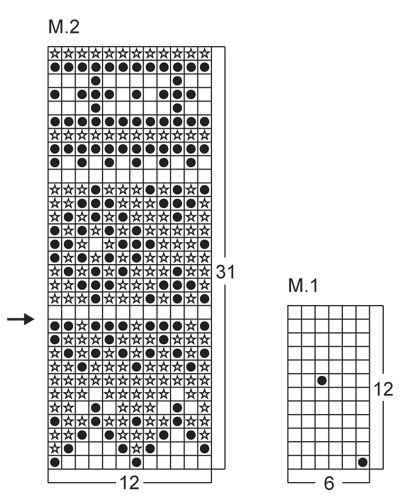
PATTERN: See diagrams M.1 and M.2. GARTER ST (back and forth on needle): K all rows. INCREASE TIP: Inc 1 st by making 1 YO, on next round K YO twisted (i.e. work in back loop of st instead front) to avoid holes. ---------------------------------------------------------- BODY: Worked in the round on circular needle. Cast on 108-120-132 (144-156) sts with red on circular needle size 4 mm. Continue to work rib as follows: * K 1, P 1 *, repeat from *-* for 3-3-3 (4-4) cm. Then switch to circular needle size 4.5 mm and continue in stocking st until finished measurements. When piece measures 4-6-4 (6-6) cm, insert a marker at beg of round and a marker after 54-60-66 (72-78) sts (= sides), and move the marker upwards. REMEMBER THE KNITTING TENSION! Then work diagram M.1 a total of 2-2-3 (3-4) times vertically. Then work rounds 1-6 in diagram M.1 1-1-1 (1-0) times, and rounds 1-3 in diagram M.2 (piece measures approx. 17-19-21 (23-25) cm). On next round (= 4th round in diagram M.2), cast off 10 sts in each side (i.e. 5 sts on each side of every marker), now divide the piece and finish each part separately. BACK PIECE: = 44-50-56 (62-68) sts. Now measure piece from here. Work next row (= RS) as follows: Work 1 st in garter st (= edge st), work 5th row in diagram M.2 until 1 st remains, finish with 1 st in garter st. Continue with diagram M.2 with 1 st in garter st in each side until piece measures 7-8-9 (10-11) cm (NOTE: Continue in stocking st with cerise after last row in diagram M.2 until finished measurements.) Cast off the middle 16-18-20 (20-22) sts for neck and finish each part separately. Cast off 1 st on next row from neck = 13-15-17 (20-22) sts remain on shoulder. When piece measures 9-10-11 (12-13) cm, cast off all sts (back piece measures approx. 26-29-32 (35-38) cm in length). FRONT PIECE: = 44-50-56 (62-68) sts. Now measure piece from here. Then continue in diagram M.2 with 1 st in garter st in each side as on back piece. When piece measures 5-6-7 (7-8) cm, cast off the middle 14-14-16 (16-18) sts for neck and finish each part separately. Then cast off on next row from neck as follows: Cast off 1 st 2-3-3 (3-3) times = 13-15-17 (20-22) sts remain on shoulder. When piece measures 9-10-11 (12-13) cm, cast off all sts. SLEEVE: Worked in the round on double pointed needles. Cast on 28-30-32 (34-36) sts with red on double pointed needles size 4 mm. Continue to work rib as follows: * K 1, P 1 *, repeat from *-* for 3-3-3 (4-4) cm. Now switch to double pointed needles size 4.5 mm. K next round while at the same time inc 2-0-4 (2-0) sts evenly = 30-30-36 (36-36) sts. READ ALL OF THE FOLLOWING SECTION BEFORE CONTINUING! Continue in stocking st until piece measures 4-4-6 (7-6) cm. Insert a marker at beg of round (= mid under sleeve) and move the marker upwards. Then work diagram M.1 upwards. When piece measures 5-5-7 (8-7) cm, inc 1 st on each side of marker - Read INCREASE TIP above = 2 new sts worked gradually in pattern. Repeat inc every 8½-5-6½ (4-3½) cm a total of 2-4-3 (5-7) times = 34-38-42 (46-50) sts. Work diagram M.1 a total of 3-3-3 (4-5) times vertically. Then work rounds 1-6 in diagram M.1 0-1-1 (0-0) times, and rounds 1-3 in diagram M.2. Now switch to circular needle size 4.5 mm while at the same time working 4th row in diagram M.2, then divide the piece at the marker and continue working back and forth on needle. On next row, inc 1 st in each side of piece (= 1 edge st in garter st), continue with diagram M.2 between edge sts up to and including the 11th row in diagram M.2 (marked with arrow on chart). With cerise cast off all sts on next row (piece measures approx. 22-24-26 (29-33) cm). ASSEMBLY: Sew shoulder seams and sew in sleeves. Knit up along neck edge approx. 60-70 sts with red on double pointed needles size 4 mm. K next round while at the same time adjusting no of sts to 60-62-66 (70-74). Continue to work rib as follows: * K 1, P 1 *, repeat from *-* for 3-3-3 (4-4) cm, then cast off all sts with K over K and P over P. Fold the rib double with the seam on in towards WS and fasten it on the back. |
|||||||||||||
Diagram explanations |
|||||||||||||
|
|||||||||||||
|
|||||||||||||
|
|||||||||||||
|
Have you made this or any other of our designs? Tag your pictures in social media with #dropsdesign so we can see them! Do you need help with this pattern?You'll find tutorial videos, a Comments/Questions area and more by visiting the pattern on garnstudio.com. © 1982-2024 DROPS Design A/S. We reserve all rights. This document, including all its sub-sections, has copyrights. Read more about what you can do with our patterns at the bottom of each pattern on our site. |
|||||||||||||


With over 40 years in knitting and crochet design, DROPS Design offers one of the most extensive collections of free patterns on the internet - translated to 17 languages. As of today we count 304 catalogues and 11422 patterns - 11422 of which are translated into English (UK/cm).
We work hard to bring you the best knitting and crochet have to offer, inspiration and advice as well as great quality yarns at incredible prices! Would you like to use our patterns for other than personal use? You can read what you are allowed to do in the Copyright text at the bottom of all our patterns. Happy crafting!
Comments / Questions (36)
Vad menas med " Vik resåren dubbelt med sömmen in och sy fast den på baksidan." betyder det att man stickar resåren separat innan man monterar den på själva tröjan? Och isåfall hur?
16.03.2020 - 22:11DROPS Design answered:
Hej När du har monterat tröjan (sytt axelsömmarna och sytt fast ärmarna) så ska du sticka upp maskor längst halskanten, här ska du sticka resår som blir halskanten. När resåren stickats färdig så ska du vika den inåt så att halskanten blir dubbel och sy fast den. Lycka till!
18.03.2020 - 11:39Hello! I’ve just cast off the middle stitches for the neck on the front section of the Rubin baby jumper and the next instructions say ‘finish each part separately. Then cast off on next row from neck as follows: cast off 1 stitch 3 times’. Does this mean I cast off three stitches on the side closest to the neck opening on the row after I’ve cast off those stiches and then finish the shoulder? Or does it mean I cast off one stitch on the next three rows? Thanks!
17.02.2020 - 08:56DROPS Design answered:
Dear Rachel, you finish each shoulder separately and cast off 1 stitch at the beginning of next row starting from neck (finishing on armhole side)a total of 3 times (= 1 st towards neck on every other row). Happy knitting!
17.02.2020 - 12:44Nå tror jeg at jeg har funnet en løsning: Jeg begynner med 84 masker og øker til 16 masker, da får jeg 100 masker, og til slutt feller jeg de 16 maskene, da gjenstår 84 masker fordelt på forstk. Og bakst. Totalt 42 masker hver: 16 til hals og 13 masker til hver skulder :P også får jeg planlegge så jeg får fordelt de 16 økningene jevnt i mønsteret med merketråden oppover. Det blir neste utfordring.
28.11.2019 - 00:35Hvis jeg øker fra utgangspunktet 108 masker så får jeg ikke resten til å stemme med fellingene. Når en omsider har 44 masker til hals og skuldre på hver side, så er det 4 masker for mye (13+13+16=42), så her trenger jeg noe støtte :)
27.11.2019 - 23:31Hei, da så jeg at jeg hadde oversett noe, det skal felles 10 masker på hver side av merketråden, og da blir det jo 88 masker, så det stemmer. Er likevel usikker på når jeg skal slutte å øke med merketråden?
27.11.2019 - 22:46Bolen på 108 masker for str. 1/3mnd, står ikke hvor mye en skal øke, kun at en skal sette merketråd i sidene som følger med oppover. Til slutt skal en felle 10 masker så det gjenstår 98 masker. Det skal være 44 masker på forstk. Og 44 masker på bakstykket, men det blir jo totalt 88 masker, hva gjør en med de 10 maskene en har til overs (98-88=10)? Så skal det være 13 masker til hver skulder og 16 til hals, totalt 42 masker, ikke 44 masker. Ingenting stemmer? Løsning?
27.11.2019 - 22:34Hei, jeg strikker til min 4 mnd gamle baby, og synes det kommer noe uklart frem hvor en skal slutte å øke maskeantallet på bolen, noe som gjør at den fort blir for vid. En øker vanligvis før og etter merketråden, når skal jeg slutte å øke for at maskeantallet skal gå opp? Mvh Paula
27.11.2019 - 19:02DROPS Design answered:
Hei Paula! Det skal ikke økes masker når bolen strikkes, det skal være 108 masker frem til det skal felles 10 masker i hver side (5 masker felles på hver side av merketrådene). Etter fellingen vil det være 88 masker, da skal det være 44 masker til forstykket og 44 masker til bakstykket. Deretter skal det felles 16 masker på bakstykket, da vil det være 14 masker til hver skulder. På forstykket skal det felles 14 masker til hals, og deretter 1 maske på hver side av halsen 2 ganger. Da er det 13 masker til hver skulder. Lykke til!
28.11.2019 - 08:25Jeg strikker denne model i ensfarvet str. 12-18 mdr. Er det muligt at få angivet i cm , hvornår ærmet skal deles og strikkes frem og tilbage. Det er lidt svært når det er angivet i mønster.
11.11.2019 - 17:22DROPS Design answered:
Hei Dorthe. Det har vi dessverre ikke. Du kan evnt telle pinnene i mønstret og sjekk strikkefastheten i høyden (pinner) og regne ut cm målen du skal ha i din strørrelse. mvh DROPS design
18.11.2019 - 11:37Jeg har strikket denne i str. 12/18 mdr. I opskriften står der 100 gr. "grundfarve" i "Merino ekstra fine". Jeg skal gøre opmærksom på, at der går ca 170 gr til den str. (Altså 200 gr. i indkøb)
16.08.2019 - 21:36S E Brooks wrote:
I just finished knitting Rubin and realized that there is an error in Chart M.2. When I zoomed into the photo you have of the finished red sweater the error existed when that sample was knit also. Rows 13-21 of chart M.2 should be moved one stitch to the right so that the pattern aligns correctly with that in lines 8-11 of the same chart. As it is now the pattern for these rows is skewed.
03.02.2018 - 01:28