DROPS BabyAlpaca Silk
70% Alpaca, 30% Silk
Discontinued
find alternatives
DROPS SS24

Sweet Violette

Set of knitted dress and crochet hat for baby and children in DROPS BabyAlpaca Silk or DROPS Safran

DROPS Baby 21-7
DROPS design: Pattern no BS-007-byb
Yarn group A
----------------------------------------------------------

DRESS:
Size: 1/3 - 6/9 - 12/18 months (2 - 3/4) years
Finished measurements:
Bust: 46-52-58 (64-70) cm / 18"-20½"-22¾" (25¼"-27½")
Hem: 56-62-70 (76-84) cm / 22"-24½"-27½" (30"-33")
Full length: 33-36-39 (42-45) cm / 13"-14¼"-15¼" (16½"-17¾")

Materials: DROPS BABYALPACA SILK from Garnstudio
Color no 3250, light old rose: 100-100-100 (150-150) g
Color no 4088, heather: 50-50-50 (50-50) g
Color no 1760, light gray purple: 50-50-50 (50-50) g

Or use:
DROPS SARAN from Garnstudio
Colour no 57, mauve: 100-150-150 (200-200) g
Colour no 58, amethyst: 50-50-50 (50-50) g
Colour no 56, powder pink: 50-50-50 (50-50) g

DROPS CIRCULAR NEEDLE size 2.5 mm / US 1or2 (60 cm / 24" for all sizes + 40 cm / 16" for the 2 smaller sizes) - or size needed to get 26 sts x 34 rows in stockinette st = 10 x 10 cm / 4" x 4".

DROPS CROCHET HOOK size 2.5mm/C/2 - for edges and flowers.

DROPS MOTHER-OF-PEARL BUTTON, NO 521 (15 mm): 1 piece for all sizes
----------------------------------------------------------

HAT:
Size: 1/3 - 6/9 - 12/18 months (2 - 3/4) years
Fits head circumference:
40/42-42/44-44/46 (48/50-50/52) cm / 16"-17"-18" (19"-20")
Height: 15-16-17 (18-19) cm / 6"-6¼"-6¾" (7"-7½")
Circumference: 44-44-46 (46-48) cm / 17¼"-17¼"-18" (18"-19") at the widest

Materials: DROPS BABYALPACA SILK from Garnstudio
Color no 4088, heather: 50 g for all sizes
Color no 3250, light old rose: 50 g for all sizes

Or use:
DROPS SAFRAN from Garnstudio
Colour no 58, amethyst: 50 g for all sizes
Colour no 57, mauve: 50 g for all sizes

DROPS CROCHET HOOK size 2.5mm/C/2 – or size needed to get 22 dc = 10 cm / 4" in width.

-------------------------------------------------------

Alternative Yarn – See how to change yarns here
Yarn Groups A to F – Use the same pattern and change the yarn here
Yarn usage using an alternative yarn – Use our yarn converter here

-------------------------------------------------------

DROPS BabyAlpaca Silk
70% Alpaca, 30% Silk
Discontinued
find alternatives

Pattern instructions

NOTE: This pattern is written in American English. All measurements in charts are in cm. For conversion from inches to cm - click here. There are different terms for crocheting in American and British English. If this pattern includes crochet, click for "crochet terms" here. For this pattern in British English, please click here.
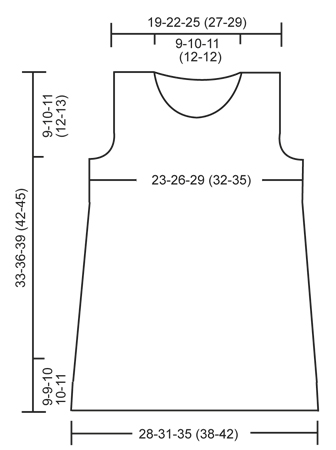
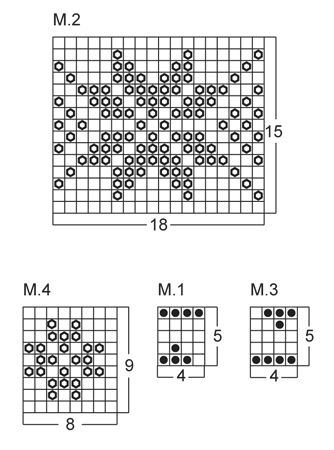
DRESS:

PATTERN: See diagrams M.1 - M.4.

DECREASE TIP 1 (applies to body):
Dec 1 st on each side of marker as follows: Work until 2 sts remain before marker, slip 1 st as if to K, K 1, psso, (marker), K tog the next 2 sts.

DECREASE TIP 2 (applies to armholes):
Dec 1 st in each side as follows: Work 4 sts in garter st, work the next 2 sts tog (K tog if next st is P, P tog if next st is K), work until 6 sts remain, work the next 2 sts tog (K tog if previous st was P, P tog if previous st was K), 4 sts in garter st.

GARTER ST (back and forth on needle): K all rows.

SEED ST (back and forth on needle):
1st row: * K 1, P 1 *, repeat from *-*.
2nd row: K over P and P over K. Repeat 2nd row.

BUTTON HOLE: Bind off for button hole on left back piece by working 3rd and 4th st from mid back tog, make 1 YO.
----------------------------------------------------------

BODY:
Worked in the round on circular needle. Cast on 144-164-180 (200-216) sts with babyAlpaca Silk light old rose or Safran mauve on circular needle size 2.5 mm / US 1or2. K for approx. 2.5 cm / ⅞", then P 1 round = folding edge, measure piece from here. REMEMBER THE GAUGE!
K 2 more rounds and insert a marker in each side (= 72-82-90 (100-108) sts between markers on front and back piece). Then work diagram M.1 1 time vertically - Dec 0-2-0 (2-0) sts evenly on last round (5th round in diagram M.1) = 144-162-180 (198-216) sts. Now work diagram M.2 1 time vertically - Dec 0-2-4 (2-4) sts evenly on last round (15th round in diagram M.2) = 144-160-176 (196-212) sts. Then work diagram M.3 1 time vertically. Continue in stockinette st with BabyAlpaca Silk light old rose / Safran mauve until piece measures 9-9-10 (10-11) cm / 3½"-3½"-4" (4"-4⅜"). Now dec 1 st on each side of every marker - Read DECREASE TIP 1 above = 4 sts dec on round. Repeat dec like this every 4-4-6 (6-6) rounds a total of 6-6-6 (7-7) times = 120-136-152 (168-184) sts.
READ ALL OF THE FOLLOWING SECTION BEFORE CONTINUING.
When piece measures 17-19-21 (23-25) cm / 6¾"-7½"-8¼" (9"-9¾") (all dec are now done), work diagram M.1, then M.4 and then M.3 1 time vertically. Then P with BabyAlpaca Silk light old rose / Safran mauve until piece measures 24-26-28 (30-32) cm / 9½"-10¼"-11" (11¾"-12½"). Now bind off 4 sts in each side (i.e. 2 sts on each side of every marker), now divide the piece and finish each part separately.

BACK PIECE:
= 56-64-72 (80-88) sts. Work next row (= RS) as follows: Work 4 sts in garter st (= edge sts), dec 1 st - Read DECREASE TIP 2 above, work in seed st - Read explanation above - until 6 sts remain, dec 1 st - Read DECREASE 2 above, finish with 4 sts in garter st. Repeat dec inside 4 sts in garter st in each side on every row from RS like this a total of 3-3-3 (5-6) times = 50-58-66 (70-76) sts.
Continue with seed st (with 4 sts in garter st in each side until finished measurements) until piece measures 27-29-31 (34-37) cm / 10⅝"-11⅜"-12¼" (13⅜"-14½"). Now insert a marker between the 2 middle sts, and divide the back piece in 2 parts from RS as follows: Slip the sts up to 2 sts before marker mid back on a stitch holder.

LEFT BACK PIECE:
= 27-31-35 (37-40) sts on needle (sts on left side + 2 sts on right side of marker mid back seen from RS). Continue in seed st and with 4 sts in garter st in each side over these sts. When piece measures 30-33-36 (39-42) cm / 11¾"-13"-14¼" (15¼"-16½"), bind off for button hole - Read BUTTON HOLE above.
When piece measures 31-34-37 (40-43) cm / 12 ¼"-13⅜"-14½" (15¾"-17"), bind off from RS the first 12-12-13 (14-15) sts for neck. Then bind off at beg of every row from RS as follows: 2 sts 1 time, 1 st 0-1-1 (1-1) time = 13-16-19 (20-22) sts remain on shoulder. When piece measures 33-36-39 (42-45) cm / 13"-14¼"-15¼" (16½"-17¾"), bind off all sts with K over P and P over K.

RIGHT BACK PIECE:
Slip sts from stitch holder back on needle and knit up 4 sts behind the first 4 sts towards mid back on left back piece = 27-31-35 (37-40) sts. Continue to work in seed st with 4 sts in garter st in each side as on left back piece but do not bind off for button hole.
When piece measures 31-34-37 (40-43) cm / 12 ¼"-13⅜"-14½" (15¾"-17"), bind off for neck as on left back piece but in opposite side.
Bind off when piece measures 33-36-39 (42-45) cm / 13"-14¼"-15¼" (16½"-17¾").

FRONT PIECE:
= 56-64-72 (80-88) sts. Continue in seed st and bind off for armholes as on back piece. When piece measures 27-30-33 (35-38) cm / 10⅝"-11¾"-13" (13¾"-15"), bind off the middle 12-12-14 (14-16) sts for neck and finish each part separately. Then bind off on next row from neck as follows: bind off 2 sts 1 time, 1 st 4-5-5 (6-6) times = 13-16-19 (20-22) sts remain on shoulder. Bind off when piece measures 33-36-39 (42-45) cm / 13"-14¼"-15¼" (16½"-17¾").

ASSEMBLY: Sew shoulder seams and sew button on to right back piece. Fold in the bottom edge at P round and fasten on WS.

CROCHET BORDER:
Crochet along the neck line and neck opening with BabyAlpaca Silk heather or Safran amethyst on hook size 2.5mm/C/2 as follows:
ROUND 1: * 1 sc, skip approx. 0.5 cm / ¼" *, repeat from *-* and finish with 1 sl st in 1st sc.
ROUND 2: * 1 sc in the next 2 sc, ch 3 *, repeat from *-* and finish with 1 sl st in 1st sc. Fasten off.

FLOWERS:
Ch 4 with BabyAlpaca Silk heather or Safran amethyst and form a ring with 1 sl st in 1st ch.
* Crochet 1 sc and 5 dc in ch-ring *, repeat from *-* a total of 3 times and finish with 1 sl st in 1st sc = 3 leaves.
Crochet another flower the same way = 2 flowers with 3 leaves. Crochet yet another flower the same way but repeat from *-* a total of 5 times instead of 3 times = 5 leaves. Sew the flowers on to the front piece.

--------------------------------------------------------

HAT:

CROCHET INFO (applies to hat):
All rounds beg with ch 2 (NOTE: not counted as first dc) continue with 1 dc in every st, finish round with 1 sl st in 1st dc at beg of round.

COLOR CHANGE:
Switch color at the end of round as follows: Crochet 1 sl st with the new color in 1st dc on round. Continue on to next round with the new color.

DECREASE TIP:
Work 1 dc but wait with last pull through (= 2 sts on hook), then work next dc but on last pull through, pull yarn through all sts on hook = 1 st dec.
--------------------------------------------------------

HAT:
Worked in the round top down. Ch 4 on hook size 2.5mm/C/2 with BabyAlpaca Silk heather or Safran amethyst and form a ring with 1 sl st in first ch.
ROUND 1: ch 2, work 12 dc in ch-ring. Read CROCHET INFO above.
ROUND 2: 2 dc in every dc = 24 dc.
ROUND 3: * 1 dc in next dc, 2 dc in next dc *, repeat from *-* the entire round = 36 dc.
ROUND 4: * 1 dc in the next 2 dc, 2 dc in next dc *, repeat from *-* the entire round = 48 dc.
ROUND 5: * 1 dc in the next 3 dc, 2 dc in next dc *, repeat from *-* the entire round = 60 dc.
Continue to inc 12 new sts on the round like this by working 2 dc in next st after every 4, 5, 6 sts etc. until there are 108-108-120 (120-132) sts on round.
Continue with 1 dc in every st until piece measures 11-12-13 (14-15) cm / 4⅜"-4¾"-5⅛" (5½"-6") (or desired length). Then dec 12 sts evenly on round - Read DECREASE TIP above = 96-96-108 (108-120) sts, and now switch to BabyAlpaca Silk light old rose or Safran mauve - Read COLOR CHANGE above. Continue with 1 dc in every st until piece measures 15-16-17 (18-19) cm / 6"-6¼"-6¾" (7"-7½") and switch to BabyAlpaca Silk heather or Safran amethyst after the last round. Work 1 round with 1 sc in every dc. Work next round as follows: * 1 sc in the next 2 sc, ch 3 *, repeat from *-* and finish with 1 sl st in 1st sc. Fasten off.

LARGE FLOWER:
Worked in the round. Ch 4 with BabyAlpaca Silk light old rose or Safran mauve and form a ring with 1 sl st in 1st ch.
ROUND 1: * 1 sc in ch-ring, ch 3 *, repeat from *-* a total of 3 times and finish with 1 sl st in 1st sc from beg of round = 3 ch-spaces.
ROUND 2: Crochet as follows in every ch-space: 1 sl st, 5 dc and 1 sl st = 3 leaves. Turn piece - work next round on the back of the flower.
ROUND 3: ch 1, work 1 sc in first sc from 1st round,* ch 4, work 1 sc at the bottom in the middle of next leaf from 2nd round, ch 4, 1 sc in next sc from 1st round *, repeat from *-* until 5 ch spaces have been worked. Finish with ch 4 and 1 sl st in 1st sc on round = 6 ch spaces in total. Turn piece - work next round on the front of the flower.
ROUND 4: Crochet as follows in every ch space: 1 sl st, 6 dc and 1 sl st = 6 leaves.
Fasten off.

SMALL FLOWER:
Worked in the round. Ch 4 with BabyAlpaca Silk heather or Safran amethys and form a ring with 1 sl st in 1st ch. * Crochet 1 sc and 5 dc in ch-ring *, repeat from *-* a total of 3 times and finish with 1 sl st in 1st sc = 3 leaves. Fasten off.

ASSEMBLY:
Sew the flowers on to the hat.

Diagram

symbols = BabyAlpaca Silk light old rose / Safran mauve
symbols = BabyAlpaca Silk heather / Safran amethyst
symbols = BabyAlpaca Silk light grey purple / Safran powder pink
diagram
diagram

Each of our patterns has specific tutorial videos to help you.

Do you have a question? See a list of frequently asked questions (FAQ)

Knitting tension is what determines the final measurements of your work, and is usually measured per 10 x 10 cm. It is provided like so: number of stitches in width x number of rows in height - eg: 19 stitches x 26 rows = 10 x 10 cm.

The knitting tension is very individual; some people knit/crochet loosely while others work tightly. You adjust the knitting tension with the needle size, which is why the suggested needle size only serve as a guide! You need to adjust this (up or down) to ensure that YOUR knitting tension matches the knitting tension provided in the pattern. If you work with a different knitting tension than provided you will have a different yarn consumption, and your work will have different measurements than what the pattern suggests.

The knitting tension also determines which yarns can replace each other. As long as you achieve the same knitting tension you can replace one yarn with another.

See DROPS lesson: How to measure your tension/gauge

See DROPS video: How to make a gauge tension swatch

The required amount of yarn is provided in grams, eg: 450 g. To calculate how many balls you’ll need you first need to know how many grams are in 1 ball (25g, 50g or 100g). This information is available if you click on the individual yarn quality on our pages. Divide the amount required with the amount of each ball. For example, if each ball is 50g (the most common amount), the calculation will be as follows: 450 / 50 = 9 balls.

The important thing when changing from one yarn to another is that the knitting/crochet tension remains the same. This is so that the measurements of the finished piece will be the same as on the sketch provided. It is easier to achieve the same knitting tension using yarns from the same yarn group. It is also possible to work with multiple strands of a thinner yarn to achieve the knitting tension of a thicker one. Please try our yarn converter. We recommend you to always work a test swatch.

Please NOTE: when changing yarn the garment might have a different look and feel to the garment in the photo, due to individual properties and qualities of each yarn.

See DROPS lesson: Can I use a different yarn than the one mentioned in the pattern?

All our yarns are categorised into yarn groups (from A to F) according to thickness and knitting tension – group A contains the thinnest yarns and group F the thickest. This makes it easier for you to find alternative yarns to our patterns, should you wish to switch yarn. All yarns within the same group have a similar knitting tension and can easily replace each other. However, different yarn qualities have different structures and properties which will give the finished work a unique look and feel.

Click here for an overview of the yarns in each yarn group

At the top of all our patterns you’ll find a link to our yarn converter, which is a helpful tool should you wish to use a different yarn than suggested. By filling in the yarn quality you wish to replace, the amount (in your size) and number of strands, the converter will present good alternative yarns with the same knitting tension. Additionally it will tell you how much you’ll require in the new qualities and whether you’ll need to work with multiple strands. Most skeins are 50g (some are 25g or 100g).

If the pattern is worked with multiple colours, every colour will have to be converted separately. Similarly, if the pattern is worked with several strands of different yarns (for example 1 strand Alpaca and 1 strand Kid-Silk) you will have to find alternatives for each, individually.

Click here to see our yarn converter

Since different yarns have different qualities and textures we have chosen to keep the original yarn in our patterns. However, you can easily find options among our available qualities by using our yarn converter, or simply pick a yarn from the same yarn group.

It is possible that some retailers still have discontinued yarns in stock, or that someone has a few skeins at home that they would like to find patterns for.

The yarn converter will provide both alternative yarn as well as required amount in the new quality.

If you think it's hard to decide what size to make, it can be a good idea to measure a garment you own already and like the size of. Then you can pick the size by comparing those measures with the ones available in the pattern's size chart.

You'll find the size chart at the bottom of the pattern.

See DROPS lesson: How to read size chart

The needle size provided in the pattern serves only as a guide, the important thing is to follow the knitting tension. And since knitting tension is very individual, you will have to adjust the needle size to ensure that YOUR tension is the same as in the pattern – maybe you’ll have to adjust 1, or even 2 needle sizes, up or down to achieve the correct tension. For this, we recommend that you work test swatches.

Should you work with a different knitting tension than the one provided, the measurements of the finished garment might deviate from the measurement sketch.

See DROPS lesson: How to measure your tension/gauge

See DROPS video: How to make a gauge tension swatch

Working a garment top-down provides more flexibility and room for personal adjustment. For example it is easier to try the garment on while working, as well as making adjustments to length of yoke and shoulder caps.

The instructions are carefully explaining every step, in the correct order. Diagrams are adjusted to the knitting direction and are worked as usual.

The diagram depicts all rows/rounds, and every stitch seen from the right side. It is read from bottom to top, from right to left. 1 square = 1 stitch.

When working back and forth, every other row is worked from the right side and every other row is worked from the wrong side. When working from the wrong side, the diagram will have to be worked reversed: from left to right, knit stitches are purled, purl stitches are knit etc.

When working in the round every round is worked from the right side and the diagram are worked from right to left on all rounds.

See DROPS lesson: How to read knitting diagrams

The diagram depicts all rows/rounds, and every stitch seen from the right side. It is worked from bottom to top, from right to left.

When working back and forth every other row is worked from the right side: from right to left and every other row is worked from the wrong side: from left to right.

When working in the round, every row in the diagram are worked from the right side, from right to left.

When working a circular diagram you start in the middle and work your way outwards, counter clockwise, row by row.

The rows usually start with a given number of chain stitches (equivalent to the height of the following stitch), this will either be depicted in the diagram or explained in the pattern.

See DROPS lesson: How to read crochet diagrams

Instructions for working several diagrams after each other on the same row/round, will often be written like so: “work A.1, A.2, A.3 a total of 0-0-2-3-4 times". This means you work A.1 once, then A.2 is worked once, and A.3 is repeated (in width) the number of times provided for your size – in this case like so: S = 0 times, M = 0 times, L=2 times, XL= 3 times and XXL = 4 times.

The diagrams are worked as usual: begin with the first row in A.1, then work the first row in A.2 etc.

See DROPS lesson: How to read knitting diagrams

See DROPS lesson: How to read crochet diagrams

The total width of the garment (from wrist-to-wrist) will be larger in the larger sizes, despite the actual sleeves being shorter. The larger sizes have longer sleeve caps and wider shoulders, so there will be a good fit in all sizes.

The measurement sketch/schematic drawing provides information regarding the full length of the garment. If it’s a jumper or a jacket the length is measured from the highest point on the shoulder (usually closest to the neckline), and straight down to the bottom of the garment. It is NOT measured from the tip of shoulder. Similarly, the length of yoke is measured from the highest point on the shoulder and down to where yoke is split into body and sleeves.

See DROPS lesson: How to read a schematic drawing

Diagrams are often repeated on the round or in height. 1 repeat is the diagram the way it appears in the pattern. If it says to work 5 repeats of A.1 in the round, then you work A.1 a total of 5 times after/next to each other in the round. If it says to work 2 repeats of A.1 vertically/in height you work the entire diagram once, then begin again at the start and work the entire diagram one more time.

Chain stitches are slightly narrower than other stitches and to avoid working the cast-on edge too tight, we simply chain more stitches to begin with. The stitch count will be adjusted on the following row to fit the pattern and measurement sketch.

The rib edge is more elastic and will contract slightly compared to, for example, stocking stitch. By increasing before the rib edge, you avoid a visible difference in width between the rib edge and the rest of the body.

It’s very easy to cast off too tightly, and by making yarn overs while casting off (and simultaneously casting these off) you avoid a too tight cast off edge.

See DROPS video: How to bind off with yarn overs (yo)

To achieve an even increase (or decrease) you can increase on, for example: every 3rd and 4th row alternately, like so: work 2 rows and increase on the 3rd row, work 3 rows and increase on the 4th. Repeat this until the increase is complete.

See DROPS lesson: Increase or decrease 1 st on every 3rd and 4th row alternately

Should you prefer to work in the round instead of back and forth, you may of course adjust the pattern. You’ll need to add steeks mid-front (usually 5 stitches), and follow the instructions. When you would normally turn and work from the wrong side, simply work across the steek and continue in the round. At the end you’ll cut the piece open, pick up stitches to work bands, and cover the cut edges.

See DROPS video: How to knit steeks and cut open

Should you prefer to work back and forth instead of in the round, you may of course adjust the pattern so you work the pieces separately and then assemble them at the end. Divide the stitches for the body in 2, add 1 edge stitch in each side (for sewing) and work the front and back pieces separately.

See DROPS lesson: Can I adapt a pattern for circular needles into straight needles?

Pattern repeats can vary slightly in the different sizes, in order to get the correct proportions. If you’re not working the exact same size as the garment in the photo, yours might deviate slightly. This has been carefully developed and adjusted so that the complete impression of the garment is the same in all sizes.

Make sure to follow instructions and diagrams for your size!

If you have found a pattern you like which is available in women’s size it’s not very difficult to convert it to men’s size. The biggest difference will be the length of sleeves and body. Start working on the women size that you think would fit across the chest. The additional length will be worked right before you cast off for the armhole/sleeve cap. If the pattern is worked top-down you can add the length right after the armhole or before the first decrease on sleeve.

Regarding additional yarn amount, this will depend on how much length you add, but it is better with a skein too many than too few.

All yarns will have excess fibres (from production) that might come off as lint or shedding. Brushed yarns (ie hairier yarns) have more of these loose, excess fibres, causing more shedding.

Shedding also depends on what is worn under or over the garment, and whether this pulls at the yarn fibres. It’s therefore not possible to guarantee that there will be no shedding

Below are some tips on how to get the best result when working with hairier yarns:

1. When the garment is finished (before you wash it) shake it vigorously so the looser hairs come off. NOTE: do NOT use a lint roller, brush or any method that pulls at the yarn.

2. Place the garment in a plastic bag and put it in your freezer - the temperature will cause the fibres to become less attached to each other, and excess fibres will come off easier.

3. Leave in the freezer for a few hours before taking it out and shaking it again.

4. Wash the garment according to the instructions on the yarn label.

Pilling is a natural process that happens to even the most exclusive of fibers. It's a natural sign of wear and tear that is hard to avoid, and that is most visible in high friction areas of your garment like a sweater's arms and cuffs.

You can make your garment look as new by removing the pilling, using a fabric comb or a pill/lint remover.

Still can't find the answer you need? Then scroll down and leave your question so one of our experts can try to help you. This will be done normally within 5 to 10 working days.
In the meantime, you can read the questions and answers that others have left to this pattern or join the DROPS Workshop on Facebook to get help from fellow knitters/crocheters!

You might also like...

Post a comment to pattern DROPS Baby 21-7

We would love to hear what you have to say about this pattern!

If you want to leave a question, please make sure you select the correct category in the form below, to speed up the answering process. Required fields are marked *.

Comments / Questions (18)

country flag Cecile wrote:

Bovenaan na m3 eerst nog een pen of twee recht anders zie je het patroon niet goed.

24.01.2024 - 20:42

country flag Veerle Van Coillie wrote:

Heb trouwens 3 hele bollen over !!!!

18.11.2022 - 08:34

country flag Veerle Van Coillie wrote:

Heb voor dit model de kleuren 56-57- en 58 van Safran besteld. ( de andere optie is niet meer leverbaar) Nu ben ik begonnen met inbreien en zie daarbij geen verschil tussen kleur 57 en 58 !! Heel erg lastig en jammer !!

04.11.2022 - 08:23

country flag Marita Eriksson wrote:

Hej hvis jeg vil strikke denne kjole i størrelse 5/6 hvordan bliver maske antallet så? Jeg kan tælle mig frem til at jeg fra størrelse 3/4 år, skal lægge til 16 masker? Tror i det vil passe? Mvh Marita

21.12.2021 - 14:52

DROPS Design answered:

Hej Marita, ja det skal nok passe men husk at når du strikker den store stjerne, så skal maskeantallet gå op i 18 masker - god fornøjelse! :)

22.12.2021 - 13:28

country flag Rose-marie Le Mené wrote:

Puis je faire le modèle avec aiguilles normales merci

06.11.2019 - 09:39

DROPS Design answered:

Bonjour Mme Le Mené, vous trouverez ici, comment adapter un modèle sur aiguilles droites. Bon tricot!

06.11.2019 - 12:04

country flag IoLa wrote:

Mach M3 müsste doch eigentlich noch mindestens eine Reihe rechts gestrickt werden, damit das Muster gut zu sehen ist (wie auf dem Bild). Das fehlt leider in der Beschreibung. Ich habe direkt links gestrickt und dadurch ist der letzte Teil des Musters sehr "versteckt"...

07.03.2018 - 19:04

country flag Monique wrote:

Pour le devant taille 3-4 ans, nous avons 88 mailles, rabattons 16 mailles au centre, il reste donc 36 mailles pour chaque épaule, après les diminutions 1x2m et 6x1m. il reste donc 28 mailles et non 22, y a-t-il erreur dans les explications?

25.11.2017 - 23:40

DROPS Design answered:

Bonjour Monique, on commence le devant avec 88 mailles et on diminue pour les emmanchures comme pour le dos = il reste 76 m. Moins les 16 m en attente = 60 m soit 30 m de chaque côté, moins les 8 m diminuées pour l'encolure = il reste 22 m. Bon tricot!

27.11.2017 - 11:01

country flag Martine wrote:

Bonjour, Je souhaiterais faire ce modèle en taille 5/6 ans. Pouvez vous me donner des conseils? Merci

29.09.2015 - 21:53

DROPS Design answered:

Bonjour Martine, nous ne sommes pas en mesure de pouvoir répondre à chaque demande individuelle, toutefois, vous pouvez vous inspirer d'un modèle similaire dans la taille souhaitée - pour toute assistance personnalisée, votre magasin DROPS pourra vous aider. Bon tricot!

30.09.2015 - 09:25

country flag Susanne E. Bøg wrote:

Hvordan måler man en cirkel?? -er det fra midten og ud?

29.05.2015 - 11:39

DROPS Design answered:

Hej Susanne, ja du måler arbejdet fra midten og ud. God fornøjelse!

29.05.2015 - 11:45

country flag Martina wrote:

Wozu braucht es knopf und knopfloch, wenn die schulternaht am schluss zusammen genäht wird?

12.01.2015 - 21:48

DROPS Design answered:

Der Knopf befindet sich nicht an der Schulter, sondern verbindet linkes und rechtes Rückenteil knapp unter dem Halsausschnitt - das Kleidchen kann also hinten aufgeknöpft werden.

14.01.2015 - 23:34