
Popular categories
Looking for a yarn?


|
|
Buttercup |
|
 |
 |
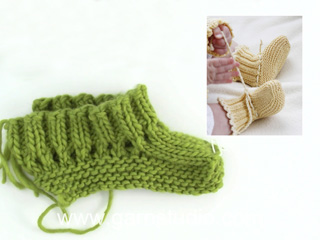
Knitted jacket with hood and booties for baby and children in DROPS BabyMerino
DROPS Baby 21-1 |
|
|
GARTER ST (back and forth on needle): K all rows. SHORT ROWS: * Work 2 rows in garter st over the 24-24-26 (28-28) band sts, work 2 rows in garter st only over the outermost 12-12-13 (14-14) sts. NOTE: When turning mid piece, slip first st. Tighten yarn and continue as before. This is done to avoid holes in the transitions *. BUTTON HOLES: The jacket is double-breasted. Bind off for 4 button holes on right band. 1 BUTTON HOLE = K tog fourth and fifth st from edge and make 1 YO. On same row also K tog fourth and fifth LAST st on band, make 1 YO. Bind off for 2 button holes when piece measures: SIZE 1/3 MONTHS: 14 and 19 cm / 5½" and 7½" SIZE 6/9 MONTHS: 16 and 21 cm / 6 1/4"- and 8 1/4" SIZE 12/18 MONTHS: 18 and 24 cm / 7" and 9½" SIZE 2 YEARS: 20 and 27 cm / 8" and 10½" SIZE 3/4 YEARS: 22 and 30 cm / 8 3/4" and 11 3/4" ---------------------------------------------------------- JACKET: Worked back and forth on circular needle. Beg on front piece, cast on sts for sleeve and work up to the shoulder. Knit the other front piece, place both front pieces tog and work down the back piece. LEFT FRONT PIECE: Read all of the following section before continuing! Cast on 43-47-51 (56-59) sts (includes 1 edge st in the side and 24-24-26 (28-28) band sts towards mid front) on needle size 2.5 mm / US 1or2 with Baby Merino. Work 6 rows in GARTER ST - see explanation above. Switch to circular needle size 3 mm / US 2or3 and work in stockinette st but continue to work the 24-24-26 (28-28) band sts towards mid front in Garter st. When piece measures 4 cm / 1½'', work SHORT ROWS - see explanation above (1st row = from WS). Repeat from *-* 1 time every 4 cm / 1½'' until piece measures 19-21-24 (27-30) cm / 7½"-8 1/4"-9½" (10 5/8"-11 3/4"), then repeat from *-* 1 time every 2 cm / 3/4'' until finished measurements. AT THE SAME TIME when piece measures 16-17-20 (23-25) cm / 6¼''-6¾''-8'' (9''-9¾''), cast on new sts at the end of every row from WS (towards the side of sleeve): 6 sts 2-2-3 (3-3) times, 8 sts 1-1-1 (2-3) times and 21-22-22 (25-26) sts 1 time = 84-89-99 (115-127) sts for shoulder/sleeve. Work inc sts in stockinette st. When all sts have been cast on, continue in stockinette st and Garter st as before while AT THE SAME TIME also working the outermost 10 sts on sleeve in garter st. When piece measures 27-29-33 (37-40) cm / 10 5/8''-11 3/8''-13'' (14½''-15¾''), insert a marker = mid on top of shoulder. Now slip the 24-24-26 (28-28) band sts towards mid front on a stitch holder. Then cast on 2 new sts at the end of row from RS (towards neck), repeat inc on next row towards neck = 64-69-77 (91-103) sts on needle. Work 1 row from WS. Put all sts on a stitch holder. RIGHT FRONT PIECE: Cast on and work as left front piece but reversed. In addition bind off for BUTTON HOLES on band - see explanation above. NOTE! Slip sts on a stitch holder after the last row with inc (i.e. last row = from WS). BACK PIECE: Work left front piece on to circular needle, cast on 16-16-18 (20-20) new sts (= back of neck) and work right front piece on to circular needle = 144-154-172 (202-226) sts. NOW MEASURE PIECE FROM MARKERS ON SHOULDERS. Continue in stockinette st and Garter st at the end on each sleeve back and forth on needle. When piece measures 8½-9½-10 (10-11) cm / 3 1/4"-3 3/4"-4" (4"-4 3/8"), beg to bind off sleeve sts. Bind off at beg of every row in each side as follows: 21-22-22 (25-26) sts 1 time, 8 sts 1-1-1 (2-3) times and 6 sts 2-2-3 (3-3) times = 62-70-76 (84-90) sts on needle. Continue in stockinette st with 1 edge st in garter st each side. When piece measures approx. 26-28-32 (36-39) cm / 10 1/4"-11"-12½" (14 1/4"-15 1/4") – fold the piece double at the markers on shoulders and make sure that the back piece is as long as front piece down to rows in garter st, switch to needle size 2.5 mm / US 1or2 and work 6 rows in garter st, then bind off. ASSEMBLY: Sew the sleeve and side seams inside 1 edge st. Sew on buttons. HOOD: Knit up approx. 102-106-112 (118-122) sts (including sts from stitch holders at the front – NOTE: If more/fewer sts have been knitted up, dec/inc evenly on 1st row. Continue in garter st over all sts while AT THE SAME TIME working short rows in each side every 2 cm / 3/4'' – SEE EXPLANATION ABOVE. Bind off when hood measures approx. 21-23-25 (27-28) cm / 8 1/4"-9"-9 3/4" (10 5/8"-11"). Sew hood neatly tog at the top - sew in outer loop of edge st to avoid a chunky seam. CROCHET BORDER: Crochet a border around the entire jacket. Beg at the bottom on right front piece and crochet with 2 strands yellow Baby Merino and hook size 3 mm / C as follows: Work 1 sc, * ch 3, 1 dc in 1st ch, skip approx. ½ cm / 1/4'', 1 sc in next st *, repeat from *-*. Crochet the same way around the openings on sleeves. ----------------------------------------------------------- BOOTEE: The bootee is worked back and forth from mid back. Cast on 48-52-56 (56) sts on needle size 2.5 mm / US 1or2 with 2 strands yellow Baby Merino. Remove 1 strand and work rib (= K 2/P 2) for 5-6-6 (7) cm / 2"-2 3/8"-2 3/8" (2 3/4") – adjust so that next row is worked from WS. P 1 row from WS while at the same time dec 14-14-18 (14) sts evenly = 34-38-38 (42) sts. On next row work eyelet row as follows from RS: K 1, *K 2 tog, 1 YO *, repeat from *-* and finish with K 1. P 1 row from WS. Now slip the outermost 12-13-13 (15) sts in each side on a stitch holder. Work 4-4½-5½ (6½) cm / 1½"-1 3/4"-2 1/4" (2½") in stockinette st over the middle 10-12-12 (12) sts. Slip sts from stitch holders back on needle and knit up 10-11-13 (16) sts on each side of mid piece = 54-60-64 (74) sts on needle. K every row over all sts for 3-4-5 (5) cm / 1 1/8"-1½"-2" (2") while at the same time after 1½-2-2½ (3) cm / ½"-3/4"-7/8" (1 1/8"), start dec on every other row as follows until completed: Dec 1 st at the beg and the end of row and K 2 tog on each side of the 2 mid sts. bind off and sew tog mid under foot and continue up mid back in outer loop of edge sts to avoid a chunky seam. Knit another bootee the same way. TIES: Cut 3 strands light yellow of approx. 1 meter / 1.1 yds each, twine them tightly tog, fold them double and they will twine again, tie a knot in each end. Thread tie up and down through the eyelet row on bootee. CROCHET BORDER: Crochet a border at the top of bootee on hook size 2 mm/US B with light yellow as follows: 1 sc in first st, * ch 3, 1 dc in 1st ch, skip approx. ½ cm / 1/4'', 1 sc in next st *, repeat from *-* and finish with 1 sl st in sc from beg of round. |
|
|
|
|
Have you made this or any other of our designs? Tag your pictures in social media with #dropsdesign so we can see them! Do you need help with this pattern?You'll find tutorial videos, a Comments/Questions area and more by visiting the pattern on garnstudio.com. © 1982-2024 DROPS Design A/S. We reserve all rights. This document, including all its sub-sections, has copyrights. Read more about what you can do with our patterns at the bottom of each pattern on our site. |
|


With over 40 years in knitting and crochet design, DROPS Design offers one of the most extensive collections of free patterns on the internet - translated to 17 languages. As of today we count 304 catalogs and 11422 patterns - 11417 of which are translated into English (US/in).
We work hard to bring you the best knitting and crochet have to offer, inspiration and advice as well as great quality yarns at incredible prices! Would you like to use our patterns for other than personal use? You can read what you are allowed to do in the Copyright text at the bottom of all our patterns. Happy crafting!
Comments / Questions (275)
Bonjour je fais le modèle en 3-4 ANs.combien dois mesurer le côté gauche en largeur? j'ai commencé la manche et la bordure du côté et plus courte de 3 cl par rapport au jersey. que soi je faire? merci
23.10.2016 - 13:45DROPS Design answered:
Bonjour Cindy, pour toute assistance complémentaire à la réalisation de ce modèle, nous vous remercions de bien vouloir contacté le magasin où vous avez acheté votre laine et/ou le forum DROPS. Bon tricot!
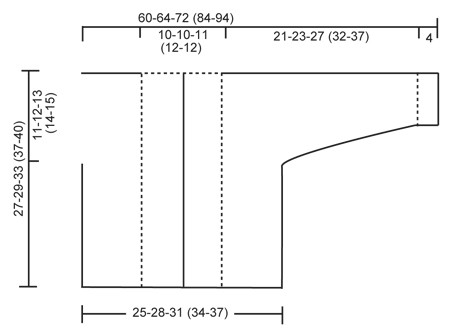
24.10.2016 - 10:27Serait-il possible d'avoir les dimensions de l'ouvrage fini en taille 3/4 ans car pour ma part je ne m'y retrouve pas avec le diagramme ni avec les données de l'échantillon (59 mailles = 27 cm donne une maille à 0.458 cm alors que votre échantillon donne une maille à 0.417 cm). Les autres dimensions du diagramme indique l'endroit ou aussi le dos de l'ouvrage? Merci de votre patience.
18.10.2016 - 11:22DROPS Design answered:
Bonjour Cindy, vous trouverez toutes les mesures pour chaque taille dans le schéma des mesures. Vous trouverez plus d'infos sur ces mesures ici. Pour toute assistance complémentaire, merci de bien vouloir contacter le magasin où vous avez acheté votre laine et/ou le forum DROPS. Bon tricot!
18.10.2016 - 11:45En fonction de mon échantillon avec les aiguilles 3 je souhaiterai adapter le modèle par une règle de 3. Pouvez-vous me dire si je dois transformer toutes les valeurs à l'identique, à savoir, les augmentations et les diminutions? Merci
18.10.2016 - 10:09DROPS Design answered:
Bonjour Cindy, nous ne sommes malheureusement pas en mesure de pouvoir ajuster chacun de nos modèles à chaque demande individuelle, merci de bien vouloir contacter le magasin où vous avez acheté votre laine, il pourra vous apporter toute l'aide nécessaire. Bon tricot!
18.10.2016 - 10:23Bonjour, j'ai regardé le diagramme joint avec les explications. J'ai l'impression que les 27 cm du devant gauche ne sont pas cohérents avec le diagramme. En calculant sur le diagramme j'obtiens 24.5 cm (37cm / 2 = 18.5 cm et 12 cm pour la partie bordure devant gauche divisée par 2 car chevauchement, soit 6cm + 18.5 cm = 24.5 cm.) merci de votre aide.
18.10.2016 - 10:07DROPS Design answered:
Bonjour Cindy, les 37 cm en taille 3/4 ans en bas du diagramme correspondent à la largeur du dos, pas à celle des devants. Bon tricot!
18.10.2016 - 10:22Je suis obligée de tout refaire du coup...! Et je vais faire un échantillon avec une taille d'aiguille supérieure car j'ai tendance à serrer de trop. Par contre, malgré avoir fait et suivi tous les rangs raccourcis comme indiqué j'ai mon décalage de 3 cm entre la bordure en point mousse et la partie jersey. Que dois-je faire? En faire tous les 3 cm au lieu de 4 cm et mesurer pour contrôler... Merci
17.10.2016 - 14:12DROPS Design answered:
Bonjour Cindy, vérifiez bien votre échantillon et ajustez les rangs raccourcis si besoin pour que les bordures des devants aient la même hauteur que le jersey. N'hésitez pas à demander conseil auprès du magasin où vous avez acheté votre laine. Bon tricot!
17.10.2016 - 14:26Face à cette différence de taille entre le point mousse et le jerzey ne serait pas plus facile de faire tout en jerzey? Bien sûr le rendu sera moins beau peut-être. Je sens que je vais devoir tout refaire, ça me démoralise :( !! En plus j'avais pris volontairement une laine légèrement plus grosse (18m * 28rg =10 cm * 10cm) et je crainds que je ne colle toujours pas avec les dimensions finales de l'ouvrage pour un 3/4 ans! Vraiment déçue
17.10.2016 - 09:24DROPS Design answered:
Bonjour Cindy, ce modèle se fait sur la base d'un échantillon de 24 m x 32 rangs en jersey = 10 x 10 cm. Pour bien avoir les bonnes mesures indiquées dans le schéma, pensez à bien respecter l'échantillon et à conserver la même tension, sinon vous obtiendrez des mesures différentes. Bon tricot!
17.10.2016 - 10:59Bonjour je fais le modèle en 3-4 ANs.combien dois mesurer le côté gauche en largeur? j'ai commencé la manche et la bordure du côté et plus courte de 3 cl par rapport au jersey. que soi je faire? merci
17.10.2016 - 07:30DROPS Design answered:
Bonjour Cindy, si votre échantillon est juste, le devant avec ses 59 m en taille 3/4 ans doit mesurer approx. 27 cm. N'oubliez pas de bien faire les rangs raccourcis sur les mailles de la bordure devant pour bien compenser la différence de hauteur du jersey et du point mousse. (cf "RANGS RACCOURCIS"). Bon tricot!
17.10.2016 - 10:57De verkorte toeren over de laatste 12 steken (tricotgedeelte) moeten in ribbelsteek gebreid worden. Dan zie je dus een ribbel in het tricot. Waarom is dat? Kun je het niet ook in tricot breien? Dat is toch mooier?
15.10.2016 - 23:30DROPS Design answered:
Hoi Yvonne. Je breit de voorbies/middenvoor in ribbelsteken en hier ook de verkorte toeren. Je breit dus niet de verkorte toeren in het gedeelte met tricotsteek.
17.10.2016 - 16:35Bonjour, Je reviens vers vous concernant ma demande sur le marqueur au niveau de l'épaule. J'avoue que je n'ai pas bien compris. Doit-on placer le marqueur après les mailles de bordures que l'on met en attente ou doit-on placer le marqueur à la 64 ème maille (pour moi que fais la taille 3/4 ans)? Merci
13.10.2016 - 10:14DROPS Design answered:
Bonjour Cindy, placez ce marqueur entre les mailles de l'épaule/manche pour marqueur la fin du devant, au niveau du rang, car c'est la hauteur que l'on doit repérer ici, pas la maille. Vous pourrez ainsi facilement vérifier votre nombre de rangs jusqu'au marqueur pour tricoter l'autre devant puis celui du dos jusqu'en bas. Bon tricot!
13.10.2016 - 10:48J'ai commencé à monter les mailles pour la manche et j'avoue que je ne suis pas très douée pour le montage. Ca forme des escaliers, c'est normal? Merci.
12.10.2016 - 10:01DROPS Design answered:
Bonjour Cindy, tout à fait, comme on monte les mailles des manches progressivement, il y a un petit décalage qui sera invisible lors de la couture. Bon tricot!
12.10.2016 - 10:06