DROPS Karisma
DROPS Karisma
100% Wool
from 3.00 $ /50g
Get the yarn to make this pattern from 12.00$.

The yarn cost is calculated from the pattern’s smallest size and the yarn’s cheapest product type. Looking for an even better price? You might find it on the DROPS Deals!

DROPS SS24

Gretchen

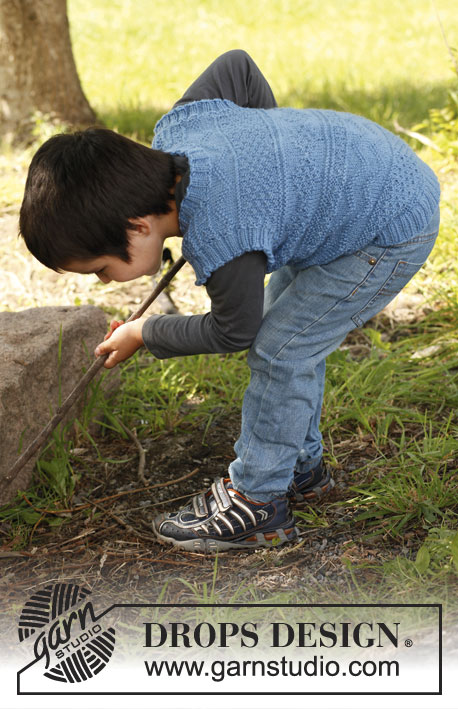
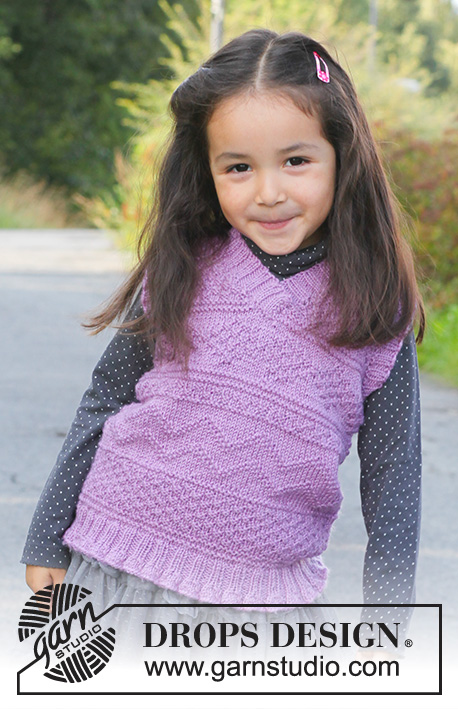
Knitted vest with textured pattern and v-neck, in DROPS Karisma. Size children 3 to 12 years.

DROPS Children 22-41
DROPS design: Pattern no U-053-bn
Yarn group B
---------------------------------------------------------
Size: 3/4 - 5/6 - 7/8 - 9/10 - 11/12 years
Finished measurements:
Bust: 60-66-72-76-82 cm / 23½"-26"-28½"-30"-32¼"
Full length: 38-41-44-47-50 cm / 15"-16⅛"-17¼"-18½"-19¾"

Materials: DROPS KARISMA from Garnstudio
Color no 40, light old pink:
200-250-250-300-300 g

DROPS CIRCULAR NEEDLE (60 cm / 24") size 3.5 mm/US 4 - or size needed to get 22 sts x 30 rows in stockinette st = 10 x 10 cm / 4" x 4".

DROPS DOUBLE POINTED NEEDLES and CIRCULAR NEEDLE (60 cm / 24") size 3 mm/US 2or3 - for rib.

-------------------------------------------------------

Alternative Yarn – See how to change yarns here
Yarn Groups A to F – Use the same pattern and change the yarn here
Yarn usage using an alternative yarn – Use our yarn converter here

-------------------------------------------------------

DROPS Karisma
DROPS Karisma
100% Wool
from 3.00 $ /50g
Get the yarn to make this pattern from 12.00$.

The yarn cost is calculated from the pattern’s smallest size and the yarn’s cheapest product type. Looking for an even better price? You might find it on the DROPS Deals!

Pattern instructions

NOTE: This pattern is written in American English. All measurements in charts are in cm. For conversion from inches to cm - click here. There are different terms for crocheting in American and British English. If this pattern includes crochet, click for "crochet terms" here. For this pattern in British English, please click here.
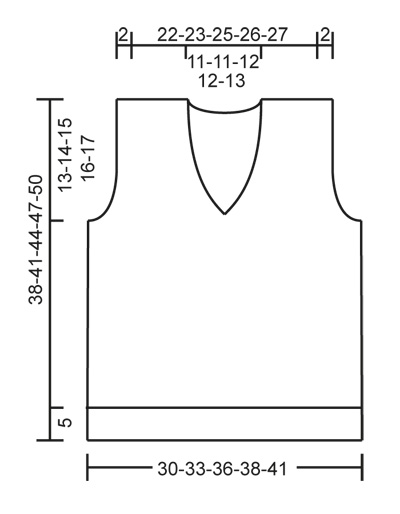
PATTERN:
See diagrams M.1 and M.2 – diagrams show all rows in pattern seen from RS.
---------------------------------------------------------

BODY:
Worked in the round on circular needle.
Cast on 288-312-336-360-384 sts on circular needle size 3 mm / US 2or3 with Karisma. Work diagram M.2. When diagram M.2 has been worked, there are 144-156-168-180-192 sts on needle. Continue with K over K and P over P.
When piece measures 5 cm / 2", switch to circular needle size 3.5 mm / US 4. K 1 round while at the same time dec 12 sts evenly = 132-144-156-168-180 sts. Continue with diagram M.1 until finished measurements - see arrow for where to beg in your size (this is important to make the pattern pretty mid front). REMEMBER THE GAUGE!
When piece measures 25-27-29-31-33 cm / 9¾"-10⅝"-11⅜"-12¼"-13", work next round as follows: bind off 3 sts for armhole, work 29-32-35-38-41 sts (= left front piece), bind off 2 sts for neck, work 29-32-35-38-41 sts (= right front piece), bind off 6 sts for armhole, work 60-66-72-78-84 sts (= back piece), bind off 3 sts for armhole, cut the yarn.
Finish front and back piece separately.

BACK PIECE:
= 60-66-72-78-84 sts. Continue diagram M.1 back and forth on needle - AT THE SAME TIME bind off for armholes at the beg of every row in each side: 3 sts 1 time, 2 sts 0-1-2-2-3 times and 1 st 3-3-2-3-3 times = 48-50-54-58-60 sts. When piece measures 36-39-42-45-48 cm / 14¼"-15¼"-16½"-17¾"-19", bind off the middle 20-20-22-22-24 sts for neck and finish each shoulder separately. Then bind off 1 st on every row starting from neck 2 times = 12-13-14-16-16 sts remain on shoulder. Bind off when piece measures approx. 38-41-44-47-50 cm / 15"-16⅛"-17¼"-18½"-19¾".

LEFT FRONT PIECE:
= 29-32-35-38-41 sts. Bind off for armhole as on back piece - AT THE SAME TIME bind off 1 st on every row starting from neck 11-11-12-12-13 times.
After all bind offs, 12-13-14-16-16 sts remain on shoulder. Bind off when piece measures 38-41-44-47-50 cm / 15"-16⅛"-17¼"-18½"-19¾".

RIGHT FRONT PIECE:
Work as left front piece but reversed.

ASSEMBLY:
Sew the shoulder seams.

NECK EDGE:
Worked back and forth from mid front. Knit up approx. 80 to 100 sts around the neck on circular needle size 3 mm / US 2or3 - beg mid front edge. Turn and K 1 row from WS while at the same time inc evenly to 96-100-108-112-124 sts.
Then work rib as follows (seen from RS): 1 st which is K on all rows, * K 2, P 2 *, repeat from *-* until 3 sts remain, finish with K 2 and 1 st which is K on all rows. When edge measures approx. 2-2½-2½-3-3 cm / ¾"-⅞"-⅞"-1⅛"-1⅛", bind off with K over K and P over P. Place the left part of neck edge over the right part and sew in bottom edge with neat stitches.

ARMHOLE EDGE:
Pick up approx. 70 to 90 sts around one armhole on double pointed needles size 3 mm / US 2or3. P 1 round while at the same time inc evenly to 80-88-92-100-104 sts. Work rib = K 2/P 2 for 2 cm / ¾", then bind off with K over K and P over P.
Work the same way around the other armhole.

Diagram

All measurements in charts are in cm.

symbols = K from RS, P from WS
symbols = P from RS, K from WS
symbols = K 2 tog
symbols = slip 1 st as if to K, K 1, psso
diagram
diagram
Do you have a question? See a list of frequently asked questions (FAQ)

Knitting tension is what determines the final measurements of your work, and is usually measured per 10 x 10 cm. It is provided like so: number of stitches in width x number of rows in height - eg: 19 stitches x 26 rows = 10 x 10 cm.

The knitting tension is very individual; some people knit/crochet loosely while others work tightly. You adjust the knitting tension with the needle size, which is why the suggested needle size only serve as a guide! You need to adjust this (up or down) to ensure that YOUR knitting tension matches the knitting tension provided in the pattern. If you work with a different knitting tension than provided you will have a different yarn consumption, and your work will have different measurements than what the pattern suggests.

The knitting tension also determines which yarns can replace each other. As long as you achieve the same knitting tension you can replace one yarn with another.

See DROPS lesson: How to measure your tension/gauge

See DROPS video: How to make a gauge tension swatch

The required amount of yarn is provided in grams, eg: 450 g. To calculate how many balls you’ll need you first need to know how many grams are in 1 ball (25g, 50g or 100g). This information is available if you click on the individual yarn quality on our pages. Divide the amount required with the amount of each ball. For example, if each ball is 50g (the most common amount), the calculation will be as follows: 450 / 50 = 9 balls.

The important thing when changing from one yarn to another is that the knitting/crochet tension remains the same. This is so that the measurements of the finished piece will be the same as on the sketch provided. It is easier to achieve the same knitting tension using yarns from the same yarn group. It is also possible to work with multiple strands of a thinner yarn to achieve the knitting tension of a thicker one. Please try our yarn converter. We recommend you to always work a test swatch.

Please NOTE: when changing yarn the garment might have a different look and feel to the garment in the photo, due to individual properties and qualities of each yarn.

See DROPS lesson: Can I use a different yarn than the one mentioned in the pattern?

All our yarns are categorised into yarn groups (from A to F) according to thickness and knitting tension – group A contains the thinnest yarns and group F the thickest. This makes it easier for you to find alternative yarns to our patterns, should you wish to switch yarn. All yarns within the same group have a similar knitting tension and can easily replace each other. However, different yarn qualities have different structures and properties which will give the finished work a unique look and feel.

Click here for an overview of the yarns in each yarn group

At the top of all our patterns you’ll find a link to our yarn converter, which is a helpful tool should you wish to use a different yarn than suggested. By filling in the yarn quality you wish to replace, the amount (in your size) and number of strands, the converter will present good alternative yarns with the same knitting tension. Additionally it will tell you how much you’ll require in the new qualities and whether you’ll need to work with multiple strands. Most skeins are 50g (some are 25g or 100g).

If the pattern is worked with multiple colours, every colour will have to be converted separately. Similarly, if the pattern is worked with several strands of different yarns (for example 1 strand Alpaca and 1 strand Kid-Silk) you will have to find alternatives for each, individually.

Click here to see our yarn converter

Since different yarns have different qualities and textures we have chosen to keep the original yarn in our patterns. However, you can easily find options among our available qualities by using our yarn converter, or simply pick a yarn from the same yarn group.

It is possible that some retailers still have discontinued yarns in stock, or that someone has a few skeins at home that they would like to find patterns for.

The yarn converter will provide both alternative yarn as well as required amount in the new quality.

If you think it's hard to decide what size to make, it can be a good idea to measure a garment you own already and like the size of. Then you can pick the size by comparing those measures with the ones available in the pattern's size chart.

You'll find the size chart at the bottom of the pattern.

See DROPS lesson: How to read size chart

The needle size provided in the pattern serves only as a guide, the important thing is to follow the knitting tension. And since knitting tension is very individual, you will have to adjust the needle size to ensure that YOUR tension is the same as in the pattern – maybe you’ll have to adjust 1, or even 2 needle sizes, up or down to achieve the correct tension. For this, we recommend that you work test swatches.

Should you work with a different knitting tension than the one provided, the measurements of the finished garment might deviate from the measurement sketch.

See DROPS lesson: How to measure your tension/gauge

See DROPS video: How to make a gauge tension swatch

Working a garment top-down provides more flexibility and room for personal adjustment. For example it is easier to try the garment on while working, as well as making adjustments to length of yoke and shoulder caps.

The instructions are carefully explaining every step, in the correct order. Diagrams are adjusted to the knitting direction and are worked as usual.

The diagram depicts all rows/rounds, and every stitch seen from the right side. It is read from bottom to top, from right to left. 1 square = 1 stitch.

When working back and forth, every other row is worked from the right side and every other row is worked from the wrong side. When working from the wrong side, the diagram will have to be worked reversed: from left to right, knit stitches are purled, purl stitches are knit etc.

When working in the round every round is worked from the right side and the diagram are worked from right to left on all rounds.

See DROPS lesson: How to read knitting diagrams

The diagram depicts all rows/rounds, and every stitch seen from the right side. It is worked from bottom to top, from right to left.

When working back and forth every other row is worked from the right side: from right to left and every other row is worked from the wrong side: from left to right.

When working in the round, every row in the diagram are worked from the right side, from right to left.

When working a circular diagram you start in the middle and work your way outwards, counter clockwise, row by row.

The rows usually start with a given number of chain stitches (equivalent to the height of the following stitch), this will either be depicted in the diagram or explained in the pattern.

See DROPS lesson: How to read crochet diagrams

Instructions for working several diagrams after each other on the same row/round, will often be written like so: “work A.1, A.2, A.3 a total of 0-0-2-3-4 times". This means you work A.1 once, then A.2 is worked once, and A.3 is repeated (in width) the number of times provided for your size – in this case like so: S = 0 times, M = 0 times, L=2 times, XL= 3 times and XXL = 4 times.

The diagrams are worked as usual: begin with the first row in A.1, then work the first row in A.2 etc.

See DROPS lesson: How to read knitting diagrams

See DROPS lesson: How to read crochet diagrams

The total width of the garment (from wrist-to-wrist) will be larger in the larger sizes, despite the actual sleeves being shorter. The larger sizes have longer sleeve caps and wider shoulders, so there will be a good fit in all sizes.

The measurement sketch/schematic drawing provides information regarding the full length of the garment. If it’s a jumper or a jacket the length is measured from the highest point on the shoulder (usually closest to the neckline), and straight down to the bottom of the garment. It is NOT measured from the tip of shoulder. Similarly, the length of yoke is measured from the highest point on the shoulder and down to where yoke is split into body and sleeves.

See DROPS lesson: How to read a schematic drawing

Diagrams are often repeated on the round or in height. 1 repeat is the diagram the way it appears in the pattern. If it says to work 5 repeats of A.1 in the round, then you work A.1 a total of 5 times after/next to each other in the round. If it says to work 2 repeats of A.1 vertically/in height you work the entire diagram once, then begin again at the start and work the entire diagram one more time.

Chain stitches are slightly narrower than other stitches and to avoid working the cast-on edge too tight, we simply chain more stitches to begin with. The stitch count will be adjusted on the following row to fit the pattern and measurement sketch.

The rib edge is more elastic and will contract slightly compared to, for example, stocking stitch. By increasing before the rib edge, you avoid a visible difference in width between the rib edge and the rest of the body.

It’s very easy to cast off too tightly, and by making yarn overs while casting off (and simultaneously casting these off) you avoid a too tight cast off edge.

See DROPS video: How to bind off with yarn overs (yo)

To achieve an even increase (or decrease) you can increase on, for example: every 3rd and 4th row alternately, like so: work 2 rows and increase on the 3rd row, work 3 rows and increase on the 4th. Repeat this until the increase is complete.

See DROPS lesson: Increase or decrease 1 st on every 3rd and 4th row alternately

Should you prefer to work in the round instead of back and forth, you may of course adjust the pattern. You’ll need to add steeks mid-front (usually 5 stitches), and follow the instructions. When you would normally turn and work from the wrong side, simply work across the steek and continue in the round. At the end you’ll cut the piece open, pick up stitches to work bands, and cover the cut edges.

See DROPS video: How to knit steeks and cut open

Should you prefer to work back and forth instead of in the round, you may of course adjust the pattern so you work the pieces separately and then assemble them at the end. Divide the stitches for the body in 2, add 1 edge stitch in each side (for sewing) and work the front and back pieces separately.

See DROPS lesson: Can I adapt a pattern for circular needles into straight needles?

Pattern repeats can vary slightly in the different sizes, in order to get the correct proportions. If you’re not working the exact same size as the garment in the photo, yours might deviate slightly. This has been carefully developed and adjusted so that the complete impression of the garment is the same in all sizes.

Make sure to follow instructions and diagrams for your size!

If you have found a pattern you like which is available in women’s size it’s not very difficult to convert it to men’s size. The biggest difference will be the length of sleeves and body. Start working on the women size that you think would fit across the chest. The additional length will be worked right before you cast off for the armhole/sleeve cap. If the pattern is worked top-down you can add the length right after the armhole or before the first decrease on sleeve.

Regarding additional yarn amount, this will depend on how much length you add, but it is better with a skein too many than too few.

All yarns will have excess fibres (from production) that might come off as lint or shedding. Brushed yarns (ie hairier yarns) have more of these loose, excess fibres, causing more shedding.

Shedding also depends on what is worn under or over the garment, and whether this pulls at the yarn fibres. It’s therefore not possible to guarantee that there will be no shedding

Below are some tips on how to get the best result when working with hairier yarns:

1. When the garment is finished (before you wash it) shake it vigorously so the looser hairs come off. NOTE: do NOT use a lint roller, brush or any method that pulls at the yarn.

2. Place the garment in a plastic bag and put it in your freezer - the temperature will cause the fibres to become less attached to each other, and excess fibres will come off easier.

3. Leave in the freezer for a few hours before taking it out and shaking it again.

4. Wash the garment according to the instructions on the yarn label.

Pilling is a natural process that happens to even the most exclusive of fibers. It's a natural sign of wear and tear that is hard to avoid, and that is most visible in high friction areas of your garment like a sweater's arms and cuffs.

You can make your garment look as new by removing the pilling, using a fabric comb or a pill/lint remover.

Still can't find the answer you need? Then scroll down and leave your question so one of our experts can try to help you. This will be done normally within 5 to 10 working days.
In the meantime, you can read the questions and answers that others have left to this pattern or join the DROPS Workshop on Facebook to get help from fellow knitters/crocheters!

You might also like...

Post a comment to pattern DROPS Children 22-41

We would love to hear what you have to say about this pattern!

If you want to leave a question, please make sure you select the correct category in the form below, to speed up the answering process. Required fields are marked *.

Comments / Questions (30)

country flag Agnes Holst Kazuhara wrote:

Iflg. opskrift skal der lukkes 2 m af til hals. Mine spørgsmål er: Skal disse 2 masker forblive aflukkede, og evt. hvorfor, eller skal de evt. indgå i de masker, man skal strikke op til halskant, - dvs. de 80 - 100 m? Jeg vil være meget taknemmelig for jeres forhåbentlige snarlige hjælp. Mvh Agnes

13.05.2018 - 14:14

DROPS Design answered:

Hei Agnes. Ja de 2 maskene skal felles av - Dette for å lage plass til halskantens om skal strikkes opp senere. God fornøyelse.

15.05.2018 - 15:10

Nelly wrote:

Hola tengo una duda en el patrón SmåDROPS 22-4, cuántos puntos d tienen que montar para iniciar para la talla 3/4, porqué dice 288 pero más adelante dice q 144, cuál es el número correcto? Muchas gracias...

23.03.2017 - 21:17

DROPS Design answered:

Hola Nelly. Está correcto. Para el elástico debes montar 288 pts. El diagrama para trabajar el elástico incluye las disminuciones. Al terminar el elástico quedan 144 pts.

27.03.2017 - 20:29

country flag Manon Tholstrup wrote:

Hvordan skal jeg forstå mønstret - i str. 3/4 skal der slås 288 m op på rundpind og når M2/rib er strikket er der 144 m tilbage på rundpind?? Herefter skal der yderligere tages 12 m ind = ialt 132 m på rundpind; dvs. 156 (!) m mindre end slået op (288)?? Mvh

02.04.2015 - 22:49

DROPS Design answered:

Hej Manon. I og med du strikker M.2 tager du automatisk ind. 1 gentagelse af M.2 er i förste pind 8 m = 36 gentagelser over 288 m. Med indtagningerne ender du i 7. pind med 4 masker per gentagelse = 144 m tilbage

29.04.2015 - 14:52

country flag Ekaterina wrote:

Heel verstandig! schiterend!

06.01.2013 - 08:10

country flag Lilly wrote:

Vielen Dank für die Antwort. Jetzt kokmmt die nächste Frage: wie wird die Halskante gestrickt, in Reihen oder in Runden?

02.12.2012 - 20:51

DROPS Design answered:

Hallo Lilly, die Halskante wird in Reihen gestrickt: Sie legen ja zum Schluss in der Spitze des V-Ausschnitts den linken über den rechten Teil und nähen die beiden Teile übereinander.

03.12.2012 - 09:48

country flag Lilly wrote:

Hallo, ist die Zeichnung mit den Maßen von diesem Modell? Lt. Zeichnung ist der untere Bund 4 cm lang, laut Beschreibung aber 5 cm. Dann sollte man lt. Beschreibung 25 cm bis zum Armloch stricken, lt. Zeichnung sind es aber (ohne Bund) 33 cm.

29.11.2012 - 18:05

DROPS Design answered:

Liebe Lilly, mit den 4 bzw. 5 cm Bündchen haben Sie Recht – vielen Dank für den Hinweis. Der Rest stimmt allerdings: 4 cm Bündchen + 20 cm bis zur Armloch + 13 cm Armloch = 37 cm wie im Diagramm angegeben. Viel Spass beim Stricken!

30.11.2012 - 09:20

country flag Else Lentz Beck wrote:

Jeg syntes ikke rigtig mønster diagram og det antal masker der skal bruges passe sammen, jeg skal lave str. 3/4 og såvidtjeg kan se i diagrammet, skal jeg bruge 10 masker, men ifølge opskriften, skal jeg strikke med 132m, og det kan ikke gå op med hindanden,

05.10.2012 - 18:02

country flag Karin Fleig wrote:

Ich moechte diese tolle Weste stricken. Habe etwas Probleme mit dem Muster. Sie schreiben, dass auf Rundstricknadeln gestrickt wird, es gibt also keine "Vorderseite" und keine "Rueckseite" zu stricken, waehrend das Muster fuer "Vorderseite" und Rueckseite beschrieben ist. Soll ich nun zwei gleiche Runden stricken? Oder nur eine??? Ich waere fuer eine schnelle Antwort sehr dankbar. Ich liebe Ihre Handarbeiten !!! Gruesse! Karin Fleig

24.02.2012 - 17:11

DROPS Design answered:

Das Muster wird zuerst rund und danach hin und zurück gestrickt. Das Diagramm zeigt alle Reihen von der Vorderseite.

27.02.2012 - 13:28

country flag DROPS Design NL wrote:

Beste Annie. Je had gelijk. De teltekening is nu toegevoegd. Veel breiplezier.

30.11.2011 - 11:21

country flag Annie wrote:

Zie telpatronen M.1 en M.2. M.1 kan ik zien, maar M.2 kan ik nergens vinden. Zijn jullie deze misschien vergeten te plaatsen ? Groetjes, Annie.

28.11.2011 - 15:02