
Popular categories
Looking for a yarn?


|
|||||||||||||
Justus |
|||||||||||||
|
|
|||||||||||||
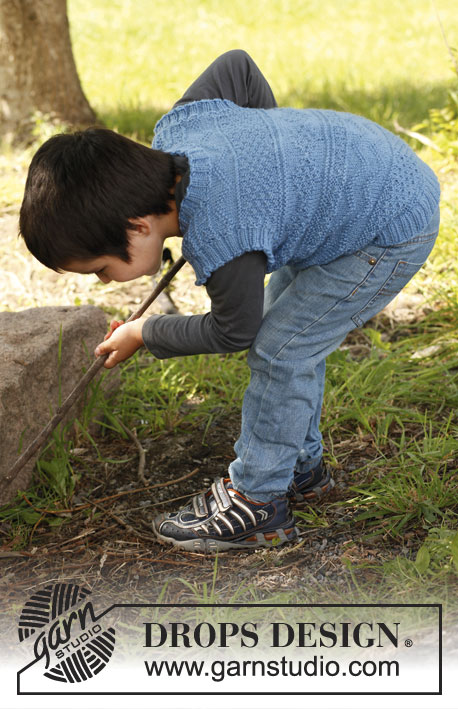
Knitted DROPS vest / slipover with v-neck and cables in ”Alpaca”. Size 3 - 12 years.
DROPS Children 22-32 |
|||||||||||||
|
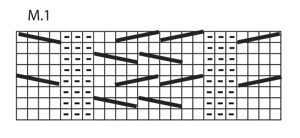
PATTERN: See diagram M.1 – all rows in diagram shows pattern from RS, 1 repetition = 24 sts in width. GARTER ST (back and forth on needle): K all rows. DECREASE TIP 1 (applies to armholes and neck): Dec inside 1 edge st in garter st + 3 sts in stocking st at the armhole and inside 1 st in garter st at the neck. All dec are done from RS. Dec AFTER 4/1 st as follows: Slip 1 st as if to K, K 1, psso. Dec BEFORE 4/1 st as follows: K 2 tog. DECREASE TIP 2 (applies to neck edge): Dec on each side of the 2 K sts mid front of neck as follows: Work until 1 st remains before the 2 K sts, K 2 tog, slip 1 st as if to K, K 1, psso. ------------------------------------------------------- BODY: Worked in the round on circular needle. Cast on 212-224-240-252-268 sts on circular needle size 2.5 mm with Alpaca. K 1 round, continue in rib = K 2/P 2 for 4 cm. Work next round as follows (insert a marker at beg of round): SIZE 3/4 YEARS: ** K 2, K 2 tog **, repeat from **-** a total of 6 times, [K 6, K 2 tog, K 10, K 2 tog, K 6], K 4, K 2 tog, K 14, K 2 tog, K 4, repeat from [-] 1 time, K 2 tog, repeat from **-** a total of 5 times, * K 8, K 2 tog *, repeat from *-* 8 times, K 8 = 186 sts. SIZE 5/6 YEARS: ** K 4, K 2 tog **, repeat from **-** a total of 4 times, [K 6, K 2 tog, K 10, K 2 tog, K 6], K 4, K 2 tog, K 4, K 2 tog, K 6, K 2 tog, K 4, K 2 tog, K 4, repeat from [-] 1 time, K 2 tog, repeat from **-** a total of 3 times, * K 7, K 2 tog *, repeat from *-* a total of 10 times, K 8 = 198 sts. SIZE 7/8 YEARS: ** K 2, K 2 tog, K 4, K 2 tog **, repeat from **-** a total of 2 times, K 2, K 2 tog, K 2, K 2 tog, [K 6, K 2 tog, K 10, K 2 tog, K 6], K 4, (K 2 tog, K 3), repeat from (-) a total of 6 times, then from [-] 1 time, K 2 tog, K 2, K 2 tog, repeat from **-** a total of 2 times, * K 10, K 2 tog *, repeat from *-* a total of 8 times, K 4 = 210 sts. SIZE 9/10 YEARS: ** K 4, K 2 tog **, repeat from **-** a total of 4 times, K 4, [K 6, K 2 tog, K 10, K 2 tog, K 6], K 4, (K 2 tog, K 6), repeat from (-) a total of 3 times, K 2 tog, K 4, repeat from [-] 1 time, repeat from **-** a total of 4 times, K 2, * K 2 tog, K 6 *, repeat from *-* a total of 14 times = 222 sts. SIZE 11/12 YEARS: ** K 2, K 2 tog, K 4, K 2 tog **, repeat from **-** a total of 3 times, K 2, [K 6, K 2 tog, K 10, K 2 tog, K 6], K 2, (K 2 tog, K 4), repeat from (-) a total of 6 times, repeat from [-] 1 time, repeat from **-** a total of 3 times, K 8, * K 2 tog, K 7 *, repeat from *-* a total of 12 times = 234 sts. ALL SIZES: There are now 186-198-210-222-234 sts on needle. Work next round as follows: K 18-20-22-24-26, diagram M.1 (= 24 sts), K 24-26-28-30-32, diagram M.1, K 96-104-112-120-128. Continue the pattern like this until piece measures 24-26-28-30-32 cm. REMEMBER THE KNITTING TENSION! Work next round as follows: Cast off the first 6 sts for armhole, work as before over the next 96-102-108-114-120 sts (= front piece), cast off 6 sts for armhole, work in stocking st over the last 78-84-90-96-102 sts (= back piece). Finish front and back piece separately. BACK PIECE: = 78-84-90-96-102 sts. Work in stocking st back and forth with 1 edge st in each side in GARTER ST – see explanation above! AT THE SAME TIME on first row from RS, dec 1 st in each side inside 4 sts - SEE DECREASE TIP 1! Repeat dec every other row a total of 7-8-9-10-11 times = 64-68-72-76-80 sts remain on needle. When piece measures 36-39-42-45-48 cm, cast off the middle 22-24-26-28-30 sts for neck and finish each shoulder (= 21-22-23-24-25 sts) separately. Cast off when piece measures 37-40-43-46-49 cm. FRONT PIECE: = 96-102-108-114-120 sts. Continue pattern back and forth on needle as before and cast off for armholes as on back piece. AT THE SAME TIME when piece measures 26-28-30-32-34 cm, slip the middle 6 sts on a stitch holder for neck and finish each side separately. Slip the sts in one side on to a stitch holder. Continue cast off for armholes – AT THE SAME TIME on next row from RS dec 1 st towards the neck inside 1 st - SEE DECREASE TIP 1. Repeat dec every other row a total of 8-9-10-11-12 times. After all cast off for armholes and dec for neck, 30-31-32-33-34 sts remain on shoulder. Continue pattern with 1 st in garter st in each side. When piece measures approx. 36½-39½-42½-45½-48½ cm (adjust so that next row is from RS), dec 2 sts over each of the small cables and 5 sts over the large cable in the middle by K tog sts 2 by 2 = 21-22-23-24-25 sts remain on shoulder. On next row, cast off the remaining sts. Slip the stitches on the stitch holder back on needle and work as first side but reversed. ASSEMBLY: Sew the shoulder seams. ARMHOLE: Knit up 92-100-108-116-124 sts inside 1 edge st around one armhole on double pointed needles size 2.5 mm. (NOTE: If too few or too many sts have been knitted up, inc or dec evenly on 1st round.) Work rib = K 2/P 2 for 2 cm, then cast off with K over K and P over P. Repeat around the other armhole. NECK: Knit up 128-136-144-152-160 sts (incl sts on stitch holder at the front) inside 1 edge st around the neck on circular needle size 2.5 mm. (NOTE: If too few or too many sts have been knitted up, inc or dec evenly on 1st round.) Work rib = K 2/P 2 – adjust so that 2 K sts are mid front. AT THE SAME TIME on 2nd round, dec 1 st on each side of the 2 K sts mid front – SEE DECREASE TIP 2. Repeat dec every round until finished measurements. When neck edge measures 2 cm, cast off with K over K and P over P. |
|||||||||||||
Diagram explanations |
|||||||||||||
|
|||||||||||||

|
|||||||||||||
|
|||||||||||||
|
Have you made this or any other of our designs? Tag your pictures in social media with #dropsdesign so we can see them! Do you need help with this pattern?You'll find tutorial videos, a Comments/Questions area and more by visiting the pattern on garnstudio.com. © 1982-2024 DROPS Design A/S. We reserve all rights. This document, including all its sub-sections, has copyrights. Read more about what you can do with our patterns at the bottom of each pattern on our site. |
|||||||||||||


With over 40 years in knitting and crochet design, DROPS Design offers one of the most extensive collections of free patterns on the internet - translated to 17 languages. As of today we count 304 catalogues and 11422 patterns - 11422 of which are translated into English (UK/cm).
We work hard to bring you the best knitting and crochet have to offer, inspiration and advice as well as great quality yarns at incredible prices! Would you like to use our patterns for other than personal use? You can read what you are allowed to do in the Copyright text at the bottom of all our patterns. Happy crafting!
Comments / Questions (23)
In het patroon staat voor het voorpand in zowel het NL als EN dat je moet afkanten zoals in het achterpand. Daar zijn echter geen steken afgekant (dat was de laatste nld body) maar geminderd. Als ik naar de stekenaantallen en antwoorden op al gestelde vragen kijk wordt bevestigd dat het om minderen en niet om afkanten gaat. Wellicht goed om dit aan te passen om verwarring te voorkomen.
05.01.2023 - 20:50Buonasera! Prima di iniziare questo gilet, vorrei sapere se in effetti il numero delle maglie è 240 per la tg 7/8, in quanto se 26 maglie sono 10 cm. (come da campione), 240 maglie corrispondono a circa 92cm. Penso che sia un po' troppo largo per un bimbo di 7-8 anni! Attendo ringraziando una Vostra cortese risposta. Buon proseguimento di giornata!
17.03.2022 - 15:31DROPS Design answered:
Buonasera Lelletta, il numero di maglie è corretto, il modello inizia con il bordo a coste, e alla fine del bordo si diminuiscono le maglie. Buon lavoro!
18.03.2022 - 20:57Hjælp! Jeg kan ikke få maskeantallet til at passe , når jeg efter ribkanten begynder på pind 1 til str 5/6 år. Hvordan hænger det sammen?
13.03.2021 - 12:19DROPS Design answered:
Hei Margit. Du har 224 masker på pinnen og etter 1. omgang har du felt 26 masker = 198 masker. Det felles slik: ** 4 r, 2 r sm **, gjenta fra **-** totalt 4 ganger (her blir det felt 4 masker), [6 r, 2 r sm, 10 r, 2 r sm, 6 r (her blir det felt 2 masker)], 4 r, 2 r sm, 4 r, 2 r sm, 6 r, 2 r sm, 4 r, 2 r sm, 4 r (her blir det felt 4 masker), gjenta fra [-] 1 gang (her blir det felt 2 masker), 2 r sm (her felles 1 det maske), gjenta fra **-** totalt 3 ganger (her blir det felt 3 masker), * 7 r, 2 r sm *, gjenta fra *-* totalt 10 ganger (her blir det felt 10 masker), 8 r = 198 m. mvh DROPS design
15.03.2021 - 15:15Can I use Millamia naturally soft merino for this and still get a reasonable fit?
27.09.2019 - 21:32DROPS Design answered:
Dear Mrs Kaiser, We are able to provide free patterns thanks to our yarns sold throughout the world. You will therefore understand that we can only recomand you to contact your DROPS Store in Canada for any further help & assistance. Thank you for your comprehension.
30.09.2019 - 08:10Buongiorno Sto lavorando la prima misura, sto riprendendo il bordo del collo Lavorando a coste 2/2 termino con 2 mg a rovescio ,e non con due a diritto Non ho capito Grazie mille
29.03.2019 - 10:38DROPS Design answered:
Buongiorno Anna. Se ha ripreso 128 maglie e ha iniziato le coste con 2 maglie diritto, è corretto che finisca il giro con 2 maglie rovescio, così poi le coste proseguono correttamente con 2 maglie dir / 2 maglie rov. Verifichi anche di avere 2 maglie diritto al centro sul davanti. Buon lavoro!
29.03.2019 - 11:04Buona sera Sto lavorando la misura 3 anni Leggendo l'esecuzione quando dice: lavorare il giro successivo Chiudere le prime 6 maglie x lo scaldo,sarebbe che devo chiudere sulle 18 maglie? Non ho capito Grazie
22.03.2019 - 17:09DROPS Design answered:
Buonasera Anna, su quel giro deve intrecciare (chiudere) le prime 6 maglie che formeranno lo scalfo, poi lavorare 96 maglie, intrecciare altre 6 maglie per l'altro scalfo, lavorare 78 maglie, e poi a questo punto lavorerà in piano e separatamente per il davanti e dietro. Buon lavoro!
22.03.2019 - 17:49I don’t understand the answer to the question I posted on 28/01/2018. What do ou mean by “start the first row on the front piece from the matching size”. Can you answer in more detail? Thanks for your quick response.
31.01.2018 - 00:04DROPS Design answered:
Dear Mrs Lomax, typo sorry, you start on the matching side (either RS or WS) so that the rows with pattern will be worked from RS. Happy knitting!
31.01.2018 - 08:43I’ve just started to work on the front piece which has to be worked back and forth instead of in the round. But the pattern stitches are worked in rows 2,4, 6 and 8. That was fine when working in the round but now these are wrong side rows. What to do?
28.01.2018 - 23:55DROPS Design answered:
Dear Mrs Lomax, make sure to start the first row on front piece from the matching size so that row 2,4,6 and 8 will be now worked from RS. Happy knitting!
29.01.2018 - 10:08Jeg kan ikke få maskeantallet på forstykket til at stemme til slut, hvis jeg også skal lukke 6 masker af til ærmegab i hver side på forstykket. Kan det passe? Jeg strikker den mindste str.. Håber du kan hjælpe mig!
07.04.2017 - 20:07DROPS Design answered:
Hej Gitte, i den mindste størrelse har du 96 m. Du sætter 6 m på en tråd og fortsætter med den ene side = 45m, tager ind til ærmegab - 7 og ind til hals - 8 = 30m, tager 2+5+2 masker ind over snoningerne = 21 tilbage. God fornøjelse!
26.04.2017 - 13:56Hello. I have a question.... do I start the dec on the same row when I do the 6 St casting off For the armhole right after completing the body? Or the row when it turns RS again? Please help.
07.12.2016 - 08:35DROPS Design answered:
Dear Yan, armholes are bound off on a RS row (last round on body), then turn piece and work next row from WS over sts on back piece only. Dec will then start on next row from RS. Happy knitting!
07.12.2016 - 09:28