
Popular categories
Looking for a yarn?


|
|||||||||||||
Julien |
|||||||||||||
|
|
|||||||||||||
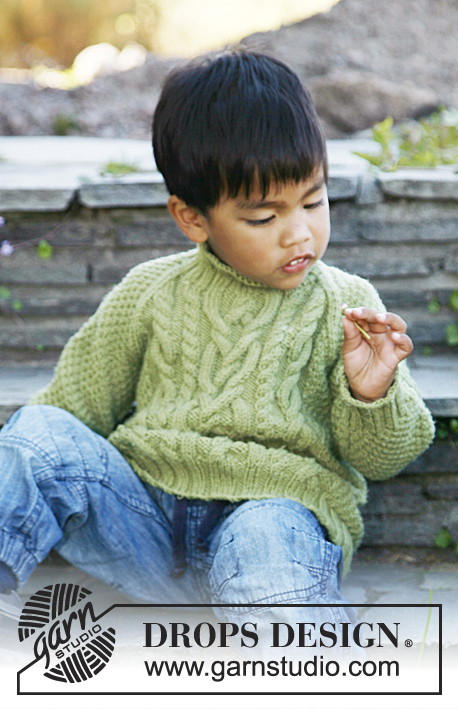
Knitted DROPS jumper with v-neck and cables in ”Fabel”. Size 3 - 12 years.
DROPS Children 22-31 |
|||||||||||||
|
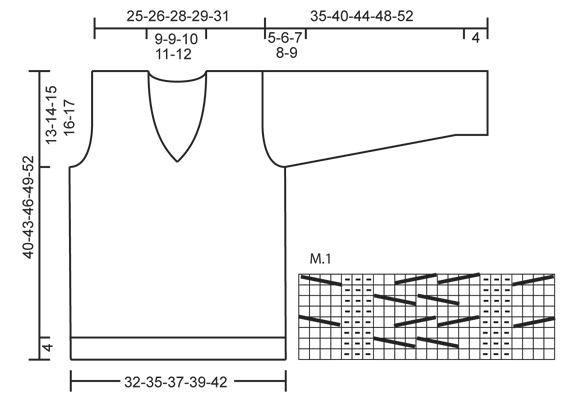
PATTERN: See diagram M.1 – all rows in diagram shows pattern from RS, 1 repetition = 24 sts in width. GARTER ST (back and forth on needle): K all rows. DECREASE TIP 1 (applies to armholes and neck): Dec inside 1 edge st in garter st + 3 sts in stockinette st at the armhole, and inside 1 st in garter st at the neck. All dec are done from RS as follows: Dec AFTER 4/1 st: Slip 1 st as if to K, K 1, psso. Dec BEFORE 4/1 st: K 2 tog. DECREASE TIP 2 (applies to neck edge): Dec on each side of the 2 K sts mid front of neck as follows: Work until 1 st remains before the 2 K sts, K 2 tog, slip 1 st as if to K, K 1, psso. ------------------------------------------------------- BODY: Worked in the round on circular needle. Cast on 212-224-240-252-268 sts on circular needle size 2.5 mm / US 1or2 with blue. K 1 round, continue in rib = K 2/P 2 for 2 rounds. Switch to gray blue and continue rib until piece measures 4 cm / 1½". Work next round as follows (insert a marker at beg of round): SIZE 3/4 YEARS: ** K 2, K 2 tog **, repeat from **-** a total of 6 times, [K 6, K 2 tog, K 10, K 2 tog, K 6], K 4, K 2 tog, K 14, K 2 tog, K 4, repeat from [-] 1 time, K 2 tog, repeat from **-** a total of 5 times, * K 8, K 2 tog *, repeat from *-* 8 times, K 8 = 186 sts. SIZE 5/6 YEARS: ** K 4, K 2 tog **, repeat from **-** a total of 4 times, [K 6, K 2 tog, K 10, K 2 tog, K 6], K 4, K 2 tog, K 4, K 2 tog, K 6, K 2 tog, K 4, K 2 tog, K 4, repeat from [-] 1 time, K 2 tog, repeat from **-** a total of 3 times, * K 7, K 2 tog *, repeat from *-* a total of 10 times, K 8 = 198 sts. SIZE 7/8 YEARS: ** K 2, K 2 tog, K 4, K 2 tog **, repeat from **-** a total of 2 times, K 2, K 2 tog, K 2, K 2 tog, [K 6, K 2 tog, K 10, K 2 tog, K 6], K 4, (K 2 tog, K 3), repeat from (-) a total of 6 times, then from [-] 1 time, K 2 tog, K 2, K 2 tog, repeat from **-** a total of 2 times, * K 10, K 2 tog *, repeat from *-* a total of 8 times, K 4 = 210 sts. SIZE 9/10 YEARS: ** K 4, K 2 tog **, repeat from **-** a total of 4 times, K 4, [K 6, K 2 tog, K 10, K 2 tog, K 6], K 4, (K 2 tog, K 6), repeat from (-) a total of 3 times, K 2 tog, K 4, repeat from [-] 1 time, repeat from **-** a total of 4 times, K 2, * K 2 tog, K 6 *, repeat from *-* a total of 14 times = 222 sts. SIZE 11/12 YEARS: ** K 2, K 2 tog, K 4, K 2 tog **, repeat from **-** a total of 3 times, K 2, [K 6, K 2 tog, K 10, K 2 tog, K 6], K 2, (K 2 tog, K 4), repeat from (-) a total of 6 times, repeat from [-] 1 time, repeat from **-** a total of 3 times, K 8, * K 2 tog, K 7 *, repeat from *-* a total of 12 times = 234 sts. ALL SIZES: There are now 186-198-210-222-234 sts on needle. Work next round as follows: K 18-20-22-24-26, diagram M.1 (= 24 sts), K 24-26-28-30-32, diagram M.1 (= 24 sts) and K 96-104-112-120-128. Continue the pattern like this until piece measures 27-29-31-33-35 cm / 10½"-11½"-12¼"-13"-13¾". REMEMBER THE GAUGE! Work next round as follows: bind off the first 6 sts for armhole, work as before over the next 96-102-108-114-120 sts (= front piece), bind off 6 sts for armhole, work in stockinette st over the last 78-84-90-96-102 sts (= back piece). Finish front and back piece separately. BACK PIECE: = 78-84-90-96-102 sts. Work in stockinette st back and forth with 1 edge st in each side in GARTER ST – see explanation above! AT THE SAME TIME on first row from RS, dec 1 st in each side inside 4 sts - SEE DECREASE TIP 1! Repeat dec every other row a total of 7-8-9-10-11 times = 64-68-72-76-80 sts remain on needle. When piece measures 39-42-45-48-51 cm / 15¼"-16½"-17¾"-19"-20", bind off the middle 22-24-26-28-30 sts for neck and finish each shoulder (= 21-22-23-24-25 sts) separately. Bind off when piece measures 40-43-46-49-52 cm / 15¾"-17"-18"-19¼"-20½". FRONT PIECE: = 96-102-108-114-120 sts. Continue pattern back and forth on needle and bind off for armholes as on back piece. AT THE SAME TIME when piece measures 30-32-34-36-38 cm / 11¾"-12½"-13⅜"-14¼"-15", slip the middle 6 sts on a stitch holder for neck and finish each side separately. Slip the sts in one side on to a stitch holder. Continue bind off for armholes – AT THE SAME TIME on next row from RS dec 1 st towards the neck inside 1 st - SEE DECREASE TIP 1. Repeat dec every other row a total of 8-9-10-11-12 times. After all bind off for armholes and dec for neck, 30-31-32-33-34 sts remain on shoulder. Continue pattern with 1 st in garter st in each side. When piece measures approx. 39½-42½-45½-48½-51½ cm / 15½"-16¾"-17¾"-19"-20¼" (adjust so that next row is from RS), dec 2 sts over each of the small cables and 5 sts over the large cable in the middle by K tog sts 2 by 2 = 21-22-23-24-25 sts remain on shoulder. On next row, bind off the remaining sts. Piece measures approx. 40-43-46-49-52 cm / 15¾"-17"-18"-19¼"-20½". Slip the stitches on the stitch holder back on needle and work as first side but reversed. SLEEVE: Worked in the round on double pointed needles. Cast on 48-52-52-56-56 sts on double pointed needles size 2.5 mm / US 1or2 with blue. K 1 round, then work 1 round rib = K 2/P 2. Switch to gray blue. Continue rib until it measures 4 cm / 1½". Continue in stockinette st – AT THE SAME TIME on 1st round, dec 4 sts evenly = 44-48-48-52-52 sts. Insert a marker at beg of round (= mid under sleeve). When piece measures 6-6-6-7-7 cm / 2½"-2½"-2½"-2¾"-2¾", inc 1 st on each side of marker. Repeat inc every 2½ cm / ⅞" a total of 9-10-12-12-14 times = 62-68-72-76-80 sts. When piece measures 30-34-37-40-43 cm / 11¾"-13⅜"-14½"-15¾"-17", bind off 6 sts mid under sleeve and work back and forth until finished measurements. Continue to bind off for sleeve cap at beg of every row in each side: 2 sts 3 times and 1 st 2-3-5-7-8 times, then bind off 2 sts in each side until piece measures 34-39-43-47-51 cm / 13¼"-15¼"-17"-18½"-20". Now bind off 3 sts 1 time in each side, then bind off the remaining sts. Sleeve measures approx. 35-40-44-48-52 cm / 13¾"-15¾"-17¼"-19"-20½". ASSEMBLY: Sew the shoulder seams. NECK: Pick up 128-136-144-152-160 sts (divisible by 4, including sts on stitch holder at the front) inside 1 edge st around the neck on circular needle size 2.5 mm / US 1or2 with gray blue. (NOTE: If too few or too many sts have been picked up, inc or dec evenly on 1st round.) Work rib = K 2/P 2 – adjust so that 2 K sts are mid front. AT THE SAME TIME on 2nd round, dec 1 st on each side of the 2 K sts mid front – SEE DECREASE TIP 2. Repeat dec every round until finished measurements. When neck edge measures 2 cm / ¾", switch to blue. Work 2 more rounds in rib, then bind off with K over K and P over P. |
|||||||||||||
Diagram explanations |
|||||||||||||
|
|||||||||||||
|
|||||||||||||
|
Have you made this or any other of our designs? Tag your pictures in social media with #dropsdesign so we can see them! Do you need help with this pattern?You'll find tutorial videos, a Comments/Questions area and more by visiting the pattern on garnstudio.com. © 1982-2024 DROPS Design A/S. We reserve all rights. This document, including all its sub-sections, has copyrights. Read more about what you can do with our patterns at the bottom of each pattern on our site. |
|||||||||||||


With over 40 years in knitting and crochet design, DROPS Design offers one of the most extensive collections of free patterns on the internet - translated to 17 languages. As of today we count 304 catalogs and 11422 patterns - 11417 of which are translated into English (US/in).
We work hard to bring you the best knitting and crochet have to offer, inspiration and advice as well as great quality yarns at incredible prices! Would you like to use our patterns for other than personal use? You can read what you are allowed to do in the Copyright text at the bottom of all our patterns. Happy crafting!
Comments / Questions (30)
Est ce normal que le devant soit plus large que le dos? C'est la première fois que je trouve un modèle avec un dos et un devant différent Merci d'avance pour votre réponse
30.08.2017 - 15:02DROPS Design answered:
Bonjour Mme Lenoir, le dos et le devant ont la même largeur, en revanche, le dos se tricote en jersey et le devant avec des torsades, d'où la différence du nombre de mailles pour les 2 pièces. Bon tricot!
30.08.2017 - 16:47Jeg tenker at Julian-genseren kunne bli neste prosjekt, men jeg må ha str 4-5 år. Hvordan skal jeg legge en økn på ca 10 masker på bolen, i og med at antall masker på for- og bakstykke er litt forskjellig? Hvor mange masker tror dere jeg burde legge opp til ermene?
28.06.2016 - 20:44DROPS Design answered:
Hej Sissel. Vi har desvaerre ikke mulighed for at hjaelpe dig med at tilpasse de gratis mönstre efter eget önske. Men som regel kan du klare dig langt ved brug af strikkefastheden. Du ved hvor stor tröjen skal vaere (bredde / höjde / omkreds erme) og du ved hvor mange m/p du har per 10 x 10 cm. Husk din strikkepröve naar du tilpasser. Held og lykke.
29.06.2016 - 12:44Bonjour, J ai un soucis pour tricoter ce modèle avec un dos et un devant ( je n ai pas les aiguilles doubles dans cette taille). Je veux le tricoter en taille 110/116. La partie qui me pose problème est celle après les 4cm de côtes 2/2. Soit c est un motif fantaisie qu il faut faire soit des diminutions en tout cas je ne vois pas comment faire pour répartir ce schema sur un dos et un devant J espère que vous pourrez m aider Merci!
27.05.2016 - 14:15DROPS Design answered:
Bonjour Laëtitia, après les 4 cm de côtes, on fait un tour avec les diminutions indiquées - puis on va continuer en point fantaisie sur le devant (torsades) soit 20 m end, M.1 (= 24 m), 20 m end, M1 (= 24 m) et 104 m pour la fin du devant + le dos. Regardez ici pour adapter sur aiguilles droites. Bon tricot!
27.05.2016 - 14:50Kelly wrote:
Yes, you are correct. Thank you so much!
11.11.2015 - 00:43Kelly wrote:
The pattern will say for example, "Work next round as follows: K 18-20-22-24-26 (tel: 18-20-22-24-26)".
09.11.2015 - 23:09DROPS Design answered:
Dear Kelly, you may have to check the settings of your browser, it looks like it is understood by your browser as a telephone number. Happy knitting!
10.11.2015 - 09:44Kelly wrote:
Hello there, my question is what does this mean? (tel:24-26-28-30-32) The "tel" part is stumping me. I have not seen this before. Thanks!
08.11.2015 - 21:05DROPS Design answered:
Dear Kelly, sorry, I cannot find any "tel: 26-26-28-30-32" in any of the English patterns, could you tell me more? thank you!
09.11.2015 - 11:03Jeg sidder med trøjen nu i den mindste størrelse. Kan det virkelig passe, at der er 18 masker i forskel på for- og bagstykke? Det er jeg ikke stødt på før. :)
28.09.2015 - 06:46DROPS Design answered:
Hej Marie, Snoningerne trækker maskerne sammen, så du er nødt til at have flere m når du strikker snoninger for at få samme bredde som på rygstykket. God fornøjelse!
01.10.2015 - 16:41I found that when knitting on 2.5mm needles I was five cm to narrow on the body, had to go up to 3.5mm to get the right measure, usually my tension fits the pattern.
25.04.2015 - 17:20Mary Manderson wrote:
I see there are 6 sts bind off for the back, pattern instructions are for the front also. But the sleeves only have 6sts bind off am I reading this correctly as it seems to me this would make the armholes too big.
04.04.2015 - 04:02DROPS Design answered:
Dear Mrs Manderson, back and front are worked in the round to armholes where you bind off 6 sts for each armhole. On sleeve, you first bind off 6 sts, then continue sleeve back and forth binding off at the beg of every row in each side some more sts to shape sleeve cap. Happy knitting!
04.04.2015 - 09:43Laura wrote:
Unless I am reading it wrong the instructions for the decrease row (after the ribbing at the start) don't add up to the correct number of stitches. For the 5/6 size the instructions go through 239 stitches, where one cast on 224, and the 7/8 size is similarly out. Makes me a little worried about continuing, though I like the rib pattern. Can I depend on the rest being right? The original numbers appear to be the same.
03.02.2015 - 06:06DROPS Design answered:
Dear Laura, in size 5/96 you cast on 224 sts and work them as follows: **K 4, K 2 tog**, repeat from **-** a total of 4 times (= 24 sts dec to 20 sts), [K 6, K 2 tog, K 10, K 2 tog, K 6] (= 26 sts dec to 24 sts), K 4, K 2 tog, K 4, K 2 tog, K 6, K 2 tog, K 4, K 2 tog, K 4, (= 30 sts dec to 26 sts) repeat from [-] 1 time (= 26 sts dec to 24 sts), K 2 tog (2 sts dec to 1 st), repeat from **-** a total of 3 times (18 sts dec to 15 sts), * K 7, K 2 tog*, repeat from *-* a total of 10 times (90 sts dec to 80 sts), K 8 = 224 sts dec to 198 sts. Happy knitting!
03.02.2015 - 09:54