DROPS BabyAlpaca Silk
70% Alpaca, 30% Silk
Discontinued
find alternatives
DROPS SS24

Illy

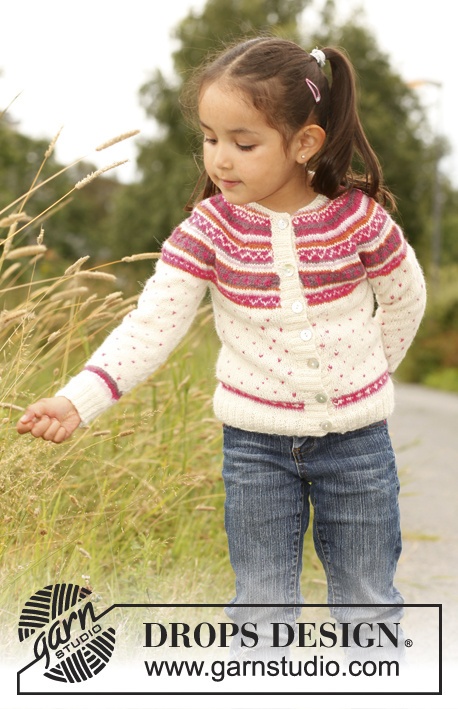
Knitted DROPS jacket with round yoke and lace pattern in ”BabyAlpaca Silk”. Size 3 - 12 years.

DROPS Children 22-16
Size: 3/4 - 5/6 - 7/8 - 9/10 - 11/12 years
Size in cm: 98/104 - 110/116 - 122/128 - 134/140 - 146/152

Materials: DROPS BABYALPACA SILK from Garnstudio
150-200-250-250-300 g colour no 3125, light pink

DROPS DOUBLE POINTED NEEDLES and CIRCULAR NEEDLE (60 cm) SIZE 3 mm - or size needed to get 24 sts x 32 rows in stocking st = 10 x 10 cm.
DROPS DOUBLE POINTED NEEDLES AND CIRCULAR NEEDLE (60 cm) SIZE 2.5 mm - for garter st.

DROPS WOODEN BUTTONS LIGHT, no 503: 5-6-6-7-7 pieces

-------------------------------------------------------

Alternative Yarn – See how to change yarns here
Yarn Groups A to F – Use the same pattern and change the yarn here
Yarn usage using an alternative yarn – Use our yarn converter here

-------------------------------------------------------

DROPS BabyAlpaca Silk
70% Alpaca, 30% Silk
Discontinued
find alternatives

Pattern instructions

NOTE: This pattern is written in British English. All measurements in charts are in cm. For conversion from cm to inches - click here. There are different terms for crocheting in British and American English. If this pattern includes crochet, click for "crochet terms" here. For this pattern in American English, please click here.
GARTER ST (back and forth on needle): K all rows.

GARTER ST (in the round on double pointed needles):
* K 1 round and P 1 round *, repeat from *-*.

PATTERN:
See diagrams M.1 and M.2. The diagrams show the pattern from RS. Diagram M.2 measures approx. 6 cm vertically.

BUTTON HOLES:
Cast off for button hole on right band. 1 BUTTON HOLE = cast off 3rd st from edge, on next row cast on 1 new st over the cast off st.
Cast off for button holes when piece measures:
SIZE 3/4 years: 2, 10, 18, 26 and 34 cm
SIZE 5/6 years: 2, 9, 16, 23, 30 and 37 cm
SIZE 7/8 years: 2, 10, 17, 25, 32 and 39 cm
SIZE 9/10 years: 2, 9, 16, 23, 30, 37 and 43 cm
SIZE 11/12 years: 2, 9, 17, 24, 31, 39 and 46 cm
--------------------------------------------------------

JACKET:
Worked back and forth on circular needle from mid front. Cast on 157-167-177-187-197 sts (incl 5 band sts in each side towards mid front) on circular needle size 2.5 mm with BabyAlpaca Silk. Work in GARTER ST - see explanation above. When piece measures 2 cm, beg to cast off for BUTTON HOLES – see explanation above! AT THE SAME TIME switch to circular needle size 3 mm. Work next row from RS as follows: 5 band sts in garter st, 1 st in stocking st, diagram M.1A until 11 sts remain, finish with diagram M.1B (= 6 sts) and 5 band sts in garter st. Continue the pattern like this. REMEMBER THE KNITTING TENSION!
When piece measures approx. 22-24-26-28-30 cm, adjust so that 3 or 5 rows in stocking st have been worked after 1 row with lace pattern, work next row from RS as follows: 38-40-43-45-48 sts (= right front piece), cast off 8 sts for armhole, work 65-71-75-81-85 sts (= back piece), cast off 8 sts for armhole and work the rest of row (= 38-40-43-45-48 sts on left front piece). Put piece aside and knit the sleeves.

SLEEVE:
Worked in the round on double pointed needles.
Cast on 42-44-46-48-50 sts on double pointed needles size 2.5 mm with BabyAlpaca Silk. Work in GARTER ST - see explanation above. Insert a marker at beg of round (= mid under sleeve). When piece measures 3 cm, switch to double pointed needles size 3 mm. Continue to work as follows: 3-4-5-1-2 sts in stocking st, diagram M.1A until 9-10-11-7-8 sts remain, finish with diagram M.1B (= 6 sts) and 3-4-5-1-2 sts in stocking st. When piece measures 6 cm, inc 1 st on each side of marker. Repeat inc every 3 cm a total of 8-9-10-11-12 times (work the inc sts in stocking st) = 58-62-66-70-74 sts. When piece measures approx. 29-33-36-40-43 cm (adjust so that as many rows in stocking st have been worked after 1 row with lace pattern as on body), cast off 8 sts mid under sleeve (i.e. 4 sts on each side of marker) = 50-54-58-62-66 sts. Slip sts on a stitch holder and knit another sleeve.

YOKE:
Slip sleeves on to same circular needle as body where armholes were cast off = 241-259-277-295-313 sts. P 1 row from WS (work bands in garter st as before until finished measurements). Insert 10 markers in the piece as follows: 1 marker after 17 sts, then 23-25-27-29-31 sts between markers, 17 sts will then remain after last marker. Switch to circular needle size 2.5 mm. Work in garter st back and forth - AT THE SAME TIME on 3rd row (= RS), dec 1 st on the right side of all markers by K 2 tog. Repeat dec every 6th row alternately on the left and right side of all markers a total of 5-5-6-6-6 times, and then every 4th row a total of 2-3-3-4-5 times = 171-179-187-195-203 sts. K 1 row from WS after last row with dec. Then work diagram M.2 with 5 band sts in each side as before (on 9th and 17th row, K last st before band) while AT THE SAME TIME dec on 5th, 13th and 21st row.
WORK 5TH ROW AS FOLLOWS:
K 5, * K 2 tog, K 5 *, repeat from *-* until 5-6-7-8-9 sts remain, K these sts = 148-155-162-169-176 sts.
WORK 13TH ROW AS FOLLOWS:
K 5, * K 2 tog, K 4 *, repeat from *-* until 5-6-7-8-9 sts remain, K these sts = 125-131-137-143-149 sts.
WORK 21ST ROW AS FOLLOWS:
K 5, * K 2 tog, K 1 *, repeat from *-* until 6 sts remain, K these sts = 87-91-95-99-103 sts.
After diagram M.2, K 1 row while at the same time dec 7-7-5-5-5 sts evenly (do not dec over bands) = 80-84-90-94-98 sts. K 1 row from WS, and then cast off with K from RS.

ASSEMBLY:
Sew the openings under the sleeves. Sew on buttons.

Diagram

symbols = K from RS, P from WS
symbols = K from WS
symbols = K 2 tog, 1 YO
symbols = 1 YO, slip 1 st as if to K, K 1, psso
diagram
diagram
Do you have a question? See a list of frequently asked questions (FAQ)

Knitting tension is what determines the final measurements of your work, and is usually measured per 10 x 10 cm. It is provided like so: number of stitches in width x number of rows in height - eg: 19 stitches x 26 rows = 10 x 10 cm.

The knitting tension is very individual; some people knit/crochet loosely while others work tightly. You adjust the knitting tension with the needle size, which is why the suggested needle size is only meant as a guide! You need to adjust this (up or down) to ensure that YOUR knitting tension matches the knitting tension provided in the pattern. If you work with a different knitting tension than provided you will have a different yarn consumption, and your work will have different measurements than what the pattern suggests.

The knitting tension also determines which yarns can replace each other. As long as you achieve the same knitting tension you can replace one yarn with another.

See DROPS lesson: How to measure your tension/gauge

See DROPS video: How to make a gauge tension swatch

The required amount of yarn is provided in grams, eg: 450 g. To calculate how many balls you’ll need you first need to know how many grams are in 1 ball (25g, 50g or 100g). This information is available if you click on the individual yarn quality on our pages. Divide the amount required with the amount of each ball. For example, if each ball is 50g (the most common amount), the calculation will be as follows: 450 / 50 = 9 balls.

The important thing when changing from one yarn to another is that the knitting/crochet tension remains the same. This is so that the measurements of the finished piece will be the same as on the sketch provided. It is easier to achieve the same knitting tension using yarns from the same yarn group. It is also possible to work with multiple strands of a thinner yarn to achieve the knitting tension of a thicker one. Please try our yarn converter. We recommend you to always work a test swatch.

Please NOTE: when changing yarn the garment might have a different look and feel to the garment in the photo, due to individual properties and qualities of each yarn.

See DROPS lesson: Can I use a different yarn than the one mentioned in the pattern?

All our yarns are categorised into yarn groups (from A to F) according to thickness and knitting tension – group A contains the thinnest yarns and group F the thickest. This makes it easier for you to find alternative yarns to our patterns, should you wish to switch yarn. All yarns within the same group have a similar knitting tension and can easily replace each other. However, different yarn qualities have different structures and properties which will give the finished work a unique look and feel.

Click here for an overview of the yarns in each yarn group

At the top of all our patterns you’ll find a link to our yarn calculator, which is a helpful tool should you wish to use a different yarn than suggested. By filling in the yarn quality you wish to replace, the amount (in your size) and number of strands, the calculator will present good alternative yarns with the same knitting tension. Additionally it will tell you how much you’ll require in the new qualities and whether you’ll need to work with multiple strands. Most skeins are 50g (some are 25g or 100g).

If the pattern is worked with multiple colours, every colour will have to be calculated separately. Similarly, if the pattern is worked with several strands of different yarns (for example 1 strand Alpaca and 1 strand Kid-Silk) you will have to find alternatives for each, individually.

Click here to see our yarn calculator

Since different yarns have different qualities and textures we have chosen to keep the original yarn in our patterns. However, you can easily find options among our available qualities by using our yarn calculator, or simply pick a yarn from the same yarn group.

It is possible that some retailers still have discontinued yarns in stock, or that someone has a few skeins at home that they would like to find patterns for.

The yarn calculator will provide both alternative yarn as well as required amount in the new quality.

If you think it's hard to decide what size to make, it can be a good idea to measure a garment you own already and like the size of. Then you can pick the size by comparing those measures with the ones available in the pattern's size chart.

You'll find the size chart at the bottom of the pattern.

See DROPS lesson: How to read size chart

The needle size provided in the pattern serves only as a guide, the important thing is to follow the knitting tension. And since knitting tension is very individual, you will have to adjust the needle size to ensure that YOUR tension is the same as in the pattern – maybe you’ll have to adjust 1, or even 2 needle sizes, up or down to achieve the correct tension. For this, we recommend that you work test swatches.

Should you work with a different knitting tension than the one provided, the measurements of the finished garment might deviate from the measurement sketch.

See DROPS lesson: How to measure your tension/gauge

See DROPS video: How to make a tension/gauge swatch

Working a garment top-down provides more flexibility and room for personal adjustment. For example it is easier to try the garment on while working, as well as making adjustments to length of yoke and shoulder caps.

The instructions are carefully explaining every step, in the correct order. Diagrams are adjusted to the knitting direction and are worked as usual.

The diagram depicts all rows/rounds, and every stitch seen from the right side. It is read from bottom to top, from right to left. 1 square = 1 stitch.

When working back and forth, every other row is worked from the right side and every other row is worked from the wrong side. When working from the wrong side, the diagram will have to be worked reversed: from left to right, knit stitches are purled, purl stitches are knit etc.

When working in the round every round is worked from the right side and the diagram are worked from right to left on all rounds.

See DROPS lesson: How to read knitting diagrams

The diagram depicts all rows/rounds, and every stitch seen from the right side. It is worked from bottom to top, from right to left.

When working back and forth every other row is worked from the right side: from right to left and every other row is worked from the wrong side: from left to right.

When working in the round, every row in the diagram are worked from the right side, from right to left.

When working a circular diagram you start in the middle and work your way outwards, counter clockwise, row by row.

The rows usually start with a given number of chain stitches (equivalent to the height of the following stitch), this will either be depicted in the diagram or explained in the pattern.

See DROPS lesson: How to read crochet diagrams

Instructions for working several diagrams after each other on the same row/round, will often be written like so: “work A.1, A.2, A.3 a total of 0-0-2-3-4 times". This means you work A.1 once, then A.2 is worked once, and A.3 is repeated (in width) the number of times provided for your size – in this case like so: S = 0 times, M = 0 times, L=2 times, XL= 3 times and XXL = 4 times.

The diagrams are worked as usual: begin with the first row in A.1, then work the first row in A.2 etc.

See DROPS lesson: How to read knitting diagrams

See DROPS lesson: How to read crochet diagrams

The total width of the garment (from wrist-to-wrist) will be larger in the larger sizes, despite the actual sleeves being shorter. The larger sizes have longer sleeve caps and wider shoulders, so there will be a good fit in all sizes.

The measurement sketch/schematic drawing provides information regarding the full length of the garment. If it’s a jumper or a jacket the length is measured from the highest point on the shoulder closest to the neckline, and straight down to the bottom of the garment. It is NOT measured from the tip of shoulder. Similarly, the length of yoke is measured from the highest point on the shoulder and down to where yoke is split into body and sleeves.

On a jacket measures are never taken along bands, unless specifically stated. Always measure inside band stitches when measuring the length.

See DROPS lesson: How to read a schematic drawing

Diagrams are often repeated on the round or in height. 1 repeat is the diagram the way it appears in the pattern. If it says to work 5 repeats of A.1 in the round, then you work A.1 a total of 5 times after/next to each other in the round. If it says to work 2 repeats of A.1 vertically/in height you work the entire diagram once, then begin again at the start and work the entire diagram one more time.

Chain stitches are slightly narrower than other stitches and to avoid working the cast-on edge too tight, we simply chain more stitches to begin with. The stitch count will be adjusted on the following row to fit the pattern and measurement sketch.

The rib edge is more elastic and will contract slightly compared to, for example, stocking stitch. By increasing before the rib edge, you avoid a visible difference in width between the rib edge and the rest of the body.

It’s very easy to cast off too tightly, and by making yarn overs while casting off (and simultaneously casting these off) you avoid a too tight cast off edge.

See DROPS video: How to bind off with yarn overs (yo)

To achieve an even increase (or decrease) you can increase on, for example: every 3rd and 4th row alternately, like so: work 2 rows and increase on the 3rd row, work 3 rows and increase on the 4th. Repeat this until the increase is complete.

See DROPS lesson: Increase or decrease 1 st on every 3rd and 4th row alternately

Should you prefer to work in the round instead of back and forth, you may of course adjust the pattern. You’ll need to add steeks mid-front (usually 5 stitches), and follow the instructions. When you would normally turn and work from the wrong side, simply work across the steek and continue in the round. At the end you’ll cut the piece open, pick up stitches to work bands, and cover the cut edges.

See DROPS video: How to knit steeks and cut open

Should you prefer to work back and forth instead of in the round, you may of course adjust the pattern so you work the pieces separately and then assemble them at the end. Divide the stitches for the body in 2, add 1 edge stitch in each side (for sewing) and work the front and back pieces separately.

See DROPS lesson: Can I adapt a pattern for circular needles into straight needles?

Pattern repeats can vary slightly in the different sizes, in order to get the correct proportions. If you’re not working the exact same size as the garment in the photo, yours might deviate slightly. This has been carefully developed and adjusted so that the complete impression of the garment is the same in all sizes.

Make sure to follow instructions and diagrams for your size!

If you have found a pattern you like which is available in women’s size it’s not very difficult to convert it to men’s size. The biggest difference will be the length of sleeves and body. Start working on the women size that you think would fit across the chest. The additional length will be worked right before you cast off for the armhole/sleeve cap. If the pattern is worked top-down you can add the length right after the armhole or before the first decrease on sleeve.

Regarding additional yarn amount, this will depend on how much length you add, but it is better with a skein too many than too few.

All yarns will have excess fibres (from production) that might come off as lint or shedding. Brushed yarns (ie hairier yarns) have more of these loose, excess fibres, causing more shedding.

Shedding also depends on what is worn under or over the garment, and whether this pulls at the yarn fibres. It’s therefore not possible to guarantee that there will be no shedding

Below are some tips on how to get the best result when working with hairier yarns:

1. When the garment is finished (before you wash it) shake it vigorously so the looser hairs come off. NOTE: do NOT use a lint roller, brush or any method that pulls at the yarn.

2. Place the garment in a plastic bag and put it in your freezer - the temperature will cause the fibres to become less attached to each other, and excess fibres will come off easier.

3. Leave in the freezer for a few hours before taking it out and shaking it again.

4. Wash the garment according to the instructions on the yarn label.

Pilling is a natural process that happens to even the most exclusive of fibers. It's a natural sign of wear and tear that is hard to avoid, and that is most visible in high friction areas of your garment like a sweater's arms and cuffs.

You can make your garment look as new by removing the pilling, using a fabric comb or a pill/lint remover.

Still can't find the answer you need? Then scroll down and leave your question so one of our experts can try to help you. This will be done normally within 5 to 10 working days.
In the meantime, you can read the questions and answers that others have left to this pattern or join the DROPS Workshop on Facebook to get help from fellow knitters/crocheters!

You might also like...

Post a comment to pattern DROPS Children 22-16

We would love to hear what you have to say about this pattern!

If you want to leave a question, please make sure you select the correct category in the form below, to speed up the answering process. Required fields are marked *.

Comments / Questions (43)

country flag Brigitte wrote:

Je comprends pour les diminutions de l’empiècement :\r\nIl faut diminuer1m à droite de chaque marqueurs.\r\nPourquoi indiquez-vous ensuite » Répéter ces diminutions alternativement à gauche et à droite de tous les marqueurs?\r\nMerci pour votre retour car je suis coincée…

15.02.2024 - 19:41

DROPS Design answered:

Bonjour Brigitte, vous devez augmenter juste 1 maille à chaque marqueur, à chaque fois, autrement dit, la 1ère fois vous diminuez à droite de chaque marqueur = avant chaque marqueur, la fois suivante, vous diminuez à gauche de chaque marqueur = après chaque marqueur, et vous continuez ainsi. Bon tricot!

19.02.2024 - 15:54

country flag Jeannett Lindebjerg wrote:

Efter ærmer og forstykke er samlet står der, der skal tages ind skiftevis på højre og venstre side af de 10 mærker og på hver 6. pind, men skal der tages ind på retsiden skiftevis h/v side af mærket på 7. pind ELLER på vrangsiden som er 6. pind?

24.04.2022 - 15:49

DROPS Design answered:

Hej Jeanette, ifølge opskriften starter du indtagningen på 3.pind (retsiden), så næste gang er på 9.pind (retsiden) osv :)

26.04.2022 - 13:52

country flag Isabelle Liévin wrote:

Bonjour ce modèle peut il se tricoter avec des aiguilles droites?

11.02.2022 - 16:10

DROPS Design answered:

Bonjour Mme Liévin, tout à fait, retrouvez dans cette leçon comment adapter les aiguilles sur aiguilles droites. Bon tricot!

11.02.2022 - 17:08

country flag Rosa wrote:

Hermoso el diseño lo hice para una clienta y quedo feliz xon el saco para su nieta . Mi nombre es Rosa y soy de córdoba Argentina no puedo subir la foto pero lo hice en hilo de algodón peruano blanco saludos y muchas gracias x compartir tus conocimientos. Tejo desde los 5 años de edad besos

24.12.2021 - 03:37

country flag Elisabeth Kromann wrote:

Jeg skal til at tage ind til bærestykke Der står i opskriften, at jeg skal tage ind på 3.p, derefter på hver 6.p Vil det sige, at jeg tager ind på 3.p og strikker til 6. P efter 3.p Eller Tager ind på 3.p og strikker 4. og 5. og tager ind på 6. p

16.09.2021 - 20:37

country flag Elisabeth Kromann wrote:

Jeg skal til at tage ind til bærestykke Der står i opskriften, at jeg skal tage ind på 3.p, derefter på hver 6.p Vil det sige, at jeg tager ind på 3.p og strikker til 6. P efter 3.p Eller Tager ind på 3.p og strikker 4. og 5. og tager ind på 6. p

12.09.2021 - 22:18

country flag Elvira Gustke wrote:

Ich habe eine Frage! Wird bei der Jacke die Abnahme auf der Vorderseite und auf Rückseite gemacht. Vielen Dank

24.08.2021 - 19:46

DROPS Design answered:

Liebe Frau Gustke, an welchen Abnahmen denken Sie? Beim rumpfteil werden die Maschen für die Armlöcher abgekettet (nicht abgenommen); bei der Passe werden Maschen abwechslungsweise rechts und links jeder Markierungen abgenommen (jeweils 10 Markierung = 10 Abnahmen/Reihe). Kann das Ihnen helfen? Oder misverstehe ich Ihre Frage?

25.08.2021 - 07:22

country flag Linda wrote:

Al montar 157 puntos aparentemente sale una circunferencia muy grande para una niña de 3/4 años, esto es asi mismo y en cardigan, dice "cuando la pieza mida aprox 22cm", se refiere al alto desde el cuello, pero en el patron consta una altura de 13 cm, por favor podria ayudarme, Gracias,

22.08.2021 - 06:03

DROPS Design answered:

Hola Linda, 157 puntos tienen que medir 60 cm (más unos cm de la cenefa) con la tensión según el patrón. La labor se trabaja de abajo arriba, desde la parte inferior del cuerpo hacia la pechera/ el canesú. Los 22 cm son desde abajo hacia el canesú, y los 13 cm son del canesú.

23.08.2021 - 13:28

country flag Dominique wrote:

Bonjour sur le modèle 22-16 ,je suis a l'empiècement je place mes 10 marqueurs après au 3 -ème rang on diminue de 10 m ,= 231 puis on diminue tous les 6 rg 5fois au total =50m = 181 m puis encore 2 fois tous les 4 rg =20m encore qui est égal a 161m et non 171m ou je fait une erreur quelque part merci

02.05.2021 - 14:00

DROPS Design answered:

Bonjour Dominique, dans la 1ère taille, vous diminuez 5 fois tous les 6 rangs puis 2 fois tous les 4 rangs soit 7 fois 10 mailles au total, vous aviez 241 m - 70 m = 171 m. Bon tricot!

03.05.2021 - 08:49

country flag SS wrote:

How do I fit the M2 into the 179 stitches What is on 9th an 17th row k last st before band

27.04.2021 - 12:33

DROPS Design answered:

Dear SS, work the 179 sts as follows: 5 sts in garter stitch, repeat the 6 sts in M.2 a total of 28 times (over the next 168 stitches), work the first stitch in M.2 (K on the lace rows), 5 sts in garter stitch. Happy knitting!

27.04.2021 - 13:15