DROPS Nepal
DROPS Nepal
65% Wool, 35% Alpaca
from 13.00 RON /50g
Get the yarn to make this pattern from 104.00RON.

The yarn cost is calculated from the pattern’s smallest size and the yarn’s cheapest product type. Looking for an even better price? You might find it on the DROPS Deals!

DROPS SS24

Annika

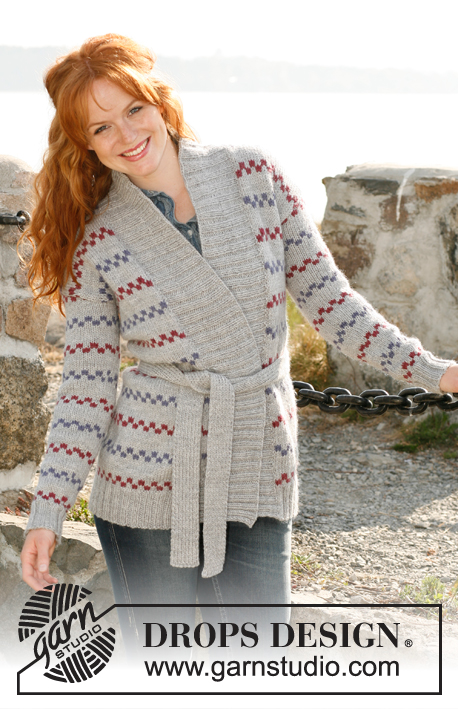
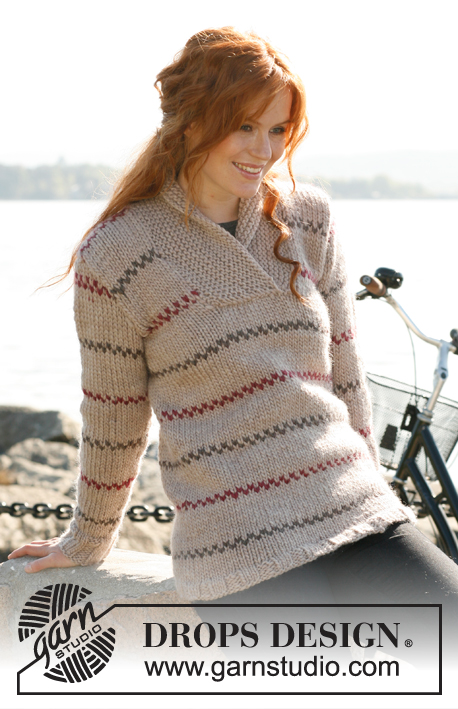
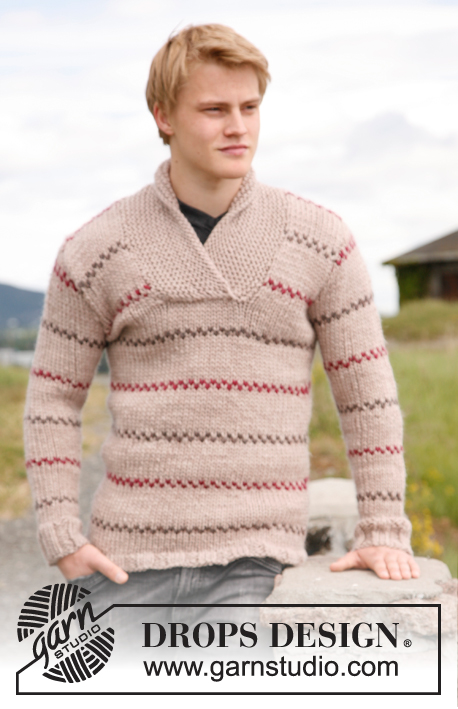
Knitted jumper with raglan, worked top down in DROPS Nepal or DROPS Paris. Size children 3 to 12 years.

DROPS Children 22-3
DROPS design: Pattern no NE-001-bnb
Yarn group C
--------------------------------------------------------
Size: 3/4 - 5/6 - 7/8 - 9/10 - 11/12 years
Size in cm: 98/104 - 110/116 - 122/128 - 134/140 - 146/152
Materials: DROPS NEPAL from Garnstudio
300-350-400-450-500 g colour no 0100, off white
50-50-50-50-100 g colour no 3620, red
50-50-50-50-100 g colour no 6790, royal blue

Or use:
DROPS PARIS from Garnstudio
300-350-400-450-500 g colour no 17, off white
50-50-50-50-100 g colour no 12, red
50-50-50-50-100 g colour no 09, royal blue

DROPS DOUBLE POINTED NEEDLES AND CIRCULAR NEEDLE SIZE 4.5 mm (40 and 60 cm) - or size needed to get 18 sts x 23 rows in stocking st = 10 x 10 cm.
DROPS DOUBLE POINTED NEEDLES AND CIRCULAR NEEDLE SIZE 3.5 mm (40 and 60 cm) - for rib.

-------------------------------------------------------

Alternative Yarn – See how to change yarns here
Yarn Groups A to F – Use the same pattern and change the yarn here
Yarn usage using an alternative yarn – Use our yarn converter here

-------------------------------------------------------

DROPS Nepal
DROPS Nepal
65% Wool, 35% Alpaca
from 13.00 RON /50g
Get the yarn to make this pattern from 104.00RON.

The yarn cost is calculated from the pattern’s smallest size and the yarn’s cheapest product type. Looking for an even better price? You might find it on the DROPS Deals!

Pattern instructions

INCREASE TIP (applies to raglan):
Work until 2 sts remain before marker: Make 1 YO, K 4 sts (marker is in the middle of these sts), make 1 YO. On next round K YOs twisted (i.e. work in back loop of st instead of front) to avoid holes.

PATTERN:
See diagram M.1 - all rows in pattern are worked in stocking st.

DECREASE TIP (applies to body and sleeves):
Work until 2 sts remain before marker, K 2 tog, marker, K 2 twisted tog (i.e. work in back loop of st instead of front).
--------------------------------------------------------

JUMPER:
Worked in the round, top down.

YOKE:
Cast on 72-76-80-84-88 sts on a short circular needle size 3.5 mm with red, insert a marker at beg of round (= mid back). K 1 round. Switch to off white and work rib = K 2/P 2 for 3 cm. Then work an elevation in back of neck as follows (continue in rib): Work 8 sts past marker, turn, tighten thread and work 16 sts back, turn, tighten thread and work 24 sts, turn, continue by working 8 sts more on every turn until a total of 48-48-48-64-64 sts have been worked, turn and work 1 round until marker mid back again.
Switch to circular needle size 4.5 mm and work 1 round in stocking st while at the same time inc 4 sts evenly = 76-80-84-88-92 sts.
Now insert 4 new markers (for raglan) as follows: Work 13-14-15-16-17 sts from marker mid back, insert 1st marker here (at the same time remove marker mid back), work 12 sts more (= sleeve), insert 2nd marker, work 26-28-30-32-34 sts (= front piece) and insert 3rd marker, work 12 sts (= sleeve), insert 4th marker and work until 1st marker again (there are 26-28-30-32-34 sts between markers on back piece). Then continue in stocking st and diagram M.1 until finished measurements. AT THE SAME TIME on 1st round, inc 1 st on each side of the 4 markers for raglan (= 8 inc) - SEE INCREASE TIP! Repeat inc every round a total of 5-5-5-6-5 times and then every other round 10-11-12-13-15 times = 196-208-220-240-252 sts on needle. Work next round as follows: Slip the 42-44-46-50-52 sts between 1st and 2nd marker on a stitch holder, cast on 6 new sts over stitch holder, work until 3rd marker, slip the 42-44-46-50-52 sts between 3rd and 4th marker on a stitch holder, cast on 6 new sts over stitch holder, work until 1st marker again = 124-132-140-152-160 sts on needle.

BODY:
Continue in stocking st and diagram M.1 – AT THE SAME TIME insert a marker in the middle of the 6 new sts in each side. When 4 cm have been worked from where sleeve sts were slipped on a stitch holder, dec 1 st on each side of the markers in the sides – SEE DECREASE TIP! Repeat dec every 5-6-6-7-7 cm a total of 4 times = 108-116-124-136-144 sts. Continue to work until piece measures 38-41-44-48-52 cm from shoulder. Continue with off white, work first 1 round in stocking st while at the same time inc 8 sts evenly = 116-124-132-144-152 sts. Switch to circular needle size 3.5 mm and work rib = K 2/P 2 for 4 cm. LOOSELY cast off with K over K and P over P. Piece measures approx. 42-45-48-52-56 cm from shoulder.

SLEEVE:
Slip sts from one stitch holder on double pointed needles size 4.5 mm and cast in addition on 6 new sts under sleeve = 48-50-52-56-58 sts. Insert a marker mid under sleeve (i.e. in the middle of the 6 new sts). NOW MEASURE PIECE FROM HERE! Continue with diagram M.1. AT THE SAME TIME when 1 cm has been worked, dec 1 st on each side of marker – SEE DECREASE TIP! Repeat dec every 6-6-8-6-8 cm a total of 4-5-4-6-5 times = 40-40-44-44-48 sts. Continue to work until sleeve measures 25-29-33-36-40 cm. Switch to double pointed needles size 3.5 mm and work rib = K 2/P 2 for 5 cm. Then LOOSELY cast off with K over K and P over P.
Work the other sleeve the same way.

ASSEMBLY:
Sew the openings under the sleeves.

Diagram

symbols = off white Nepal / off white Paris
symbols = red Nepal / red Paris
symbols = royal blue Nepal / royal blue Paris
diagram
Do you have a question? See a list of frequently asked questions (FAQ)

Knitting tension is what determines the final measurements of your work, and is usually measured per 10 x 10 cm. It is provided like so: number of stitches in width x number of rows in height - eg: 19 stitches x 26 rows = 10 x 10 cm.

The knitting tension is very individual; some people knit/crochet loosely while others work tightly. You adjust the knitting tension with the needle size, which is why the suggested needle size is only meant as a guide! You need to adjust this (up or down) to ensure that YOUR knitting tension matches the knitting tension provided in the pattern. If you work with a different knitting tension than provided you will have a different yarn consumption, and your work will have different measurements than what the pattern suggests.

The knitting tension also determines which yarns can replace each other. As long as you achieve the same knitting tension you can replace one yarn with another.

See DROPS lesson: How to measure your tension/gauge

See DROPS video: How to make a gauge tension swatch

The required amount of yarn is provided in grams, eg: 450 g. To calculate how many balls you’ll need you first need to know how many grams are in 1 ball (25g, 50g or 100g). This information is available if you click on the individual yarn quality on our pages. Divide the amount required with the amount of each ball. For example, if each ball is 50g (the most common amount), the calculation will be as follows: 450 / 50 = 9 balls.

The important thing when changing from one yarn to another is that the knitting/crochet tension remains the same. This is so that the measurements of the finished piece will be the same as on the sketch provided. It is easier to achieve the same knitting tension using yarns from the same yarn group. It is also possible to work with multiple strands of a thinner yarn to achieve the knitting tension of a thicker one. Please try our yarn converter. We recommend you to always work a test swatch.

Please NOTE: when changing yarn the garment might have a different look and feel to the garment in the photo, due to individual properties and qualities of each yarn.

See DROPS lesson: Can I use a different yarn than the one mentioned in the pattern?

All our yarns are categorised into yarn groups (from A to F) according to thickness and knitting tension – group A contains the thinnest yarns and group F the thickest. This makes it easier for you to find alternative yarns to our patterns, should you wish to switch yarn. All yarns within the same group have a similar knitting tension and can easily replace each other. However, different yarn qualities have different structures and properties which will give the finished work a unique look and feel.

Click here for an overview of the yarns in each yarn group

At the top of all our patterns you’ll find a link to our yarn calculator, which is a helpful tool should you wish to use a different yarn than suggested. By filling in the yarn quality you wish to replace, the amount (in your size) and number of strands, the calculator will present good alternative yarns with the same knitting tension. Additionally it will tell you how much you’ll require in the new qualities and whether you’ll need to work with multiple strands. Most skeins are 50g (some are 25g or 100g).

If the pattern is worked with multiple colours, every colour will have to be calculated separately. Similarly, if the pattern is worked with several strands of different yarns (for example 1 strand Alpaca and 1 strand Kid-Silk) you will have to find alternatives for each, individually.

Click here to see our yarn calculator

Since different yarns have different qualities and textures we have chosen to keep the original yarn in our patterns. However, you can easily find options among our available qualities by using our yarn calculator, or simply pick a yarn from the same yarn group.

It is possible that some retailers still have discontinued yarns in stock, or that someone has a few skeins at home that they would like to find patterns for.

The yarn calculator will provide both alternative yarn as well as required amount in the new quality.

If you think it's hard to decide what size to make, it can be a good idea to measure a garment you own already and like the size of. Then you can pick the size by comparing those measures with the ones available in the pattern's size chart.

You'll find the size chart at the bottom of the pattern.

See DROPS lesson: How to read size chart

The needle size provided in the pattern serves only as a guide, the important thing is to follow the knitting tension. And since knitting tension is very individual, you will have to adjust the needle size to ensure that YOUR tension is the same as in the pattern – maybe you’ll have to adjust 1, or even 2 needle sizes, up or down to achieve the correct tension. For this, we recommend that you work test swatches.

Should you work with a different knitting tension than the one provided, the measurements of the finished garment might deviate from the measurement sketch.

See DROPS lesson: How to measure your tension/gauge

See DROPS video: How to make a tension/gauge swatch

Working a garment top-down provides more flexibility and room for personal adjustment. For example it is easier to try the garment on while working, as well as making adjustments to length of yoke and shoulder caps.

The instructions are carefully explaining every step, in the correct order. Diagrams are adjusted to the knitting direction and are worked as usual.

The diagram depicts all rows/rounds, and every stitch seen from the right side. It is read from bottom to top, from right to left. 1 square = 1 stitch.

When working back and forth, every other row is worked from the right side and every other row is worked from the wrong side. When working from the wrong side, the diagram will have to be worked reversed: from left to right, knit stitches are purled, purl stitches are knit etc.

When working in the round every round is worked from the right side and the diagram are worked from right to left on all rounds.

See DROPS lesson: How to read knitting diagrams

The diagram depicts all rows/rounds, and every stitch seen from the right side. It is worked from bottom to top, from right to left.

When working back and forth every other row is worked from the right side: from right to left and every other row is worked from the wrong side: from left to right.

When working in the round, every row in the diagram are worked from the right side, from right to left.

When working a circular diagram you start in the middle and work your way outwards, counter clockwise, row by row.

The rows usually start with a given number of chain stitches (equivalent to the height of the following stitch), this will either be depicted in the diagram or explained in the pattern.

See DROPS lesson: How to read crochet diagrams

Instructions for working several diagrams after each other on the same row/round, will often be written like so: “work A.1, A.2, A.3 a total of 0-0-2-3-4 times". This means you work A.1 once, then A.2 is worked once, and A.3 is repeated (in width) the number of times provided for your size – in this case like so: S = 0 times, M = 0 times, L=2 times, XL= 3 times and XXL = 4 times.

The diagrams are worked as usual: begin with the first row in A.1, then work the first row in A.2 etc.

See DROPS lesson: How to read knitting diagrams

See DROPS lesson: How to read crochet diagrams

The total width of the garment (from wrist-to-wrist) will be larger in the larger sizes, despite the actual sleeves being shorter. The larger sizes have longer sleeve caps and wider shoulders, so there will be a good fit in all sizes.

The measurement sketch/schematic drawing provides information regarding the full length of the garment. If it’s a jumper or a jacket the length is measured from the highest point on the shoulder closest to the neckline, and straight down to the bottom of the garment. It is NOT measured from the tip of shoulder. Similarly, the length of yoke is measured from the highest point on the shoulder and down to where yoke is split into body and sleeves.

On a jacket measures are never taken along bands, unless specifically stated. Always measure inside band stitches when measuring the length.

See DROPS lesson: How to read a schematic drawing

Diagrams are often repeated on the round or in height. 1 repeat is the diagram the way it appears in the pattern. If it says to work 5 repeats of A.1 in the round, then you work A.1 a total of 5 times after/next to each other in the round. If it says to work 2 repeats of A.1 vertically/in height you work the entire diagram once, then begin again at the start and work the entire diagram one more time.

Chain stitches are slightly narrower than other stitches and to avoid working the cast-on edge too tight, we simply chain more stitches to begin with. The stitch count will be adjusted on the following row to fit the pattern and measurement sketch.

The rib edge is more elastic and will contract slightly compared to, for example, stocking stitch. By increasing before the rib edge, you avoid a visible difference in width between the rib edge and the rest of the body.

It’s very easy to cast off too tightly, and by making yarn overs while casting off (and simultaneously casting these off) you avoid a too tight cast off edge.

See DROPS video: How to bind off with yarn overs (yo)

To achieve an even increase (or decrease) you can increase on, for example: every 3rd and 4th row alternately, like so: work 2 rows and increase on the 3rd row, work 3 rows and increase on the 4th. Repeat this until the increase is complete.

See DROPS lesson: Increase or decrease 1 st on every 3rd and 4th row alternately

Should you prefer to work in the round instead of back and forth, you may of course adjust the pattern. You’ll need to add steeks mid-front (usually 5 stitches), and follow the instructions. When you would normally turn and work from the wrong side, simply work across the steek and continue in the round. At the end you’ll cut the piece open, pick up stitches to work bands, and cover the cut edges.

See DROPS video: How to knit steeks and cut open

Should you prefer to work back and forth instead of in the round, you may of course adjust the pattern so you work the pieces separately and then assemble them at the end. Divide the stitches for the body in 2, add 1 edge stitch in each side (for sewing) and work the front and back pieces separately.

See DROPS lesson: Can I adapt a pattern for circular needles into straight needles?

Pattern repeats can vary slightly in the different sizes, in order to get the correct proportions. If you’re not working the exact same size as the garment in the photo, yours might deviate slightly. This has been carefully developed and adjusted so that the complete impression of the garment is the same in all sizes.

Make sure to follow instructions and diagrams for your size!

If you have found a pattern you like which is available in women’s size it’s not very difficult to convert it to men’s size. The biggest difference will be the length of sleeves and body. Start working on the women size that you think would fit across the chest. The additional length will be worked right before you cast off for the armhole/sleeve cap. If the pattern is worked top-down you can add the length right after the armhole or before the first decrease on sleeve.

Regarding additional yarn amount, this will depend on how much length you add, but it is better with a skein too many than too few.

All yarns will have excess fibres (from production) that might come off as lint or shedding. Brushed yarns (ie hairier yarns) have more of these loose, excess fibres, causing more shedding.

Shedding also depends on what is worn under or over the garment, and whether this pulls at the yarn fibres. It’s therefore not possible to guarantee that there will be no shedding

Below are some tips on how to get the best result when working with hairier yarns:

1. When the garment is finished (before you wash it) shake it vigorously so the looser hairs come off. NOTE: do NOT use a lint roller, brush or any method that pulls at the yarn.

2. Place the garment in a plastic bag and put it in your freezer - the temperature will cause the fibres to become less attached to each other, and excess fibres will come off easier.

3. Leave in the freezer for a few hours before taking it out and shaking it again.

4. Wash the garment according to the instructions on the yarn label.

Pilling is a natural process that happens to even the most exclusive of fibers. It's a natural sign of wear and tear that is hard to avoid, and that is most visible in high friction areas of your garment like a sweater's arms and cuffs.

You can make your garment look as new by removing the pilling, using a fabric comb or a pill/lint remover.

Still can't find the answer you need? Then scroll down and leave your question so one of our experts can try to help you. This will be done normally within 5 to 10 working days.
In the meantime, you can read the questions and answers that others have left to this pattern or join the DROPS Workshop on Facebook to get help from fellow knitters/crocheters!

You might also like...

Post a comment to pattern DROPS Children 22-3

We would love to hear what you have to say about this pattern!

If you want to leave a question, please make sure you select the correct category in the form below, to speed up the answering process. Required fields are marked *.

Comments / Questions (15)

country flag Bernadet wrote:

Beste, Helaas krijg ik het patroon niet kloppend door de meerderingen van de raglan. Kunt u mij daarbij helpen?

06.04.2024 - 12:38

DROPS Design answered:

Dag Bernadet,

Het kan inderdaad gebeuren dat het patroon verbroken wordt door de raglanmeerderingen en dit kan verschillend zijn per maat. Probeer steeds het patroon zo ver mogelijk door te laten lopen vanaf de mouwen de panden richting de raglanlijnen.

07.04.2024 - 18:21

country flag Marica wrote:

Hej, Upprepa ökningen på varje v totalt 5-5-5-6-5 ggr och sedan på vartannat v 10-11-12-13-15 ggr. Ökning varje varv, ska jag öka på samma varv som jag vrider förra ökningen? Hälsningar, Marica

04.03.2024 - 09:06

DROPS Design answered:

Hej Marica. Ja det stämmer. När du ökar på varje varv så blir det då på samma varv som du stickar omslaget från förra varvet vridet. Mvh DROPS Design

06.03.2024 - 14:49

country flag Lena Stangvik wrote:

Beskrivning av ökning för raglanärm måste sakna något. Om man följer beskrivningen blir det ingen raglanökning. Jag har varit i kontakt med den butik där jag köpte garnet och de delade min åsikt att det måste fattas något. Jag fick rådet att öka på de fyra maskorna som omger ärmmarkörerna mws 2 på varje varv. Det fungerar till att börja med men inte när man kommer ner till de 11-12 ökningarna som ska göra på varannat varv för då går de ihop. Hur ska ökningen göras?

16.12.2022 - 10:10

DROPS Design answered:

Hej Lena. Du gör ett omslag 2 maskor innan varje markör (de 4 nya som sattes) och ett omslag 2 maskor efter markören. Då ökar du alltså 8 maskor totalt på ett varv för raglan. Mvh DROPS Design

16.12.2022 - 14:20

country flag Ylva Horndal wrote:

Fins det mønster på denne genseren også i voksen størrelse, evt oppskrift på annen genser som er strikket på samme måte?

17.10.2022 - 23:13

DROPS Design answered:

Hei Ylva. Tenker du da på mønstret, raglan eller strikket ovenfra og ned? Ta en titt DROPS 137-17 (likt mønster) eller DROPS 236-16 som har samme fasong og strikket ovenfra og ned. mvh DROPS Design

24.10.2022 - 14:36

country flag Vigdis Håland wrote:

Det står sett ett merke i begynnelsen av omg. dette er mitt bak. Skall man begynne på omg. Midt bak?

25.08.2021 - 13:36

DROPS Design answered:

Hei Vigdis, Ja begynnelsen av omgangen er midt bak. God fornøyelse!

26.08.2021 - 13:44

country flag Connie Thornberg wrote:

Der står ved bærestykket, at man skal tage ud på hver pind 5 gange, men der står også i vejledningen, at man skal sno garnet om pinden og strikke den næste omgang, så betyder det, at man skal både tage ud og strikke den slå om maske på samme omgang ?

09.11.2020 - 18:02

DROPS Design answered:

Hei Connie. Før du starter med raglansøkingene, skal det strikkes en forhøyning på bakstykket = det strikkes frem og tilbake over et x antall masker. Når forhøyningen er ferdig, begynner økningene til raglan. God Fornøyelse!

16.11.2020 - 14:45

country flag Anne wrote:

Hallo, Was ist denn der Unterschied zu Modell NE-001-bna "Tommy"? Ich habe die Anleitungen nur grob überflogen, aber die Maße scheinen identisch zu sein. Ist das also eigentlich das selbe Modell und unterscheidet sich nur im Namen ("Tommy" und "Annika")? Danke!

08.11.2020 - 20:53

DROPS Design answered:

Liebe Anne, es handelt sich um dasselbe Modell, nun für Mädchen bzw Jungen gezeigt. Viel Spaß beim stricken!

09.11.2020 - 11:28

country flag Karen Marie Elbrønd wrote:

Skal strikke Pippi blusen.. Har stillet spørgsmålet hos knithouse, men har ikke fået svar, jeg kan bruge. Jeg vil gerne bruge et andet garn end Nepal eller Paris. Jeg vil gerne bruge Duo. Hos knithouse, siger de, at jeg godt kan, men kan ikke helt forstå det, for det ser ud til, at det skal strikkes på tyndere pinde. Jeg har prøvet jeres garnomregner, men er i tvivl om, hvor mange tråde Nepal har. Jeg søger et blødt alternativ. Mit barnebarn synes ofte strik stikker.

17.12.2019 - 11:22

DROPS Design answered:

Hej Karen Marie, Vi kender ikke Duo, så det er svært at sige om det passer. Men hvis du sørger for at få strikkefastheden til at stemme med det som står i opskriften, så får i størrelsen som står i måleskitsen nederst i opskriften. God fornøjelse!

17.12.2019 - 11:35

country flag Simone wrote:

Hallo, ich möchte Annika in kraus in Größe 122/128 stricken. Gibt es hierzu eine Anleitung/Umrechnung, da ich ja mehr Reihen benötige? Ich würde mich auch über eine Anleitung in kraus für einen ähnlichen Pullover freuen. Danke schön

09.10.2018 - 20:05

DROPS Design answered:

Liebe Simone, leider können wir nicht jede unserer Anleitung nach jeder Anfrage anpassen. Für weitere persönnliche Hilfe nehmen Sie bitte Konkat mit Ihrem DROPS Laden auf. Viel Spaß beim stricken!

10.10.2018 - 09:13

country flag Mia wrote:

Hallo, ist es Absicht, dass zwischen der blauen bis zur roten Linie eine Reihe mehr natur dazwischen ist, als dann von rot bis blau? Warum ist im Zählmuster zuerst blau, aber auf dem Produktbild ist die oberste Linie rot? Wann fange ich mit dem Muster an? Zähle ich die glatt rechts gestrickten Runden nach dem Bündchen?

03.10.2018 - 23:59

DROPS Design answered:

Liebe Mia, Diagram stimmt so, es sind 9 Reihen zwischen rot und blau und 8 Reihen zwischen blau und rot. Diagram lesen Sie von dem unteren rechten Ecken an der rechten seite, und jede Runde rechts nach links. Das Diagram beginnen Sie nach der Runde, wo Sie die Markierungen eingesetzt haben. Viel Spaß beim stricken!

04.10.2018 - 10:13